")

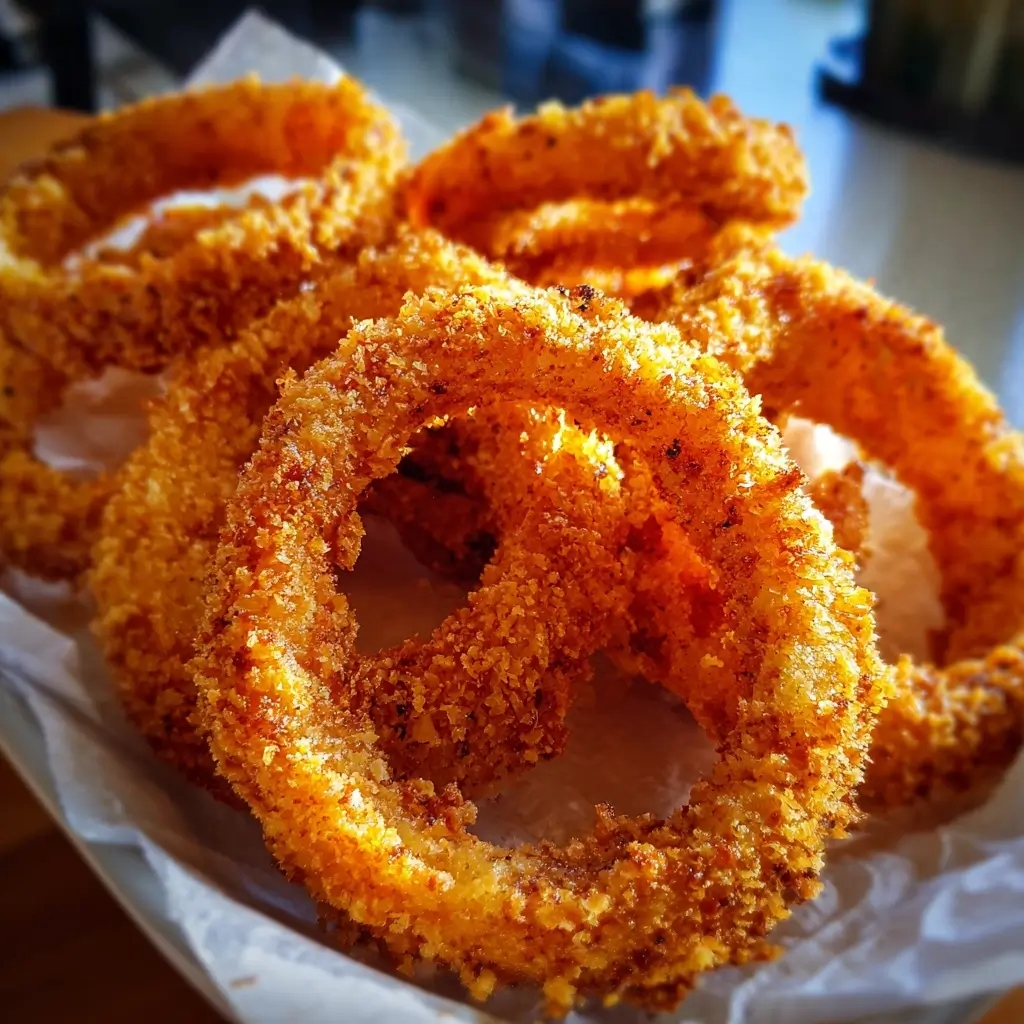

Of all the classic comfort foods, the onion ring holds a special place in my heart. For years, I chased the memory of those perfectly crunchy, subtly sweet rings from my favorite childhood diner. My attempts at home, however, were always a bit of a letdown. The deep-fried versions left my kitchen smelling of oil for days and sat a little too heavily, while my early forays into baking resulted in limp, disappointing circles that were a pale imitation of the real thing. I was on the verge of giving up, resigning myself to the fact that great onion rings were a restaurant-only treat. Then, after countless rounds of trial and error, this recipe was born. The first time I pulled a batch of these Crispy Baked Onion Rings from the oven, I knew I had cracked the code. The audible crunch as my husband bit into one, followed by a wide-eyed “Wow, you baked these?” was all the confirmation I needed. They became an instant family legend, requested for every game day, movie night, and casual get-together. They deliver all the satisfying crunch and flavor of their deep-fried cousins but without the guilt or the mess. This isn’t just a recipe; it’s the culmination of a quest for the perfect, guilt-free, golden-brown onion ring that you can proudly make in your own kitchen.
Ingredients
- 2 large sweet onions (like Vidalia or Walla Walla): These are the star of the show. Their lower sulfur content means they are naturally sweeter and less pungent, caramelizing beautifully in the oven to provide a tender, flavorful interior.
- 1 cup buttermilk: This is the secret to tenderizing the onion and helping the breading adhere. Its slight acidity breaks down the onion’s fibers, and its thickness provides the perfect glue for the flour mixture.
- 1 cup all-purpose flour: This forms the essential base layer of our three-part breading system, giving the buttermilk something substantial to cling to.
- 2 cups Panko breadcrumbs: Do not substitute these! Panko breadcrumbs are lighter and flakier than traditional breadcrumbs. They absorb less oil (even the small amount we use) and toast up to an incredibly airy, crispy texture that is the key to that signature crunch.
- 2 large eggs: Beaten lightly, the eggs act as the binder that fuses the flour-coated onion to the Panko breadcrumbs, creating a durable, crispy crust.
- 2 teaspoons smoked paprika: This adds a beautiful, warm color and a subtle, smoky depth of flavor that complements the sweetness of the onion.
- 1 teaspoon garlic powder: Provides a savory, aromatic undertone that is a classic pairing with onion.
- 1 teaspoon onion powder: This might seem redundant, but it actually intensifies the onion flavor within the breading itself, ensuring every bite is packed with savory goodness.
- 1 teaspoon salt (plus more for sprinkling): Essential for seasoning the breading from the inside out and for a final sprinkle after baking to make the flavors pop.
- ½ teaspoon black pepper: Adds a gentle, woody spice to balance the sweetness and salt.
- Olive oil spray or cooking spray: A light misting of this is all you need to help the Panko toast to a perfect golden brown and achieve a fried-like crispiness in the oven.
Instructions
Crafting these perfectly crispy baked onion rings is a straightforward process that relies on a methodical approach to building the perfect crust. Follow these steps carefully for a guaranteed crunchy outcome.
Step 1: Prepare the Onions and Baking Sheets
First, preheat your oven to 425°F (220°C). This high heat is crucial for quickly crisping the exterior of the onion rings before the interior has a chance to get soggy. Line two large baking sheets with parchment paper. Parchment paper is essential as it prevents the rings from sticking and promotes even browning on the bottom. Lightly spray the parchment paper with olive oil or cooking spray. This creates a non-stick surface and helps crisp the underside of the rings.
Next, prepare the onions. Peel the outer papery skin off the onions. Slice them crosswise into thick rings, about ½-inch to ¾-inch thick. Thinner rings tend to become flimsy and overcook, while thicker ones may not cook through evenly. Carefully separate the slices into individual rings. Place the separated rings into a large, shallow dish.
Step 2: The Buttermilk Soak
Pour the 1 cup of buttermilk over the onion rings in the dish. Gently toss them with your hands to ensure every ring is fully coated and submerged. Let the onions soak for at least 15-20 minutes. This step is a game-changer for two reasons: First, the acidity in the buttermilk tenderizes the onion, resulting in a soft, sweet interior that contrasts beautifully with the crispy coating. Second, the thick buttermilk acts as a fantastic primer, helping the flour mixture adhere much more effectively in the next step.
Step 3: Set Up Your Breading Station
While the onions are soaking, prepare your three-stage breading station. This assembly-line setup makes the process clean and efficient. You will need three shallow dishes (pie plates or wide bowls work well).
- Dish 1 (Flour Mixture): In the first dish, whisk together the all-purpose flour, salt, black pepper, garlic powder, and onion powder. Mix until everything is evenly distributed.
- Dish 2 (Egg Wash): In the second dish, crack the two large eggs and whisk them lightly with a fork until the yolks and whites are just combined.
- Dish 3 (Panko Coating): In the third and final dish, combine the Panko breadcrumbs and the smoked paprika. Use a fork to stir them together until the paprika has evenly colored the breadcrumbs a pale orange.
Step 4: The Breading Process
Now comes the fun part. To minimize mess, it’s helpful to use one hand for the wet ingredients and the other hand for the dry ingredients.
- Take an onion ring from the buttermilk, allowing any excess to drip off.
- Dredge it thoroughly in the flour mixture (Dish 1), making sure it’s completely coated on all sides, inside and out. Gently tap off any excess flour.
- Transfer the flour-coated ring to the egg wash (Dish 2). Flip it a few times to ensure it’s fully coated in the egg. Again, let any excess drip back into the dish.
- Finally, place the egg-coated ring into the Panko mixture (Dish 3). Press the Panko crumbs firmly onto the ring to create a thick, even crust. Ensure the entire surface is covered.
Step 5: Arrange and Bake
As you finish breading each ring, place it in a single layer on your prepared baking sheet. It is critically important not to overcrowd the pan. The rings should not be touching. Overcrowding will cause the rings to steam instead of bake, resulting in a soggy texture. Use the second baking sheet if necessary.
Once all the rings are arranged on the baking sheets, give them a final, light but even spritz with the olive oil spray. This is the key to achieving that beautiful golden-brown color and fried-like crunch.
Place the baking sheets in the preheated 425°F oven. Bake for 10-12 minutes, then carefully remove the sheets from the oven, flip each onion ring over using tongs, and return them to the oven. Bake for another 8-10 minutes, or until the rings are a deep golden brown and wonderfully crispy.
Step 6: Cool and Serve
Remove the onion rings from the oven and immediately sprinkle them with a little extra salt while they are still hot. For maximum crispiness, transfer them to a wire cooling rack for a minute or two before serving. This allows air to circulate underneath, preventing the bottoms from getting steamy. Serve hot with your favorite dipping sauces.
Nutrition Facts
- Servings: 6
- Calories per serving: Approximately 250 kcal
This recipe offers a significantly healthier profile compared to traditional deep-fried onion rings.
- Lower in Fat: By baking instead of deep-frying, we eliminate a massive amount of absorbed oil. The only fat comes from a light spray of olive oil, drastically reducing the overall fat and saturated fat content, making it a heart-friendlier option.
- Source of Fiber: Onions are a natural source of dietary fiber, which is important for digestive health and helping you feel full and satisfied.
- Reduced Acrylamide: Deep-frying starchy foods at very high temperatures can create a compound called acrylamide. Baking is a gentler cooking method that significantly reduces the formation of this potentially harmful substance.
- Controlled Sodium: Making these at home allows you to control the amount of salt used. You can adjust the seasoning to your dietary needs, unlike restaurant versions which are often heavily salted.
- Baked, Not Fried: This is the most significant nutritional benefit. You achieve a satisfyingly crispy texture using the oven’s dry heat rather than submerging the food in oil, cutting down calories and making them a lighter, more digestible treat.
Preparation Time
- Total Time: Approximately 45-50 minutes
- Preparation: 25 minutes (includes soaking time)
- Cook Time: 20 minutes
The preparation phase involves slicing the onions, letting them soak in buttermilk, and setting up the breading station. The 15-20 minute soak is a passive time where you can get your dredging bowls ready. The active breading process takes about 10 minutes. The baking time is a consistent 18-22 minutes, including the flip halfway through.
How to Serve
These Crispy Baked Onion Rings are incredibly versatile and can be served as a standalone appetizer, a crowd-pleasing party snack, or a delicious side dish. Here are some fantastic ways to serve them:
- The Classic Appetizer Platter:
- Arrange the hot onion rings in a heaping pile on a large platter or in a rustic basket lined with parchment paper.
- Serve with a trio of dipping sauces in small bowls. This allows guests to choose their favorite.
- As a Burger or Sandwich Topper:
- Elevate your homemade burgers by adding two or three crispy rings right on top of the patty. They add incredible crunch and flavor.
- They are also fantastic layered into a roast beef sandwich or a grilled chicken sandwich for an unexpected textural contrast.
- The Ultimate Side Dish:
- Move over, French fries! Serve these alongside a perfectly grilled steak, a juicy chicken breast, or a hearty beef chili.
- They make an excellent accompaniment to any barbecue or cookout menu.
- Game Day or Movie Night Snack:
- Serve them in individual paper cones for easy, mess-free snacking while watching the main event.
Perfect Dipping Sauce Pairings
- Spicy Sriracha Aioli: A creamy and fiery sauce that cuts through the richness.
- Recipe: Mix ½ cup mayonnaise, 1-2 tablespoons Sriracha (to taste), 1 minced garlic clove, and 1 teaspoon of lime juice.
- Tangy Honey Mustard: A classic sweet and tangy combination.
- Recipe: Whisk together ¼ cup Dijon mustard, ¼ cup honey, and 2 tablespoons of mayonnaise until smooth.
- Smoky BBQ Ranch: A creamy, smoky, and herby dip that’s a guaranteed crowd-pleaser.
- Recipe: Combine ½ cup of your favorite ranch dressing with 2 tablespoons of a smoky barbecue sauce.
- Classic Ketchup: You can never go wrong with the simple, timeless appeal of ketchup.
Additional Tips
- Don’t Skip the Soak: Soaking the onions in buttermilk is not an optional step. It is the secret to a tender, non-stringy interior and helps the coating stick like glue. If you don’t have buttermilk, you can make a quick substitute by adding one tablespoon of lemon juice or white vinegar to one cup of regular milk and letting it sit for 5-10 minutes.
- Choose the Right Onion: Sweet onions like Vidalia, Walla Walla, or Mayan Sweet are ideal because they have a higher sugar content and less of the sharp, pungent bite of yellow or white onions. This results in a sweeter, more flavorful onion ring.
- The “Dry Hand, Wet Hand” Method: To avoid getting your fingers caked in a gluey mess of breading, designate one hand for the wet steps (picking onions from buttermilk, dipping in egg) and the other hand for the dry step (dredging in flour and Panko). This keeps the process cleaner and more efficient.
- Press the Panko Firmly: When you get to the final Panko stage, don’t be shy. Use your dry hand to gently but firmly press the Panko crumbs onto the entire surface of the onion ring. This ensures a thick, durable crust that won’t fall off during baking.
- Single Layer is Non-Negotiable: The most common mistake that leads to soggy baked goods is overcrowding the pan. The onion rings need space for the hot air to circulate around them. If they are touching, they will trap steam and will never get crispy. Always use two baking sheets if you need to.
- Make Them Gluten-Free: This recipe is easily adaptable for a gluten-free diet. Simply substitute the all-purpose flour with a good quality gluten-free all-purpose blend and use gluten-free Panko breadcrumbs, which are now widely available in most grocery stores. The results are just as crispy.
- Spice It Up: Feel free to customize the seasoning blend. For a spicy kick, add ¼ to ½ teaspoon of cayenne pepper to the flour mixture. For a more herbaceous flavor, try adding a teaspoon of dried Italian seasoning or dried oregano to the Panko crumbs.
- Storing and Reheating: While these are best enjoyed fresh from the oven, you can store leftovers in an airtight container in the refrigerator for up to 2 days. To reheat and bring back the crunch, place them in a single layer on a baking sheet and bake in a 375°F (190°C) oven or an air fryer for 5-7 minutes, until hot and crispy again. Avoid the microwave at all costs, as it will make them hopelessly soggy.
FAQ Section
Q1: Why are my baked onion rings soggy instead of crispy?
A: This is the most common issue and usually stems from one of two things: overcrowding the pan or not having a hot enough oven. When onion rings are placed too close together on the baking sheet, they trap moisture and steam each other instead of baking in dry heat. Always leave space between each ring. Secondly, ensure your oven is fully preheated to 425°F (220°C). This high heat immediately starts crisping the exterior. If the oven isn’t hot enough, the breading will absorb moisture from the onion before it has a chance to crisp up.
Q2: Can I make these in an air fryer?
A: Absolutely! An air fryer is fantastic for making onion rings. Follow the recipe through the breading process. Preheat your air fryer to 375°F (190°C). Place the breaded rings in a single layer in the air fryer basket (you will need to cook in batches). Spray the tops with olive oil spray and air fry for 6-8 minutes, flipping halfway through, until they are golden brown and crispy.
Q3: My breading keeps falling off. What am I doing wrong?
A: If your breading isn’t sticking, it’s likely a problem with the three-stage process. First, make sure you’re letting excess buttermilk drip off before dredging in flour; too much liquid can make the flour layer pasty. Second, ensure a complete and even coating at each stage—no bald spots! Finally, and most importantly, press the Panko crumbs firmly onto the ring in the final step to create a secure, mechanical bond.
Q4: Can I prepare these ahead of time?
A: It’s best not to bread them too far in advance, as the moisture from the onion will eventually seep into the breading and make it soggy before it even hits the oven. However, you can slice the onions and have them soaking in the buttermilk in the fridge for up to an hour before you plan to bread and bake them. This can save you some prep time right before serving.
Q5: What’s the difference between Panko and regular breadcrumbs, and can I substitute them?
A: Panko breadcrumbs are made from a specific type of crustless white bread that is processed to create large, airy flakes. Regular breadcrumbs are finer and denser. The flaky structure of Panko allows it to absorb less oil and become much crispier and lighter when cooked. While you can substitute regular breadcrumbs in a pinch, the final texture will be denser and less crunchy. For the ultimate crispy baked onion ring, Panko is highly recommended.
Q6: Can I use a different type of onion?
A: Yes, you can, but the flavor profile will change. Yellow onions will work well but will have a more robust, pungent onion flavor compared to the sweetness of a Vidalia. White onions have a sharper, crisper bite. Red onions can also be used; they are milder than yellow onions and will add a beautiful color, but they can sometimes have a slightly bitter note when cooked this way. For the classic, slightly sweet onion ring flavor, sweet onions are the best choice.
Q7: How do I get an even golden-brown color on both sides?
A: The key to even browning is threefold. First, lightly spray the parchment paper with oil before placing the rings down. Second, spray the tops of the rings before they go into the oven. And third, and most crucially, you must flip them halfway through the baking time. This ensures both the top and bottom get direct exposure to the oven’s heat, resulting in a perfectly uniform golden-brown crunch all around.
Q8: Are these onion rings freezable?
A: Yes, they freeze surprisingly well. To freeze, first bake them completely and let them cool fully on a wire rack. Then, place the cooled onion rings on a baking sheet in a single layer and “flash freeze” them for about an hour. Once they are solid, you can transfer them to a freezer-safe zip-top bag. They can be stored for up to 3 months. Reheat directly from frozen in a 375°F (190°C) oven for 10-15 minutes until hot and crispy.
Crispy Baked Onion Rings
Ingredients
- 2 large sweet onions (like Vidalia or Walla Walla): These are the star of the show. Their lower sulfur content means they are naturally sweeter and less pungent, caramelizing beautifully in the oven to provide a tender, flavorful interior.
- 1 cup buttermilk: This is the secret to tenderizing the onion and helping the breading adhere. Its slight acidity breaks down the onion’s fibers, and its thickness provides the perfect glue for the flour mixture.
- 1 cup all-purpose flour: This forms the essential base layer of our three-part breading system, giving the buttermilk something substantial to cling to.
- 2 cups Panko breadcrumbs: Do not substitute these! Panko breadcrumbs are lighter and flakier than traditional breadcrumbs. They absorb less oil (even the small amount we use) and toast up to an incredibly airy, crispy texture that is the key to that signature crunch.
- 2 large eggs: Beaten lightly, the eggs act as the binder that fuses the flour-coated onion to the Panko breadcrumbs, creating a durable, crispy crust.
- 2 teaspoons smoked paprika: This adds a beautiful, warm color and a subtle, smoky depth of flavor that complements the sweetness of the onion.
- 1 teaspoon garlic powder: Provides a savory, aromatic undertone that is a classic pairing with onion.
- 1 teaspoon onion powder: This might seem redundant, but it actually intensifies the onion flavor within the breading itself, ensuring every bite is packed with savory goodness.
- 1 teaspoon salt (plus more for sprinkling): Essential for seasoning the breading from the inside out and for a final sprinkle after baking to make the flavors pop.
- ½ teaspoon black pepper: Adds a gentle, woody spice to balance the sweetness and salt.
- Olive oil spray or cooking spray: A light misting of this is all you need to help the Panko toast to a perfect golden brown and achieve a fried-like crispiness in the oven.
Instructions
Crafting these perfectly crispy baked onion rings is a straightforward process that relies on a methodical approach to building the perfect crust. Follow these steps carefully for a guaranteed crunchy outcome.
Step 1: Prepare the Onions and Baking Sheets
First, preheat your oven to 425°F (220°C). This high heat is crucial for quickly crisping the exterior of the onion rings before the interior has a chance to get soggy. Line two large baking sheets with parchment paper. Parchment paper is essential as it prevents the rings from sticking and promotes even browning on the bottom. Lightly spray the parchment paper with olive oil or cooking spray. This creates a non-stick surface and helps crisp the underside of the rings.
Next, prepare the onions. Peel the outer papery skin off the onions. Slice them crosswise into thick rings, about ½-inch to ¾-inch thick. Thinner rings tend to become flimsy and overcook, while thicker ones may not cook through evenly. Carefully separate the slices into individual rings. Place the separated rings into a large, shallow dish.
Step 2: The Buttermilk Soak
Pour the 1 cup of buttermilk over the onion rings in the dish. Gently toss them with your hands to ensure every ring is fully coated and submerged. Let the onions soak for at least 15-20 minutes. This step is a game-changer for two reasons: First, the acidity in the buttermilk tenderizes the onion, resulting in a soft, sweet interior that contrasts beautifully with the crispy coating. Second, the thick buttermilk acts as a fantastic primer, helping the flour mixture adhere much more effectively in the next step.
Step 3: Set Up Your Breading Station
While the onions are soaking, prepare your three-stage breading station. This assembly-line setup makes the process clean and efficient. You will need three shallow dishes (pie plates or wide bowls work well).
- Dish 1 (Flour Mixture): In the first dish, whisk together the all-purpose flour, salt, black pepper, garlic powder, and onion powder. Mix until everything is evenly distributed.
- Dish 2 (Egg Wash): In the second dish, crack the two large eggs and whisk them lightly with a fork until the yolks and whites are just combined.
- Dish 3 (Panko Coating): In the third and final dish, combine the Panko breadcrumbs and the smoked paprika. Use a fork to stir them together until the paprika has evenly colored the breadcrumbs a pale orange.
Step 4: The Breading Process
Now comes the fun part. To minimize mess, it’s helpful to use one hand for the wet ingredients and the other hand for the dry ingredients.
- Take an onion ring from the buttermilk, allowing any excess to drip off.
- Dredge it thoroughly in the flour mixture (Dish 1), making sure it’s completely coated on all sides, inside and out. Gently tap off any excess flour.
- Transfer the flour-coated ring to the egg wash (Dish 2). Flip it a few times to ensure it’s fully coated in the egg. Again, let any excess drip back into the dish.
- Finally, place the egg-coated ring into the Panko mixture (Dish 3). Press the Panko crumbs firmly onto the ring to create a thick, even crust. Ensure the entire surface is covered.
Step 5: Arrange and Bake
As you finish breading each ring, place it in a single layer on your prepared baking sheet. It is critically important not to overcrowd the pan. The rings should not be touching. Overcrowding will cause the rings to steam instead of bake, resulting in a soggy texture. Use the second baking sheet if necessary.
Once all the rings are arranged on the baking sheets, give them a final, light but even spritz with the olive oil spray. This is the key to achieving that beautiful golden-brown color and fried-like crunch.
Place the baking sheets in the preheated 425°F oven. Bake for 10-12 minutes, then carefully remove the sheets from the oven, flip each onion ring over using tongs, and return them to the oven. Bake for another 8-10 minutes, or until the rings are a deep golden brown and wonderfully crispy.
Step 6: Cool and Serve
Remove the onion rings from the oven and immediately sprinkle them with a little extra salt while they are still hot. For maximum crispiness, transfer them to a wire cooling rack for a minute or two before serving. This allows air to circulate underneath, preventing the bottoms from getting steamy. Serve hot with your favorite dipping sauces.
Nutrition
- Serving Size: one normal portion
- Calories: 250