Ingredients
The beauty of these Crispy Italian Herb Cheese Crackers lies in their simplicity. With just a handful of everyday ingredients, you can create a snack that is bursting with flavor and texture. Let’s break down each component and understand why they are essential for achieving cracker perfection:
- All-Purpose Flour: The backbone of our crackers, all-purpose flour provides structure and lightness. It creates the delicate crumb that ensures a crispy yet tender bite. You’ll want to ensure you measure it correctly – spooning it into your measuring cup and leveling it off is the best way to avoid using too much flour, which can lead to dry crackers.
- Grated Parmesan Cheese: Parmesan cheese is the star of the show, lending its sharp, nutty, and savory flavor that defines these Italian-inspired crackers. Use freshly grated Parmesan for the best taste and texture. Pre-grated Parmesan often contains cellulose and anti-caking agents, which can affect the melting and overall flavor of the crackers. The Parmesan also contributes to the beautiful golden-brown color and crispy edges as it bakes.
- Unsalted Butter: Cold, unsalted butter is crucial for creating flaky layers and a tender crumb in our crackers. The cold butter, when cut into the flour, creates small pockets of fat that melt during baking, resulting in air pockets and a light, crispy texture. Using unsalted butter allows you to control the salt level in the recipe, ensuring the perfect balance of flavors.
- Cold Water: Just like with pie crust or biscuits, cold water is essential for keeping the butter cold and preventing gluten development in the flour. This contributes to the desired tender and crispy texture rather than a tough, chewy cracker. Ice water is even better if you live in a warm climate or if your kitchen is particularly warm.
- Dried Italian Herb Blend: This is where the Italian magic comes in! A blend of dried Italian herbs, typically including oregano, basil, rosemary, thyme, and marjoram, infuses the crackers with their signature aromatic and savory notes. You can use a pre-mixed Italian herb blend for convenience, or create your own blend to customize the flavor profile to your liking. Fresh herbs can also be used, but dried herbs often provide a more concentrated and robust flavor in baked goods.
- Garlic Powder: A touch of garlic powder adds a subtle savory depth that complements the cheese and herbs beautifully. It enhances the overall flavor profile without being overpowering. Make sure to use garlic powder and not garlic salt, as we want to control the salt content separately.
- Salt: Salt is essential for balancing the flavors and enhancing the taste of all the other ingredients. It also plays a role in gluten development and the overall texture of the crackers. Use kosher salt or sea salt for the best flavor, and adjust the amount to your preference.
- Black Pepper: Freshly ground black pepper adds a subtle warmth and spice that elevates the crackers. It complements the savory flavors and provides a pleasant contrast to the richness of the cheese and butter. Freshly ground pepper offers a brighter and more aromatic flavor than pre-ground pepper.
Instructions
Making these Crispy Italian Herb Cheese Crackers is surprisingly straightforward. While the results are gourmet-level, the process is simple enough for even novice bakers to master. Follow these step-by-step instructions to create your own batch of irresistible crackers:
Step 1: Prepare the Dry Ingredients
- In a large bowl, whisk together the all-purpose flour, grated Parmesan cheese, dried Italian herb blend, garlic powder, salt, and black pepper. Whisking ensures that all the dry ingredients are evenly distributed, creating a consistent flavor throughout the crackers. This step also aerates the flour slightly, contributing to a lighter texture.
- Make sure there are no clumps of cheese or herbs. Break up any clumps with your fingers or a fork to ensure even distribution in the dough.
Step 2: Incorporate the Cold Butter
- Cut the cold unsalted butter into small cubes. The smaller the cubes, the easier they will be to incorporate into the flour mixture. Keeping the butter cold is crucial for creating a flaky texture.
- Add the cubed butter to the bowl with the dry ingredients.
- Using a pastry blender, your fingertips, or two knives, cut the butter into the flour mixture until it resembles coarse crumbs. The mixture should have pea-sized pieces of butter still visible. Avoid overworking the dough at this stage, as this can develop the gluten and result in tougher crackers. If using your fingertips, work quickly to prevent the butter from melting from the heat of your hands.
Step 3: Add the Cold Water and Form the Dough
- Gradually add the cold water, one tablespoon at a time, to the flour and butter mixture. Mix gently with a fork after each addition. The amount of water needed may vary slightly depending on the humidity and the type of flour used.
- Continue adding water and mixing until the dough just comes together and forms a shaggy ball. It should not be sticky, but it should hold its shape when gently pressed. Be careful not to add too much water, as this can make the dough sticky and difficult to work with.
- Turn the dough out onto a lightly floured surface.
- Gently knead the dough a few times to bring it together into a smooth disc. Avoid over-kneading, as this will develop the gluten and make the crackers tough. Just a few gentle kneads are enough to create a cohesive dough.
- Wrap the dough disc tightly in plastic wrap and refrigerate for at least 30 minutes, or up to 2 hours. Chilling the dough allows the gluten to relax, making it easier to roll out, and it also firms up the butter, which contributes to a flakier texture in the baked crackers.
Step 4: Roll Out the Dough and Cut the Crackers
- Preheat your oven to 375°F (190°C). Line baking sheets with parchment paper. Parchment paper prevents the crackers from sticking and makes cleanup easy.
- Remove the chilled dough from the refrigerator. If the dough is very firm, let it sit at room temperature for a few minutes to soften slightly.
- On a lightly floured surface, roll out the dough very thinly, about 1/8 inch thick or even thinner if you can manage. The thinner you roll the dough, the crispier the crackers will be. Roll from the center outwards, rotating the dough frequently to ensure even thickness.
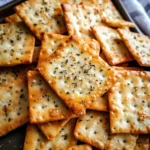
- Use cookie cutters, a pizza cutter, or a sharp knife to cut the dough into desired shapes. You can make squares, rectangles, circles, or any other shape you like. For a rustic look, you can simply cut the dough into irregular shapes.
- If you want to create uniform crackers, use a ruler and pizza cutter to cut straight lines.
Step 5: Bake the Crackers
- Carefully transfer the cut crackers to the prepared baking sheets, spacing them slightly apart. Use a thin spatula to lift the crackers and avoid tearing them.
- Prick each cracker several times with a fork. This prevents the crackers from puffing up too much during baking and ensures a flat, crispy texture.
- Bake for 10-15 minutes, or until the crackers are golden brown around the edges and lightly golden in the center. Baking time may vary depending on the thickness of the crackers and your oven. Keep a close eye on them to prevent burning.
- Rotate the baking sheets halfway through baking for even browning.
Step 6: Cool and Enjoy
- Remove the baking sheets from the oven and let the crackers cool on the baking sheets for a few minutes before transferring them to a wire rack to cool completely. Cooling on a wire rack allows air to circulate and prevents the crackers from becoming soggy on the bottom.
- Once completely cooled, the Crispy Italian Herb Cheese Crackers are ready to be enjoyed! Store them in an airtight container at room temperature for up to a week. They are best enjoyed within a few days for optimal crispness.
Nutrition
- Serving Size: one normal portion
- Calories: 180
- Fat: 12g
- Cholesterol: 40mg