")

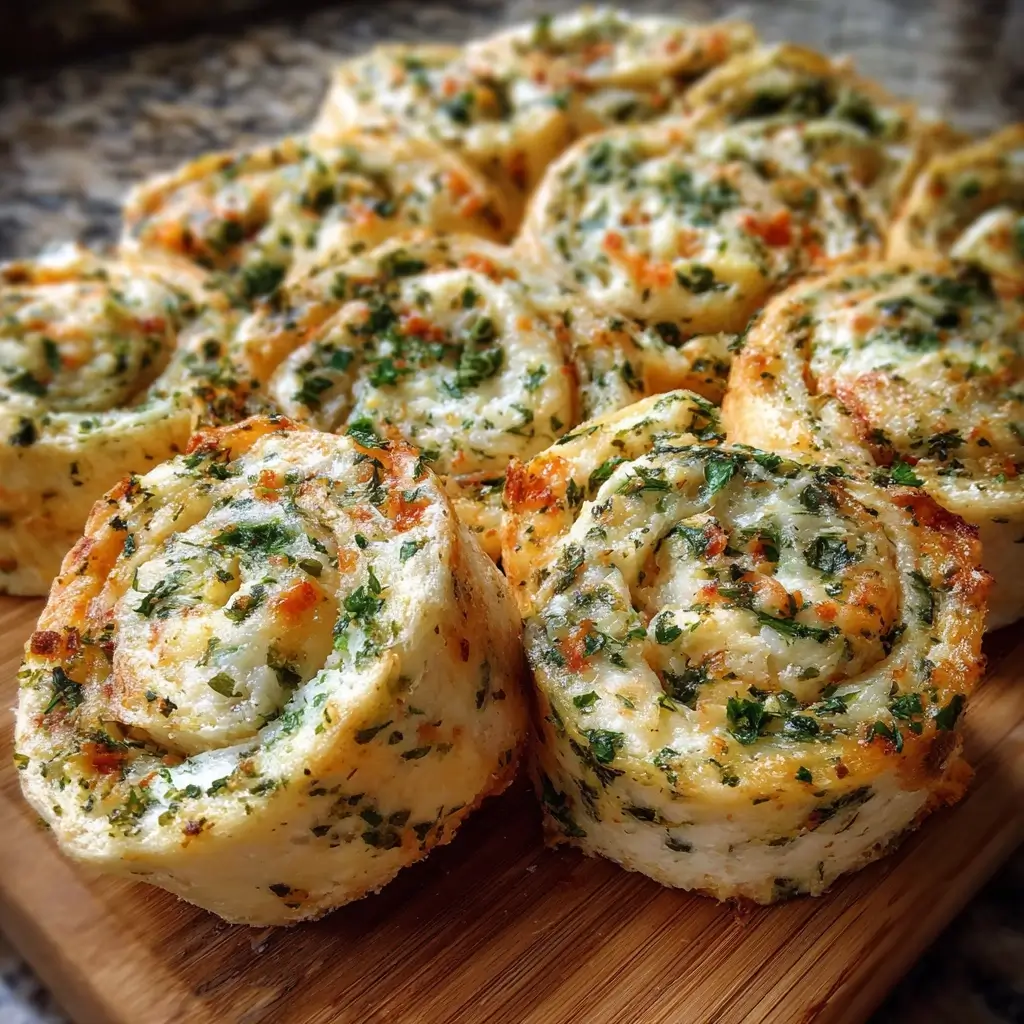

Of all the recipes I keep tucked away for gatherings, these Herbed Cream Cheese Pinwheels are, without a doubt, the reigning champion. My journey with this recipe began years ago, born from a desperate need for a reliable, make-ahead party appetizer that could please everyone from my discerning mother-in-law to my kids’ pickiest friends. The first time I made them for a family barbecue, they vanished from the platter in under ten minutes. I watched in amazement as people came back for seconds, and then thirds, asking, “What is in these? They’re incredible!” The secret, I’ve learned, isn’t in one single ingredient, but in the perfect symphony of textures and flavors. It’s the cool, creamy tang of the herbed cheese, the subtle crunch of fresh vegetables, and the soft, yielding tortilla that holds it all together. They are deceptively simple to make, yet they look elegant and taste like you spent hours in the kitchen. These pinwheels have become my signature dish for potlucks, holiday parties, game days, and even as a special treat in school lunchboxes. They are the first thing to go and the recipe everyone asks for, and I am absolutely thrilled to share my tried-and-true method with you.
Why You’ll Fall in Love with This Pinwheel Recipe
Before we dive into the details, let’s talk about why these Herbed Cream Cheese Pinwheels deserve a permanent spot in your recipe collection. This isn’t just another appetizer; it’s a versatile solution for so many occasions.
- Incredibly Easy to Make: With no cooking required and just a bit of chopping and mixing, this is a recipe that even the most novice cook can master with confidence. It’s a fantastic recipe to make with kids, letting them help with mixing the filling and rolling the tortillas.
- Perfect for Parties and Potlucks: These pinwheels are the ultimate party food. They are bite-sized, easy to eat while mingling, and don’t require any plates or forks. Because they are served cold, you don’t have to worry about keeping them warm on a buffet table.
- The Ultimate Make-Ahead Appetizer: The fact that these not only can be made ahead but should be made ahead is a game-changer for event planning. You can do all the prep work the day before, leaving you stress-free and ready to enjoy your own party.
- Endlessly Customizable: Think of this recipe as a perfect canvas. While the classic herbed cream cheese version is a guaranteed hit, you can easily adapt it to suit any taste or occasion. We’ll explore some exciting variations further down, from spicy to savory.
- A Certified Crowd-Pleaser: It’s a simple fact: people love pinwheels. They are nostalgic, satisfying, and visually appealing. The vibrant flecks of herbs and vegetables against the creamy white filling make them a beautiful addition to any food spread.
Ingredients
The beauty of this recipe lies in its simplicity and the freshness of its components. Using high-quality, fresh ingredients will make a noticeable difference in the final flavor.
- Cream Cheese (16 ounces, or two blocks): Use full-fat, block-style cream cheese for the best consistency. It’s firmer than the whipped tub variety, which helps the pinwheels hold their shape. Make sure it’s softened to room temperature for easy mixing.
- Sour Cream or Greek Yogurt (1/4 cup): This adds a pleasant tang and makes the cream cheese mixture more spreadable without making it watery.
- Fresh Chives (2 tablespoons, finely chopped): Provides a delicate, mild onion flavor that is essential to the classic taste.
- Fresh Parsley (2 tablespoons, finely chopped): Flat-leaf or curly parsley works well, adding a bright, peppery freshness.
- Fresh Dill (1 tablespoon, finely chopped): Gives a distinctive, slightly tangy flavor that pairs beautifully with cream cheese.
- Red Bell Pepper (1/2 cup, very finely diced): Adds a wonderful, sweet crunch and a vibrant pop of color.
- Green Onions (1/4 cup, thinly sliced): Offers a sharper, more pungent onion flavor than chives, creating a lovely depth.
- Garlic Powder (1 teaspoon): Provides a savory, aromatic base note without the harsh bite of raw garlic.
- Salt (1/2 teaspoon, or to taste): Enhances all the other flavors.
- Black Pepper (1/4 teaspoon, or to taste): Adds a touch of warmth and spice.
- Large Flour Tortillas (5-6, 10-inch “burrito size”): These are the perfect vessel. They are pliable, sturdy enough to hold the filling, and have a neutral flavor that lets the herbed cream cheese shine.
Instructions
Follow these steps carefully for perfectly rolled, beautifully sliced pinwheels every time. The chilling step is the most important part—do not skip it!
Step 1: Prepare the Herbed Cream Cheese Filling
In a medium to large mixing bowl, add the two blocks of softened cream cheese. It is crucial that the cream cheese is at room temperature; otherwise, you will end up with a lumpy filling. You can leave it on the counter for about an hour or carefully microwave it in 15-second intervals until softened but not melted.
Using a hand mixer or a sturdy spatula, beat the cream cheese until it is completely smooth and creamy. Scrape down the sides of the bowl to ensure there are no lumps.
Add the sour cream (or Greek yogurt), finely chopped chives, parsley, dill, garlic powder, salt, and black pepper to the bowl. Mix on low speed (or by hand) until all the herbs and seasonings are evenly distributed throughout the cream cheese.
Gently fold in the finely diced red bell pepper and thinly sliced green onions with a spatula. You want to mix them in just enough to be incorporated without overmixing, which can release too much moisture from the vegetables. Take a moment to taste the filling and adjust the salt and pepper if needed.
Step 2: Assemble the Pinwheels
Lay one large flour tortilla on a clean, flat surface like a cutting board or countertop.
Using an offset spatula or the back of a spoon, spread a thin, even layer of the cream cheese mixture over the entire surface of the tortilla, leaving a small half-inch border along one edge. Spreading it all the way to the other edges ensures that every bite has filling. The empty border will help seal the roll.
Do not overfill the tortillas! A thick layer of filling will ooze out the sides when you roll it and make the pinwheels difficult to slice neatly. A layer about 1/4-inch thick is perfect.
Step 3: Roll and Chill for Best Results
Starting from the edge opposite the empty border, begin to roll the tortilla up as tightly as you can. A tight roll is the key to preventing gaps and ensuring the pinwheels don’t fall apart after slicing.
Once you have a tight log, the cream cheese mixture should help the empty border edge seal itself shut. Place the rolled tortilla log seam-side down.
Carefully wrap each tortilla log tightly in plastic wrap. The plastic wrap serves two purposes: it keeps the logs from drying out in the refrigerator and helps them maintain their tight, round shape. Twist the ends of the plastic wrap like a candy wrapper to secure it.
Place the wrapped logs in the refrigerator to chill for a minimum of 2 hours, but preferably for 4 hours or even overnight. This chilling period is non-negotiable! It allows the cream cheese filling to firm up significantly, which is essential for getting clean, beautiful slices.
Step 4: Slice and Serve
Once the logs are thoroughly chilled and firm to the touch, remove them from the refrigerator and unwrap them from the plastic wrap.
Place a log on a cutting board. Using a very sharp, thin-bladed knife or a serrated knife, slice off and discard the two uneven ends of the log. This gives you a clean start for perfect pinwheels.
Proceed to slice the log into uniform rounds, about 1/2 to 3/4-inch thick. If the filling starts to stick to your knife, simply wipe the blade clean with a damp paper towel between a few cuts.
Arrange the sliced pinwheels on a serving platter, and enjoy!
Nutrition Facts
Please note that these are estimates and can vary based on the specific ingredients used.
- Servings: This recipe yields approximately 48-50 pinwheels.
- Calories per serving (2 pinwheels): Approximately 120-140 kcal.
- Fat: The majority of calories come from fat, primarily from the full-fat cream cheese. It provides richness and satisfaction.
- Carbohydrates: Sourced mainly from the flour tortillas.
- Protein: A modest amount of protein is present from the cream cheese and Greek yogurt.
- Sodium: The salt and cream cheese contribute to the sodium content. Be mindful if you are on a low-sodium diet.
- Vitamin C: The fresh red bell pepper provides a good source of Vitamin C.
Preparation Time
This recipe is quick to assemble but requires patience for chilling.
- Active Prep Time: 20 minutes
- Chilling Time: Minimum 2 hours, ideally 4+ hours or overnight.
- Total Time: Approximately 2 hours and 20 minutes.
How to Serve
These versatile pinwheels can be served in a variety of ways, making them suitable for any meal or occasion.
As a Classic Party Appetizer:
- Arrange them on a large circular platter, starting from the outside and spiraling inwards for a beautiful presentation.
- Garnish the platter with extra fresh herbs like parsley sprigs or dill fronds.
- Create a colorful appetizer board by pairing the pinwheels with other finger foods like cherry tomatoes, olives, cheese cubes, and crackers.
For a Light Lunch or Snack:
- Serve a portion of 4-5 pinwheels alongside a simple green salad with a vinaigrette dressing.
- Pair them with a warm bowl of tomato soup for a comforting and delicious lunch.
- Enjoy them on their own as a quick, satisfying afternoon snack to beat the 3 PM slump.
In a Bento Box or Lunchbox:
- They are a fantastic alternative to a traditional sandwich and hold up well.
- Pack them alongside healthy sides like baby carrots, cucumber slices, apple slices, or a small container of grapes.
- Their bite-sized nature makes them perfect for kids’ lunches.
Additional Tips for Perfect Herbed Cream Cheese Pinwheels
Over the years, I’ve learned a few tricks that take these pinwheels from good to absolutely foolproof.
- Soften the Cream Cheese Properly: I cannot stress this enough. Cold cream cheese is impossible to mix smoothly. If you’re short on time, unwrap the blocks, place them on a microwave-safe plate, and microwave for 15-20 seconds. It should be soft to the touch but not melted or warm.
- Pat Your Vegetables Dry: If you rinse your bell pepper or green onions, make sure to pat them completely dry with a paper towel before dicing. Excess moisture is the enemy of crisp pinwheels and can lead to a watery filling and soggy tortillas.
- Choose Your Tortillas Wisely: Standard burrito-size flour tortillas are the best choice. Avoid corn tortillas as they will crack when rolled. Flavored tortillas, like spinach or sun-dried tomato wraps, can also add a fun visual and flavor twist.
- Use a Serrated Knife for Slicing: While a very sharp chef’s knife works, I find that a serrated bread knife is the absolute best tool for the job. It saws through the tortilla and filling without squishing the roll, resulting in perfectly round, clean-cut pinwheels.
- Don’t Be Afraid to Roll Tightly: New rollers are often timid, but a tight roll is essential. As you roll, gently pull the tortilla back towards you to keep the log compact. This minimizes air pockets and ensures they hold their shape.
- The Chill is Your Best Friend: If your pinwheels are falling apart or “smooshing” when you slice them, it’s almost always because they weren’t chilled for long enough. If you’re making them for an event, prepare the logs the night before. This guarantees they’ll be perfectly firm and easy to slice.
- Taste and Adjust the Filling: Before you spread the mixture on the tortillas, take a small taste. Does it need more salt? A little more dill? A pinch more garlic powder? This is your only chance to perfect the flavor, so don’t skip this step.
- Trim the Ends Generously: It can feel wasteful to cut off the ends of the logs, but don’t be shy. These end pieces are usually less full and a bit misshapen. Trimming them ensures that every single pinwheel you serve is picture-perfect. (Bonus: chef’s treat!).
Creative Pinwheel Variations
Once you’ve mastered the classic recipe, the possibilities are endless. Here are a few of my family’s favorite variations to inspire your next creation.
Spicy Jalapeño Cheddar Pinwheels:
- Swap the fresh herbs for 1/4 cup of chopped cilantro.
- Omit the red bell pepper and add 2-3 tablespoons of finely diced pickled jalapeños (pat them dry!).
- Add 1 cup of finely shredded sharp cheddar cheese to the cream cheese mixture.
- Add 1/2 teaspoon of cumin for a smoky flavor.
Hearty Roast Beef and Horseradish Pinwheels:
- Reduce the cream cheese to 8 ounces (one block).
- Add 2-3 tablespoons of prepared horseradish to the cream cheese base.
- Keep the chives but omit the other herbs.
- On each tortilla, lay down a thin layer of the cream cheese mixture, followed by 2-3 very thin slices of deli roast beef, covering the surface. Then roll up as directed.
Mediterranean Feta and Olive Pinwheels:
- Swap the herbs for 2 tablespoons of fresh oregano and 1 tablespoon of fresh parsley.
- Omit the red bell pepper and green onions.
- Fold in 1/2 cup of crumbled feta cheese, 1/3 cup of finely chopped Kalamata olives, and 1/4 cup of finely chopped sun-dried tomatoes (the kind packed in oil, but drained well).
Smoked Ham and Swiss Pinwheels:
- Prepare the classic herbed cream cheese base, but you can reduce the herbs by half if you prefer.
- Spread the cream cheese mixture on the tortilla.
- Top with 2-3 very thin slices of deli smoked ham and one slice of Swiss cheese.
- Roll tightly, chill, and slice. The combination of savory ham and nutty Swiss with the herbed cream cheese is divine.
Frequently Asked Questions (FAQ)
Here are answers to some of the most common questions about making tortilla pinwheels.
1. Why are my pinwheels soggy?
Sogginess is usually caused by two things: excess moisture in the filling (from not drying vegetables properly) or not chilling the logs long enough. Another culprit can be using low-fat or whipped cream cheese, which contains more water. Stick to full-fat block cream cheese and ensure your veggie add-ins are as dry as possible.
2. How far in advance can I make these?
You can assemble and roll the logs up to 24 hours in advance. Keep them wrapped tightly in plastic wrap in the refrigerator. Wait to slice them until just before you are ready to serve for the freshest appearance and best texture.
3. Can I freeze cream cheese pinwheels?
While you technically can freeze them, the texture of the cream cheese and vegetables can change upon thawing. The cream cheese can become slightly grainy and the vegetables can release water, making the pinwheels soft. For best results, it’s recommended to serve them fresh. If you must freeze, freeze the unsliced logs tightly wrapped in plastic and then foil. Thaw in the refrigerator overnight before slicing.
4. My pinwheels are falling apart when I slice them. What did I do wrong?
This is almost always due to two reasons: the roll wasn’t tight enough, or the log wasn’t chilled for long enough. A loose roll leaves gaps, and a warm filling is too soft to hold its shape against the pressure of a knife. Ensure you roll tightly and chill for at least 2-4 hours.
5. Can I use dried herbs instead of fresh?
Fresh herbs are highly recommended for their vibrant flavor and color. However, in a pinch, you can use dried herbs. The general rule of thumb is to use one-third the amount of dried herbs as you would fresh. So, for this recipe, you would use about 2 teaspoons of dried parsley, 2 teaspoons of dried chives, and 1 teaspoon of dried dill.
6. What are the best tortillas for making pinwheels?
Large (10-inch “burrito” size) flour tortillas are the ideal choice. They are flexible, strong, and easy to roll without cracking. You can also use flavored wraps like spinach, sun-dried tomato, or whole wheat for a different look and taste.
7. Can I make this recipe gluten-free?
Absolutely! Simply substitute the flour tortillas with your favorite brand of large gluten-free wraps. Be aware that some gluten-free wraps can be a bit more delicate, so handle them gently when rolling. The filling itself is naturally gluten-free.
8. What other vegetables can I add to the filling?
You can get very creative! Just be sure to dice them very finely and pat them dry. Great additions include shredded carrots, finely chopped celery, chopped black olives, or finely diced cucumbers (with the seeds removed to reduce moisture).

Herbed Cream Cheese Pinwheels
Ingredients
The beauty of this recipe lies in its simplicity and the freshness of its components. Using high-quality, fresh ingredients will make a noticeable difference in the final flavor.
- Cream Cheese (16 ounces, or two blocks): Use full-fat, block-style cream cheese for the best consistency. It’s firmer than the whipped tub variety, which helps the pinwheels hold their shape. Make sure it’s softened to room temperature for easy mixing.
- Sour Cream or Greek Yogurt (1/4 cup): This adds a pleasant tang and makes the cream cheese mixture more spreadable without making it watery.
- Fresh Chives (2 tablespoons, finely chopped): Provides a delicate, mild onion flavor that is essential to the classic taste.
- Fresh Parsley (2 tablespoons, finely chopped): Flat-leaf or curly parsley works well, adding a bright, peppery freshness.
- Fresh Dill (1 tablespoon, finely chopped): Gives a distinctive, slightly tangy flavor that pairs beautifully with cream cheese.
- Red Bell Pepper (1/2 cup, very finely diced): Adds a wonderful, sweet crunch and a vibrant pop of color.
- Green Onions (1/4 cup, thinly sliced): Offers a sharper, more pungent onion flavor than chives, creating a lovely depth.
- Garlic Powder (1 teaspoon): Provides a savory, aromatic base note without the harsh bite of raw garlic.
- Salt (1/2 teaspoon, or to taste): Enhances all the other flavors.
- Black Pepper (1/4 teaspoon, or to taste): Adds a touch of warmth and spice.
- Large Flour Tortillas (5-6, 10-inch “burrito size”): These are the perfect vessel. They are pliable, sturdy enough to hold the filling, and have a neutral flavor that lets the herbed cream cheese shine.
Instructions
Follow these steps carefully for perfectly rolled, beautifully sliced pinwheels every time. The chilling step is the most important part—do not skip it!
Step 1: Prepare the Herbed Cream Cheese Filling
In a medium to large mixing bowl, add the two blocks of softened cream cheese. It is crucial that the cream cheese is at room temperature; otherwise, you will end up with a lumpy filling. You can leave it on the counter for about an hour or carefully microwave it in 15-second intervals until softened but not melted.
Using a hand mixer or a sturdy spatula, beat the cream cheese until it is completely smooth and creamy. Scrape down the sides of the bowl to ensure there are no lumps.
Add the sour cream (or Greek yogurt), finely chopped chives, parsley, dill, garlic powder, salt, and black pepper to the bowl. Mix on low speed (or by hand) until all the herbs and seasonings are evenly distributed throughout the cream cheese.
Gently fold in the finely diced red bell pepper and thinly sliced green onions with a spatula. You want to mix them in just enough to be incorporated without overmixing, which can release too much moisture from the vegetables. Take a moment to taste the filling and adjust the salt and pepper if needed.
Step 2: Assemble the Pinwheels
Lay one large flour tortilla on a clean, flat surface like a cutting board or countertop.
Using an offset spatula or the back of a spoon, spread a thin, even layer of the cream cheese mixture over the entire surface of the tortilla, leaving a small half-inch border along one edge. Spreading it all the way to the other edges ensures that every bite has filling. The empty border will help seal the roll.
Do not overfill the tortillas! A thick layer of filling will ooze out the sides when you roll it and make the pinwheels difficult to slice neatly. A layer about 1/4-inch thick is perfect.
Step 3: Roll and Chill for Best Results
Starting from the edge opposite the empty border, begin to roll the tortilla up as tightly as you can. A tight roll is the key to preventing gaps and ensuring the pinwheels don’t fall apart after slicing.
Once you have a tight log, the cream cheese mixture should help the empty border edge seal itself shut. Place the rolled tortilla log seam-side down.
Carefully wrap each tortilla log tightly in plastic wrap. The plastic wrap serves two purposes: it keeps the logs from drying out in the refrigerator and helps them maintain their tight, round shape. Twist the ends of the plastic wrap like a candy wrapper to secure it.
Place the wrapped logs in the refrigerator to chill for a minimum of 2 hours, but preferably for 4 hours or even overnight. This chilling period is non-negotiable! It allows the cream cheese filling to firm up significantly, which is essential for getting clean, beautiful slices.
Step 4: Slice and Serve
Once the logs are thoroughly chilled and firm to the touch, remove them from the refrigerator and unwrap them from the plastic wrap.
Place a log on a cutting board. Using a very sharp, thin-bladed knife or a serrated knife, slice off and discard the two uneven ends of the log. This gives you a clean start for perfect pinwheels.
Proceed to slice the log into uniform rounds, about 1/2 to 3/4-inch thick. If the filling starts to stick to your knife, simply wipe the blade clean with a damp paper towel between a few cuts.
Arrange the sliced pinwheels on a serving platter, and enjoy!
Nutrition
- Serving Size: one normal portion
- Calories: 140