")


The frantic rush of a weekday morning is a scene I know all too well. Between getting the kids ready for school, remembering my own deadlines, and trying to find matching socks, a nutritious and satisfying breakfast often felt like an impossible dream. We were stuck in a rut of sugary cereals or toast that left everyone hungry an hour later. I was on a mission to find a solution: something quick, healthy, grab-and-go friendly, and, most importantly, something my entire family would actually eat without complaint. That’s when these No-Bake Granola Breakfast Bars entered our lives and completely changed our morning routine. The first time I made them, the aroma of toasted oats and warm honey filled the kitchen, and I had a good feeling. The real test, however, was the next morning. I watched as my notoriously picky youngest grabbed a bar, took a hesitant bite, and then broke into a wide-eyed grin. Success! They are chewy, packed with nutty flavor, and have just the right amount of sweetness to feel like a treat. Now, a fresh batch is a Sunday meal-prep ritual, ensuring our weeks start on a delicious, stress-free, and energized note. They are our secret weapon against morning chaos.
Ingredients
- 2 cups Old-Fashioned Rolled Oats: These are the backbone of the bars, providing a hearty, chewy texture and a wealth of fiber. Do not use instant or steel-cut oats, as they will not produce the correct consistency. For a gluten-free version, ensure you use certified gluten-free rolled oats.
- 1 cup Creamy Peanut Butter: This is the primary binder that holds the bars together. Use a good quality, creamy peanut butter for the best results. Natural peanut butter (the kind you have to stir) works wonderfully here.
- ½ cup Honey: Acting as both a sweetener and a crucial secondary binder, honey lends a classic, warm sweetness. The stickiness of honey is essential for ensuring the bars don’t crumble.
- ⅓ cup Chopped Nuts (Almonds, Walnuts, or Pecans): This adds a delightful crunch, healthy fats, and extra protein. I prefer using roasted, unsalted almonds, but feel free to use your favorite or a combination.
- ¼ cup Ground Flaxseed: A nutritional powerhouse, ground flaxseed boosts fiber and omega-3 content without noticeably altering the flavor. It also helps with binding.
- ¼ cup Mini Chocolate Chips: For a touch of indulgence that makes these bars irresistible to kids and adults alike. Use dark, semi-sweet, or milk chocolate based on your preference.
- 2 tablespoons Chia Seeds: These tiny seeds are packed with nutrients and absorb liquid, which helps to firm up the bars and add a subtle texture.
- 1 teaspoon Vanilla Extract: This enhances all the other flavors in the bars, adding a layer of warmth and depth.
- ¼ teaspoon Sea Salt: A small amount of salt is critical for balancing the sweetness of the honey and bringing out the nutty flavors of the oats and peanut butter.
Instructions
- Prepare the Pan: Line an 8×8 inch square baking pan with parchment paper, leaving some overhang on two opposite sides. This parchment paper “sling” is the secret to easily lifting the bars out of the pan for clean cutting later. Lightly grease the parchment paper and any exposed parts of the pan to prevent any sticking.
- Toast the Oats (Optional but Recommended): For a deeper, nuttier flavor, spread the rolled oats on a dry baking sheet. Toast in a preheated oven at 350°F (175°C) for 8-10 minutes, or until they are lightly golden and fragrant. Watch them carefully as they can burn quickly. Let them cool completely before proceeding. This step elevates the flavor from good to incredible.
- Combine Dry Ingredients: In a large mixing bowl, combine the toasted (and cooled) rolled oats, chopped nuts, ground flaxseed, chia seeds, and sea salt. Stir everything together with a spatula or wooden spoon until the mix-ins are evenly distributed throughout the oats.
- Melt the Binders: In a small saucepan, combine the peanut butter and honey. Place the saucepan over low to medium-low heat. Stir constantly until the mixture is completely melted, smooth, and easily pourable. Be careful not to let it boil or scorch, as this can make the final bars hard. The goal is just to warm it enough to become liquid. Once melted, remove from the heat and stir in the vanilla extract.
- Combine Wet and Dry: Pour the warm peanut butter and honey mixture over the dry ingredients in the large bowl. Immediately begin to stir with a sturdy spatula. It’s crucial to work relatively quickly while the mixture is warm. Scrape the bottom and sides of the bowl to ensure every single oat and seed is coated in the sticky binder. The mixture will be thick and sticky.
- Press into the Pan: Transfer the sticky granola mixture into your prepared 8×8 inch pan. Spread it out into an even layer. Now for the most important step: pressing. Take a flat-bottomed glass or measuring cup, lightly grease the bottom, and use it to press the mixture down firmly and evenly across the entire surface. You can also place a second piece of parchment paper on top and press down with your hands. The firmer you press, the better your bars will hold together.
- Add Chocolate Chips: If using mini chocolate chips, sprinkle them evenly over the top of the pressed bars. Gently press them into the surface with your spatula or the back of a spoon so they adhere. If you mix them in with the hot liquid, they will melt and create a marbled effect, which is also delicious. For distinct chips, adding them on top is the best method.
- Chill and Set: Cover the pan with plastic wrap or foil and place it in the refrigerator to chill for at least 2 to 3 hours, or until the bars are very firm to the touch. This chilling time is non-negotiable; it allows the peanut butter and honey to solidify and bind everything together.
- Cut and Store: Once fully chilled and firm, use the parchment paper overhangs to lift the entire block of granola out of the pan and onto a cutting board. Use a large, sharp knife to cut into 16 squares or 12 rectangular bars. For the cleanest cuts, you can run the knife under hot water and wipe it dry between slices. Store the bars in an airtight container.
Nutrition Facts
- Servings: 16 square bars
- Calories per serving: Approximately 210-240 kcal
- Protein: Each bar provides a solid dose of plant-based protein, primarily from the peanut butter, nuts, and seeds. Protein is crucial for satiety, helping to keep you feeling full and energized, preventing mid-morning slumps and cravings.
- Fiber: Rich in both soluble and insoluble fiber from the oats, flaxseed, and chia seeds. Fiber aids in digestion, helps to regulate blood sugar levels, and contributes to that feeling of fullness, making these bars a genuinely satisfying breakfast or snack.
- Healthy Fats: The almonds, peanut butter, flaxseed, and chia seeds are excellent sources of monounsaturated and polyunsaturated fats, including omega-3 fatty acids. These fats are essential for brain health, reducing inflammation, and supporting overall cardiovascular wellness.
- Complex Carbohydrates: The old-fashioned rolled oats provide complex carbohydrates, which are digested slowly. This results in a steady release of energy, rather than the quick spike and crash associated with sugary, refined breakfast options.
- Micronutrients: These bars are a good source of various vitamins and minerals, including magnesium from the nuts and seeds, iron from the oats, and B vitamins, all of which play vital roles in energy metabolism and overall health.
Preparation Time
The beauty of this recipe lies in its simplicity and speed. The active preparation time is only about 15 minutes. This includes gathering your ingredients, toasting the oats (if you choose), melting the binders, and pressing the mixture into the pan. The majority of the time required is passive chilling time, which is at least 2 to 3 hours in the refrigerator. This hands-off period is essential for the bars to firm up properly, making it a perfect recipe to prepare the night before or during a Sunday meal prep session.
How to Serve
These no-bake granola bars are incredibly versatile. While perfect on their own, here are some creative and delicious ways to serve them:
- The Classic Grab-and-Go:
- The simplest and most common way. Keep them individually wrapped in the fridge for a quick breakfast as you run out the door.
- Pair with a piece of fruit like a banana or an apple for a more complete and balanced meal.
- The Breakfast Parfait Bowl:
- Crumble one or two bars into a bowl or jar.
- Layer the crumbled granola with Greek yogurt (for extra protein) or a dairy-free yogurt alternative.
- Add a layer of fresh berries, such as blueberries, raspberries, or sliced strawberries.
- Repeat the layers for a beautiful and texturally exciting breakfast parfait.
- As an Energizing Snack:
- Enjoy a bar about an hour before a workout for a sustained energy boost from the complex carbs and healthy fats.
- Have one post-workout to help replenish glycogen stores and provide protein for muscle recovery.
- Pack them in lunchboxes for a healthy school or work snack that beats a processed candy bar every time.
- A Healthier Dessert Option:
- Gently warm a bar in the microwave for about 10 seconds to soften it slightly.
- Serve with a small scoop of vanilla frozen yogurt or a nice cream made from frozen bananas.
- Drizzle with a little extra melted dark chocolate or a dollop of your favorite nut butter for an indulgent finish.
Additional Tips
- Toast Your Oats and Nuts: While listed as optional in the instructions, taking 10 extra minutes to toast your rolled oats and chopped nuts is the single best thing you can do to improve this recipe. It deepens their flavor, making it richer and nuttier, and also gives the bars a slightly crispier, less raw texture.
- The Press is Everything: Do not be gentle when pressing the mixture into the pan. The structural integrity of your bars depends entirely on how tightly you compact the mixture. Use the bottom of a flat glass, a metal spatula, or even another pan of the same size to press down with significant force. This eliminates air pockets and ensures the sticky binder is in contact with every ingredient, preventing crumbly bars.
- Don’t Skip the Salt: It might seem like a tiny amount, but that ¼ teaspoon of salt is a flavor powerhouse. It doesn’t make the bars salty; instead, it balances the sweetness of the honey and chocolate and intensifies the nutty, roasted flavors of the peanut butter and oats. It makes the overall taste more complex and satisfying.
- Experiment with Extracts and Spices: Vanilla extract is classic, but you can easily customize the flavor profile. Try adding ½ teaspoon of cinnamon or a pinch of nutmeg for a warmer, spiced version. A ¼ teaspoon of almond extract can amplify the nutty flavor, especially if you’re using almonds as your mix-in.
- Be Patient with Chilling: It can be tempting to cut into the bars after just an hour in the fridge, but patience pays off. A full 2-3 hours (or even overnight) allows the fats in the peanut butter to fully solidify and the honey to become firm, creating a bar that holds its shape perfectly at room temperature and has a satisfyingly chewy bite.
- Maintain the Binder Ratio: The ratio of wet to dry ingredients is key. The recipe calls for 1.5 cups of “wet” binders (1 cup peanut butter + ½ cup honey) to about 3 cups of “dry” ingredients (oats, nuts, seeds). If you add more dry mix-ins, like protein powder or extra seeds, you may need to add a tablespoon or two of extra peanut butter or honey to ensure everything is well-coated and will stick together.
- Customize Your Mix-Ins: This recipe is a fantastic template. Feel free to swap the ingredients based on what you have on hand.
- Nuts: Use any nut you like—pistachios, cashews, hazelnuts.
- Seeds: Pumpkin seeds or sunflower seeds add a great crunch.
- Dried Fruit: Add ¼ cup of chopped dried apricots, cranberries, or raisins for extra chewiness and sweetness. Add them with the dry ingredients.
- Flash Freeze for Easy Cutting and Storage: For perfectly clean, professional-looking squares, place the pan in the freezer for 20-30 minutes just before cutting. This makes the block extra firm, allowing your knife to slice through cleanly without crumbling the edges. It also makes them easy to wrap individually for long-term freezer storage.
Frequently Asked Questions (FAQ)
1. Why are my granola bars falling apart?
This is the most common issue and usually stems from one of three things. First, the binder ratio might be off. If you added too many dry ingredients without increasing the peanut butter or honey, there isn’t enough “glue” to hold them. Second, you may not have pressed the mixture into the pan firmly enough. You need to use significant pressure to compact the mixture and eliminate air gaps. Third, they may not have been chilled for long enough. The bars need at least 2-3 hours in the refrigerator to fully set and solidify.
2. Can I make these granola bars vegan?
Absolutely! The only non-vegan ingredient in this recipe is honey. To make them fully vegan, simply substitute the honey with an equal amount of pure maple syrup or brown rice syrup. Note that maple syrup is slightly less sticky than honey, so be extra diligent about pressing the bars firmly and chilling them thoroughly. Agave nectar also works well as a 1:1 substitute.
3. How can I make this recipe nut-free?
Yes, this recipe is easily adaptable for nut allergies. Swap the peanut butter for a seed-based butter like sunflower seed butter (SunButter) or tahini. Instead of chopped nuts, use an equivalent amount of raw pumpkin seeds (pepitas), sunflower seeds, or crispy rice cereal for a similar crunch. Always check the labels on all your ingredients, including chocolate chips, to ensure they were not processed in a facility with nuts.
4. Are these granola bars gluten-free?
They can be! Oats are naturally gluten-free, but they are often processed in facilities that also handle wheat, barley, and rye, leading to cross-contamination. To ensure the bars are 100% gluten-free, you must purchase old-fashioned rolled oats that are specifically labeled and certified as “gluten-free.” All other ingredients in the base recipe are naturally gluten-free, but it’s always wise to check labels.
5. What is the best way to store these bars?
For the best texture, store the bars in an airtight container in the refrigerator. They will stay fresh and firm for up to two weeks. You can also store them at room temperature for up to a week, but they will be softer. For long-term storage, they freeze exceptionally well. Wrap each bar individually in plastic wrap and then place them in a freezer-safe bag or container. They will last for up to 3 months in the freezer. Thaw in the fridge or on the counter for a few minutes before eating.
6. Can I reduce the amount of sweetener in this recipe?
You can slightly reduce the honey or maple syrup, but be cautious. The sweetener does more than just add flavor; it’s a critical binder. If you reduce it too much (e.g., by more than 2 tablespoons), your bars will likely be very crumbly. If you want to reduce sweetness, a better approach is to use unsweetened peanut butter and use dark chocolate chips (70% cacao or higher) or omit the chocolate chips altogether.
7. What kind of oats should I use? Can I use quick oats?
Old-fashioned rolled oats are highly recommended for the best texture—they provide a hearty, chewy bite that holds up well. You can use quick-cooking oats in a pinch, but the final texture will be softer, less chewy, and more dense. Do NOT use steel-cut oats or instant oatmeal packets, as their texture and cooking properties are completely different and they will not work in this no-bake recipe.
8. Can I add protein powder to these bars?
Yes, you can boost the protein content by adding 1-2 scoops of your favorite protein powder (vanilla or chocolate flavor works best). However, protein powder is a very “thirsty” dry ingredient. For every scoop of protein powder you add, you will likely need to add an extra tablespoon of peanut butter and/or honey to ensure the mixture isn’t too dry and will still bind together properly. Mix the protein powder in with the other dry ingredients before adding the wet binders.

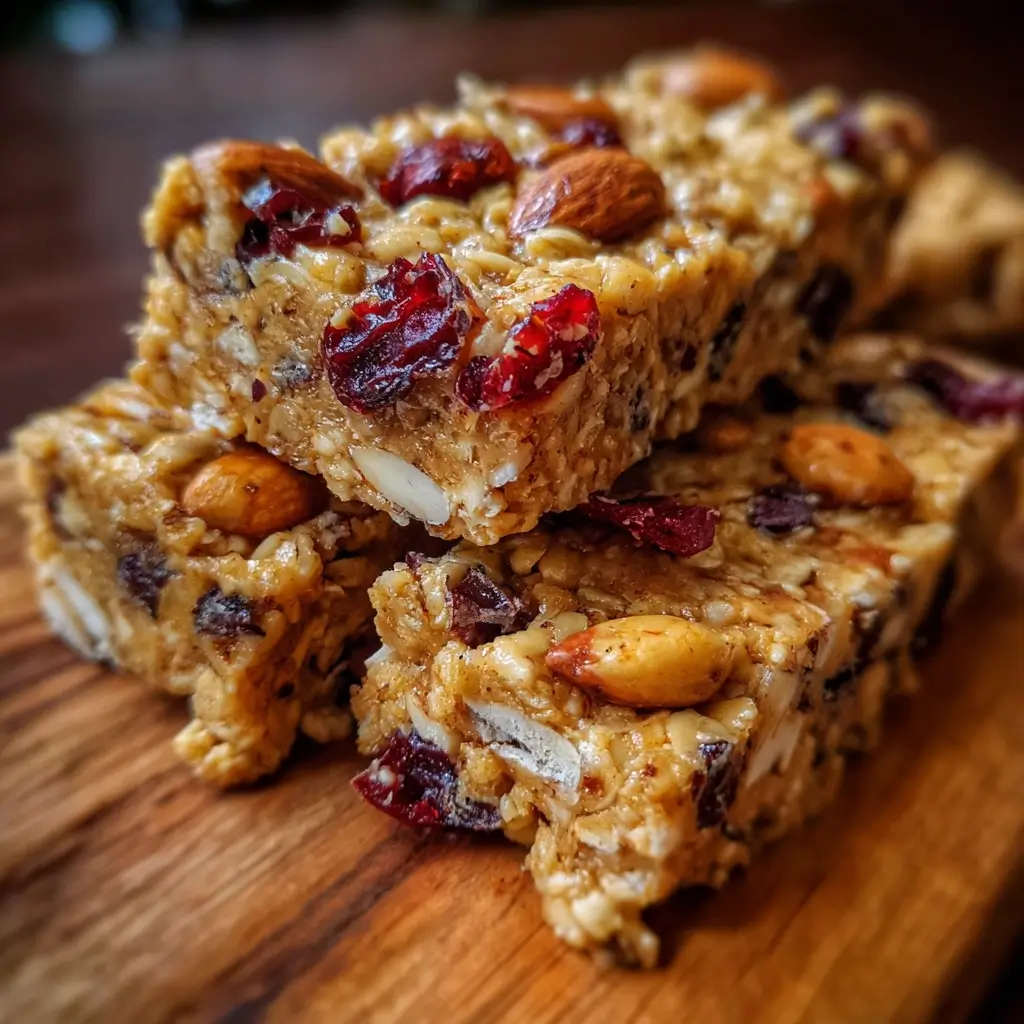
No-Bake Granola Breakfast Bars
Ingredients
- 2 cups Old-Fashioned Rolled Oats: These are the backbone of the bars, providing a hearty, chewy texture and a wealth of fiber. Do not use instant or steel-cut oats, as they will not produce the correct consistency. For a gluten-free version, ensure you use certified gluten-free rolled oats.
- 1 cup Creamy Peanut Butter: This is the primary binder that holds the bars together. Use a good quality, creamy peanut butter for the best results. Natural peanut butter (the kind you have to stir) works wonderfully here.
- ½ cup Honey: Acting as both a sweetener and a crucial secondary binder, honey lends a classic, warm sweetness. The stickiness of honey is essential for ensuring the bars don’t crumble.
- ⅓ cup Chopped Nuts (Almonds, Walnuts, or Pecans): This adds a delightful crunch, healthy fats, and extra protein. I prefer using roasted, unsalted almonds, but feel free to use your favorite or a combination.
- ¼ cup Ground Flaxseed: A nutritional powerhouse, ground flaxseed boosts fiber and omega-3 content without noticeably altering the flavor. It also helps with binding.
- ¼ cup Mini Chocolate Chips: For a touch of indulgence that makes these bars irresistible to kids and adults alike. Use dark, semi-sweet, or milk chocolate based on your preference.
- 2 tablespoons Chia Seeds: These tiny seeds are packed with nutrients and absorb liquid, which helps to firm up the bars and add a subtle texture.
- 1 teaspoon Vanilla Extract: This enhances all the other flavors in the bars, adding a layer of warmth and depth.
- ¼ teaspoon Sea Salt: A small amount of salt is critical for balancing the sweetness of the honey and bringing out the nutty flavors of the oats and peanut butter.
Instructions
- Prepare the Pan: Line an 8×8 inch square baking pan with parchment paper, leaving some overhang on two opposite sides. This parchment paper “sling” is the secret to easily lifting the bars out of the pan for clean cutting later. Lightly grease the parchment paper and any exposed parts of the pan to prevent any sticking.
- Toast the Oats (Optional but Recommended): For a deeper, nuttier flavor, spread the rolled oats on a dry baking sheet. Toast in a preheated oven at 350°F (175°C) for 8-10 minutes, or until they are lightly golden and fragrant. Watch them carefully as they can burn quickly. Let them cool completely before proceeding. This step elevates the flavor from good to incredible.
- Combine Dry Ingredients: In a large mixing bowl, combine the toasted (and cooled) rolled oats, chopped nuts, ground flaxseed, chia seeds, and sea salt. Stir everything together with a spatula or wooden spoon until the mix-ins are evenly distributed throughout the oats.
- Melt the Binders: In a small saucepan, combine the peanut butter and honey. Place the saucepan over low to medium-low heat. Stir constantly until the mixture is completely melted, smooth, and easily pourable. Be careful not to let it boil or scorch, as this can make the final bars hard. The goal is just to warm it enough to become liquid. Once melted, remove from the heat and stir in the vanilla extract.
- Combine Wet and Dry: Pour the warm peanut butter and honey mixture over the dry ingredients in the large bowl. Immediately begin to stir with a sturdy spatula. It’s crucial to work relatively quickly while the mixture is warm. Scrape the bottom and sides of the bowl to ensure every single oat and seed is coated in the sticky binder. The mixture will be thick and sticky.
- Press into the Pan: Transfer the sticky granola mixture into your prepared 8×8 inch pan. Spread it out into an even layer. Now for the most important step: pressing. Take a flat-bottomed glass or measuring cup, lightly grease the bottom, and use it to press the mixture down firmly and evenly across the entire surface. You can also place a second piece of parchment paper on top and press down with your hands. The firmer you press, the better your bars will hold together.
- Add Chocolate Chips: If using mini chocolate chips, sprinkle them evenly over the top of the pressed bars. Gently press them into the surface with your spatula or the back of a spoon so they adhere. If you mix them in with the hot liquid, they will melt and create a marbled effect, which is also delicious. For distinct chips, adding them on top is the best method.
- Chill and Set: Cover the pan with plastic wrap or foil and place it in the refrigerator to chill for at least 2 to 3 hours, or until the bars are very firm to the touch. This chilling time is non-negotiable; it allows the peanut butter and honey to solidify and bind everything together.
- Cut and Store: Once fully chilled and firm, use the parchment paper overhangs to lift the entire block of granola out of the pan and onto a cutting board. Use a large, sharp knife to cut into 16 squares or 12 rectangular bars. For the cleanest cuts, you can run the knife under hot water and wipe it dry between slices. Store the bars in an airtight container.
Nutrition
- Serving Size: one normal portion
- Calories: 240