")


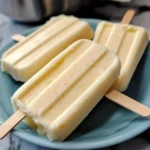
There’s something incredibly satisfying about making a treat from scratch, especially one that evokes pure, simple nostalgia. I remember the first time I decided to tackle homemade vanilla pudding pops. Store-bought versions were fine, but I craved that truly creamy, intensely vanilla flavor that often seemed missing. My kids were initially skeptical – why make something you can easily buy? But the moment they tasted these homemade vanilla pudding pops, their eyes widened. “Wow, Mom, these are way better!” became the resounding verdict. Since then, this Vanilla Pudding Pops Recipe has become a staple in our house, especially during warmer months. They are velvety smooth, perfectly sweet, bursting with authentic vanilla flavor, and surprisingly easy to whip up. They transform simple ingredients into a frozen delight that feels both comforting and special. Sharing this recipe feels like sharing a little piece of sunshine and childhood joy, and I’m confident your family will love these creamy, dreamy treats just as much as mine does. They aren’t just popsicles; they’re frozen custard dreams on a stick.
Ingredients
Here’s what you’ll need to create these delightful homemade vanilla pudding pops:
- 2 ¾ cups Whole Milk: Provides the creamy base and richness essential for authentic pudding pops. You can experiment with lower-fat milk, but whole milk yields the best texture.
- ¾ cup Granulated Sugar: Adds the perfect level of sweetness. Feel free to adjust slightly based on your preference, but this amount balances well with the vanilla.
- ¼ cup Cornstarch: The key thickening agent that gives the pudding its characteristic smooth, slightly dense texture, crucial for preventing excessive iciness when frozen.
- ½ teaspoon Salt: Enhances the overall flavor profile and balances the sweetness. Don’t skip it!
- 3 Large Egg Yolks: Adds richness, color, and contributes to the custard-like smoothness. Ensure they are separated carefully from the whites.
- 2 tablespoons Unsalted Butter: Stirred in at the end, it adds extra richness, silkiness, and a subtle depth of flavor.
- 1 ½ teaspoons Pure Vanilla Extract: The star of the show! Use high-quality pure vanilla extract for the best, most authentic flavor. Vanilla bean paste can also be substituted for an even more intense flavor with visible vanilla specks.
Instructions
Follow these simple steps to create perfectly creamy vanilla pudding pops:
- Prepare the Base: In a medium saucepan, whisk together the granulated sugar, cornstarch, and salt. Make sure there are no lumps of cornstarch remaining. Gradually whisk in the whole milk until the mixture is smooth.
- Temper the Eggs: In a separate medium bowl, lightly whisk the egg yolks.
- Heat the Milk Mixture: Place the saucepan over medium heat. Cook, whisking constantly, until the mixture begins to thicken and bubble gently around the edges. Don’t let it come to a rolling boil at this stage. Ensure you are scraping the bottom and corners of the pan to prevent scorching.
- Combine Egg Yolks and Hot Milk: Carefully ladle about ½ cup of the hot milk mixture into the bowl with the whisked egg yolks, whisking constantly as you pour. This process, called tempering, gently heats the egg yolks, preventing them from scrambling when added back into the hot saucepan.
- Cook the Pudding: Pour the tempered egg yolk mixture back into the saucepan with the remaining milk mixture. Continue to cook over medium heat, whisking constantly and vigorously, until the pudding thickens considerably and comes to a gentle boil. Let it bubble gently for 1-2 minutes while still whisking constantly. The pudding should be thick enough to coat the back of a spoon.
- Finish the Pudding: Remove the saucepan from the heat. Immediately stir in the unsalted butter and pure vanilla extract until the butter is fully melted and incorporated, and the pudding is smooth and glossy.
- Cool the Pudding: Transfer the pudding to a heatproof bowl. To prevent a skin from forming on top, you have two options: press a piece of plastic wrap directly onto the surface of the pudding, ensuring no air is trapped, OR lightly grease the surface with a tiny bit of butter. Let the pudding cool at room temperature for about 20-30 minutes, stirring occasionally. Then, refrigerate the pudding for at least 1-2 hours, or until thoroughly chilled. Chilling is crucial for the best texture in the final pops.
- Fill the Molds: Once the pudding is completely cool, give it a good whisk to ensure it’s smooth. Carefully spoon or pipe the chilled pudding mixture into your popsicle molds. Fill them almost to the top, leaving a tiny bit of space for expansion during freezing.
- Insert Sticks: Insert popsicle sticks into the center of each mold. If your molds have built-in stick holders, follow their instructions. If using traditional molds and wooden sticks, you might need to freeze the pops for about 1-1.5 hours until partially set before inserting the sticks so they stand upright.
- Freeze: Place the filled molds in the freezer. Freeze for at least 4-6 hours, or preferably overnight, until completely solid. Freezing time can vary depending on your freezer’s temperature and the size of your molds.
- Unmold: To release the pudding pops, briefly run the outside of the molds under warm (not hot) water for a few seconds. Gently wiggle the stick and pull to release the pop. Avoid using hot water or running it for too long, as this can melt the pop.
Nutrition Facts
- Servings: Makes approximately 8-10 pops, depending on mold size.
- Calories per serving: Approximately 180-220 kcal (estimated).
- Protein: Around 4-5g per pop. Contributes to satiety and structure.
- Carbohydrates: Approximately 25-30g per pop. Primarily from sugar and cornstarch, providing energy and sweetness.
- Fat: Approximately 6-8g per pop. Mostly from whole milk, egg yolks, and butter, crucial for the creamy texture and rich flavor.
(Disclaimer: Nutritional information is an estimate based on standard ingredients and serving sizes. Actual values may vary depending on specific ingredients used and mold size.)
Preparation Time
- Active Preparation Time: Approximately 20-25 minutes (includes mixing, cooking the pudding, and filling molds).
- Inactive Time (Cooling & Freezing): Approximately 5-8 hours (includes 1-2 hours chilling time for the pudding and 4-6+ hours freezing time for the pops). For best results, allow overnight freezing.
How to Serve
These homemade vanilla pudding pops are fantastic on their own, but here are some fun ways to serve them:
- Classic Style:
- Enjoy them straight from the freezer on a hot day – simple, classic, and refreshing.
- Party Perfect:
- Arrange them on a chilled platter or in a container filled with crushed ice for parties or gatherings.
- Wrap individual pops in clear cellophane bags tied with ribbons for party favors or easy grab-and-go treats.
- Dipped Delights:
- Chocolate Magic Shell: Briefly dip the frozen pops into melted chocolate (mixed with a little coconut oil for a quick-hardening shell). Let the shell set before serving.
- Caramel Drizzle: Drizzle the pops with your favorite caramel sauce just before serving.
- White Chocolate Dip: Offer a contrast by dipping them in melted white chocolate.
- Textural Fun:
- Sprinkle Surprise: After dipping in chocolate (while it’s still wet) or just slightly softening the pop’s surface, roll them in colorful sprinkles, crushed cookies (like Oreos or vanilla wafers), chopped nuts (pecans, almonds), toasted coconut flakes, or mini chocolate chips.
- Paired with Fruit:
- Serve alongside a bowl of fresh berries (strawberries, raspberries, blueberries) for a refreshing contrast.
- Dessert Upgrade:
- Use them as a fun accompaniment to a slice of cake or brownie instead of traditional ice cream.
Additional Tips
Maximize your vanilla pudding pop success with these eight handy tips:
- Ensure Thorough Chilling: Don’t rush the chilling process for the pudding before pouring it into the molds. A thoroughly chilled pudding base freezes more evenly and results in a creamier, less icy texture. Aim for at least 1-2 hours in the refrigerator.
- Strain for Silkiness: For an absolutely guaranteed silky smooth texture with no chance of tiny cooked egg bits or cornstarch lumps, strain the cooked pudding through a fine-mesh sieve into the cooling bowl before adding the butter and vanilla.
- Vanilla Variations: While pure vanilla extract is classic, consider using vanilla bean paste (use the same amount) for visible vanilla specks and a slightly more intense flavor. You could even scrape a whole vanilla bean into the milk mixture while heating (remove the pod before chilling).
- Preventing Ice Crystals: Using whole milk, egg yolks, and ensuring the pudding is properly thickened with cornstarch are key defenses against iciness. Avoid adding extra water or using very low-fat milk, which increases the water content and promotes larger ice crystals. Freezing quickly in a cold freezer also helps.
- Easy Unmolding Trick: If pops are stubborn, fill your sink with an inch of warm water and dip the mold base in for just 5-10 seconds. Avoid getting water near the top opening. Wiggle the stick gently; they should slide out easily.
- Proper Storage: Once unmolded, wrap individual pudding pops tightly in plastic wrap or place them in airtight freezer bags or containers. This prevents them from absorbing freezer odors and minimizes freezer burn. They are best enjoyed within 1-2 weeks for optimal texture and flavor, though they can last longer.
- Milk Alternatives Exploration: While whole dairy milk gives the creamiest result, you can experiment with alternatives like full-fat canned coconut milk for a dairy-free, tropical twist. Note that the texture and flavor will change. Almond or soy milk might result in a less creamy, potentially icier pop due to lower fat content. Adjust expectations accordingly.
- Get Creative with Layers or Swirls: For visual appeal, try layering the vanilla pudding with a thin layer of chocolate pudding or fruit puree (like strawberry or raspberry) in the molds. You can also create swirls by adding a dollop of fruit jam or chocolate sauce to the mold partway through filling and gently swirling with a skewer before freezing.
FAQ Section
Here are answers to some frequently asked questions about making this Vanilla Pudding Pops Recipe:
- Q: Can I use instant vanilla pudding mix instead of making it from scratch?
- A: Yes, you can use an instant vanilla pudding mix as a shortcut. Prepare the pudding according to package directions (usually requires just milk), let it set slightly, then pour into molds and freeze. However, the texture and flavor will likely be different from the homemade custard-based version. Homemade offers a richer, creamier, and more authentic taste.
- Q: How do I prevent my pudding pops from being too icy?
- A: Iciness usually results from too much water content or slow freezing. Ensure you use whole milk and egg yolks for adequate fat content, properly thicken the pudding with cornstarch, chill the pudding thoroughly before freezing, and freeze in a cold freezer (0°F or -18°C). Avoid adding extra liquid or using low-fat milk.
- Q: Can I make this recipe dairy-free?
- A: Yes, you can try making it dairy-free. Substitute the whole milk with full-fat canned coconut milk for the creamiest result. You can also use other plant-based milks like oat or cashew milk, but they might yield a less rich texture. Use a dairy-free butter alternative or coconut oil instead of unsalted butter. The flavor profile will change, especially with coconut milk.
- Q: How long do these homemade vanilla pudding pops last in the freezer?
- A: When stored properly (individually wrapped or in an airtight container), they are best enjoyed within 1-2 weeks for optimal texture and flavor. They can technically last for 1-2 months, but may start to develop ice crystals or absorb freezer odors over time.
- Q: What if I don’t have popsicle molds?
- A: No problem! You can use small paper or plastic cups (like Dixie cups) as molds. Pour the pudding in, partially freeze for about an hour, insert wooden popsicle sticks, and then freeze completely. To serve, simply peel away the cup. Small yogurt containers also work well.
- Q: Can I adjust the sweetness level?
- A: Yes, you can slightly adjust the sugar amount to your preference. Try reducing it to ⅔ cup or increasing it slightly if you like it sweeter. However, keep in mind that sugar does more than just sweeten; it also affects the freezing point and texture, helping to keep the pops smoother. Drastic reductions might lead to harder, icier pops.
- Q: Why did my pudding get lumpy?
- A: Lumps can happen for a few reasons: the cornstarch wasn’t fully whisked into the cold milk initially, the heat was too high causing scorching, or the eggs scrambled because they weren’t tempered properly. Whisk constantly, control the heat, temper the eggs carefully, and consider straining the pudding before chilling for extra smoothness.
- Q: Are these vanilla pudding pops kid-friendly to make?
- A: While kids shouldn’t handle the hot stove part, they can definitely help with whisking the cold ingredients, whisking the egg yolks, stirring the pudding once it’s slightly cooled (with supervision), and especially filling the molds and inserting the sticks. It’s a fun recipe to involve them in!
Vanilla Pudding Pops Recipe
Ingredients
Here’s what you’ll need to create these delightful homemade vanilla pudding pops:
- 2 ¾ cups Whole Milk: Provides the creamy base and richness essential for authentic pudding pops. You can experiment with lower-fat milk, but whole milk yields the best texture.
- ¾ cup Granulated Sugar: Adds the perfect level of sweetness. Feel free to adjust slightly based on your preference, but this amount balances well with the vanilla.
- ¼ cup Cornstarch: The key thickening agent that gives the pudding its characteristic smooth, slightly dense texture, crucial for preventing excessive iciness when frozen.
- ½ teaspoon Salt: Enhances the overall flavor profile and balances the sweetness. Don’t skip it!
- 3 Large Egg Yolks: Adds richness, color, and contributes to the custard-like smoothness. Ensure they are separated carefully from the whites.
- 2 tablespoons Unsalted Butter: Stirred in at the end, it adds extra richness, silkiness, and a subtle depth of flavor.
- 1 ½ teaspoons Pure Vanilla Extract: The star of the show! Use high-quality pure vanilla extract for the best, most authentic flavor. Vanilla bean paste can also be substituted for an even more intense flavor with visible vanilla specks.
Instructions
Follow these simple steps to create perfectly creamy vanilla pudding pops:
- Prepare the Base: In a medium saucepan, whisk together the granulated sugar, cornstarch, and salt. Make sure there are no lumps of cornstarch remaining. Gradually whisk in the whole milk until the mixture is smooth.
- Temper the Eggs: In a separate medium bowl, lightly whisk the egg yolks.
- Heat the Milk Mixture: Place the saucepan over medium heat. Cook, whisking constantly, until the mixture begins to thicken and bubble gently around the edges. Don’t let it come to a rolling boil at this stage. Ensure you are scraping the bottom and corners of the pan to prevent scorching.
- Combine Egg Yolks and Hot Milk: Carefully ladle about ½ cup of the hot milk mixture into the bowl with the whisked egg yolks, whisking constantly as you pour. This process, called tempering, gently heats the egg yolks, preventing them from scrambling when added back into the hot saucepan.
- Cook the Pudding: Pour the tempered egg yolk mixture back into the saucepan with the remaining milk mixture. Continue to cook over medium heat, whisking constantly and vigorously, until the pudding thickens considerably and comes to a gentle boil. Let it bubble gently for 1-2 minutes while still whisking constantly. The pudding should be thick enough to coat the back of a spoon.
- Finish the Pudding: Remove the saucepan from the heat. Immediately stir in the unsalted butter and pure vanilla extract until the butter is fully melted and incorporated, and the pudding is smooth and glossy.
- Cool the Pudding: Transfer the pudding to a heatproof bowl. To prevent a skin from forming on top, you have two options: press a piece of plastic wrap directly onto the surface of the pudding, ensuring no air is trapped, OR lightly grease the surface with a tiny bit of butter. Let the pudding cool at room temperature for about 20-30 minutes, stirring occasionally. Then, refrigerate the pudding for at least 1-2 hours, or until thoroughly chilled. Chilling is crucial for the best texture in the final pops.
- Fill the Molds: Once the pudding is completely cool, give it a good whisk to ensure it’s smooth. Carefully spoon or pipe the chilled pudding mixture into your popsicle molds. Fill them almost to the top, leaving a tiny bit of space for expansion during freezing.
- Insert Sticks: Insert popsicle sticks into the center of each mold. If your molds have built-in stick holders, follow their instructions. If using traditional molds and wooden sticks, you might need to freeze the pops for about 1-1.5 hours until partially set before inserting the sticks so they stand upright.
- Freeze: Place the filled molds in the freezer. Freeze for at least 4-6 hours, or preferably overnight, until completely solid. Freezing time can vary depending on your freezer’s temperature and the size of your molds.
- Unmold: To release the pudding pops, briefly run the outside of the molds under warm (not hot) water for a few seconds. Gently wiggle the stick and pull to release the pop. Avoid using hot water or running it for too long, as this can melt the pop.
Nutrition
- Serving Size: one normal portion
- Calories: 220
- Fat: 8g
- Carbohydrates: 30g
- Protein: 5g