")

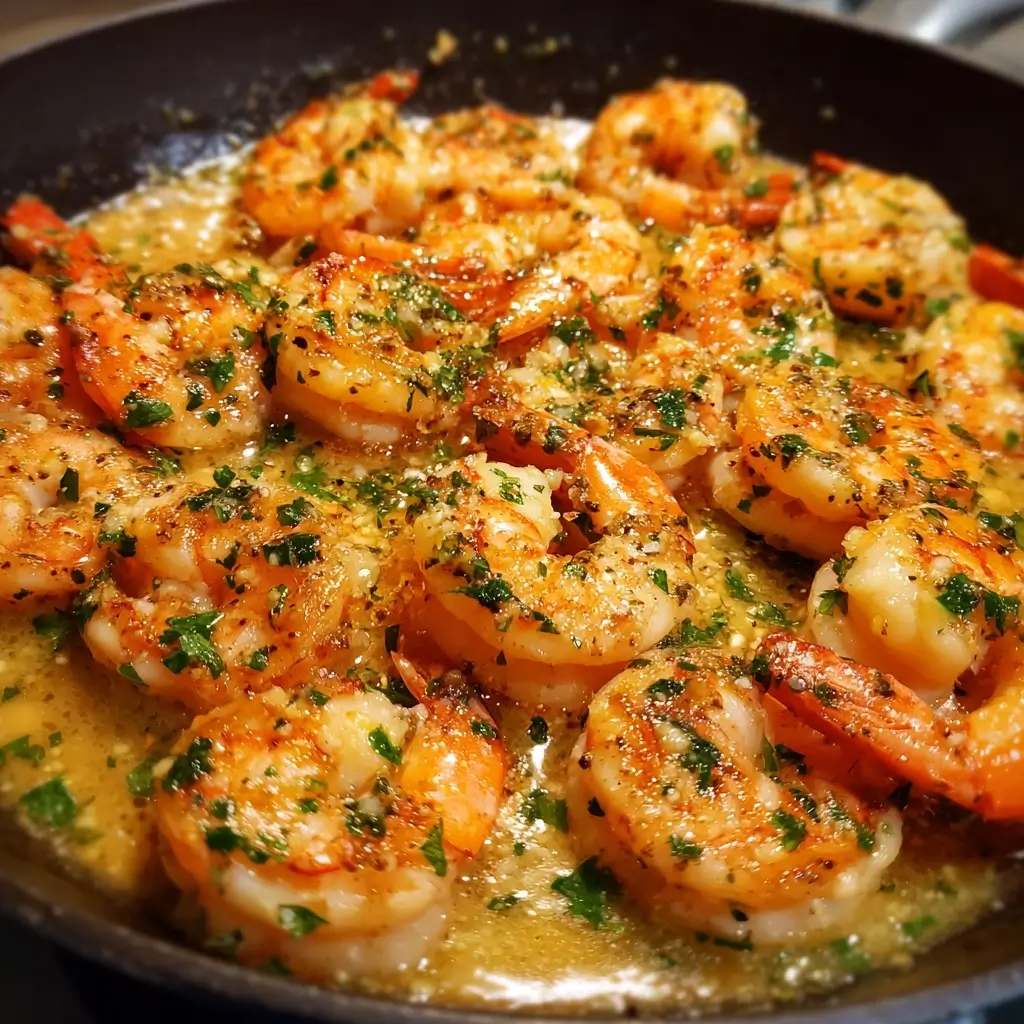

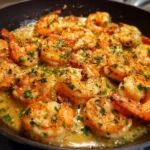
Of all the recipes that have become a permanent fixture in my weeknight dinner rotation, this 15-Minute Garlic Butter Shrimp Skillet holds a special place in my heart. I still remember the first time I made it. It was one of those chaotic Tuesdays where everything seemed to go wrong, and by 6 PM, the last thing I wanted to do was spend an hour in the kitchen. I stumbled upon the concept of a quick shrimp skillet and decided to give it a try with what I had on hand. The result was nothing short of miraculous. The kitchen, once a symbol of my stressful day, filled with the most incredible aroma of sizzling garlic and butter. My family, initially skeptical about a “15-minute” meal, was drawn to the stove. The first bite was a revelation—tender, juicy shrimp swimming in a luxurious, garlicky sauce with a bright kick of lemon. It tasted like something you’d order at a seaside bistro, yet it came together faster than ordering a pizza. Now, this recipe is our go-to for busy nights, a quick and elegant lunch, or even when we have last-minute guests. It’s a testament to the fact that you don’t need a lot of time or complicated ingredients to create a meal that feels truly special and brings everyone to the table with a smile.
Ingredients
This recipe relies on a handful of simple yet powerful ingredients to create its signature flavor. Using fresh, high-quality components will make a significant difference in the final dish.
- 1 ½ pounds large shrimp: The star of the show. Use raw shrimp that has been peeled and deveined to save time. Tail-on or tail-off is a matter of personal preference; tail-on often presents more beautifully.
- 4 tablespoons unsalted butter: This creates the rich, decadent base of the sauce. Using unsalted allows you to control the overall sodium content of the dish.
- 2 tablespoons olive oil: Combined with the butter, olive oil helps prevent the butter from browning too quickly and adds its own subtle, fruity flavor.
- 6-8 cloves garlic, minced: Do not skimp on the garlic! Freshly minced garlic is essential for that potent, aromatic punch that defines this skillet. Avoid pre-minced jarred garlic if possible, as its flavor is less vibrant.
- ¼ cup chicken broth or dry white wine: This liquid is used to deglaze the pan, lifting all the flavorful browned bits from the bottom and forming the body of the sauce. White wine (like a Sauvignon Blanc or Pinot Grigio) adds a touch of acidity and complexity.
- Juice of 1 lemon: Freshly squeezed lemon juice, added at the end, cuts through the richness of the butter and brightens all the flavors, making the dish feel fresh and lively.
- ½ teaspoon red pepper flakes: This provides a gentle, warming heat in the background. Adjust the amount based on your personal preference for spice.
- Salt and freshly ground black pepper: To taste. Season the shrimp before cooking and adjust the sauce at the end.
- ¼ cup fresh parsley, chopped: Stirred in at the very end, fresh parsley adds a pop of color and a clean, herbaceous note that perfectly complements the garlic and lemon.
Instructions
The beauty of this 15-Minute Garlic Butter Shrimp Skillet lies in its simple and rapid cooking process. Follow these steps closely for perfectly cooked, succulent shrimp every time. The key is to have all your ingredients prepped and ready to go before you even turn on the stove—this is a technique chefs call mise en place.
- Prepare the Shrimp: If your shrimp is frozen, ensure it is fully thawed. To do this quickly, place the frozen shrimp in a colander and run cold water over them for 5-7 minutes. Once thawed, pat the shrimp completely dry with paper towels. This step is crucial! Removing excess moisture allows the shrimp to sear in the pan rather than steam, resulting in a much better texture and color. Season the dried shrimp generously with salt and black pepper on both sides.
- Heat the Skillet: Place a large skillet or frying pan (a 12-inch cast iron or stainless steel skillet works best) over medium-high heat. Add 1 tablespoon of the olive oil and 2 tablespoons of the butter. Allow the butter to melt and foam, swirling the pan to combine it with the oil. The pan is ready when a drop of water sizzles instantly upon contact.
- Sear the Shrimp: Carefully arrange the seasoned shrimp in the skillet in a single layer. Be careful not to overcrowd the pan, as this will lower the temperature and cause the shrimp to steam instead of sear. If necessary, work in two batches. Cook the shrimp for 1-2 minutes per side, until they turn pink and opaque and curl into a “C” shape. A perfectly cooked shrimp is tender; an overcooked shrimp, which curls into a tight “O” shape, will be tough and rubbery. Once cooked, immediately remove the shrimp from the skillet and set them aside on a plate.
- Create the Garlic Butter Sauce: Reduce the heat to medium-low. Add the remaining 1 tablespoon of olive oil and 2 tablespoons of butter to the same skillet. Once the butter is melted, add the minced garlic and red pepper flakes. Sauté for about 30-60 seconds, stirring constantly, until the garlic is fragrant. Be very careful not to let the garlic burn, as it will become bitter and ruin the sauce.
- Deglaze and Simmer: As soon as the garlic is fragrant, pour in the chicken broth or white wine. Use a wooden spoon or spatula to scrape up any browned bits (called fond) from the bottom of the pan. This is where a huge amount of flavor is concentrated. Bring the sauce to a simmer and let it cook for 2-3 minutes, allowing it to reduce slightly and the flavors to meld together.
- Combine and Finish: Turn off the heat. Return the cooked shrimp to the skillet. Add the freshly squeezed lemon juice and the chopped fresh parsley. Toss everything together gently to coat the shrimp completely in the glorious garlic butter sauce. The residual heat from the pan and sauce will rewarm the shrimp perfectly without overcooking them.
- Serve Immediately: Taste the sauce and add more salt and pepper if needed. Serve the garlic butter shrimp straight from the skillet for a rustic feel, or transfer it to a serving platter. Garnish with an extra sprinkle of fresh parsley and a few lemon wedges on the side for squeezing.
Nutrition Facts
This dish is not only quick and delicious but also offers a favorable nutritional profile, making it a great choice for a healthy meal.
- Servings: 4
- Calories per serving: Approximately 380 kcal
- High in Protein (Approx. 35g): Shrimp is an excellent source of lean protein, which is essential for building and repairing tissues, supporting muscle mass, and keeping you feeling full and satisfied.
- Rich in Healthy Fats (from Olive Oil): The use of olive oil contributes monounsaturated fats, which are known to be heart-healthy and can help reduce bad cholesterol levels.
- Source of Selenium: Shrimp is one of the best dietary sources of selenium, a powerful antioxidant that helps protect cells from damage and plays a vital role in thyroid function and immune health.
- Low in Carbohydrates: With virtually no carbs, this dish is naturally keto-friendly and a fantastic option for those following a low-carb or ketogenic diet.
- Excellent Source of Vitamin B12: This dish provides a significant amount of Vitamin B12, which is crucial for nerve function and the formation of DNA and red blood cells.
Preparation Time
This recipe is designed for maximum efficiency, making it an ideal choice for any busy schedule.
The total time from start to finish is approximately 15 minutes. This can be broken down into about 5-7 minutes of preparation (mincing garlic, juicing the lemon, patting the shrimp dry) and 8-10 minutes of active cooking time. Having all ingredients prepped and ready before you begin is the key to staying within this timeframe.
How to Serve
This 15-Minute Garlic Butter Shrimp Skillet is incredibly versatile. The rich, savory sauce is practically begging to be soaked up. Here are some of the best ways to serve it to create a complete and satisfying meal:
- With Pasta:
- Toss with long pasta like linguine or angel hair. The thin strands are perfect for catching the garlic butter sauce.
- Mix with shorter pasta shapes like penne or farfalle (bow ties) for a different textural experience.
- With Grains:
- Serve over a bed of fluffy white or brown rice. The rice will absorb the sauce beautifully. Jasmine or basmati rice are particularly good choices.
- For a healthier, nuttier alternative, serve it with cooked quinoa.
- Low-Carb and Keto-Friendly Options:
- Spoon over zucchini noodles (zoodles) or spaghetti squash for a light, gluten-free, and low-carb meal.
- Serve alongside a generous portion of cauliflower rice or creamy cauliflower mash.
- Pair with steamed or roasted vegetables like asparagus, broccoli, or green beans.
- For Soaking Up the Sauce:
- The most classic pairing is a loaf of crusty bread. Slices of baguette, ciabatta, or sourdough are perfect for dipping into the skillet and soaking up every last drop of the delicious sauce.
- Serve over creamy polenta for a comforting and rustic meal.
- As an Appetizer:
- Serve the shrimp on a platter with toothpicks for an elegant and easy party appetizer that is sure to disappear quickly.
Additional Tips
To elevate your 15-Minute Garlic Butter Shrimp Skillet from great to absolutely unforgettable, keep these professional tips in mind.
- The Golden Rule: Do Not Overcook the Shrimp. This is the most important tip. Shrimp cook incredibly fast. The difference between succulent and rubbery is a matter of seconds. Watch for them to turn pink and form a gentle “C” shape. The moment they do, they’re done.
- Choose the Right Shrimp. For the best texture and flavor, always opt for raw, large (or jumbo) shrimp (size 16/20 or 21/25). Pre-cooked shrimp will inevitably become tough and chewy when reheated in the skillet.
- Properly Thaw Frozen Shrimp. If using frozen shrimp, thaw them correctly. Never use a microwave. The best method is to thaw them overnight in the refrigerator. For a quick thaw, place them in a colander in the sink and run cold water over them until they are pliable.
- A Hot Pan is a Happy Pan. Preheating your skillet is non-negotiable for getting a good sear. A hot surface ensures the shrimp’s exterior cooks quickly, creating a slightly crisp texture while keeping the inside tender and juicy.
- Manage Your Garlic. Fresh garlic is key, but it burns easily over high heat. That’s why you should lower the heat before adding the garlic to the pan. Sauté it just until it’s fragrant (about 30-60 seconds). If it starts to turn dark brown, it will taste bitter.
- Embrace the Fond. Those little browned bits that stick to the bottom of the pan after you sear the shrimp are flavor gold. When you add the broth or wine (deglazing), make sure you scrape all of those bits up. They will dissolve into the liquid and create a sauce with incredible depth.
- Customize the Spice and Acidity. This recipe is a fantastic template. If you love heat, add a few more red pepper flakes or even a finely minced chili. If you love a bright, tangy flavor, add a little extra lemon juice or even some lemon zest along with the juice.
- Make It a One-Pan Meal. You can easily add quick-cooking vegetables to this skillet. Toss in a large handful of fresh spinach during the last minute of cooking the sauce; it will wilt down perfectly. Halved cherry tomatoes or thinly sliced asparagus spears can also be added with the garlic to make it a more complete meal.
Frequently Asked Questions (FAQ)
Here are answers to some of the most common questions about making the perfect garlic butter shrimp.
1. Can I use frozen shrimp for this recipe?
Absolutely! Frozen shrimp is often more convenient and can be of very high quality. The key is to thaw it completely and pat it thoroughly dry before cooking. Thawing under cold running water is the fastest method. Do not attempt to cook the shrimp from frozen, as they will release too much water and steam instead of sear.
2. Is it okay to use pre-cooked shrimp?
It is highly recommended to use raw shrimp. Pre-cooked shrimp has already been cooked once, so cooking it again in the skillet will almost certainly make it overcooked, tough, and rubbery. The recipe is designed to cook raw shrimp to perfection.
3. What is the best type of pan to use for this recipe?
A large (12-inch) skillet is ideal to give the shrimp enough space to sear properly. A cast-iron skillet is an excellent choice as it retains heat exceptionally well, providing a great sear. A heavy-bottomed stainless steel skillet is also a fantastic option and makes it easy to see the fond developing. A non-stick skillet will work, but you may not achieve the same quality of sear.
4. How can I tell for sure when the shrimp is cooked?
There are two main indicators. First, look at the color: raw shrimp is translucent and grey, while cooked shrimp is opaque and pinkish-white. Second, look at the shape: as shrimp cook, they curl up. A perfectly cooked shrimp will form a loose “C” shape. If it curls into a tight “O” shape, it is overcooked.
5. How can I make this recipe dairy-free?
It’s very simple to make this recipe dairy-free. You can replace the unsalted butter with a high-quality dairy-free butter substitute or simply use extra olive oil. Using all olive oil will give the sauce a slightly different, more fruity flavor, but it will still be delicious.
6. How do I store and reheat leftovers?
Store any leftover shrimp in an airtight container in the refrigerator for up to 2 days. To reheat, it’s best to avoid the microwave, which can make the shrimp rubbery. Instead, gently reheat the shrimp and sauce in a skillet over low heat just until warmed through. This method preserves the texture of the shrimp much better.
7. Can I add vegetables to the skillet?
Yes, this dish is very adaptable! For best results, cook the vegetables separately or before the shrimp, then combine everything at the end. Quick-cooking vegetables like asparagus spears, bell pepper strips, or sliced mushrooms can be sautéed after you remove the shrimp. Leafy greens like spinach or kale can be wilted directly into the sauce just before you add the shrimp back in.
8. What can I substitute for chicken broth or white wine?
If you don’t have chicken broth or white wine, you have a few options. Vegetable broth is an excellent substitute. In a pinch, you can simply use water with an extra squeeze of lemon juice to provide the necessary liquid and acidity to create the sauce and deglaze the pan.
15-Minute Garlic Butter Shrimp Skillet
Ingredients
This recipe relies on a handful of simple yet powerful ingredients to create its signature flavor. Using fresh, high-quality components will make a significant difference in the final dish.
- 1 ½ pounds large shrimp: The star of the show. Use raw shrimp that has been peeled and deveined to save time. Tail-on or tail-off is a matter of personal preference; tail-on often presents more beautifully.
- 4 tablespoons unsalted butter: This creates the rich, decadent base of the sauce. Using unsalted allows you to control the overall sodium content of the dish.
- 2 tablespoons olive oil: Combined with the butter, olive oil helps prevent the butter from browning too quickly and adds its own subtle, fruity flavor.
- 6–8 cloves garlic, minced: Do not skimp on the garlic! Freshly minced garlic is essential for that potent, aromatic punch that defines this skillet. Avoid pre-minced jarred garlic if possible, as its flavor is less vibrant.
- ¼ cup chicken broth or dry white wine: This liquid is used to deglaze the pan, lifting all the flavorful browned bits from the bottom and forming the body of the sauce. White wine (like a Sauvignon Blanc or Pinot Grigio) adds a touch of acidity and complexity.
- Juice of 1 lemon: Freshly squeezed lemon juice, added at the end, cuts through the richness of the butter and brightens all the flavors, making the dish feel fresh and lively.
- ½ teaspoon red pepper flakes: This provides a gentle, warming heat in the background. Adjust the amount based on your personal preference for spice.
- Salt and freshly ground black pepper: To taste. Season the shrimp before cooking and adjust the sauce at the end.
- ¼ cup fresh parsley, chopped: Stirred in at the very end, fresh parsley adds a pop of color and a clean, herbaceous note that perfectly complements the garlic and lemon.
Instructions
The beauty of this 15-Minute Garlic Butter Shrimp Skillet lies in its simple and rapid cooking process. Follow these steps closely for perfectly cooked, succulent shrimp every time. The key is to have all your ingredients prepped and ready to go before you even turn on the stove—this is a technique chefs call mise en place.
- Prepare the Shrimp: If your shrimp is frozen, ensure it is fully thawed. To do this quickly, place the frozen shrimp in a colander and run cold water over them for 5-7 minutes. Once thawed, pat the shrimp completely dry with paper towels. This step is crucial! Removing excess moisture allows the shrimp to sear in the pan rather than steam, resulting in a much better texture and color. Season the dried shrimp generously with salt and black pepper on both sides.
- Heat the Skillet: Place a large skillet or frying pan (a 12-inch cast iron or stainless steel skillet works best) over medium-high heat. Add 1 tablespoon of the olive oil and 2 tablespoons of the butter. Allow the butter to melt and foam, swirling the pan to combine it with the oil. The pan is ready when a drop of water sizzles instantly upon contact.
- Sear the Shrimp: Carefully arrange the seasoned shrimp in the skillet in a single layer. Be careful not to overcrowd the pan, as this will lower the temperature and cause the shrimp to steam instead of sear. If necessary, work in two batches. Cook the shrimp for 1-2 minutes per side, until they turn pink and opaque and curl into a “C” shape. A perfectly cooked shrimp is tender; an overcooked shrimp, which curls into a tight “O” shape, will be tough and rubbery. Once cooked, immediately remove the shrimp from the skillet and set them aside on a plate.
- Create the Garlic Butter Sauce: Reduce the heat to medium-low. Add the remaining 1 tablespoon of olive oil and 2 tablespoons of butter to the same skillet. Once the butter is melted, add the minced garlic and red pepper flakes. Sauté for about 30-60 seconds, stirring constantly, until the garlic is fragrant. Be very careful not to let the garlic burn, as it will become bitter and ruin the sauce.
- Deglaze and Simmer: As soon as the garlic is fragrant, pour in the chicken broth or white wine. Use a wooden spoon or spatula to scrape up any browned bits (called fond) from the bottom of the pan. This is where a huge amount of flavor is concentrated. Bring the sauce to a simmer and let it cook for 2-3 minutes, allowing it to reduce slightly and the flavors to meld together.
- Combine and Finish: Turn off the heat. Return the cooked shrimp to the skillet. Add the freshly squeezed lemon juice and the chopped fresh parsley. Toss everything together gently to coat the shrimp completely in the glorious garlic butter sauce. The residual heat from the pan and sauce will rewarm the shrimp perfectly without overcooking them.
- Serve Immediately: Taste the sauce and add more salt and pepper if needed. Serve the garlic butter shrimp straight from the skillet for a rustic feel, or transfer it to a serving platter. Garnish with an extra sprinkle of fresh parsley and a few lemon wedges on the side for squeezing.
Nutrition
- Serving Size: one normal portion
- Calories: 380
- Protein: 35g