")


There’s a certain magic that fills the house when autumn arrives. The air gets a little crisper, the leaves begin to blush with color, and my kitchen instinctively craves the scent of warm spices. For my family, this season is synonymous with a few core memories, and surprisingly, these Apple Cinnamon Granola Bars are at the heart of them. The first time I perfected this recipe, the aroma of baking apples and cinnamon drifted through every room, pulling my kids away from their screens and into the kitchen with a single question: “What is that amazing smell?” When they finally got to taste the warm, chewy, oaty bars, their eyes lit up. It was an instant victory. These aren’t just snacks in our home; they are the fuel for a weekend hike, a welcome treat in a school lunchbox, and the perfect cozy bite with a cup of tea on a rainy afternoon. They manage to be both wholesome and indulgent, packed with nutty goodness and sweet bursts of apple, all held together in a perfectly chewy, satisfying square. This recipe has become our go-to, a delicious tradition that signals the start of the best time of year.
Ingredients
- 2 ½ cups Rolled Oats: Use old-fashioned rolled oats, not instant or steel-cut, as they provide the ideal chewy texture and structure for the bars.
- 1 cup Walnuts or Pecans: Roughly chopped, these nuts add a wonderful buttery crunch and healthy fats.
- ½ cup Dried Apples: Finely chopped. These provide concentrated sweet and tart apple flavor and a pleasant chewy texture.
- ⅓ cup Flaxseed Meal: This acts as a binder and adds a significant boost of fiber and omega-3s.
- 1 ½ tsp Ground Cinnamon: The star spice that provides that classic warm, comforting flavor.
- ½ tsp Ground Nutmeg: Adds a layer of warmth and complexity that pairs beautifully with apple and cinnamon.
- ¼ tsp Salt: Essential for balancing the sweetness and enhancing all the other flavors in the bars.
- ½ cup Almond Butter: A creamy, natural almond butter works best as the primary binder. Ensure it’s the runny kind, not the hard, dry type from the bottom of a jar.
- ½ cup Honey or Maple Syrup: This is both a binder and the main sweetener. Maple syrup will make the recipe vegan-friendly.
- ¼ cup Melted Coconut Oil: Provides moisture and helps the bars set firmly once cooled.
- 1 tsp Vanilla Extract: Rounds out the flavors and adds a touch of aromatic sweetness.
Instructions
- Preheat and Prepare: Begin by preheating your oven to 350°F (175°C). Line an 8×8 inch (20×20 cm) baking pan with parchment paper, leaving some overhang on the sides. This “sling” will make it much easier to lift the bars out of the pan later. Lightly grease the parchment paper and the pan.
- Combine Dry Ingredients: In a large mixing bowl, add the rolled oats, chopped nuts (walnuts or pecans), chopped dried apples, flaxseed meal, ground cinnamon, ground nutmeg, and salt. Use a whisk or a large spoon to stir everything together until the spices and smaller ingredients are evenly distributed throughout the oats. This step is crucial for ensuring every single bite is flavorful.
- Combine Wet Ingredients: In a separate, medium-sized microwave-safe bowl, combine the almond butter, honey (or maple syrup), and melted coconut oil. Microwave in 30-second increments, stirring in between, until the mixture is warm, smooth, and easily pourable. This usually takes about 60-90 seconds. Be careful not to make it scorching hot. Once smooth, stir in the vanilla extract.
- Mix Everything Together: Pour the warm wet mixture over the dry ingredients in the large bowl. Using a sturdy spatula, mix thoroughly until every oat and nut is completely coated. The mixture will be thick and sticky. Take your time to scrape the bottom and sides of the bowl to ensure there are no dry pockets left.
- Press into Pan: Transfer the sticky granola mixture into your prepared baking pan. This is the most important step for ensuring your bars hold together. Spread the mixture out evenly to the corners. Then, using your spatula, press down VERY firmly across the entire surface. For extra pressure, you can place a piece of parchment paper on top and use the bottom of a flat measuring cup or glass to compact the mixture as tightly as you can. The more compressed it is, the less likely your bars are to crumble.
- Bake the Bars: Place the pan in the preheated oven and bake for 20-25 minutes. You’ll know they are done when the edges are turning a lovely golden brown and your kitchen smells incredible. The center may still feel slightly soft to the touch, which is perfectly fine. Be careful not to overbake, as this will result in dry, hard bars instead of chewy ones.
- Cool Completely: Remove the pan from the oven and place it on a wire cooling rack. This is another critical step. You must allow the bars to cool in the pan COMPLETELY. Do not even think about cutting them while they are warm. This cooling process allows the sugars and binders to set and solidify, which is what holds the bars together. Let them cool at room temperature for at least 2 to 3 hours. For best results, you can even chill them in the refrigerator for 30 minutes before slicing.
- Slice and Serve: Once completely cooled, use the parchment paper overhangs to lift the entire block of granola out of the pan. Place it on a cutting board. Use a large, sharp knife to cut into 12 or 16 bars, depending on your desired size.
Nutrition Facts
(Estimated for a serving size of 1 bar, based on 16 bars per batch)
- Calories: Approximately 210 kcal per bar. This makes for a substantial and energy-providing snack that’s perfect for bridging the gap between meals.
- Fiber: 4g per bar. The combination of rolled oats, flaxseed meal, and apples provides a healthy dose of dietary fiber, which is crucial for digestive health and helping you feel full and satisfied.
- Protein: 5g per bar. Sourced from the nuts, oats, and almond butter, the protein content helps with satiety and muscle repair, making it a great post-workout option.
- Healthy Fats: 13g per bar. The majority of the fat comes from the walnuts/pecans, almond butter, and flaxseed, which are excellent sources of heart-healthy monounsaturated and polyunsaturated fats.
- Carbohydrates: 20g per bar. Primarily complex carbohydrates from the oats, providing a slow and steady release of energy, unlike the quick spike and crash from sugary, processed snacks.
Preparation Time
These delicious Apple Cinnamon Granola Bars are remarkably simple to prepare. You will need about 15 minutes of active preparation time for measuring, chopping, and mixing the ingredients. The baking time is 20-25 minutes, and the crucial cooling time is a minimum of 2 hours. While the cooling time is passive, it is non-negotiable for achieving perfectly formed, non-crumbly bars. In total, expect about 2 hours and 40 minutes from start to finish before you can slice and enjoy them.
How to Serve
These versatile bars can be enjoyed in many ways, fitting into any part of your day. Here are some of our favorite ways to serve them:
- The Grab-and-Go Breakfast:
- For those hectic mornings, simply grab a bar as you head out the door.
- Pair it with a piece of fruit like a banana or an apple for a more complete and balanced breakfast on the run.
- Enjoy it alongside a travel mug of coffee or tea for the perfect morning commute combo.
- The Perfect Lunchbox Addition:
- Tuck a bar into your child’s (or your own!) lunchbox for a healthy and satisfying treat that beats store-bought alternatives.
- It’s a wonderful way to provide a midday energy boost without a sugar crash.
- An Energizing Pre- or Post-Workout Snack:
- Eat a bar about 30-60 minutes before a workout for a source of sustained energy from complex carbs.
- Enjoy one after a workout to help replenish glycogen stores and provide protein for muscle recovery.
- A Cozy Afternoon or Evening Treat:
- Serve a bar with a dollop of Greek yogurt or vanilla skyr for a more decadent, dessert-like experience.
- Gently warm a bar in the microwave for 10 seconds and serve with a small scoop of vanilla ice cream.
- Crumble a bar over a bowl of yogurt and fresh fruit to create a delicious and textured yogurt parfait.
- Enjoy it whole with a warm mug of herbal tea, hot apple cider, or a milky latte for the ultimate cozy snack.
Additional Tips
- Press for Success: I cannot overstate this: the key to bars that don’t fall apart is pressing the mixture into the pan as firmly as possible. Use the back of a sturdy metal spatula. For even better results, place a piece of parchment on top of the mixture and use the flat bottom of a drinking glass or another, smaller pan to press down with your full body weight. Compress every square inch.
- Toast for Flavor: To elevate the flavor profile, spread your rolled oats and chopped nuts on a baking sheet and toast them in the 350°F (175°C) oven for 6-8 minutes, or until lightly fragrant and golden. Let them cool slightly before mixing with the other ingredients. This step adds a deep, nutty, roasted flavor that is absolutely incredible.
- The Cooling Rule is a Golden Rule: Be patient! Trying to slice the bars while they are still warm is a guaranteed recipe for a crumbly mess. The melted sugars and binders need time to cool and set, which is what glues everything together. If you’re in a hurry, you can pop the pan into the refrigerator for 30-45 minutes after it has cooled for about an hour at room temperature.
- Embrace Ingredient Swaps: This recipe is very forgiving. Feel free to customize it! You can swap the walnuts for pecans, almonds, or even pumpkin seeds for a nut-free version. The almond butter can be replaced with peanut butter, cashew butter, or sunflower seed butter. The dried apples can be substituted with dried cranberries, raisins, or chopped dates.
- Get Your Knife Right: For clean, sharp cuts, use a large, very sharp chef’s knife. Don’t use a serrated knife, as it can tear the bars. For extra-clean slices, you can run the knife under hot water and wipe it dry between cuts. This prevents the blade from sticking and dragging.
- Control the Stickiness: The granola mixture is inherently sticky. To make pressing it into the pan easier, you can lightly wet your fingertips with water or grease your spatula with a little coconut oil. This will prevent the mixture from sticking to your hands or tools, allowing you to press more effectively.
- Add a Finishing Drizzle: To make the bars look extra special, you can add a simple drizzle after they have been cooled and cut. Whisk together a bit of powdered sugar with a tiny splash of milk or lemon juice to create a simple glaze. Alternatively, you can melt some white chocolate or yogurt chips and drizzle that over the top for a more decadent finish.
- Don’t Overbake: It’s better to slightly underbake these bars than to overbake them. Overbaking will evaporate too much moisture, leaving you with dry, hard, and brittle bars. The bars should look set and golden at the edges, but the center might still look a little underdone when you pull them from the oven. They will continue to firm up significantly as they cool.
Frequently Asked Questions (FAQ)
1. Why did my granola bars fall apart and turn into a crumbly mess?
This is the most common issue with homemade granola bars and it usually comes down to three things: not enough binder, not enough pressure, or not enough cooling time. First, ensure your wet-to-dry ingredient ratio is correct. If your nut butter is particularly thick, the mixture might be too dry. Second, you must press the mixture into the pan extremely firmly, as detailed in the tips section. This compression is what physically holds them together. Finally, you absolutely must let the bars cool completely for at least two hours before cutting. This allows the sugars and oils to solidify and act as edible glue.
2. How should I store these Apple Cinnamon Granola Bars and how long do they last?
To maintain their chewy texture, store the bars in an airtight container at room temperature. They will stay fresh for up to one week. If you place a sheet of parchment paper between layers, it will prevent them from sticking together. While you can store them in the refrigerator, be aware that this will make them harder and less chewy.
3. Can I freeze these granola bars for later?
Yes, this recipe is perfect for freezing! To do so, wrap each bar individually and tightly in plastic wrap, and then place all the wrapped bars into a larger freezer-safe bag or container. They can be frozen for up to 3 months. To eat, simply pull one out and let it thaw at room temperature for about 30-60 minutes. This is a fantastic method for meal prep.
4. How can I make this recipe gluten-free?
Making this recipe gluten-free is very simple. Oats are naturally gluten-free, but they are often processed in facilities that also handle wheat, which can lead to cross-contamination. To ensure the recipe is completely gluten-free, just make sure you purchase oats that are specifically labeled and certified as “gluten-free.” All other ingredients in this recipe are naturally gluten-free.
5. Is it possible to make this granola bar recipe vegan?
Absolutely! The only non-vegan ingredient in the standard recipe is honey. To make it fully vegan, simply substitute the honey with an equal amount of pure maple syrup. Brown rice syrup or agave nectar would also work well as a substitute binder and sweetener.
6. Can I use fresh apples instead of dried apples?
While you can, it’s generally not recommended. Fresh apples contain a lot of water, which can make the bars soggy and prevent them from setting properly, significantly reducing their shelf life. If you are set on using fresh apples, you would need to finely dice one small apple and sauté it in a pan with a little coconut oil and cinnamon until it’s soft and the moisture has cooked off before adding it to the mixture. Dried apples provide a more concentrated flavor and better texture for bars.
7. What other fun mix-ins can I add to this recipe?
This is a great base recipe for creativity! You could add ¼ to ½ cup of other ingredients to the dry mixture. Some great ideas include:
- White chocolate chips or butterscotch chips
- Unsweetened shredded coconut
- Pumpkin seeds or sunflower seeds
- Other dried fruits like raisins, chopped apricots, or cherries
- A tablespoon of chia seeds for an extra nutritional punch.
8. Are these homemade granola bars actually healthy?
Compared to most store-bought granola bars, which are often high in refined sugars, preservatives, and unhealthy fats, these homemade bars are a much healthier choice. You have complete control over the ingredients, using whole foods like oats, nuts, and seeds. They are sweetened with natural sweeteners like honey or maple syrup and are packed with fiber, protein, and healthy fats. While they are calorie-dense and should be enjoyed in moderation, they are a genuinely wholesome and nourishing snack.
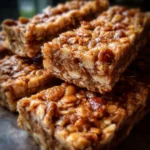
Apple Cinnamon Granola Bars
Ingredients
- 2 ½ cups Rolled Oats: Use old-fashioned rolled oats, not instant or steel-cut, as they provide the ideal chewy texture and structure for the bars.
- 1 cup Walnuts or Pecans: Roughly chopped, these nuts add a wonderful buttery crunch and healthy fats.
- ½ cup Dried Apples: Finely chopped. These provide concentrated sweet and tart apple flavor and a pleasant chewy texture.
- ⅓ cup Flaxseed Meal: This acts as a binder and adds a significant boost of fiber and omega-3s.
- 1 ½ tsp Ground Cinnamon: The star spice that provides that classic warm, comforting flavor.
- ½ tsp Ground Nutmeg: Adds a layer of warmth and complexity that pairs beautifully with apple and cinnamon.
- ¼ tsp Salt: Essential for balancing the sweetness and enhancing all the other flavors in the bars.
- ½ cup Almond Butter: A creamy, natural almond butter works best as the primary binder. Ensure it’s the runny kind, not the hard, dry type from the bottom of a jar.
- ½ cup Honey or Maple Syrup: This is both a binder and the main sweetener. Maple syrup will make the recipe vegan-friendly.
- ¼ cup Melted Coconut Oil: Provides moisture and helps the bars set firmly once cooled.
- 1 tsp Vanilla Extract: Rounds out the flavors and adds a touch of aromatic sweetness.
Instructions
- Preheat and Prepare: Begin by preheating your oven to 350°F (175°C). Line an 8×8 inch (20×20 cm) baking pan with parchment paper, leaving some overhang on the sides. This “sling” will make it much easier to lift the bars out of the pan later. Lightly grease the parchment paper and the pan.
- Combine Dry Ingredients: In a large mixing bowl, add the rolled oats, chopped nuts (walnuts or pecans), chopped dried apples, flaxseed meal, ground cinnamon, ground nutmeg, and salt. Use a whisk or a large spoon to stir everything together until the spices and smaller ingredients are evenly distributed throughout the oats. This step is crucial for ensuring every single bite is flavorful.
- Combine Wet Ingredients: In a separate, medium-sized microwave-safe bowl, combine the almond butter, honey (or maple syrup), and melted coconut oil. Microwave in 30-second increments, stirring in between, until the mixture is warm, smooth, and easily pourable. This usually takes about 60-90 seconds. Be careful not to make it scorching hot. Once smooth, stir in the vanilla extract.
- Mix Everything Together: Pour the warm wet mixture over the dry ingredients in the large bowl. Using a sturdy spatula, mix thoroughly until every oat and nut is completely coated. The mixture will be thick and sticky. Take your time to scrape the bottom and sides of the bowl to ensure there are no dry pockets left.
- Press into Pan: Transfer the sticky granola mixture into your prepared baking pan. This is the most important step for ensuring your bars hold together. Spread the mixture out evenly to the corners. Then, using your spatula, press down VERY firmly across the entire surface. For extra pressure, you can place a piece of parchment paper on top and use the bottom of a flat measuring cup or glass to compact the mixture as tightly as you can. The more compressed it is, the less likely your bars are to crumble.
- Bake the Bars: Place the pan in the preheated oven and bake for 20-25 minutes. You’ll know they are done when the edges are turning a lovely golden brown and your kitchen smells incredible. The center may still feel slightly soft to the touch, which is perfectly fine. Be careful not to overbake, as this will result in dry, hard bars instead of chewy ones.
- Cool Completely: Remove the pan from the oven and place it on a wire cooling rack. This is another critical step. You must allow the bars to cool in the pan COMPLETELY. Do not even think about cutting them while they are warm. This cooling process allows the sugars and binders to set and solidify, which is what holds the bars together. Let them cool at room temperature for at least 2 to 3 hours. For best results, you can even chill them in the refrigerator for 30 minutes before slicing.
- Slice and Serve: Once completely cooled, use the parchment paper overhangs to lift the entire block of granola out of the pan. Place it on a cutting board. Use a large, sharp knife to cut into 12 or 16 bars, depending on your desired size.
Nutrition
- Serving Size: one normal portion
- Calories: 210
- Fat: 13g
- Carbohydrates: 20g
- Fiber: 4g
- Protein: 5g