")

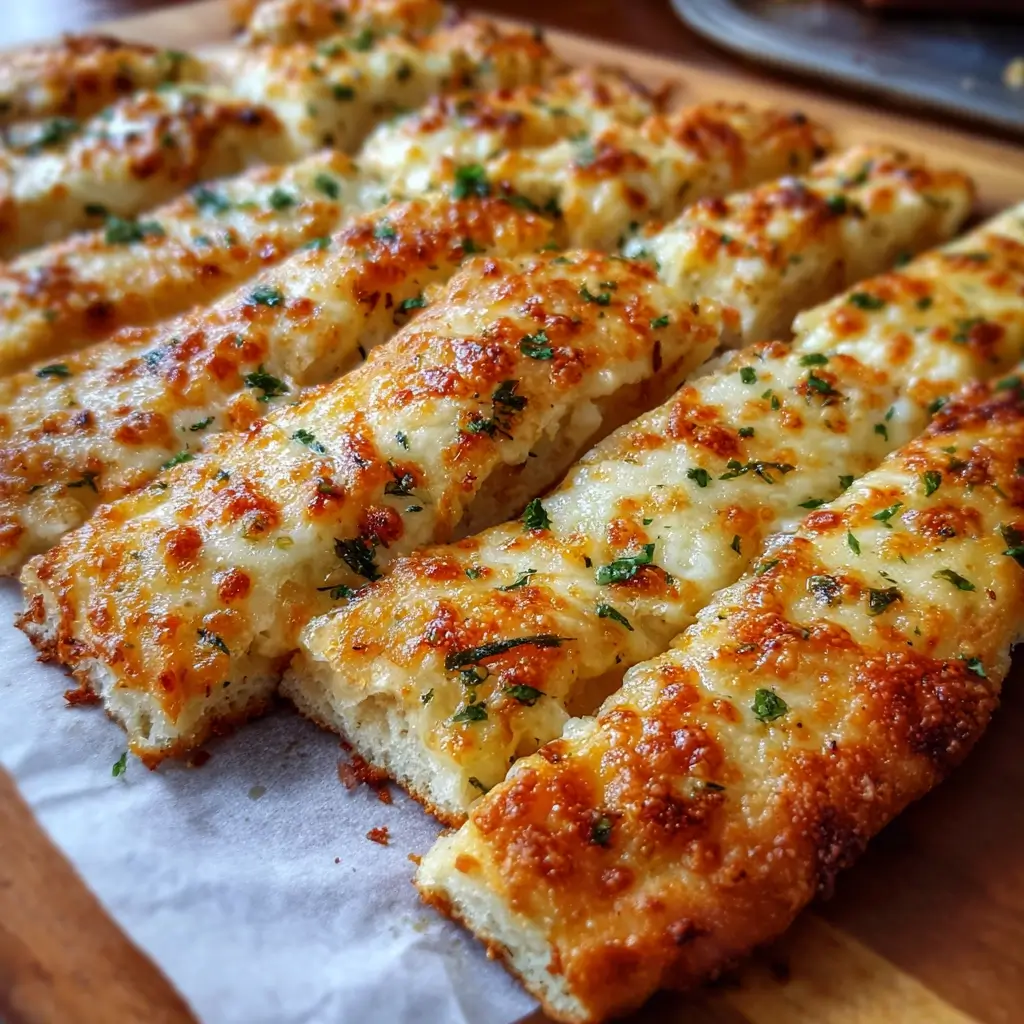

Of all the aromas that can fill a home, the scent of baking bread combined with melting cheese and warm garlic is, without a doubt, one of the most comforting and universally loved. I’ll never forget the first time I made these Baked Cheesy Garlic Breadsticks. It was a chilly, rainy Sunday, the kind of day that calls for something special. I was looking for the perfect side dish for our family pasta night, something more exciting than a simple loaf of garlic bread. When I pulled the golden, bubbly pan out of the oven, the kitchen was immediately filled with an irresistible fragrance that brought everyone running. My kids’ eyes went wide, and my husband, a man of few words, simply said, “Wow.” Watching them tear apart the soft, pillowy breadsticks, each pull revealing a glorious string of melted mozzarella, was pure joy. They were an instant hit, devoured in minutes with requests for a second batch already being made. This recipe has since become a legend in our household, a go-to for everything from game day snacks and party appetizers to the ultimate comfort food on a quiet night in. They are more than just a recipe; they are an experience, a surefire way to bring smiles and a little bit of delicious magic to your table.
Ingredients
Here is everything you will need to create these heavenly breadsticks from scratch. Each component plays a vital role in achieving the perfect balance of a soft, chewy interior with a crispy, cheesy, and garlic-infused crust.
For the Breadstick Dough:
- 1 ½ cups warm water (110-115°F / 43-46°C): This is the catalyst for our yeast. The temperature is crucial; too cold and the yeast won’t activate, too hot and it will be destroyed.
- 2 tablespoons granulated sugar: Provides food for the yeast to help it activate and adds a subtle sweetness to balance the savory flavors of the dough.
- 2 ¼ teaspoons active dry yeast (1 standard packet): The leavening agent that will make our breadsticks rise, creating a light, airy, and fluffy texture.
- 3 ½ cups all-purpose flour, plus more for dusting: The structural foundation of our breadsticks. All-purpose flour provides the ideal balance of protein for a soft yet chewy bite.
- 1 ½ teaspoons salt: Essential for flavor. Salt controls the yeast’s activity and strengthens the gluten structure, preventing the dough from being bland.
- ¼ cup olive oil: Adds richness, tenderness, and flavor to the dough, contributing to a wonderfully soft crumb.
For the Cheesy Garlic Topping:
- ½ cup unsalted butter, melted: This is the luxurious base for our topping, ensuring every inch of the breadsticks is coated in rich, buttery goodness.
- 4-5 cloves garlic, minced: The star of the show. Using fresh, minced garlic provides a potent, aromatic flavor that is far superior to garlic powder.
- 1 teaspoon dried Italian seasoning (or a mix of dried oregano and basil): These herbs add a classic, savory depth that perfectly complements the garlic and cheese.
- ½ teaspoon salt: Enhances all the flavors in the topping, making the garlic and cheese pop.
- ¼ teaspoon black pepper: Adds a subtle hint of warmth and spice.
- 2 cups shredded mozzarella cheese: The key to the irresistible cheese pull. Low-moisture, part-skim mozzarella melts beautifully, creating a gooey, stringy layer.
- ½ cup grated Parmesan cheese: Adds a sharp, nutty, and salty flavor that cuts through the richness of the mozzarella and butter.
- 2 tablespoons fresh parsley, chopped (optional, for garnish): Provides a final touch of fresh, vibrant color and a clean taste to contrast with the rich topping.
Instructions
Follow these detailed steps carefully to ensure your homemade breadsticks turn out perfectly fluffy, cheesy, and delicious every time. The process is broken down into dough preparation, rising, and baking.
Step 1: Activate the Yeast (Proofing)
In a large mixing bowl or the bowl of a stand mixer, combine the warm water and granulated sugar. Stir gently until the sugar is mostly dissolved. Sprinkle the active dry yeast over the surface of the water. Let it sit undisturbed for 5-10 minutes. You’ll know the yeast is active and ready when the mixture becomes foamy and bubbly on top. If it doesn’t foam, your yeast may be old or the water temperature was incorrect; you will need to start over.
Step 2: Form the Dough
Once the yeast is activated, add the olive oil, salt, and about 3 cups of the all-purpose flour to the bowl. If using a stand mixer, attach the dough hook and mix on low speed until a shaggy dough begins to form. If mixing by hand, use a wooden spoon to stir everything together.
Step 3: Knead the Dough
Continue to mix on low-medium speed, gradually adding the remaining ½ cup of flour until the dough pulls away from the sides of the bowl. The dough should be soft and slightly tacky, but not overly sticky. If it’s too sticky, add a tablespoon of flour at a time. Knead the dough for 6-8 minutes with the stand mixer, or transfer it to a lightly floured surface and knead by hand for 8-10 minutes. The goal is to develop the gluten, which will make the breadsticks chewy and structured. The finished dough should be smooth and elastic.
Step 4: First Rise
Lightly grease a large, clean bowl with a bit of olive oil. Form your kneaded dough into a smooth ball and place it in the bowl, turning it over once to coat the top with oil. This prevents a dry crust from forming. Cover the bowl with plastic wrap or a damp kitchen towel. Place it in a warm, draft-free spot to rise for 60-90 minutes, or until the dough has doubled in size.
Step 5: Shape the Breadsticks
Grease a 9×13-inch baking pan with butter or non-stick spray. Gently punch down the risen dough to release the air. Transfer the dough to the prepared baking pan. Using your fingertips, gently press and stretch the dough until it evenly covers the bottom of the pan. Don’t worry if it’s not perfect; it will even out as it rises again.
Step 6: Second Rise
Cover the pan with plastic wrap or a damp towel and let the dough rest for a second, shorter rise of about 20-30 minutes. While the dough is resting, preheat your oven to 400°F (200°C).
Step 7: Prepare the Topping
In a small bowl, combine the melted butter, minced garlic, Italian seasoning, ½ teaspoon of salt, and black pepper. Stir well to create your garlic butter mixture.
Step 8: Top the Dough
After the second rise, uncover the dough. Using your fingers or the handle of a wooden spoon, press dimples all over the surface of the dough. This creates little pockets to hold the delicious garlic butter. Brush the entire surface of the dough evenly with the garlic butter mixture, making sure to get it into all the dimples. Sprinkle the shredded mozzarella cheese evenly over the top, followed by the grated Parmesan cheese.
Step 9: Bake to Golden Perfection
Place the pan in the preheated oven and bake for 20-25 minutes. The breadsticks are done when the top is deeply golden brown, the cheese is completely melted and bubbly, and the edges are slightly crispy.
Step 10: Garnish and Serve
Remove the pan from the oven and let it cool for about 5 minutes. This allows the cheese to set slightly, making it easier to cut. Sprinkle the chopped fresh parsley over the top for a fresh finish. Use a pizza cutter or a sharp knife to slice the bread into 12-16 individual sticks. Serve immediately while warm and gooey.
Nutrition Facts
The following nutritional information is an estimate based on the recipe yielding 16 breadsticks. Actual values may vary depending on the specific ingredients used.
- Servings: 16 breadsticks
- Calories per serving: Approximately 210 kcal
- Carbohydrates: The primary source of energy in this recipe, coming from the flour in the dough, providing the fuel your body needs.
- Protein: A good source of protein from the cheese and flour, which helps in keeping you feeling full and satisfied.
- Fat: Primarily from the butter, olive oil, and cheese, this provides rich flavor and contributes to the tender texture of the bread.
- Sodium: Derived from the salt and cheese, it’s crucial for flavor enhancement but should be consumed in moderation.
- Calcium: A notable amount of calcium is present thanks to the generous layers of mozzarella and Parmesan cheese, supporting bone health.
Preparation Time
This recipe involves both active work and inactive waiting time for the dough to rise. Planning accordingly will ensure a smooth and enjoyable baking experience.
- Active Time (25 minutes): This includes the time you’ll spend actively mixing the ingredients, kneading the dough, and assembling the breadsticks with the topping.
- Inactive Time (80-120 minutes): This is the total rising time for the dough (60-90 minutes for the first rise and 20-30 minutes for the second). This is the perfect opportunity to prepare your main course, a dipping sauce, or simply relax while the yeast works its magic.
- Baking Time (20-25 minutes): The final step where the magic happens in the oven.
Total Time: Approximately 2 hours 30 minutes from start to finish.
How to Serve
These Baked Cheesy Garlic Breadsticks are incredibly versatile. They can be the star of the show or the perfect supporting actor for a larger meal. Here are some fantastic ways to serve them:
- With Dipping Sauces: Setting out a variety of dips turns these breadsticks into an interactive and fun appetizer.
- Classic Marinara Sauce: The timeless pairing. The acidity of the tomato sauce cuts through the richness of the cheese and garlic perfectly.
- Creamy Ranch Dressing: A cool, herby, and tangy option that is always a crowd-pleaser, especially with kids.
- Garlic Aioli: For the ultimate garlic lovers. A creamy, mayonnaise-based dip infused with even more garlic flavor.
- Warm Pizza Sauce: A slightly sweeter and more seasoned alternative to marinara.
- Alfredo Sauce: For an incredibly decadent and rich pairing, dip the cheesy bread into a warm, creamy Alfredo sauce.
- As a Side Dish: Their savory profile makes them the ideal accompaniment to a wide range of main courses.
- Pasta Dishes: Serve alongside spaghetti and meatballs, creamy chicken Alfredo, or a hearty baked lasagna to soak up any extra sauce.
- Soups and Stews: Perfect for dipping into a bowl of creamy tomato soup, a robust beef stew, or a hearty minestrone.
- Salads: Balance a fresh, crisp Caesar or garden salad with these warm, cheesy breadsticks for a satisfying lunch or light dinner.
- Grilled Meats: They are a fantastic alternative to dinner rolls when served with grilled chicken, steak, or roasted vegetables.
- As a Standalone Appetizer or Snack:
- Party Platter: Arrange the cut breadsticks on a large platter with a few dipping sauces in the center for a party appetizer that will disappear in minutes.
- Game Day Fuel: They are the ultimate snack for watching the big game, easy to eat with one hand and incredibly satisfying.
- After-School Snack: A warm, cheesy breadstick is a guaranteed way to make your kids’ day after a long day at school.
Additional Tips
Unlock the full potential of your breadsticks and customize them to your liking with these eight expert tips.
- Achieve the Perfect Dough Consistency: The feel of your dough is key. If it feels too wet and sticky after kneading, add flour one tablespoon at a time. Conversely, if it feels too dry and stiff, add warm water one teaspoon at a time. The final dough should be soft, pliable, and only slightly tacky to the touch.
- Experiment with Cheese Varieties: While mozzarella and Parmesan are a classic combination, don’t be afraid to mix things up. Try using a blend of Italian cheeses like provolone and asiago for a sharper flavor, or add some sharp cheddar for a different kind of cheesy tang.
- Infuse with More Herbs: Elevate the flavor by adding herbs directly into the dough or the butter topping. A teaspoon of dried rosemary or thyme added to the flour can give the bread a wonderful, rustic aroma. Or, mix fresh chopped chives into the garlic butter for a mild oniony note.
- Make-Ahead Magic: You can prepare the dough up to 24 hours in advance. After the first rise, punch it down, wrap it tightly in plastic wrap, and refrigerate it. When you’re ready to bake, let the dough sit at room temperature for about 30 minutes before pressing it into the pan and proceeding with the second rise and baking.
- For a Perfectly Golden, Crispy Top: If your breadsticks are baked through but you want a more golden, bubbly top, switch your oven to the broiler setting for the last 1-2 minutes of baking. Watch it very carefully, as the cheese can go from golden to burnt in a matter of seconds.
- Control the Garlic Intensity: The flavor of garlic changes based on how it’s prepared. For a sharp, potent garlic punch, use fresh, raw minced garlic as the recipe directs. For a sweeter, milder, and more mellow garlic flavor, roast a whole head of garlic first, then squeeze out the soft cloves and mash them into the melted butter.
- Give Your Dough a Rise Boost: Yeast loves warmth. If your kitchen is cold, you can create a proofing box to help your dough rise. Simply turn your oven on to its lowest temperature for a minute or two, then turn it OFF. Place the covered bowl of dough inside the slightly warm, turned-off oven. The gentle residual heat is the perfect environment for yeast to thrive.
- Freezing for a Future Craving: These breadsticks freeze wonderfully. You can freeze them baked or unbaked. To freeze baked, let them cool completely, slice, and store in a freezer-safe bag for up to 3 months. Reheat in a 350°F (175°C) oven until warm. To freeze unbaked, prepare them up to the point of adding the topping, then cover tightly and freeze. When ready to bake, let them thaw and rise at room temperature before adding the topping and baking as directed.
FAQ Section
Here are answers to some of the most common questions about making Baked Cheesy Garlic Breadsticks.
1. Can I use store-bought pizza dough instead of making it from scratch?
Absolutely! Using a 1-pound ball of store-bought pizza dough is a fantastic time-saving shortcut. Let the dough come to room temperature for about 20-30 minutes, then press it into your greased 9×13-inch pan. Skip the first rise and proceed directly to the second rise (letting it rest in the pan for 20 minutes) before topping and baking.
2. Why didn’t my dough rise?
The most common culprits are old yeast or incorrect water temperature. Always check the expiration date on your yeast packet. The water must be warm (110-115°F / 43-46°C) to activate the yeast. If it’s too hot, it will kill the yeast; too cold, and it won’t wake it up. Another reason could be that the rising environment was too cold or drafty.
3. Can I use garlic powder instead of fresh garlic?
You can, but the flavor will be different and less potent. Freshly minced garlic provides a much brighter and more authentic garlic flavor. If you must use powder, a good rule of thumb is to substitute 1 teaspoon of garlic powder for the 4-5 cloves of fresh garlic.
4. How do I store leftovers?
Store any leftover breadsticks in an airtight container or a resealable plastic bag at room temperature for up to 2 days. For longer storage, you can refrigerate them for up to 5 days.
5. What is the best way to reheat breadsticks?
For the best results, avoid the microwave, which can make them soggy. To restore their crispy top and soft interior, preheat your oven or toaster oven to 350°F (175°C). Place the breadsticks on a baking sheet and heat for 5-8 minutes, or until warmed through and the cheese is re-melted.
6. Can I make these breadsticks gluten-free?
Yes, you can adapt this recipe to be gluten-free. You would need to use a high-quality, all-purpose gluten-free flour blend that contains xanthan gum. Be aware that gluten-free dough has a different texture and may not rise as high as traditional dough. Follow the package instructions on your gluten-free flour for best results.
7. Can I add other toppings before baking?
Certainly! This recipe is a wonderful canvas for creativity. Consider adding toppings like sliced jalapeños for a spicy kick, finely diced red onions for a sweet bite, or a sprinkle of red pepper flakes with the cheese for some extra heat. Just be sure not to overload the top, as this can make the dough soggy.
8. What is the best pan to use for this recipe?
A standard 9×13-inch metal or glass baking pan is ideal. A metal pan will typically produce slightly crispier edges and bottom crust, while a glass pan cooks a bit more slowly and evenly. Both will yield delicious results. You could also use two 8×8-inch pans if that’s what you have on hand.

Baked Cheesy Garlic Breadsticks
Ingredients
Here is everything you will need to create these heavenly breadsticks from scratch. Each component plays a vital role in achieving the perfect balance of a soft, chewy interior with a crispy, cheesy, and garlic-infused crust.
For the Breadstick Dough:
- 1 ½ cups warm water (110-115°F / 43-46°C): This is the catalyst for our yeast. The temperature is crucial; too cold and the yeast won’t activate, too hot and it will be destroyed.
- 2 tablespoons granulated sugar: Provides food for the yeast to help it activate and adds a subtle sweetness to balance the savory flavors of the dough.
- 2 ¼ teaspoons active dry yeast (1 standard packet): The leavening agent that will make our breadsticks rise, creating a light, airy, and fluffy texture.
- 3 ½ cups all-purpose flour, plus more for dusting: The structural foundation of our breadsticks. All-purpose flour provides the ideal balance of protein for a soft yet chewy bite.
- 1 ½ teaspoons salt: Essential for flavor. Salt controls the yeast’s activity and strengthens the gluten structure, preventing the dough from being bland.
- ¼ cup olive oil: Adds richness, tenderness, and flavor to the dough, contributing to a wonderfully soft crumb.
For the Cheesy Garlic Topping:
- ½ cup unsalted butter, melted: This is the luxurious base for our topping, ensuring every inch of the breadsticks is coated in rich, buttery goodness.
- 4–5 cloves garlic, minced: The star of the show. Using fresh, minced garlic provides a potent, aromatic flavor that is far superior to garlic powder.
- 1 teaspoon dried Italian seasoning (or a mix of dried oregano and basil): These herbs add a classic, savory depth that perfectly complements the garlic and cheese.
- ½ teaspoon salt: Enhances all the flavors in the topping, making the garlic and cheese pop.
- ¼ teaspoon black pepper: Adds a subtle hint of warmth and spice.
- 2 cups shredded mozzarella cheese: The key to the irresistible cheese pull. Low-moisture, part-skim mozzarella melts beautifully, creating a gooey, stringy layer.
- ½ cup grated Parmesan cheese: Adds a sharp, nutty, and salty flavor that cuts through the richness of the mozzarella and butter.
- 2 tablespoons fresh parsley, chopped (optional, for garnish): Provides a final touch of fresh, vibrant color and a clean taste to contrast with the rich topping.
Instructions
Follow these detailed steps carefully to ensure your homemade breadsticks turn out perfectly fluffy, cheesy, and delicious every time. The process is broken down into dough preparation, rising, and baking.
Step 1: Activate the Yeast (Proofing)
In a large mixing bowl or the bowl of a stand mixer, combine the warm water and granulated sugar. Stir gently until the sugar is mostly dissolved. Sprinkle the active dry yeast over the surface of the water. Let it sit undisturbed for 5-10 minutes. You’ll know the yeast is active and ready when the mixture becomes foamy and bubbly on top. If it doesn’t foam, your yeast may be old or the water temperature was incorrect; you will need to start over.
Step 2: Form the Dough
Once the yeast is activated, add the olive oil, salt, and about 3 cups of the all-purpose flour to the bowl. If using a stand mixer, attach the dough hook and mix on low speed until a shaggy dough begins to form. If mixing by hand, use a wooden spoon to stir everything together.
Step 3: Knead the Dough
Continue to mix on low-medium speed, gradually adding the remaining ½ cup of flour until the dough pulls away from the sides of the bowl. The dough should be soft and slightly tacky, but not overly sticky. If it’s too sticky, add a tablespoon of flour at a time. Knead the dough for 6-8 minutes with the stand mixer, or transfer it to a lightly floured surface and knead by hand for 8-10 minutes. The goal is to develop the gluten, which will make the breadsticks chewy and structured. The finished dough should be smooth and elastic.
Step 4: First Rise
Lightly grease a large, clean bowl with a bit of olive oil. Form your kneaded dough into a smooth ball and place it in the bowl, turning it over once to coat the top with oil. This prevents a dry crust from forming. Cover the bowl with plastic wrap or a damp kitchen towel. Place it in a warm, draft-free spot to rise for 60-90 minutes, or until the dough has doubled in size.
Step 5: Shape the Breadsticks
Grease a 9×13-inch baking pan with butter or non-stick spray. Gently punch down the risen dough to release the air. Transfer the dough to the prepared baking pan. Using your fingertips, gently press and stretch the dough until it evenly covers the bottom of the pan. Don’t worry if it’s not perfect; it will even out as it rises again.
Step 6: Second Rise
Cover the pan with plastic wrap or a damp towel and let the dough rest for a second, shorter rise of about 20-30 minutes. While the dough is resting, preheat your oven to 400°F (200°C).
Step 7: Prepare the Topping
In a small bowl, combine the melted butter, minced garlic, Italian seasoning, ½ teaspoon of salt, and black pepper. Stir well to create your garlic butter mixture.
Step 8: Top the Dough
After the second rise, uncover the dough. Using your fingers or the handle of a wooden spoon, press dimples all over the surface of the dough. This creates little pockets to hold the delicious garlic butter. Brush the entire surface of the dough evenly with the garlic butter mixture, making sure to get it into all the dimples. Sprinkle the shredded mozzarella cheese evenly over the top, followed by the grated Parmesan cheese.
Step 9: Bake to Golden Perfection
Place the pan in the preheated oven and bake for 20-25 minutes. The breadsticks are done when the top is deeply golden brown, the cheese is completely melted and bubbly, and the edges are slightly crispy.
Step 10: Garnish and Serve
Remove the pan from the oven and let it cool for about 5 minutes. This allows the cheese to set slightly, making it easier to cut. Sprinkle the chopped fresh parsley over the top for a fresh finish. Use a pizza cutter or a sharp knife to slice the bread into 12-16 individual sticks. Serve immediately while warm and gooey.
Nutrition
- Serving Size: one normal portion
- Calories: 210