")

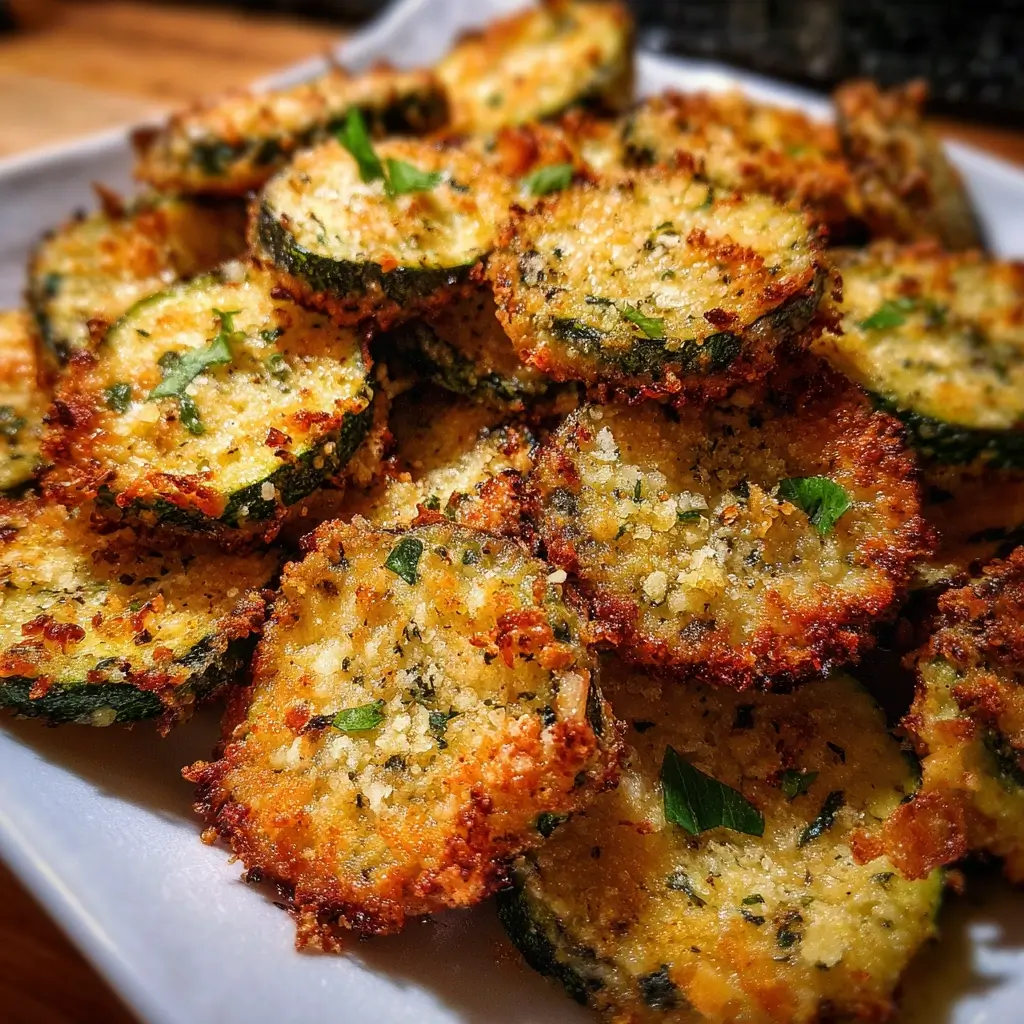

It started, as many of my kitchen adventures do, with a challenge. My youngest had declared a personal war on all things green, and zucchini was public enemy number one. I, on the other hand, had an abundance of it from the local farmer’s market, its glossy green skin practically begging to be turned into something delicious. The usual suspects—sautéed zucchini, zucchini noodles, zucchini bread—had all been met with a firm “no.” I needed a Trojan horse, a recipe so irresistibly crunchy and savory that the vegetable within would be a secondary thought. That’s when the idea for these Baked Zucchini and Parmesan Crisps was born. I remember the first time I made them; the house filled with the nutty aroma of toasting Parmesan and garlic. As I pulled the golden-brown discs from the oven, even my skeptical husband drifted into the kitchen, drawn by the scent. But the real test was the kids. I set a platter on the table with a side of marinara sauce and simply called it “crunchy cheese bites.” The first crisp was picked up hesitantly, inspected, then dipped and eaten. A moment of silence, a slow chew, and then a wide-eyed, “Whoa, can I have another one?” Victory. Since that day, these zucchini crisps have become a staple in our home. They are our go-to healthy snack, our favorite appetizer for guests, and the one side dish that is guaranteed to disappear completely. They are proof that with a little creativity and a lot of Parmesan cheese, you can turn even the most resisted vegetable into a family-wide sensation.
Ingredients
Here is the simple list of ingredients you’ll need to create these incredibly addictive and healthy crisps. The magic lies in the quality of these components, so choose the best you can for a truly superior result.
- 2 medium Zucchini (about 1.5 lbs total): Look for firm zucchini with smooth, vibrant green skin. This ensures they are fresh and will hold their shape well during baking.
- 1/2 cup All-Purpose Flour: This initial light coating helps the egg wash adhere properly, creating the foundation for our crispy crust.
- 2 large Eggs: Beaten well, the eggs act as the essential binder, making sure the delicious Parmesan and panko coating sticks to every slice of zucchini.
- 3/4 cup Panko Breadcrumbs: These Japanese-style breadcrumbs are lighter and flakier than traditional breadcrumbs, which is the secret to achieving an exceptionally airy and ultra-crispy texture.
- 3/4 cup Freshly Grated Parmesan Cheese: For the best flavor and melting quality, grate your own from a block. It’s worlds apart from the pre-shredded kind and delivers a rich, nutty, and salty bite.
- 1 tsp Garlic Powder: Provides a wonderful savory, aromatic flavor that permeates the coating without the risk of burning that fresh garlic would have.
- 1/2 tsp Dried Oregano or Italian Seasoning: This adds a lovely herbaceous, Mediterranean note that complements the zucchini and Parmesan perfectly.
- 1/2 tsp Paprika (optional): A pinch of sweet or smoked paprika adds a beautiful golden color and a subtle smoky depth to the flavor profile.
- Salt and Freshly Ground Black Pepper: To taste. These are essential for seasoning the zucchini itself and enhancing all the other flavors in the dish.
- Olive Oil Spray or Melted Butter: For greasing the baking sheet and lightly spritzing the tops of the crisps to help them achieve a perfect golden-brown finish.
Instructions
Follow these step-by-step instructions carefully to ensure your zucchini crisps are perfectly golden, irresistibly crunchy, and full of flavor every single time. The process is straightforward and relies on a classic three-step breading technique.
- Prepare the Oven and Baking Sheets: Begin by preheating your oven to 425°F (220°C). This high heat is crucial for quickly cooking the zucchini and crisping up the coating, preventing them from becoming soggy. Line two large baking sheets with parchment paper for easy cleanup and to prevent sticking. Lightly grease the parchment paper with olive oil spray or a thin layer of melted butter.
- Slice the Zucchini: Wash and dry your zucchini thoroughly. Trim off both ends. Using a sharp knife or a mandoline slicer, cut the zucchini into uniform 1/4-inch thick rounds. Uniformity is key here; if some slices are thicker than others, they will cook at different rates, leaving you with some burnt and some undercooked crisps.
- The Moisture Removal Step (Crucial for Crispiness): Place the zucchini slices in a single layer on a clean kitchen towel or a layer of paper towels. Sprinkle them lightly with salt. Let them sit for about 15-20 minutes. You will see beads of moisture forming on the surface. The salt draws out excess water from the zucchini, which is the number one enemy of crispiness. After 15-20 minutes, use another towel to gently pat each slice dry, removing both the moisture and the excess salt. Do not skip this step if you want truly crispy results!
- Set Up Your Breading Station: You will need three shallow dishes or bowls.
- Dish 1 (Flour): In the first dish, combine the all-purpose flour with a pinch of salt and black pepper.
- Dish 2 (Egg Wash): In the second dish, whisk the two large eggs until they are smooth and uniform.
- Dish 3 (Panko-Parmesan Coating): In the third dish, combine the Panko breadcrumbs, freshly grated Parmesan cheese, garlic powder, dried oregano (or Italian seasoning), and paprika (if using). Mix thoroughly with a fork until all the ingredients are evenly distributed.
- Dredge and Coat the Zucchini: Now, working with one zucchini slice at a time, follow this process:
- First, lightly dredge the dry zucchini slice in the flour mixture, shaking off any excess. It should just have a very thin, dusty coating.
- Next, dip the floured slice into the beaten egg, ensuring it’s fully coated on both sides. Allow any excess egg to drip off.
- Finally, press the egg-coated slice firmly into the Panko-Parmesan mixture. Pat the coating on to make sure it adheres well to all sides of the zucchini.
- Arrange on Baking Sheets: As you coat each slice, place it in a single layer on your prepared baking sheets. It’s very important not to overcrowd the pans. Leave a little space between each crisp. Overcrowding will cause the zucchini to steam instead of bake, resulting in a soft, soggy texture. Use two baking sheets if necessary to give them enough room.
- Bake to Golden Perfection: Lightly spritz the tops of the coated zucchini slices with olive oil spray. This helps them brown beautifully and become extra crispy. Place the baking sheets in the preheated oven. Bake for 15-20 minutes, flipping the crisps halfway through the cooking time. They are done when they are a deep golden brown, crispy to the touch, and the cheese is melted and fragrant.
- Cool and Serve: Remove the baking sheets from the oven. For maximum crispiness, let them cool for a minute or two on the baking sheet before transferring them to a wire rack. This allows air to circulate underneath, preventing them from steaming and becoming soft. Serve them warm with your favorite dipping sauce.
Nutrition Facts
This recipe provides a wonderfully light and satisfying snack. The nutritional values are estimates and can vary based on the exact size of your zucchini and specific ingredients used.
- Servings: This recipe makes approximately 4-6 servings.
- Calories per Serving: Approximately 180-220 kcal.
- Carbohydrates (approx. 18g): Primarily from the flour and panko breadcrumbs, these provide the energy and the classic “crisp” texture. This makes them a more mindful choice compared to deep-fried snacks.
- Protein (approx. 10g): A good portion of protein comes from the Parmesan cheese and eggs, helping to make this snack more filling and satisfying.
- Fiber (approx. 3g): Zucchini is a good source of dietary fiber, which is beneficial for digestive health and helps you feel full longer.
- Sodium (approx. 350mg): The saltiness comes mainly from the Parmesan cheese and any added salt. Be mindful of this if you are monitoring your sodium intake.
- Fat (approx. 9g): A moderate amount of fat, primarily from the cheese and olive oil, which adds flavor and contributes to the golden-brown crust.
Preparation Time
The entire process is relatively quick and simple, making it perfect for a weeknight side dish or a last-minute appetizer.
- Prep Time: 25 minutes (This includes the 15-minute salting time for the zucchini, during which you can set up your breading station).
- Cook Time: 15-20 minutes
- Total Time: Approximately 40-45 minutes from start to finish.
How to Serve
These versatile Baked Zucchini and Parmesan Crisps can be served in a multitude of ways. Their savory, cheesy crunch makes them a welcome addition to almost any meal. Here are some of our favorite ways to enjoy them:
- As a Standalone Appetizer:
- Arrange them on a large platter or wooden board.
- Serve with a variety of dipping sauces. This is the classic and most popular way to enjoy them. Excellent sauce pairings include:
- Classic Marinara Sauce: The bright, acidic tomato flavor cuts through the richness of the cheese perfectly.
- Creamy Garlic Aioli or Ranch Dip: A cool, creamy dip provides a wonderful contrast in temperature and texture.
- Spicy Sriracha Mayo: For those who like a little kick, a simple mix of mayonnaise and sriracha is a fantastic choice.
- Pesto Yogurt Dip: Mix plain Greek yogurt with a spoonful of basil pesto for a fresh and herby dip.
- As a Healthy Side Dish:
- These crisps are a fantastic, healthier alternative to French fries or potato chips.
- They pair wonderfully with grilled or roasted main courses. Serve them alongside:
- Grilled Chicken Breast
- Baked Salmon or Cod
- A juicy Steak or Lean Beef Burgers
- Pasta dishes, to add a crunchy element.
- As a Crunchy Salad Topper:
- Let the crisps cool completely, then break them into smaller, crouton-sized pieces.
- Toss them into a Caesar salad or a simple mixed greens salad in place of traditional croutons for an extra boost of flavor, texture, and vegetables.
- Inside a Sandwich or Wrap:
- Layer a few warm zucchini crisps into a vegetarian sandwich or wrap.
- They add a surprising and delightful crunch, along with cheesy, savory flavor. They work particularly well with fresh tomatoes, lettuce, and a creamy spread.
Additional Tips
To elevate your zucchini crisps from good to absolutely unforgettable, keep these pro tips in mind.
- Don’t Skip the Salting: This is the most important tip and bears repeating. Zucchini is over 90% water. Salting the slices and patting them dry is the non-negotiable secret to drawing out that moisture. If you skip this, no amount of baking time will save them from being soggy.
- Uniform Slices are Your Best Friend: Using a mandoline slicer is highly recommended for this recipe. It ensures every single slice is the exact same thickness (aim for 1/4 inch). This guarantees even cooking, so you don’t have a mix of burnt and undercooked crisps on the same tray.
- Give Them Space to Breathe: Do not overcrowd your baking sheets! When food is packed too tightly in the oven, it traps moisture and steams itself instead of roasting. This is the second biggest cause of sogginess. Use two or even three baking sheets if you have to, ensuring there’s space around each crisp for hot air to circulate.
- Freshly Grated Parmesan is a Game Changer: Bagged, pre-shredded Parmesan cheese often contains anti-caking agents like cellulose, which prevent it from melting smoothly and can give it a powdery texture. Grating your own from a wedge of Parmigiano-Reggiano will result in a much richer flavor and a better, more authentic cheesy crust.
- Panko for the Win: While you can use regular breadcrumbs in a pinch, Panko breadcrumbs are specifically designed for crispier coatings. They are larger and flakier, so they absorb less oil and create a lighter, crunchier texture that holds up better.
- Experiment with Seasonings: Don’t be afraid to customize the breading. Add 1/2 teaspoon of smoked paprika for a smoky flavor, a pinch of cayenne pepper for heat, or some onion powder for more savory depth. A lemon-pepper seasoning blend also works wonderfully.
- The Air Fryer Method: If you have an air fryer, these are fantastic! Preheat your air fryer to 400°F (200°C). Place the coated zucchini slices in a single layer in the basket (you’ll need to work in batches). Cook for 8-10 minutes, flipping halfway, until golden and crispy. They get exceptionally crunchy in the air fryer.
- Reheating for Leftovers: These crisps are undeniably best when fresh from the oven. However, if you have leftovers, you can revive some of their crunch. Do not use a microwave, as it will make them rubbery. Instead, place them in a single layer on a baking sheet and reheat in a 400°F (200°C) oven or in an air fryer for 3-5 minutes until warmed through and crispy again.
Frequently Asked Questions (FAQ)
Here are answers to some of the most common questions about making Baked Zucchini and Parmesan Crisps.
1. My zucchini crisps turned out soggy. What went wrong?
Sogginess is the most common issue and it’s almost always due to one of three things: excess moisture, overcrowding the pan, or an oven that wasn’t hot enough. First, ensure you completed the crucial step of salting and patting the zucchini slices dry. Second, make sure you left ample space between each crisp on the baking sheet to allow for proper air circulation. Third, always fully preheat your oven to the high temperature of 425°F (220°C); this high heat helps the exterior crisp up quickly before the inside has a chance to release too much steam.
2. Can I make these zucchini crisps keto-friendly or low-carb?
Yes, you absolutely can with a simple substitution. The main sources of carbs are the flour and Panko breadcrumbs. To make them keto-friendly, replace the all-purpose flour with a small amount of almond flour or coconut flour for dredging. For the coating, use a mixture of crushed pork rinds (a popular keto “breadcrumb”) and Parmesan cheese instead of the Panko. The result will be a delicious, ultra-low-carb, and very crispy alternative.
3. Can I make these ahead of time for a party?
While they are best served immediately, you can do some prep work ahead of time. You can slice the zucchini, salt and dry it, and prepare your breading mixture. Store the dry zucchini slices in an airtight container lined with paper towels in the fridge for up to a day, and keep the dry breading mix in a separate airtight container. However, for the best texture, you should bread and bake them just before serving. Baking them completely ahead of time will result in a loss of their signature crunch.
4. How do I store leftover zucchini crisps?
Store any leftovers in an airtight container in the refrigerator for up to 2-3 days. It’s helpful to place a paper towel in the container to absorb any condensation. Be aware that they will lose their crispness in the fridge. To revive them, follow the reheating instructions in the “Additional Tips” section above (using an oven or air fryer, not a microwave).
5. Can I use other vegetables with this recipe?
Definitely! This breading technique is very versatile. It works wonderfully with yellow summer squash, which is very similar to zucchini. You can also try it with thin slices of eggplant (you’ll need to salt eggplant for a longer period, about 30 minutes) or even with green tomato slices for a baked version of the Southern classic. Adjust baking time as needed based on the vegetable’s thickness and water content.
6. Is it possible to freeze Baked Zucchini and Parmesan Crisps?
It is generally not recommended to freeze these. Because of zucchini’s high water content, the texture will change significantly upon thawing. They will become very watery and mushy, and it will be nearly impossible to get them crispy again, even with reheating in the oven. This is one recipe that is truly best enjoyed fresh.
7. Why do I need to use an egg wash? What does it do?
The egg wash is a critical binding agent. The initial light coating of flour gives the egg something to cling to, and then the sticky egg wash acts like glue for the Panko-Parmesan coating. Without the egg, the delicious, crunchy coating would simply fall off the zucchini slices during baking.
8. Can I make this recipe gluten-free?
Yes, it’s very easy to adapt this recipe to be gluten-free. Simply substitute the all-purpose flour with a gluten-free all-purpose flour blend. For the breadcrumbs, use certified gluten-free Panko breadcrumbs, which are available in most major grocery stores, or crush up gluten-free crackers or cereals to use as a coating. The rest of the ingredients are naturally gluten-free.
Baked Zucchini and Parmesan Crisps
Ingredients
Here is the simple list of ingredients you’ll need to create these incredibly addictive and healthy crisps. The magic lies in the quality of these components, so choose the best you can for a truly superior result.
- 2 medium Zucchini (about 1.5 lbs total): Look for firm zucchini with smooth, vibrant green skin. This ensures they are fresh and will hold their shape well during baking.
- 1/2 cup All-Purpose Flour: This initial light coating helps the egg wash adhere properly, creating the foundation for our crispy crust.
- 2 large Eggs: Beaten well, the eggs act as the essential binder, making sure the delicious Parmesan and panko coating sticks to every slice of zucchini.
- 3/4 cup Panko Breadcrumbs: These Japanese-style breadcrumbs are lighter and flakier than traditional breadcrumbs, which is the secret to achieving an exceptionally airy and ultra-crispy texture.
- 3/4 cup Freshly Grated Parmesan Cheese: For the best flavor and melting quality, grate your own from a block. It’s worlds apart from the pre-shredded kind and delivers a rich, nutty, and salty bite.
- 1 tsp Garlic Powder: Provides a wonderful savory, aromatic flavor that permeates the coating without the risk of burning that fresh garlic would have.
- 1/2 tsp Dried Oregano or Italian Seasoning: This adds a lovely herbaceous, Mediterranean note that complements the zucchini and Parmesan perfectly.
- 1/2 tsp Paprika (optional): A pinch of sweet or smoked paprika adds a beautiful golden color and a subtle smoky depth to the flavor profile.
- Salt and Freshly Ground Black Pepper: To taste. These are essential for seasoning the zucchini itself and enhancing all the other flavors in the dish.
- Olive Oil Spray or Melted Butter: For greasing the baking sheet and lightly spritzing the tops of the crisps to help them achieve a perfect golden-brown finish.
Instructions
Follow these step-by-step instructions carefully to ensure your zucchini crisps are perfectly golden, irresistibly crunchy, and full of flavor every single time. The process is straightforward and relies on a classic three-step breading technique.
- Prepare the Oven and Baking Sheets: Begin by preheating your oven to 425°F (220°C). This high heat is crucial for quickly cooking the zucchini and crisping up the coating, preventing them from becoming soggy. Line two large baking sheets with parchment paper for easy cleanup and to prevent sticking. Lightly grease the parchment paper with olive oil spray or a thin layer of melted butter.
- Slice the Zucchini: Wash and dry your zucchini thoroughly. Trim off both ends. Using a sharp knife or a mandoline slicer, cut the zucchini into uniform 1/4-inch thick rounds. Uniformity is key here; if some slices are thicker than others, they will cook at different rates, leaving you with some burnt and some undercooked crisps.
- The Moisture Removal Step (Crucial for Crispiness): Place the zucchini slices in a single layer on a clean kitchen towel or a layer of paper towels. Sprinkle them lightly with salt. Let them sit for about 15-20 minutes. You will see beads of moisture forming on the surface. The salt draws out excess water from the zucchini, which is the number one enemy of crispiness. After 15-20 minutes, use another towel to gently pat each slice dry, removing both the moisture and the excess salt. Do not skip this step if you want truly crispy results!
- Set Up Your Breading Station: You will need three shallow dishes or bowls.
-
- Dish 1 (Flour): In the first dish, combine the all-purpose flour with a pinch of salt and black pepper.
- Dish 2 (Egg Wash): In the second dish, whisk the two large eggs until they are smooth and uniform.
- Dish 3 (Panko-Parmesan Coating): In the third dish, combine the Panko breadcrumbs, freshly grated Parmesan cheese, garlic powder, dried oregano (or Italian seasoning), and paprika (if using). Mix thoroughly with a fork until all the ingredients are evenly distributed.
Kitchen remodeling -
- Dredge and Coat the Zucchini: Now, working with one zucchini slice at a time, follow this process:
- First, lightly dredge the dry zucchini slice in the flour mixture, shaking off any excess. It should just have a very thin, dusty coating.
- Next, dip the floured slice into the beaten egg, ensuring it’s fully coated on both sides. Allow any excess egg to drip off.
- Finally, press the egg-coated slice firmly into the Panko-Parmesan mixture. Pat the coating on to make sure it adheres well to all sides of the zucchini.
- Arrange on Baking Sheets: As you coat each slice, place it in a single layer on your prepared baking sheets. It’s very important not to overcrowd the pans. Leave a little space between each crisp. Overcrowding will cause the zucchini to steam instead of bake, resulting in a soft, soggy texture. Use two baking sheets if necessary to give them enough room.
- Bake to Golden Perfection: Lightly spritz the tops of the coated zucchini slices with olive oil spray. This helps them brown beautifully and become extra crispy. Place the baking sheets in the preheated oven. Bake for 15-20 minutes, flipping the crisps halfway through the cooking time. They are done when they are a deep golden brown, crispy to the touch, and the cheese is melted and fragrant.
- Cool and Serve: Remove the baking sheets from the oven. For maximum crispiness, let them cool for a minute or two on the baking sheet before transferring them to a wire rack. This allows air to circulate underneath, preventing them from steaming and becoming soft. Serve them warm with your favorite dipping sauce.
Nutrition
- Serving Size: one normal portion
- Calories: 220
- Sodium: 350mg
- Fat: 9g
- Carbohydrates: 18g
- Fiber: 3g
- Protein: 10g