")


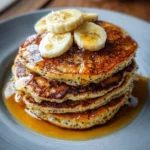
There’s a certain magic to a weekend morning, a quiet promise of a slower pace and simple joys. In our house, that joy often smells like pancakes. For years, I was on a quest for the perfect pancake—one that wasn’t just a vehicle for syrup but a delicious, satisfying meal in its own right. I wanted something my kids would devour without realizing it was packed with goodness, and something that would keep us all energized for a day of adventures rather than leading to a mid-morning sugar crash. That quest ended the day I perfected this Banana Chia Pancake recipe. The first time I served them, the kitchen was filled with the warm, comforting aroma of sweet banana and a hint of cinnamon. The pancakes puffed up beautifully on the griddle, turning a perfect golden-brown. My youngest, usually a skeptic of anything “healthy,” took one bite and his eyes widened. “Mom, these are the best ever!” he declared. That was it. This recipe became our gold standard, our go-to for lazy Saturdays, special birthday breakfasts, and even the occasional “breakfast-for-dinner” night. They are unbelievably fluffy, naturally sweet from the ripe bananas, and have a wonderfully subtle texture from the chia seeds that adds substance and a powerhouse of nutrition. They are, quite simply, pancake perfection.
Ingredients
Here is everything you’ll need to create a stack of these wholesome and delicious pancakes. Each ingredient plays a crucial role in achieving the perfect balance of flavor, texture, and nutrition.
- 1 ½ cups All-Purpose Flour or Whole Wheat Flour: All-purpose flour yields a lighter, fluffier pancake, while whole wheat flour adds a heartier, nuttier flavor and extra fiber. You can also use a 50/50 blend for the best of both worlds.
- 2 tablespoons Chia Seeds: These tiny seeds are a nutritional powerhouse. When mixed with liquid, they form a gel that helps bind the pancakes together while adding a significant boost of fiber, protein, and healthy omega-3 fatty acids.
- 2 tablespoons Granulated Sugar or Coconut Sugar: This adds just a touch of sweetness to complement the banana. Coconut sugar can be used as a less-refined alternative. You can reduce or omit this if your bananas are very ripe and sweet.
- 2 teaspoons Baking Powder: This is our primary leavening agent, essential for creating the chemical reaction that produces carbon dioxide bubbles and makes the pancakes light and airy.
- ½ teaspoon Baking Soda: Working in tandem with the acidity from the milk or yogurt, baking soda gives the pancakes an extra lift.
- ½ teaspoon Ground Cinnamon: This warm spice is the perfect companion to banana, adding depth and a comforting aroma to the pancakes.
- ¼ teaspoon Salt: A small amount of salt is crucial in any sweet recipe; it doesn’t make the pancakes salty but rather enhances all the other flavors.
- 2 large, Very Ripe Bananas: The star of the show! Use bananas with plenty of brown spots. They are sweeter, more flavorful, and much easier to mash into a smooth consistency, providing natural sweetness and moisture.
- 1 ¼ cups Milk: You can use any milk you prefer. Whole milk or buttermilk will result in a richer pancake, while plant-based options like almond, soy, or oat milk work perfectly for a dairy-free version.
- 1 large Egg: The egg acts as a key binder, holding the ingredients together, and contributes to the richness and structure of the pancakes.
- 2 tablespoons Melted Unsalted Butter or Coconut Oil: This adds fat, which is essential for a tender, moist crumb and a rich flavor. Allow it to cool slightly before adding to the batter.
- 1 teaspoon Vanilla Extract: A splash of pure vanilla extract enhances the sweetness and adds a beautiful, aromatic background note.
Instructions
Follow these step-by-step instructions carefully to achieve perfectly fluffy, golden, and flavorful banana chia pancakes every time. The key is in the technique, from mixing the batter to heating the griddle.
Step 1: Prepare the Chia Gel
In a small bowl, combine the 2 tablespoons of chia seeds with 4 tablespoons of water. Stir well and set it aside for at least 5-10 minutes. The chia seeds will absorb the water and form a thick, gel-like consistency, similar to an egg. This “chia gel” adds incredible moisture and acts as a secondary binder.
Step 2: Combine the Dry Ingredients
In a large mixing bowl, add the flour, sugar, baking powder, baking soda, ground cinnamon, and salt. Use a whisk to thoroughly combine everything. Whisking is important as it evenly distributes the leavening agents (baking powder and soda), ensuring that every pancake puffs up evenly.
Step 3: Prepare the Wet Ingredients
In a separate medium-sized bowl, peel the very ripe bananas and mash them thoroughly with a fork until they are mostly smooth with only a few small lumps remaining. To the mashed bananas, add the milk, the large egg, the cooled melted butter (or coconut oil), and the vanilla extract. Finally, add the prepared chia gel from Step 1. Whisk all the wet ingredients together until they are well combined and uniform.
Step 4: Combine Wet and Dry Mixtures
Pour the wet ingredient mixture into the large bowl containing the dry ingredients. Using a spatula or a wooden spoon, gently fold the ingredients together until they are just combined. It is crucial not to overmix the batter. A few lumps are perfectly fine and are the secret to tender, fluffy pancakes. Overmixing develops the gluten in the flour, which will result in tough, rubbery pancakes.
Step 5: Let the Batter Rest
Once the batter is mixed, let it sit on the counter for 5 to 10 minutes. This resting period is a critical step. It allows the gluten to relax after mixing, and it gives the baking powder time to activate and the chia seeds and flour time to fully hydrate. This simple pause will reward you with a thicker batter and significantly fluffier pancakes.
Step 6: Heat and Grease the Pan
Place a large non-stick skillet or a griddle over medium heat. To test if it’s ready, you can sprinkle a few drops of water on the surface; they should sizzle and evaporate quickly. Once hot, lightly grease the pan with a small amount of butter, coconut oil, or cooking spray. Use a paper towel to wipe out any excess oil to ensure an even, golden-brown color on your pancakes.
Step 7: Cook the Pancakes
Using a ¼-cup measuring cup or a small ladle, pour the batter onto the hot griddle to form pancakes of your desired size, leaving some space between them. Cook for about 2-3 minutes on the first side. You’ll know it’s time to flip when the edges look set and bubbles start to appear on the surface and pop.
Step 8: Flip and Finish Cooking
Carefully slide a thin spatula under the pancake and confidently flip it over. Cook on the second side for another 1-2 minutes, or until it is golden brown and cooked through. Transfer the cooked pancake to a plate and cover it to keep warm while you cook the remaining batter. Repeat the process, adding a little more butter or oil to the pan as needed between batches.
Nutrition Facts
This recipe is designed to be as nourishing as it is delicious. The nutritional information is an estimate and can vary based on the specific ingredients used.
- Servings: This recipe makes approximately 10-12 medium-sized pancakes, serving 4-5 people.
- Calories per Serving (2-3 pancakes): Approximately 350-400 kcal.
- Fiber: High in dietary fiber, thanks to the whole wheat flour option and the chia seeds. Fiber is essential for digestive health and helps you feel full and satisfied for longer.
- Potassium: Bananas are a fantastic source of potassium, an important mineral and electrolyte that helps regulate blood pressure and muscle function.
- Omega-3 Fatty Acids: Chia seeds are one of the best plant-based sources of ALA (alpha-linolenic acid), a type of omega-3 fatty acid that is crucial for brain health and reducing inflammation.
- Protein: With contributions from the egg, milk, and chia seeds, these pancakes provide a good amount of protein to help build and repair tissues and keep you energized throughout the morning.
- Naturally Sweetened: The majority of the sweetness comes from the ripe bananas, allowing for a lower amount of added sugar compared to traditional pancake recipes.
Preparation Time
This is a quick and easy recipe, perfect for a weekday treat or a relaxed weekend brunch.
- Prep Time: 15 minutes. This includes gathering your ingredients, preparing the chia gel, and mixing the batter.
- Rest Time: 5-10 minutes. This is the crucial time when the batter rests to ensure maximum fluffiness.
- Cook Time: 15-20 minutes. This will depend on the size of your skillet or griddle and how many pancakes you can cook at once.
- Total Time: Approximately 35-45 minutes from start to finish.
How to Serve
These Banana Chia Pancakes are a wonderful canvas for a wide variety of toppings. Here are some delicious ways to serve them, catering to every taste:
- The Classic Stack:
- A small pat of high-quality unsalted butter melting over the warm stack.
- A generous drizzle of pure maple syrup.
- The Fresh and Fruity:
- A handful of fresh berries like blueberries, raspberries, or sliced strawberries.
- Extra slices of fresh banana.
- A spoonful of fruit compote or jam.
- The Creamy and Indulgent:
- A large dollop of plain Greek yogurt or coconut yogurt for a tangy contrast.
- A schmear of your favorite nut butter, such as almond, peanut, or cashew butter.
- A spoonful of freshly whipped cream for a special occasion.
- The Crunchy Topper:
- A sprinkle of toasted pecans, walnuts, or sliced almonds.
- A scattering of pumpkin seeds, sunflower seeds, or hemp hearts.
- A spoonful of your favorite granola for extra crunch and fiber.
- A Drizzle of Something Special:
- A drizzle of local honey or agave nectar.
- Melted dark chocolate or a quality chocolate-hazelnut spread.
- A spoonful of date syrup for a unique, caramel-like sweetness.
Additional Tips
Master this recipe with these eight expert tips that will help you troubleshoot common issues and elevate your pancake game.
- Embrace the Brown Spots: The single most important tip for flavor is to use very ripe bananas. The more brown spots, the better! Ripe bananas are not only significantly sweeter, reducing the need for added sugar, but their starches have broken down, making them softer and easier to mash into a smooth, lump-free puree that incorporates seamlessly into the batter.
- The “Do Not Overmix” Golden Rule: This cannot be stressed enough. When you mix flour with liquid, you begin to develop gluten. A little gluten gives the pancakes structure, but too much makes them tough and chewy instead of light and fluffy. Mix only until the wet and dry ingredients are combined. A lumpy batter is a good batter!
- Don’t Skip the Resting Period: That 5-10 minute rest for the batter is not an optional step. It allows the flour to fully absorb the liquid, which thickens the batter and makes for a more tender pancake. It also gives the baking powder a head start, creating more air bubbles and resulting in a higher, fluffier rise on the griddle.
- Master Your Pan’s Temperature: An inconsistent pan temperature is the enemy of perfect pancakes. If the pan is too hot, the outside will burn before the inside is cooked. If it’s not hot enough, the pancakes will absorb too much oil and won’t get that beautiful golden crust. Medium heat is your friend. The water drop test (sprinkling a little water to see if it sizzles) is the best way to know when your pan is ready.
- Uniformity is Key: For pancakes that are all the same size and cook evenly, use a tool for portioning your batter. A ¼-cup dry measuring cup, an ice cream scoop with a trigger release, or a small ladle are all excellent choices. This ensures each pancake cooks in the same amount of time.
- Keeping Batches Warm: If you’re cooking for a crowd, you’ll likely need to make pancakes in several batches. To ensure everyone eats warm pancakes together, preheat your oven to its lowest setting (around 200°F or 90°C). Place a wire cooling rack on a baking sheet and transfer cooked pancakes to the rack in a single layer. This will keep them warm without making them soggy.
- Freeze for Future Breakfasts: These pancakes freeze beautifully! Cook the entire batch and let them cool completely to room temperature. Stack them with small squares of parchment or wax paper between each pancake to prevent them from sticking together. Place the stack in a freezer-safe zip-top bag or container. They can be reheated directly from frozen in a toaster, microwave, or on a baking sheet in the oven.
- Customize Your Flavors: Think of this recipe as a base. Feel free to add other ingredients to the batter for a new experience every time. A handful of mini chocolate chips, fresh or frozen blueberries, finely chopped nuts, or a pinch of nutmeg or cardamom are all fantastic additions. Stir them in gently at the very end of mixing.
FAQ Section
Here are answers to some of the most frequently asked questions about making Banana Chia Pancakes.
1. Can I make this recipe gluten-free?
Absolutely! To make these pancakes gluten-free, simply substitute the all-purpose or whole wheat flour with a high-quality, one-to-one gluten-free baking flour blend. These blends typically contain xanthan gum, which will help with the structure. Oat flour (made by simply blending rolled oats until fine) is also a fantastic and nutritious option, though it may result in a slightly denser pancake.
2. How can I make these pancakes vegan?
This recipe is very easy to adapt for a vegan diet. The chia seeds are already doing the work of an egg. Simply make these two substitutions: use a plant-based milk (almond, soy, oat, or cashew milk all work well) and replace the melted butter with melted coconut oil or another neutral-flavored vegetable oil. Ensure your sugar is certified vegan if that is a concern.
3. My pancakes turned out dense and flat. What went wrong?
There are two likely culprits for dense pancakes. The first and most common is overmixing the batter, which develops too much gluten. Remember to mix only until the flour streaks disappear. The second possibility is that your leavening agents (baking powder and baking soda) are old and no longer active. To test your baking powder, stir a small spoonful into a cup of hot water; it should bubble vigorously.
4. Can I use frozen bananas for this recipe?
Yes, frozen bananas work wonderfully. In fact, freezing very ripe bananas is a great way to save them for future baking. To use them, let the bananas thaw completely at room temperature or in the microwave. They will release a lot of liquid as they thaw; be sure to include this liquid along with the mashed banana in your wet ingredients, as it’s full of banana flavor.
5. How do I store and reheat leftover pancakes?
Leftover pancakes can be stored in an airtight container in the refrigerator for up to 3-4 days. For longer storage, freeze them as described in the tips section. The best way to reheat them is in a toaster or a toaster oven, which will make them warm and slightly crispy on the outside. You can also reheat them for 30-60 seconds in the microwave or in a single layer on a baking sheet in a 350°F (175°C) oven for about 5 minutes.
6. Can I make the pancake batter ahead of time?
It’s best to cook the batter shortly after it has rested. If you let it sit for too long (e.g., overnight), the baking powder and baking soda will lose their leavening power, and your pancakes will not be as fluffy. If you want to prep ahead, you can mix all the dry ingredients in one bowl and all the wet ingredients (except the melted butter/oil) in another. Store them separately in the fridge, and then combine them with the melted butter/oil just before you’re ready to cook.
7. What is the best type of flour to use for this recipe?
The “best” flour depends on your preference. For the lightest, fluffiest, most classic pancake texture, use all-purpose flour. For a heartier, denser pancake with more fiber and a slightly nutty flavor, use 100% whole wheat flour. For a happy medium, try using a half-and-half mixture of both all-purpose and whole wheat flour.
8. Are these Banana Chia Pancakes healthy for kids?
Yes, these pancakes are an excellent and kid-friendly healthy breakfast option. They are made with whole food ingredients like bananas and chia seeds, are naturally sweetened, and provide a good balance of carbohydrates for energy, protein for growth, and fiber for a healthy gut. You can also boost the nutrition by using whole wheat flour and serving them with healthy toppings like fruit and yogurt instead of just syrup.
Banana Chia Pancakes Recipe
Ingredients
Here is everything you’ll need to create a stack of these wholesome and delicious pancakes. Each ingredient plays a crucial role in achieving the perfect balance of flavor, texture, and nutrition.
- 1 ½ cups All-Purpose Flour or Whole Wheat Flour: All-purpose flour yields a lighter, fluffier pancake, while whole wheat flour adds a heartier, nuttier flavor and extra fiber. You can also use a 50/50 blend for the best of both worlds.
- 2 tablespoons Chia Seeds: These tiny seeds are a nutritional powerhouse. When mixed with liquid, they form a gel that helps bind the pancakes together while adding a significant boost of fiber, protein, and healthy omega-3 fatty acids.
- 2 tablespoons Granulated Sugar or Coconut Sugar: This adds just a touch of sweetness to complement the banana. Coconut sugar can be used as a less-refined alternative. You can reduce or omit this if your bananas are very ripe and sweet.
- 2 teaspoons Baking Powder: This is our primary leavening agent, essential for creating the chemical reaction that produces carbon dioxide bubbles and makes the pancakes light and airy.
- ½ teaspoon Baking Soda: Working in tandem with the acidity from the milk or yogurt, baking soda gives the pancakes an extra lift.
- ½ teaspoon Ground Cinnamon: This warm spice is the perfect companion to banana, adding depth and a comforting aroma to the pancakes.
- ¼ teaspoon Salt: A small amount of salt is crucial in any sweet recipe; it doesn’t make the pancakes salty but rather enhances all the other flavors.
- 2 large, Very Ripe Bananas: The star of the show! Use bananas with plenty of brown spots. They are sweeter, more flavorful, and much easier to mash into a smooth consistency, providing natural sweetness and moisture.
- 1 ¼ cups Milk: You can use any milk you prefer. Whole milk or buttermilk will result in a richer pancake, while plant-based options like almond, soy, or oat milk work perfectly for a dairy-free version.
- 1 large Egg: The egg acts as a key binder, holding the ingredients together, and contributes to the richness and structure of the pancakes.
- 2 tablespoons Melted Unsalted Butter or Coconut Oil: This adds fat, which is essential for a tender, moist crumb and a rich flavor. Allow it to cool slightly before adding to the batter.
- 1 teaspoon Vanilla Extract: A splash of pure vanilla extract enhances the sweetness and adds a beautiful, aromatic background note.
Instructions
Follow these step-by-step instructions carefully to achieve perfectly fluffy, golden, and flavorful banana chia pancakes every time. The key is in the technique, from mixing the batter to heating the griddle.
Step 1: Prepare the Chia Gel
In a small bowl, combine the 2 tablespoons of chia seeds with 4 tablespoons of water. Stir well and set it aside for at least 5-10 minutes. The chia seeds will absorb the water and form a thick, gel-like consistency, similar to an egg. This “chia gel” adds incredible moisture and acts as a secondary binder.
Step 2: Combine the Dry Ingredients
In a large mixing bowl, add the flour, sugar, baking powder, baking soda, ground cinnamon, and salt. Use a whisk to thoroughly combine everything. Whisking is important as it evenly distributes the leavening agents (baking powder and soda), ensuring that every pancake puffs up evenly.
Step 3: Prepare the Wet Ingredients
In a separate medium-sized bowl, peel the very ripe bananas and mash them thoroughly with a fork until they are mostly smooth with only a few small lumps remaining. To the mashed bananas, add the milk, the large egg, the cooled melted butter (or coconut oil), and the vanilla extract. Finally, add the prepared chia gel from Step 1. Whisk all the wet ingredients together until they are well combined and uniform.
Step 4: Combine Wet and Dry Mixtures
Pour the wet ingredient mixture into the large bowl containing the dry ingredients. Using a spatula or a wooden spoon, gently fold the ingredients together until they are just combined. It is crucial not to overmix the batter. A few lumps are perfectly fine and are the secret to tender, fluffy pancakes. Overmixing develops the gluten in the flour, which will result in tough, rubbery pancakes.
Step 5: Let the Batter Rest
Once the batter is mixed, let it sit on the counter for 5 to 10 minutes. This resting period is a critical step. It allows the gluten to relax after mixing, and it gives the baking powder time to activate and the chia seeds and flour time to fully hydrate. This simple pause will reward you with a thicker batter and significantly fluffier pancakes.
Step 6: Heat and Grease the Pan
Place a large non-stick skillet or a griddle over medium heat. To test if it’s ready, you can sprinkle a few drops of water on the surface; they should sizzle and evaporate quickly. Once hot, lightly grease the pan with a small amount of butter, coconut oil, or cooking spray. Use a paper towel to wipe out any excess oil to ensure an even, golden-brown color on your pancakes.
Step 7: Cook the Pancakes
Using a ¼-cup measuring cup or a small ladle, pour the batter onto the hot griddle to form pancakes of your desired size, leaving some space between them. Cook for about 2-3 minutes on the first side. You’ll know it’s time to flip when the edges look set and bubbles start to appear on the surface and pop.
Step 8: Flip and Finish Cooking
Carefully slide a thin spatula under the pancake and confidently flip it over. Cook on the second side for another 1-2 minutes, or until it is golden brown and cooked through. Transfer the cooked pancake to a plate and cover it to keep warm while you cook the remaining batter. Repeat the process, adding a little more butter or oil to the pan as needed between batches.
Nutrition
- Serving Size: one normal portion
- Calories: 400