")


There’s something incredibly comforting about a smooth, creamy custard, especially when it’s infused with the gentle warmth of classic vanilla. These Classic Vanilla Custard Cups bring back memories of cozy afternoons and simple pleasures—a homemade treat that feels elegant yet is surprisingly easy to make. Whether you’re a culinary enthusiast craving that perfect, silky texture or someone tired of the same old desserts, this recipe offers a delightful escape. The subtle sweetness and rich aroma make it a versatile dessert that can be enjoyed as is or dressed up with fresh berries or a drizzle of caramel. Let me take you through a method that transforms just a handful of ingredients into a timeless delight everyone will love.
Why choose Classic Vanilla Custard Cups?
Simplicity shines in this recipe with minimal ingredients and easy steps that anyone can master. Creamy, dreamy texture offers a silky smooth bite that melts in your mouth. Versatile dessert: enjoy it plain or elevate with fresh fruits and sauces. Comfort food at its best, evoking nostalgic feelings of homemade goodness. Quick to make, perfect for last-minute treats or elegant dinner parties.
Classic Vanilla Custard Cups Ingredients
For the Custard Base
- Whole Milk – use full-fat milk for the creamiest texture.
- Heavy Cream – adds richness and a silky finish to your custard.
- Granulated Sugar – balances the creaminess with just the right sweetness.
- Egg Yolks – the key to that smooth, custard consistency everyone loves.
- Vanilla Bean or Pure Vanilla Extract – infusion of classic vanilla flavor makes these custard cups unforgettable.
Optional Garnishes
- Fresh Berries – add a fresh burst of color and natural sweetness.
- Caramel Sauce – drizzle for an elegant, indulgent touch.
This blend of ingredients forms the heart of your Classic Vanilla Custard Cups, bringing homemade bliss to every spoonful.
How to Make Classic Vanilla Custard Cups
- Preheat Oven: Preheat oven to 325°F for gentle baking and set a deep baking dish or roasting pan ready to hold ramekins in a calm water bath.
- Heat Milk Mixture: Combine whole milk, heavy cream, and scraped vanilla bean seeds in a saucepan; warm gently over medium-low heat until steam rises and tiny bubbles form around edges, about 5 minutes.
- Whisk Yolks: In a chilled bowl, whisk egg yolks and granulated sugar vigorously until mixture is pale yellow and slightly thickened, about 1–2 minutes for a smooth, airy base.
- Temper Yolks: Slowly pour about one-third of hot milk mixture into the yolk mixture, whisking constantly to prevent cooking, then transfer the tempered custard back into the saucepan.
- Gentle Cook: Warm the custard over low heat, stirring continuously until it thickens enough to coat the back of a spoon, about 5 minutes, to achieve that luxurious, silky consistency—do not boil.
- Strain Custard: Pour mixture through a fine-mesh sieve into a clean pitcher or bowl to ensure an ultra-smooth texture free of any cooked egg bits, gently tapping the sieve to encourage flow.
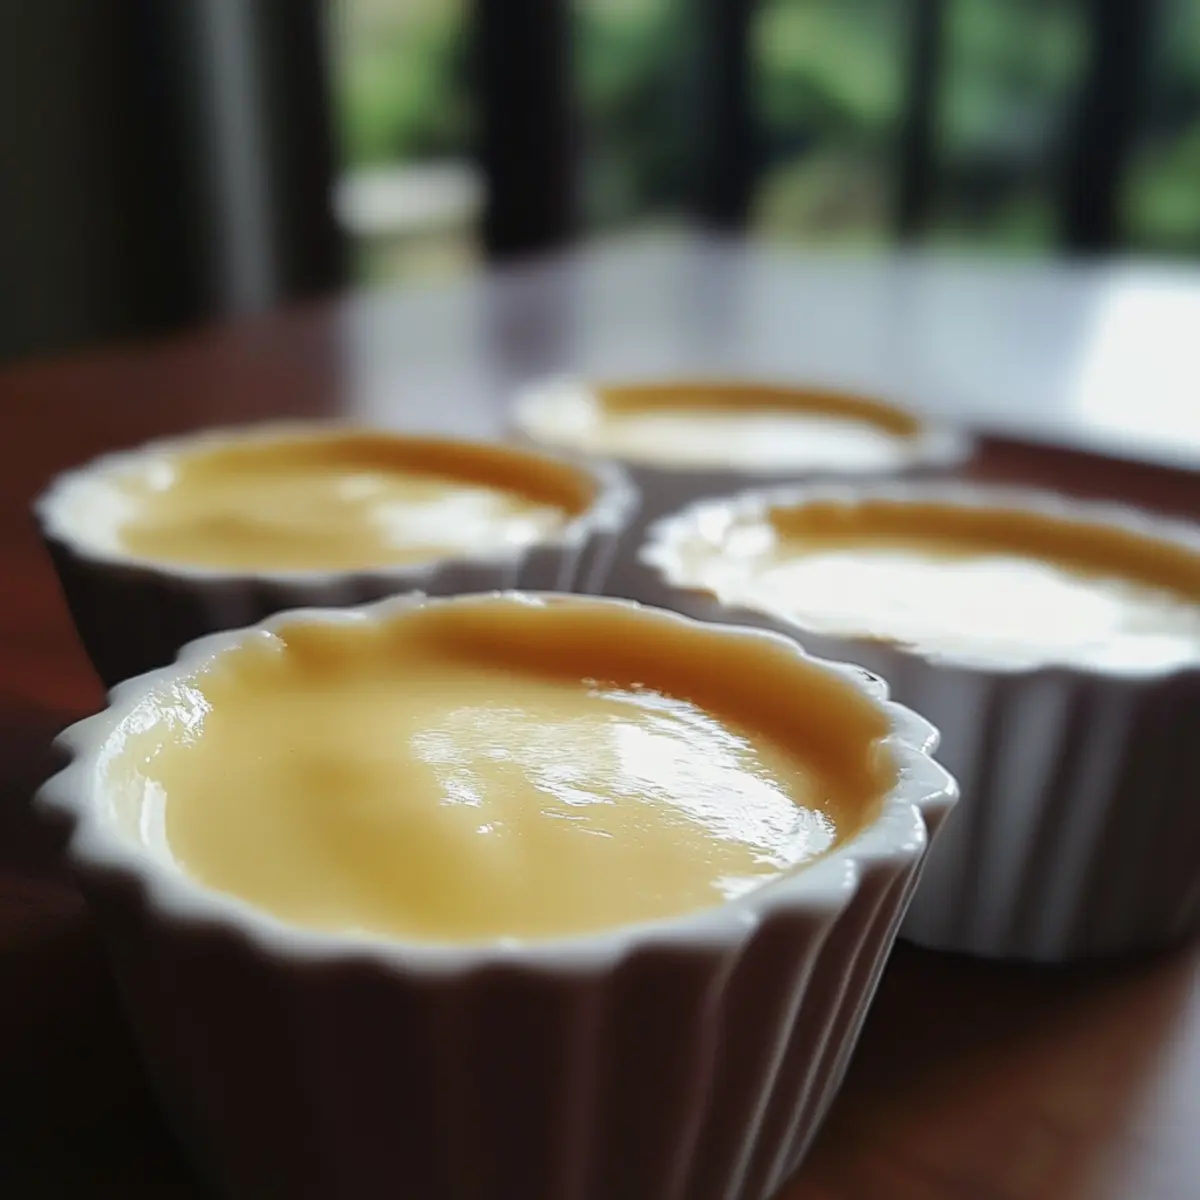
- Fill Ramekins: Place 6–8 custard cups in the baking dish and ladle the strained mixture evenly, filling each ramekin about three-quarters full to allow room for gentle rising.
- Add Water Bath: Carefully pour hot water into the baking dish until it reaches halfway up the ramekins’ sides to ensure even, gentle cooking for a velvety texture.
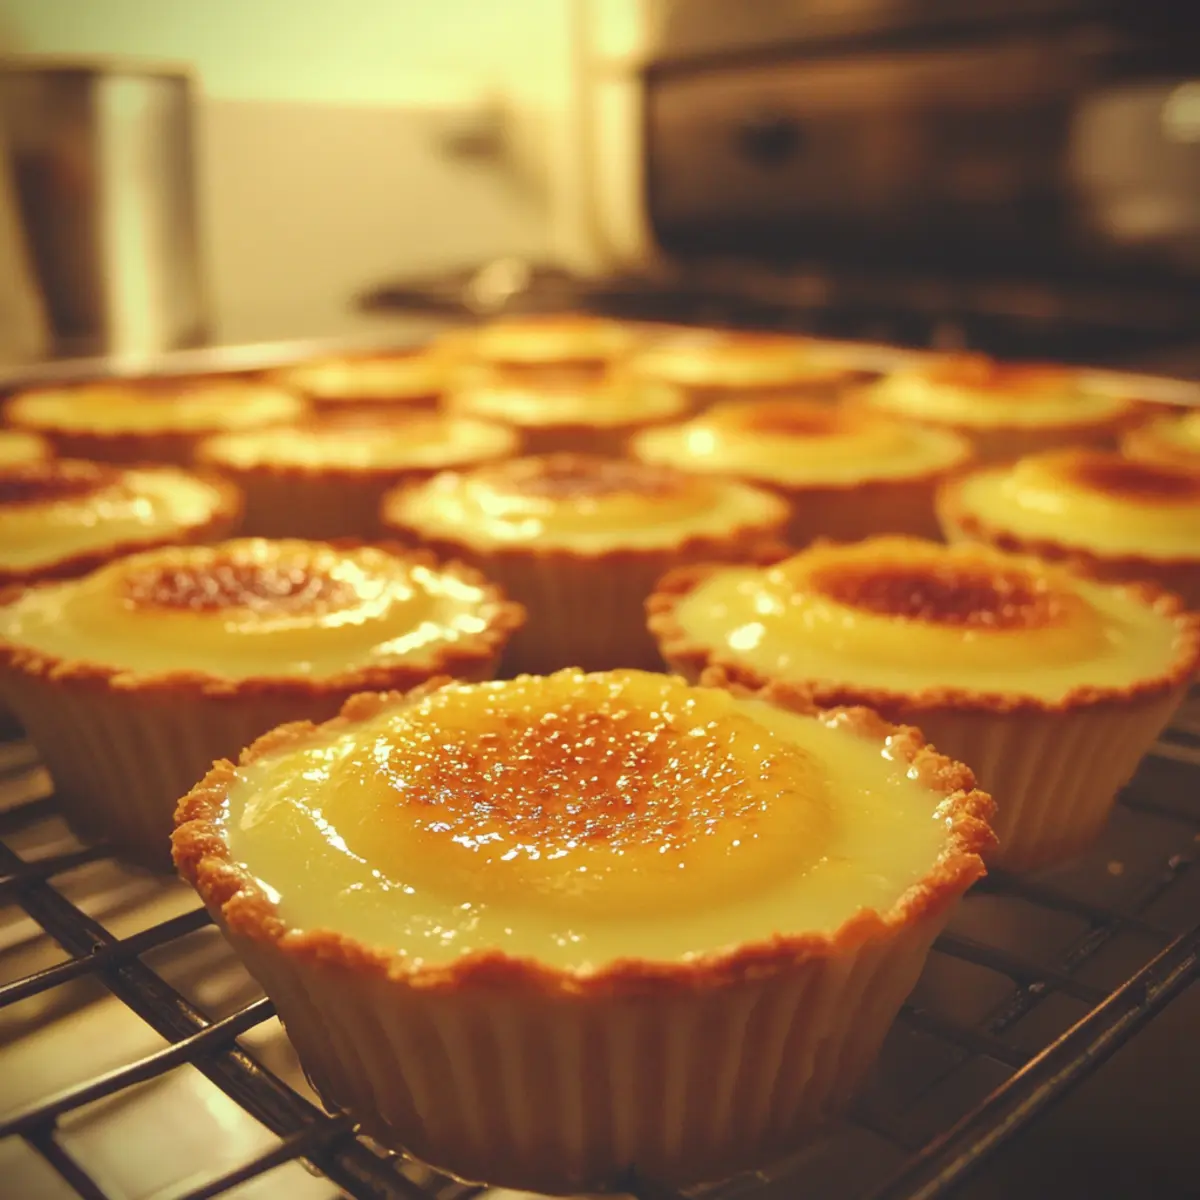
- Bake Custards: Transfer to the oven and bake at 325°F for 30–35 minutes, until edges are set and centers still tremble slightly when gently shaken for perfectly creamy cups.
- Chill Thoroughly: Remove ramekins from water bath, cool to room temperature, then refrigerate for at least 2 hours or overnight for the custard to fully set and flavors meld.
Optional: Top with fresh berries or a caramel drizzle.
Exact quantities are listed in the recipe card below.
Expert Tips for Classic Vanilla Custard Cups
- Use fresh eggs: Fresh egg yolks create the smoothest, richest custard, preventing any off flavors or graininess in your Classic Vanilla Custard Cups.
- Temper carefully: Pour hot milk slowly into eggs while whisking constantly to avoid curdling and achieve a silky custard texture.
- Don’t boil the custard: Gently heat until it coats the back of a spoon; boiling causes curdling and a lumpy custard.
- Strain the mixture: Always strain before baking to remove any cooked bits, ensuring a perfectly smooth finish.
- Water bath is key: Bake custards in a hot water bath for even cooking and the signature creamy consistency.
- Chill properly: Refrigerate for at least 2 hours to fully set the custard and deepen the vanilla flavor.
Make Ahead Options
These Classic Vanilla Custard Cups are perfect for busy home cooks looking to save time without sacrificing flavor! You can prepare the custard base up to 24 hours in advance—just follow the recipe until the chilling step. After baking and cooling, cover the ramekins with plastic wrap and refrigerate them to maintain their creamy texture. When you’re ready to serve, simply remove them from the fridge, top with fresh berries or caramel if desired, and enjoy a delightful dessert that feels freshly made. This preparation method ensures they are just as delicious as when first whipped up, making your dessert planning a breeze!
How to Store and Freeze Classic Vanilla Custard Cups
Fridge: Store leftover custard cups in the refrigerator for up to 3 days. Cover each ramekin with plastic wrap or a lid to keep them fresh and prevent them from absorbing any other odors.
Freezer: If you want to freeze Classic Vanilla Custard Cups, wrap them tightly in plastic wrap and then foil. They can be frozen for up to 2 months; for best results, thaw in the fridge overnight before consuming.
Reheating: To reheat, gently warm the custard cups in a water bath at a low temperature until just warm. Avoid direct heat to maintain the smooth texture.
Serving Tip: Add fresh fruits or caramel on top just before serving for a delightful touch!
What to Serve with Classic Vanilla Custard Cups?
Indulging in these creamy delights creates a perfect opportunity to complement your dessert with delightful pairings.
-
Fresh Berries: Add vibrant color and a natural sweetness that beautifully balances the custard’s richness. Strawberries or blueberries provide a refreshing burst of flavor.
-
Caramel Sauce: A drizzle of caramel not only enhances the custard’s sweet profile but also adds a luxurious touch. Its buttery notes harmonize perfectly with the vanilla.
-
Almond Biscotti: The crunchy texture of almond biscotti contrasts wonderfully with the silky custard. Dip them for an elegant twist that transforms each bite!
-
Chocolate Shavings: A sprinkle of dark chocolate or milk chocolate shavings gives each spoonful an added depth of flavor and an indulgent touch. This little treat pairs beautifully.
-
Whipped Cream: A dollop of lightly sweetened whipped cream adds airiness and elevates the dessert. Its lightness melds seamlessly with the custard for utmost satisfaction.
-
Espresso: A small cup of rich espresso pairs well with the custard’s creamy sweetness. The bitter notes enhance every nuance of the vanilla, creating a match made in dessert heaven.
-
Chopped Nuts: Toasted pistachios or hazelnuts add an unexpected crunch. Their nutty flavor complements the custard while adding an irresistible contrast in texture.
Variations & Substitutions for Classic Vanilla Custard Cups
Feel free to get creative and make this custard your own with these delightful twists!
-
Dairy-Free: Substitute coconut milk and coconut cream for a rich, tropical flavor that still delivers creaminess.
-
Chocolate Bliss: Stir in 2 tablespoons of cocoa powder or melted dark chocolate for a decadent chocolate custard; a real treat for chocolate lovers!
-
Spiced Twist: Add a pinch of cinnamon or nutmeg to the milk mixture for warm spice notes that elevate your custard to new heights.
-
Fruit-Infused: Replace vanilla with pureed passion fruit or mango for a refreshing, fruity spin that brightens up every bite.
-
Maple Sweetness: Swap granulated sugar with pure maple syrup for a unique sweetness that complements the vanilla beautifully.
-
Coffee Lovers: Mix in a tablespoon of instant espresso powder with the milk for a rich coffee flavor that adds an exciting dimension.
-
Nutty Flavor: Use almond milk instead of whole milk and add finely chopped toasted almonds for a delightful nuttiness that pairs wonderfully with the vanilla.
-
Citrus Zest: Infuse the milk with the zest of lemon or orange for a refreshing citrus twist that lightens the creamy texture.
Each variation invites you to explore different flavors and enhance the comforting nature of your Classic Vanilla Custard Cups. Enjoy experimenting!
Classic Vanilla Custard Cups Recipe FAQs
How do I know if my vanilla bean is fresh and good for custard?
Look for a vanilla bean that is dark, pliable, and slightly oily to the touch. Avoid beans that are dry or have dark spots all over, as these can indicate age or poor quality. Fresh beans release the best flavor and aroma, making your custard truly stand out.
What’s the best way to store leftover custard cups, and how long do they last?
Absolutely keep your custard cups refrigerated! Cover each ramekin tightly with plastic wrap or an airtight lid to prevent drying out and absorbing odors. Stored properly, they stay fresh for 3 to 4 days, making them perfect for enjoying over a few days without losing that silky texture.
Can I freeze Classic Vanilla Custard Cups for later? How do I do it?
Yes, freezing is a great option! First, cover each custard cup tightly with plastic wrap, then wrap again in aluminum foil to prevent freezer burn. Label them with the date and freeze for up to 2 months. To thaw, place the custard cups in the fridge overnight. Gently reheat in a warm water bath if you prefer serving them slightly warmed, but they’re lovely chilled too!
What should I do if my custard turns grainy or curdled during cooking?
Grainy custard usually means it got too hot too fast or boiled. Next time, cook your mixture over low heat and stir constantly until it just coats the back of a spoon—never let it boil. If curdling happens, straining the custard immediately through a fine sieve can help smooth out any lumps. Tempering the egg yolks by slowly adding hot milk while whisking helps prevent this issue too.
Are Classic Vanilla Custard Cups safe for kids or pets?
The custard is absolutely kid-friendly and perfect as a creamy treat. However, avoid giving it to pets since it contains sugar, dairy, and raw eggs that can upset their stomachs. If you’re catering for someone with egg allergies, consider a custard alternative made without eggs, like a silky coconut milk pudding.
Best Classic Vanilla Custard Cups Recipe for Creamy Homemade Bliss
Ingredients
Equipment
Method
- Preheat oven to 325°F for gentle baking and set a deep baking dish or roasting pan ready to hold ramekins in a calm water bath.
- Combine whole milk, heavy cream, and scraped vanilla bean seeds in a saucepan; warm gently over medium-low heat until steam rises and tiny bubbles form around edges.
- In a chilled bowl, whisk egg yolks and granulated sugar vigorously until mixture is pale yellow and slightly thickened.
- Slowly pour about one-third of hot milk mixture into the yolk mixture, whisking constantly to prevent cooking, then transfer the tempered custard back into the saucepan.
- Warm the custard over low heat, stirring continuously until it thickens enough to coat the back of a spoon; do not boil.
- Pour mixture through a fine-mesh sieve into a clean pitcher or bowl to ensure an ultra-smooth texture.
- Place 6–8 custard cups in the baking dish and ladle the strained mixture evenly, filling each ramekin about three-quarters full.
- Carefully pour hot water into the baking dish until it reaches halfway up the ramekins’ sides.
- Transfer to the oven and bake at 325°F for 30–35 minutes, until edges are set and centers still tremble slightly.
- Remove ramekins from water bath, cool to room temperature, then refrigerate for at least 2 hours or overnight.