")


There are certain desserts that just hit different, aren’t there? The ones that evoke childhood nostalgia, bring smiles to faces, and disappear from the dessert table faster than you can say “seconds, please!”. For me, these Caramel Chocolate Crunch Bars are that dessert. From the moment the aroma of buttery caramel starts to waft through the kitchen, you know you’re in for a treat. Honestly, these bars have become a staple in my home – the go-to for bake sales, potlucks, or just a simple weekend indulgence. My family? They’re obsessed. My youngest declared them “better than store-bought candy bars,” which, in kid-speak, is high praise indeed. Even my husband, who claims he’s “not really a dessert person,” finds himself sneaking back for ‘just one more’ every time I make them. What I love most about this recipe, besides the fact that they are utterly and completely delicious, is how incredibly easy they are to make. No fancy equipment, no complicated techniques – just simple ingredients and a few straightforward steps that result in a symphony of flavors and textures. The chewy caramel, the satisfying crunch of the Rice Krispies, and the smooth, rich chocolate topping create a perfect trifecta that’s simply irresistible. So, if you’re looking for a dessert that’s guaranteed to impress, requires minimal effort, and delivers maximum flavor, look no further. Get ready to experience the magic of homemade Caramel Chocolate Crunch Bars – you and your loved ones are in for a treat!
Ingredients: Your Simple Path to Crunchy Caramel Bliss
This recipe shines in its simplicity, relying on just a handful of pantry staples to create a dessert that tastes anything but ordinary. Each ingredient plays a vital role in building the layers of flavor and texture that make these Caramel Chocolate Crunch Bars so addictive. Let’s break down each component and see why it’s essential for achieving that perfect crunchy caramel bliss.
- Butter: (1 cup, 2 sticks, unsalted) – The heart and soul of our caramel, unsalted butter provides a rich, creamy base and that signature melt-in-your-mouth texture. Using unsalted butter gives us precise control over the saltiness of the caramel, allowing us to balance the sweetness perfectly. The fat in the butter also contributes to the chewy texture of the caramel, preventing it from becoming too hard or brittle.
- Granulated Sugar: (1 cup) – The magic ingredient that transforms into golden, luscious caramel! Granulated sugar is the key to sweetness and depth of flavor in this recipe. As it heats and caramelizes, it develops complex notes that are far more nuanced than simple sweetness, creating that distinctive caramel taste we all crave.
- Light Corn Syrup: (1/2 cup) – Often misunderstood, light corn syrup is a crucial component for achieving the perfect caramel texture. It acts as an invert sugar, preventing the granulated sugar from crystallizing during the caramelization process. This ensures a smooth, chewy, and beautifully textured caramel, rather than a grainy or hard one. It also adds a subtle, balanced sweetness that complements the granulated sugar.
- Sweetened Condensed Milk: (1 (14 ounce) can) – This is the secret weapon for unbelievably creamy and decadent caramel! Sweetened condensed milk brings a unique richness and chewiness to the caramel layer that is simply unmatched. It adds a milky sweetness and a luxurious texture that elevates the caramel far beyond a basic sugar syrup. This ingredient is what truly sets this caramel apart.
- Vanilla Extract: (1 teaspoon) – A flavor enhancer extraordinaire! Vanilla extract might seem like a small addition, but it plays a significant role in rounding out the overall flavor profile of both the caramel and chocolate layers. It adds warmth, depth, and complexity, enhancing the sweetness and richness of the other ingredients. A good quality vanilla extract makes a noticeable difference.
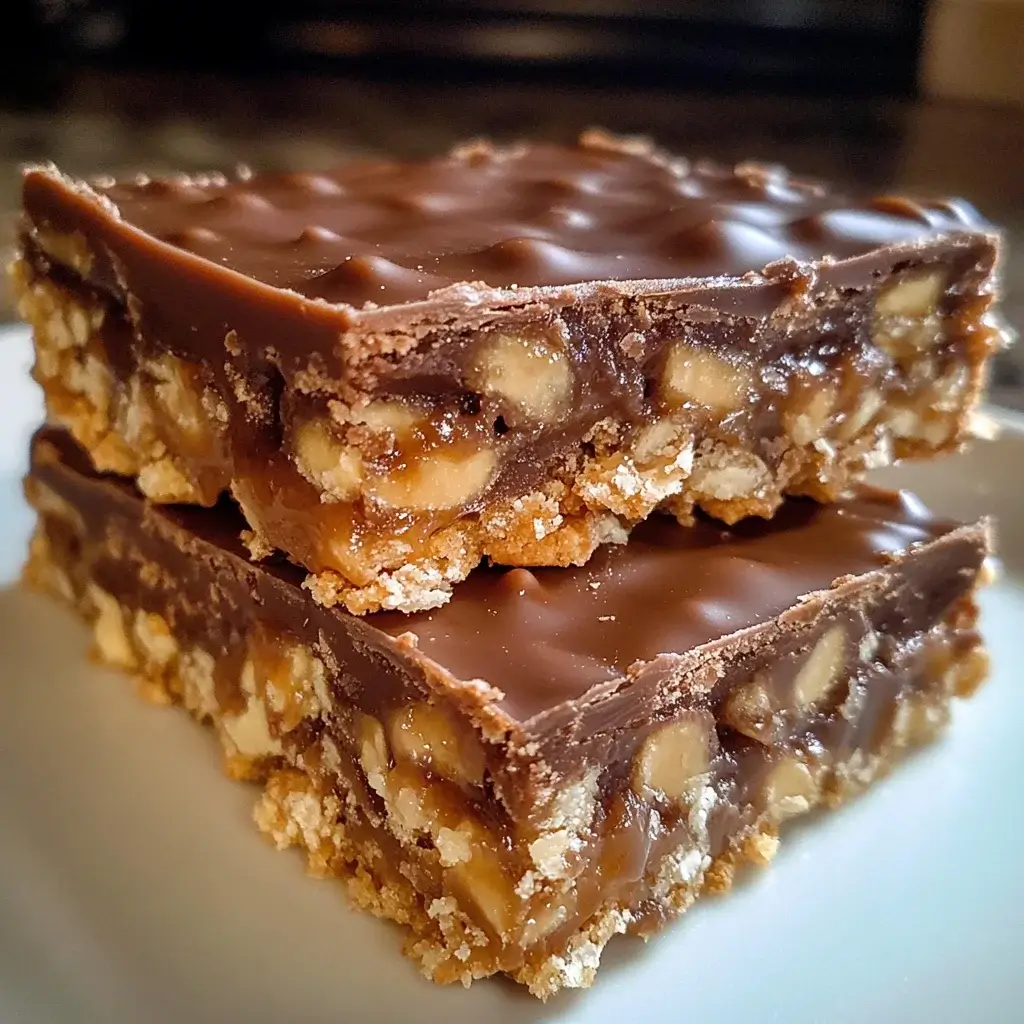
- Rice Krispies Cereal: (6 cups) – The star of the “crunch” in Caramel Chocolate Crunch Bars! Rice Krispies cereal provides that essential light and airy crispness that beautifully contrasts with the chewy caramel and smooth chocolate. Their neutral flavor allows the caramel and chocolate to shine, while their delicate texture provides the perfect satisfying crunch in every bite. No other cereal replicates this texture quite like Rice Krispies.
- Semi-Sweet Chocolate Chips: (2 cups) – The crowning glory – the decadent chocolate topping! Semi-sweet chocolate chips offer a balanced sweetness that perfectly complements the rich caramel without being overwhelmingly sugary. The slight bitterness of semi-sweet chocolate provides a wonderful counterpoint to the sweetness of the caramel, creating a harmonious flavor combination. You can also experiment with dark chocolate for a more intense flavor or milk chocolate for a sweeter, milder option, depending on your personal preference.
- Vegetable Oil: (1 tablespoon) – This seemingly simple ingredient is essential for creating a perfectly smooth and glossy chocolate topping. Adding vegetable oil to the melted chocolate chips thins the chocolate slightly, making it easier to spread evenly and prevents it from becoming too hard and brittle when set. This ensures a clean cut and a pleasant melt-in-your-mouth texture for the chocolate topping. It also adds a beautiful sheen to the finished bars.
Instructions: Crafting Your Caramel Chocolate Crunch Bars Step-by-Step
Creating these irresistible Caramel Chocolate Crunch Bars is a surprisingly simple and rewarding process. The recipe is designed to be accessible to bakers of all skill levels, requiring no complicated techniques or specialized equipment. By following these step-by-step instructions carefully, you’ll be well on your way to enjoying a batch of homemade crunchy caramel goodness. Let’s dive into the process:
Step 1: Prepare Your Pan – The Foundation for Success
The first step, and a crucial one for easy removal and clean bars, is to prepare your baking pan. Take a 9×13 inch baking pan and line it completely with parchment paper. Ensure you leave an overhang of parchment paper on both long sides of the pan – this overhang will act as handles, making it incredibly easy to lift the entire slab of bars out of the pan once they are set. This simple trick eliminates any struggle with sticking and makes cutting a breeze. While not strictly necessary, you can lightly grease the parchment paper with cooking spray or a touch of butter. This extra step can further ensure that the bars release cleanly, although the parchment lining is usually sufficient. Set your prepared pan aside and get ready to move on to the caramel magic.
Step 2: Craft the Caramel Base – The Heart of the Crunch Bar
Now for the star of the show – the caramel! In a medium-sized, heavy-bottomed saucepan, melt the butter over medium heat. Using a heavy-bottomed saucepan is important because it distributes heat more evenly, reducing the risk of scorching the caramel. Once the butter is completely melted and shimmering, add the granulated sugar and light corn syrup to the saucepan. Stir continuously with a wooden spoon or a heat-resistant spatula until the sugar is fully dissolved and the mixture becomes smooth and homogenous. This initial stirring helps to combine the ingredients and prevents the sugar from settling and potentially burning at the bottom of the pan.
Once the sugar is dissolved, increase the heat to medium-high and bring the mixture to a rolling boil. A “rolling boil” means the mixture is bubbling vigorously even when you are stirring. It’s crucial to stir constantly throughout this boiling process to prevent burning and ensure even caramelization. Once the mixture reaches a rolling boil, set a timer for exactly 1 minute. Continue to boil for precisely 1 minute, stirring constantly. This is a critical step for achieving the correct caramel consistency. Boiling for too short a time will result in a caramel that is too soft and runny, while boiling for too long can lead to a hard, brittle caramel that is difficult to chew. Accuracy in timing is key here.
Remove the saucepan from the heat immediately after the 1-minute boiling time is up. Quickly stir in the sweetened condensed milk and vanilla extract. Be cautious when adding the sweetened condensed milk, as the hot caramel mixture may bubble up slightly. This is a normal reaction. Stir vigorously and continuously with your wooden spoon or spatula until everything is smoothly and completely combined. The caramel should become a uniform, luscious golden brown color. Ensure there are no streaks of condensed milk remaining and that the mixture is homogenous and glossy. You’ve now created your perfect caramel base!
Step 3: Incorporate the Crunch – Marrying Caramel and Rice Krispies
The next step is to bring in the crunch factor! Pour the Rice Krispies cereal into a large mixing bowl. It’s important to use a large bowl to allow for ample space to mix the cereal and caramel without spilling. Immediately pour the hot, freshly made caramel mixture directly over the Rice Krispies cereal in the bowl. Working quickly is important at this stage because the caramel will begin to cool and set as it comes into contact with the cereal.
Using a spatula, gently but thoroughly fold the cereal into the hot caramel until all the Rice Krispies are evenly and completely coated. Ensure that every piece of cereal is glistening with caramel. This even coating is essential for achieving a uniformly crunchy and flavorful bar. Don’t overmix, but make sure there are no dry pockets of cereal remaining. The goal is to have every Rice Krispie embraced by the warm, sticky caramel.
Step 4: Press into the Pan – Creating a Solid Foundation
Now it’s time to transfer the caramel-coated Rice Krispies mixture into your prepared 9×13 inch baking pan. Pour the entire mixture into the pan, spreading it roughly evenly. Using a piece of parchment paper (you can use the same parchment paper you used to line the pan, or a fresh piece) or the back of a spatula that has been lightly dampened with water (to prevent sticking), press the mixture firmly and evenly into the pan. Work your way across the entire surface, ensuring you get into all the corners and create a smooth, compact layer. The firmer you press, the more cohesive and less crumbly your bars will be when you cut them later. A well-compacted layer will also result in a neater, more professional-looking finished product. Aim for a uniform thickness across the entire pan.
Step 5: Melt the Chocolate Topping – Adding the Decadent Finish
It’s time to create the luscious chocolate topping! In a microwave-safe bowl, combine the semi-sweet chocolate chips and vegetable oil. The vegetable oil is crucial for achieving a smooth, glossy, and easily spreadable chocolate. Microwave in 30-second intervals, stirring well after each interval, until the chocolate is completely melted and smooth. Microwaving in short intervals and stirring frequently is essential to prevent the chocolate from overheating and seizing or burning. Between each 30-second burst, stir thoroughly to distribute the heat and encourage even melting. Continue this process until the chocolate is completely melted and has a smooth, glossy consistency.
If you prefer not to use a microwave, you can also melt the chocolate in a double boiler over simmering water. Place the chocolate chips and vegetable oil in a heatproof bowl set over a saucepan of simmering water (making sure the bottom of the bowl doesn’t touch the water). Stir constantly until the chocolate is melted and smooth. Whether you use the microwave or a double boiler, ensure the chocolate is completely melted and free of any lumps for the best results.
Step 6: Spread the Chocolate and Chill – Setting the Stage for Perfection
Pour the melted chocolate evenly over the caramel-Rice Krispies layer in the pan. Use a spatula or an offset knife to spread the chocolate into a smooth, even layer, ensuring it reaches all edges of the pan and completely covers the caramel base. A smooth, even chocolate layer not only looks more appealing but also ensures a consistent chocolate-to-caramel ratio in every bite.
For a decorative touch, you can get creative with the chocolate topping. Use a toothpick or a knife to create swirls or patterns in the wet chocolate. This adds a visually appealing element to your Caramel Chocolate Crunch Bars.
Once the chocolate is spread, place the pan in the refrigerator and chill for at least 2 hours, or preferably overnight. This chilling time is absolutely essential. It allows the bars to fully set and firm up, making them much easier to cut cleanly and hold their shape. Chilling also allows the flavors to meld and deepen, resulting in a more delicious and cohesive final product. Overnight chilling is ideal for the best texture and flavor development.
Step 7: Cut and Serve – The Grand Finale
Once the bars are thoroughly chilled and firm (at least 2 hours, or preferably after overnight chilling), it’s time to cut and serve your masterpiece! Lift the bars out of the pan using the parchment paper overhang handles you created in Step 1. Place the entire slab of bars onto a cutting board.
Use a sharp knife to cut the bars into squares or rectangles of your desired size. For clean, professional-looking cuts, try this trick: run the knife under hot water for a few seconds, then wipe it dry with a clean towel before each cut. The warm knife will slice through the chocolate and caramel more smoothly, preventing cracking and crumbling. Repeat this process of warming and wiping the knife between each cut for the cleanest possible edges.
Serve your Caramel Chocolate Crunch Bars immediately and enjoy the delightful crunch, the rich caramel, and the smooth chocolate! Store any leftover bars in an airtight container at room temperature for up to 3 days, or for longer storage, in the refrigerator for up to a week. While they can be stored at room temperature, they are often best enjoyed slightly chilled, especially in warmer weather.
Nutrition Facts: A Treat in Moderation – Understanding the Indulgence
While these Caramel Chocolate Crunch Bars are undeniably a delightful treat, it’s important to remember that they are also a dessert to be enjoyed in moderation as part of a balanced diet. Understanding the nutritional content can help you make informed choices about incorporating them into your eating habits. Here’s a general overview of the approximate nutritional information per serving, based on cutting the 9×13 inch pan into 16 servings and using standard nutritional values for common ingredients:
- Serving Size: 1 bar (approx. 1/16th of 9×13 inch pan) – This is a reasonable portion size for a rich dessert like this.
- Calories: Approximately 250-300 calories per serving – Calories will vary slightly based on specific ingredient brands and precise portion sizes, but this range is a good estimate.
- Fat: 12-15 grams – This reflects the butter, chocolate chips, and sweetened condensed milk in the recipe, which contribute to the rich flavor and texture.
Important Note: These nutritional values are estimations and can vary depending on the specific brands of ingredients used and the exact portion sizes. This recipe is intended as an occasional treat and should be enjoyed as part of a balanced dietary pattern that includes a variety of nutrient-rich foods. It’s always a good idea to consult with a registered dietitian or nutritionist for personalized dietary advice.
Preparation Time: Quick and Easy Dessert Delight – From Kitchen to Fridge in Minutes
One of the best things about these Caramel Chocolate Crunch Bars, besides their incredible taste, is how quickly and easily they come together. They are a fantastic option when you need a delicious dessert that doesn’t require hours of baking or complicated techniques. Let’s break down the preparation time:
- Prep Time: 20 minutes (This includes gathering all your ingredients, preparing the 9×13 inch baking pan with parchment paper, and actively making the caramel and melting the chocolate layers.) – The active hands-on time is minimal and efficient.
- Chill Time: 2 hours minimum (Ideally overnight for the best results, allowing the bars to fully set and firm up completely, and for the flavors to meld and deepen beautifully.) – While chilling time is required, it’s entirely hands-off time in the refrigerator.
- Total Time: Approximately 2 hours 20 minutes (excluding overnight chilling, if you choose that option) – From start to almost-finish in just over two hours, with the majority of that time being passive chilling.
The active cooking and preparation time is remarkably short, making this recipe perfect for busy weeknights, last-minute dessert cravings, or when you need to whip up a treat quickly for a gathering. Most of the time involved is simply waiting for the bars to chill and set in the refrigerator, which requires no active effort on your part. This makes Caramel Chocolate Crunch Bars a truly convenient and delightful dessert option.
How to Serve: Elevating Your Caramel Chocolate Crunch Bar Experience – Serving Suggestions for Every Occasion
Caramel Chocolate Crunch Bars are incredibly versatile and can be enjoyed in so many ways! While they are absolutely delicious on their own, here are some creative and delightful serving suggestions to elevate your Caramel Chocolate Crunch Bar experience and suit various occasions:
- Classic Dessert: Serve them as a simple and satisfying dessert after a casual lunch or a more formal dinner. Their rich flavor and satisfying crunchy texture are a perfect and universally loved way to end any meal.
- Party Pleaser: Cut the bars into smaller squares or even bite-sized pieces for parties, potlucks, birthday celebrations, or any type of gathering. They are always a crowd-pleaser, easy to eat, and incredibly portable, making them ideal for sharing.
- Coffee or Tea Time Treat: Pair a Caramel Chocolate Crunch Bar with a hot cup of freshly brewed coffee, a soothing cup of tea, or a rich mug of hot chocolate for a cozy and comforting afternoon or evening treat. The sweetness of the bars perfectly complements the warmth and slight bitterness of these beverages.
- Ice Cream Sundae Topping: Crumble or roughly chop the Caramel Chocolate Crunch Bars and use them as a decadent and crunchy topping for ice cream sundaes. The combination of warm or cold ice cream with the crunchy, caramel-y chocolate pieces is simply divine. They pair exceptionally well with vanilla, chocolate, caramel, or even coffee-flavored ice cream.
- Gift Giving: Package the bars attractively in decorative boxes, cellophane bags tied with ribbons, or festive tins to give as thoughtful and homemade gifts to friends, family, neighbors, teachers, or colleagues. They make a delicious and appreciated present for holidays, birthdays, or just because.
- Elevated Dessert Platter: Include Caramel Chocolate Crunch Bars as part of a more elaborate dessert platter alongside other complementary treats like homemade cookies, fudgy brownies, fresh fruit skewers, mini cheesecakes, or chocolate-dipped strawberries. This offers a delightful variety of textures and flavors for your guests.
- Picnic or BBQ Dessert: These bars are perfectly portable and hold up relatively well at room temperature for a short period (especially if kept out of direct sunlight and extreme heat), making them an ideal dessert choice for picnics, barbecues, outdoor gatherings, or potlucks where refrigeration might be limited.
- With Fresh Fruit: Serve a Caramel Chocolate Crunch Bar alongside a side of fresh berries (strawberries, raspberries, blueberries), sliced bananas, peaches, or a fruit salad. The refreshing tartness of the fruit provides a wonderful contrast to the richness and sweetness of the bars, creating a balanced and delightful dessert experience.
Additional Tips: Mastering Your Caramel Chocolate Crunch Bars – Secrets to Success
To ensure your Caramel Chocolate Crunch Bars are absolutely perfect every single time, here are eight helpful tips, tricks, and best practices to guide you to crunchy caramel perfection:
- Use a Heavy-Bottomed Saucepan for Caramel: As mentioned earlier, a heavy-bottomed saucepan is crucial for even heat distribution when making the caramel. This minimizes the risk of hot spots and scorching, which can lead to a bitter or burnt-tasting caramel. The even heat helps the sugar caramelize uniformly and prevents sticking.
- Stir Constantly and Vigilantly During Caramel Making: From the moment you combine the butter, sugar, and corn syrup, constant stirring is essential. Do not stop stirring while the caramel is cooking, especially once it starts to boil. This constant motion prevents the sugar from burning on the bottom of the pan and ensures a smooth, homogenous caramel mixture.
- Accurately Time the Caramel Boiling Stage (1 Minute): Precisely timing the boiling stage of the caramel is critical for achieving the correct texture. Use a kitchen timer or your phone timer to ensure you boil for exactly 1 minute after the mixture reaches a rolling boil. Boiling for too long will result in a hard, brittle caramel, while under-boiling will lead to a caramel that is too soft and runny and may not set properly.
- Work Quickly After Adding Rice Krispies to the Caramel: Once you pour the hot caramel over the Rice Krispies cereal, work swiftly to mix and press the mixture into the prepared pan. The caramel will begin to set and firm up as it cools, so prompt action is needed to ensure even coating and pressing before it becomes too stiff to work with easily.
- Press the Rice Krispies Mixture Firmly and Evenly into the Pan: Thoroughly and firmly pressing the Rice Krispies mixture into the baking pan is vital for creating cohesive bars that hold together well when cut. A firmly packed layer will be less prone to crumbling and will result in neater, more defined bars. Use parchment paper or a dampened spatula to achieve a smooth, compact surface.
- Don’t Overheat the Chocolate When Melting: When melting the chocolate chips, whether in the microwave or a double boiler, be careful not to overheat them. Overheated chocolate can seize, become grainy, and lose its smooth texture and shine. Microwave in short 30-second intervals, stirring well in between, or use gentle heat in a double boiler. Stop heating as soon as the chocolate is just melted and smooth.
- Chill the Bars Thoroughly Before Cutting (Minimum 2 Hours, Ideally Overnight): Adequate chilling time is absolutely crucial for the bars to set properly and become firm enough to cut cleanly. A minimum of 2 hours in the refrigerator is necessary, but overnight chilling is highly recommended for the best texture and to allow the flavors to fully meld and deepen. Impatience in chilling will result in soft, messy bars that are difficult to cut neatly.
- Use a Warm Knife for Clean Cuts: For perfectly clean and professional-looking cuts, run your knife under hot water for a few seconds, then wipe it dry with a clean towel before each cut. The warm blade will glide through the chocolate and caramel layers more smoothly, minimizing cracking and crumbling and resulting in neat, even bar shapes. Repeat this warming and wiping process between each cut for optimal results.
FAQ Section: Your Caramel Chocolate Crunch Bar Questions Answered
Got questions about making the perfect Caramel Chocolate Crunch Bars? We’ve anticipated some of the most common queries and provided detailed answers to help you troubleshoot and achieve dessert success every time.
Q1: Can I use milk chocolate or dark chocolate chips instead of semi-sweet?
A1: Absolutely! You can definitely substitute milk chocolate chips for a sweeter, milder chocolate flavor, or dark chocolate chips for a richer, more intense chocolate experience. The choice is entirely based on your personal preference. Keep in mind that milk chocolate will result in a sweeter bar overall, while dark chocolate will offer a slightly less sweet and more bittersweet profile.
Q2: Can I make these bars without light corn syrup?
A2: Light corn syrup plays a crucial role in preventing sugar crystallization and ensuring a smooth, chewy caramel texture. While you can technically make caramel without it, the texture may be slightly grainier or harder. If you prefer to avoid corn syrup, you could try substituting with honey or golden syrup, but be aware that the texture and flavor of the caramel may be slightly altered.
Q3: How do I store Caramel Chocolate Crunch Bars?
A3: Store leftover Caramel Chocolate Crunch Bars in an airtight container at room temperature for up to 3 days, or in the refrigerator for up to a week. Storing them in the refrigerator will help them maintain their firmness, especially in warmer climates, but they might become slightly harder when cold. Allow them to come to room temperature for a few minutes before serving if you prefer a softer texture.
Q4: Can I freeze Caramel Chocolate Crunch Bars?
A4: Yes, you can freeze Caramel Chocolate Crunch Bars for longer storage. Wrap them tightly in plastic wrap, then place them in a freezer-safe bag or container. They can be frozen for up to 2-3 months. Thaw them in the refrigerator overnight before serving. The texture may be slightly altered after freezing and thawing, but they will still be delicious.
Q5: My caramel is too hard, what did I do wrong?
A5: The most likely reason for hard caramel is boiling it for too long. It’s crucial to boil the caramel for exactly 1 minute after it reaches a rolling boil. Over-boiling evaporates too much moisture and concentrates the sugar, leading to a hard, brittle caramel. Make sure to time the boiling stage accurately.
Q6: My caramel is too soft and runny, what went wrong?
A6: Conversely, if your caramel is too soft and runny, it’s likely that you didn’t boil it for long enough. Boiling for the full 1 minute is essential to evaporate enough moisture and achieve the correct caramel consistency. Double-check your timing and ensure you reached a full rolling boil before starting the 1-minute timer.
Q7: Can I add nuts or other mix-ins to these bars?
A7: Absolutely! Feel free to customize your bars by adding chopped nuts (like pecans, walnuts, or peanuts) to the Rice Krispies mixture or sprinkling them on top of the chocolate. You could also add dried cranberries, mini marshmallows, or even a sprinkle of sea salt for a salted caramel flavor. Get creative and experiment with your favorite mix-ins!
Q8: Can I double this recipe?
A8: Yes, you can easily double this recipe if you need to make a larger batch. Simply double all the ingredient quantities and use a larger baking pan, such as a 12×18 inch pan. Keep in mind that the cooking time for the caramel might need to be slightly adjusted when making a larger batch, so watch it carefully and ensure it reaches the desired consistency.

Caramel Chocolate Crunch Bars
Ingredients
This recipe shines in its simplicity, relying on just a handful of pantry staples to create a dessert that tastes anything but ordinary. Each ingredient plays a vital role in building the layers of flavor and texture that make these Caramel Chocolate Crunch Bars so addictive. Let’s break down each component and see why it’s essential for achieving that perfect crunchy caramel bliss.
- Butter: (1 cup, 2 sticks, unsalted) – The heart and soul of our caramel, unsalted butter provides a rich, creamy base and that signature melt-in-your-mouth texture. Using unsalted butter gives us precise control over the saltiness of the caramel, allowing us to balance the sweetness perfectly. The fat in the butter also contributes to the chewy texture of the caramel, preventing it from becoming too hard or brittle.
- Granulated Sugar: (1 cup) – The magic ingredient that transforms into golden, luscious caramel! Granulated sugar is the key to sweetness and depth of flavor in this recipe. As it heats and caramelizes, it develops complex notes that are far more nuanced than simple sweetness, creating that distinctive caramel taste we all crave.
- Light Corn Syrup: (1/2 cup) – Often misunderstood, light corn syrup is a crucial component for achieving the perfect caramel texture. It acts as an invert sugar, preventing the granulated sugar from crystallizing during the caramelization process. This ensures a smooth, chewy, and beautifully textured caramel, rather than a grainy or hard one. It also adds a subtle, balanced sweetness that complements the granulated sugar.
- Sweetened Condensed Milk: (1 (14 ounce) can) – This is the secret weapon for unbelievably creamy and decadent caramel! Sweetened condensed milk brings a unique richness and chewiness to the caramel layer that is simply unmatched. It adds a milky sweetness and a luxurious texture that elevates the caramel far beyond a basic sugar syrup. This ingredient is what truly sets this caramel apart.
- Vanilla Extract: (1 teaspoon) – A flavor enhancer extraordinaire! Vanilla extract might seem like a small addition, but it plays a significant role in rounding out the overall flavor profile of both the caramel and chocolate layers. It adds warmth, depth, and complexity, enhancing the sweetness and richness of the other ingredients. A good quality vanilla extract makes a noticeable difference.
- Rice Krispies Cereal: (6 cups) – The star of the “crunch” in Caramel Chocolate Crunch Bars! Rice Krispies cereal provides that essential light and airy crispness that beautifully contrasts with the chewy caramel and smooth chocolate. Their neutral flavor allows the caramel and chocolate to shine, while their delicate texture provides the perfect satisfying crunch in every bite. No other cereal replicates this texture quite like Rice Krispies.
- Semi-Sweet Chocolate Chips: (2 cups) – The crowning glory – the decadent chocolate topping! Semi-sweet chocolate chips offer a balanced sweetness that perfectly complements the rich caramel without being overwhelmingly sugary. The slight bitterness of semi-sweet chocolate provides a wonderful counterpoint to the sweetness of the caramel, creating a harmonious flavor combination. You can also experiment with dark chocolate for a more intense flavor or milk chocolate for a sweeter, milder option, depending on your personal preference.
- Vegetable Oil: (1 tablespoon) – This seemingly simple ingredient is essential for creating a perfectly smooth and glossy chocolate topping. Adding vegetable oil to the melted chocolate chips thins the chocolate slightly, making it easier to spread evenly and prevents it from becoming too hard and brittle when set. This ensures a clean cut and a pleasant melt-in-your-mouth texture for the chocolate topping. It also adds a beautiful sheen to the finished bars.
Instructions
Creating these irresistible Caramel Chocolate Crunch Bars is a surprisingly simple and rewarding process. The recipe is designed to be accessible to bakers of all skill levels, requiring no complicated techniques or specialized equipment. By following these step-by-step instructions carefully, you’ll be well on your way to enjoying a batch of homemade crunchy caramel goodness. Let’s dive into the process:
Step 1: Prepare Your Pan – The Foundation for Success
The first step, and a crucial one for easy removal and clean bars, is to prepare your baking pan. Take a 9×13 inch baking pan and line it completely with parchment paper. Ensure you leave an overhang of parchment paper on both long sides of the pan – this overhang will act as handles, making it incredibly easy to lift the entire slab of bars out of the pan once they are set. This simple trick eliminates any struggle with sticking and makes cutting a breeze. While not strictly necessary, you can lightly grease the parchment paper with cooking spray or a touch of butter. This extra step can further ensure that the bars release cleanly, although the parchment lining is usually sufficient. Set your prepared pan aside and get ready to move on to the caramel magic.
Step 2: Craft the Caramel Base – The Heart of the Crunch Bar
Now for the star of the show – the caramel! In a medium-sized, heavy-bottomed saucepan, melt the butter over medium heat. Using a heavy-bottomed saucepan is important because it distributes heat more evenly, reducing the risk of scorching the caramel. Once the butter is completely melted and shimmering, add the granulated sugar and light corn syrup to the saucepan. Stir continuously with a wooden spoon or a heat-resistant spatula until the sugar is fully dissolved and the mixture becomes smooth and homogenous. This initial stirring helps to combine the ingredients and prevents the sugar from settling and potentially burning at the bottom of the pan.
Once the sugar is dissolved, increase the heat to medium-high and bring the mixture to a rolling boil. A “rolling boil” means the mixture is bubbling vigorously even when you are stirring. It’s crucial to stir constantly throughout this boiling process to prevent burning and ensure even caramelization. Once the mixture reaches a rolling boil, set a timer for exactly 1 minute. Continue to boil for precisely 1 minute, stirring constantly. This is a critical step for achieving the correct caramel consistency. Boiling for too short a time will result in a caramel that is too soft and runny, while boiling for too long can lead to a hard, brittle caramel that is difficult to chew. Accuracy in timing is key here.
Remove the saucepan from the heat immediately after the 1-minute boiling time is up. Quickly stir in the sweetened condensed milk and vanilla extract. Be cautious when adding the sweetened condensed milk, as the hot caramel mixture may bubble up slightly. This is a normal reaction. Stir vigorously and continuously with your wooden spoon or spatula until everything is smoothly and completely combined. The caramel should become a uniform, luscious golden brown color. Ensure there are no streaks of condensed milk remaining and that the mixture is homogenous and glossy. You’ve now created your perfect caramel base!
Step 3: Incorporate the Crunch – Marrying Caramel and Rice Krispies
The next step is to bring in the crunch factor! Pour the Rice Krispies cereal into a large mixing bowl. It’s important to use a large bowl to allow for ample space to mix the cereal and caramel without spilling. Immediately pour the hot, freshly made caramel mixture directly over the Rice Krispies cereal in the bowl. Working quickly is important at this stage because the caramel will begin to cool and set as it comes into contact with the cereal.
Using a spatula, gently but thoroughly fold the cereal into the hot caramel until all the Rice Krispies are evenly and completely coated. Ensure that every piece of cereal is glistening with caramel. This even coating is essential for achieving a uniformly crunchy and flavorful bar. Don’t overmix, but make sure there are no dry pockets of cereal remaining. The goal is to have every Rice Krispie embraced by the warm, sticky caramel.
Step 4: Press into the Pan – Creating a Solid Foundation
Now it’s time to transfer the caramel-coated Rice Krispies mixture into your prepared 9×13 inch baking pan. Pour the entire mixture into the pan, spreading it roughly evenly. Using a piece of parchment paper (you can use the same parchment paper you used to line the pan, or a fresh piece) or the back of a spatula that has been lightly dampened with water (to prevent sticking), press the mixture firmly and evenly into the pan. Work your way across the entire surface, ensuring you get into all the corners and create a smooth, compact layer. The firmer you press, the more cohesive and less crumbly your bars will be when you cut them later. A well-compacted layer will also result in a neater, more professional-looking finished product. Aim for a uniform thickness across the entire pan.
Step 5: Melt the Chocolate Topping – Adding the Decadent Finish
It’s time to create the luscious chocolate topping! In a microwave-safe bowl, combine the semi-sweet chocolate chips and vegetable oil. The vegetable oil is crucial for achieving a smooth, glossy, and easily spreadable chocolate. Microwave in 30-second intervals, stirring well after each interval, until the chocolate is completely melted and smooth. Microwaving in short intervals and stirring frequently is essential to prevent the chocolate from overheating and seizing or burning. Between each 30-second burst, stir thoroughly to distribute the heat and encourage even melting. Continue this process until the chocolate is completely melted and has a smooth, glossy consistency.
If you prefer not to use a microwave, you can also melt the chocolate in a double boiler over simmering water. Place the chocolate chips and vegetable oil in a heatproof bowl set over a saucepan of simmering water (making sure the bottom of the bowl doesn’t touch the water). Stir constantly until the chocolate is melted and smooth. Whether you use the microwave or a double boiler, ensure the chocolate is completely melted and free of any lumps for the best results.
Step 6: Spread the Chocolate and Chill – Setting the Stage for Perfection
Pour the melted chocolate evenly over the caramel-Rice Krispies layer in the pan. Use a spatula or an offset knife to spread the chocolate into a smooth, even layer, ensuring it reaches all edges of the pan and completely covers the caramel base. A smooth, even chocolate layer not only looks more appealing but also ensures a consistent chocolate-to-caramel ratio in every bite.
For a decorative touch, you can get creative with the chocolate topping. Use a toothpick or a knife to create swirls or patterns in the wet chocolate. This adds a visually appealing element to your Caramel Chocolate Crunch Bars.
Once the chocolate is spread, place the pan in the refrigerator and chill for at least 2 hours, or preferably overnight. This chilling time is absolutely essential. It allows the bars to fully set and firm up, making them much easier to cut cleanly and hold their shape. Chilling also allows the flavors to meld and deepen, resulting in a more delicious and cohesive final product. Overnight chilling is ideal for the best texture and flavor development.
Step 7: Cut and Serve – The Grand Finale
Once the bars are thoroughly chilled and firm (at least 2 hours, or preferably after overnight chilling), it’s time to cut and serve your masterpiece! Lift the bars out of the pan using the parchment paper overhang handles you created in Step 1. Place the entire slab of bars onto a cutting board.
Use a sharp knife to cut the bars into squares or rectangles of your desired size. For clean, professional-looking cuts, try this trick: run the knife under hot water for a few seconds, then wipe it dry with a clean towel before each cut. The warm knife will slice through the chocolate and caramel more smoothly, preventing cracking and crumbling. Repeat this process of warming and wiping the knife between each cut for the cleanest possible edges.
Serve your Caramel Chocolate Crunch Bars immediately and enjoy the delightful crunch, the rich caramel, and the smooth chocolate! Store any leftover bars in an airtight container at room temperature for up to 3 days, or for longer storage, in the refrigerator for up to a week. While they can be stored at room temperature, they are often best enjoyed slightly chilled, especially in warmer weather.
Nutrition
- Serving Size: one normal portion
- Calories: 300
- Fat: 15 grams