")

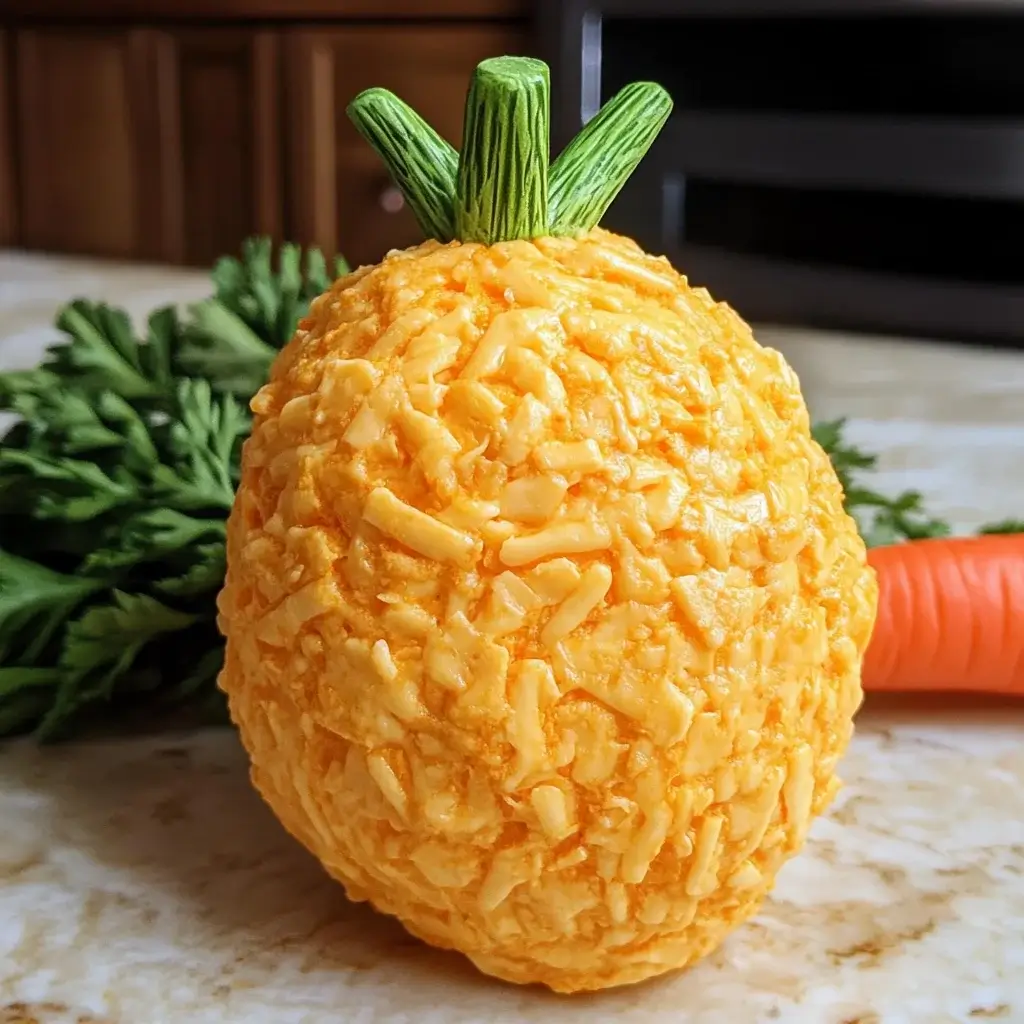

My family absolutely adores appetizers, especially when we’re hosting gatherings. But I always strive to bring something to the table that’s not only delicious but also visually appealing and a little bit fun. That’s how I stumbled upon the Carrot-Shaped Cheese Ball recipe, and let me tell you, it was an instant hit! From the moment I placed this vibrant orange creation on the appetizer platter, it was the star of the show. Kids and adults alike were drawn to its whimsical shape, and the creamy, savory flavor kept everyone coming back for more. It’s become a go-to for Easter, spring celebrations, or even just a cheerful weekend snack. The best part? It’s surprisingly easy to make, and you can customize it to your liking. If you’re looking for a crowd-pleasing appetizer that’s both tasty and visually delightful, look no further than this Carrot-Shaped Cheese Ball – it’s guaranteed to be a conversation starter and a delicious treat!
Ingredients for a Delightful Carrot-Shaped Cheese Ball
To craft this charming and flavorful Carrot-Shaped Cheese Ball, you’ll need a selection of fresh and pantry-staple ingredients. Each component plays a crucial role in achieving the perfect taste and texture. Here’s what you’ll need:
- Cream Cheese (8 ounces, softened): The foundation of our cheese ball, providing a smooth and creamy base. Ensure it’s softened to room temperature for easy mixing.
- Sharp Cheddar Cheese (2 cups, shredded): Adds a bold and savory cheese flavor that complements the cream cheese beautifully. Sharp cheddar offers a delightful tang.
- Monterey Jack Cheese (1 cup, shredded): Contributes a mild and buttery flavor, along with excellent melting properties that enhance the cheese ball’s overall texture.
- Mayonnaise (1/2 cup): Lends moisture and richness, binding the cheeses together and creating a spreadable consistency. Use a good quality mayonnaise for the best flavor.
- Worcestershire Sauce (1 tablespoon): Provides a depth of umami flavor, enhancing the savory notes of the cheese and adding a touch of complexity.
- Garlic Powder (1 teaspoon): Infuses a subtle garlic flavor, adding warmth and aroma to the cheese ball without being overpowering.
- Onion Powder (1 teaspoon): Adds a mild onion flavor, complementing the garlic and contributing to the overall savory profile.
- Dried Dill Weed (1 tablespoon): Brings a fresh, herbaceous note that brightens the cheese ball and pairs wonderfully with cheese.
- Hot Sauce (1/2 teaspoon, optional): Adds a subtle kick of heat, optional for those who enjoy a little spice. Adjust to your preference or omit for a milder flavor.
- Orange Food Coloring (gel or liquid): To achieve that vibrant carrot color! Gel food coloring is recommended for intense color with less liquid.
- Finely Chopped Parsley or Fresh Dill (for coating): Mimics the green carrot top! Fresh herbs provide a vibrant green color and fresh flavor.
- Baby Carrots or Pretzel Sticks (for the stem): To create the carrot’s stem at the top, adding a final touch of realism and fun.
Step-by-Step Instructions for Creating Your Carrot Cheese Ball
Making this Carrot-Shaped Cheese Ball is easier than you might think! Follow these detailed instructions to create a stunning and delicious appetizer:
Step 1: Soften and Combine the Cheeses
Begin by ensuring your cream cheese is thoroughly softened to room temperature. This is crucial for creating a smooth and lump-free cheese ball. In a large mixing bowl, add the softened cream cheese, shredded sharp cheddar cheese, and shredded Monterey Jack cheese. Using a hand mixer or a sturdy spoon, beat the cheeses together until they are well combined and creamy. This initial mixing step ensures all the cheeses are evenly distributed and ready to absorb the other flavors.
Step 2: Incorporate Flavor Enhancers
Now it’s time to layer in the savory flavors that will make this cheese ball irresistible. Add the mayonnaise, Worcestershire sauce, garlic powder, onion powder, dried dill weed, and hot sauce (if using) to the cheese mixture. Continue to mix everything together until all the ingredients are thoroughly incorporated and the mixture is smooth and uniform. Take a moment to taste the mixture and adjust seasonings if needed. Perhaps you want a bit more garlic powder or a stronger dill flavor – now is the time to customize it to your liking.
Step 3: Add the Vibrant Carrot Color
This is where the magic happens and your cheese ball starts to transform into a carrot! Add a few drops of orange food coloring to the cheese mixture. Start with a small amount, as you can always add more to achieve your desired shade of vibrant carrot orange. Mix the food coloring in thoroughly, checking the color as you go. Continue adding food coloring, drop by drop, until you reach a rich, carrot-like orange hue. Remember, gel food coloring is more concentrated, so use it sparingly. Liquid food coloring will require more drops to achieve the same intensity.
Step 4: Shape the Cheese Ball into a Carrot
Once you have the perfect orange color, it’s time to shape your cheese ball. Lightly dampen your hands with water – this will prevent the cheese mixture from sticking to your hands and make shaping easier. Scoop the cheese mixture out of the bowl and begin to mold it into a carrot shape. Start by forming a cone shape, wider at the top and tapering down to a point at the bottom. Gently refine the shape, smoothing out any bumps and creating a nicely tapered carrot form. If the mixture feels too soft to handle easily, you can chill it in the refrigerator for about 15-20 minutes to firm up slightly before shaping.
Step 5: Chill the Shaped Cheese Ball
Place the shaped cheese ball on a plate or a parchment-lined baking sheet. Cover it loosely with plastic wrap. Refrigerate the cheese ball for at least 2 hours, or preferably overnight. Chilling is essential as it allows the cheese ball to firm up completely, making it easier to coat and serve. It also allows the flavors to meld together and deepen, resulting in a more flavorful final product.
Step 6: Coat with Fresh Herbs
Just before serving, it’s time to add the “carrot top”! Remove the chilled cheese ball from the refrigerator. In a shallow dish, spread out the finely chopped fresh parsley or fresh dill. Gently roll the cheese ball in the herbs, pressing lightly to ensure they adhere evenly to the surface. Completely coat the cheese ball in the green herbs, mimicking the leafy top of a carrot. The fresh herbs not only add visual appeal but also a burst of fresh, herbaceous flavor that complements the cheesy base.
Step 7: Add the Carrot Stem (Optional but Recommended)
For the final touch of realism and fun, add a “stem” to the top of your carrot cheese ball. You have a couple of options here:
- Baby Carrots: Insert 2-3 baby carrots into the top of the cheese ball, arranging them to resemble carrot stems. This is a simple and edible option.
- Pretzel Sticks: Alternatively, you can use pretzel sticks. Break pretzel sticks into shorter lengths and insert them into the top of the cheese ball to create a more twig-like stem effect.
Step 8: Serve and Enjoy!
Your Carrot-Shaped Cheese Ball is now ready to be the star of your appetizer spread! Place it on a serving platter surrounded by an assortment of crackers, vegetables, and bread for dipping. Watch as your guests admire its charming appearance and then dive in to enjoy its delicious flavor!
Nutrition Facts for Carrot-Shaped Cheese Ball (Per Serving)
Please note that the nutritional information is an estimate and can vary based on specific ingredient brands and portion sizes. This is based on a recipe yielding approximately 12 servings.
- Serving Size: Approximately 2 tablespoons
- Calories: 180 kcal
- Fat: 15g
Preparation Time: Quick Assembly, Chilling Required
The active preparation time for this Carrot-Shaped Cheese Ball is surprisingly short, making it a great option for busy hosts.
- Active Prep Time: 20-25 minutes (This includes softening cream cheese, shredding cheese if not pre-shredded, mixing ingredients, shaping the cheese ball, and initial herb chopping).
- Chilling Time: Minimum 2 hours, ideally overnight (This is inactive time where the cheese ball firms up and flavors meld in the refrigerator).
- Total Time (excluding chilling): Approximately 25 minutes.
While the hands-on time is minimal, remember to factor in the chilling time for the best results. Making this cheese ball ahead of time is actually beneficial, allowing the flavors to develop fully and making your party prep smoother on the day of your event.
How to Serve Your Carrot Cheese Ball: Creative Serving Suggestions
The Carrot-Shaped Cheese Ball is incredibly versatile and can be served in a variety of ways to suit different occasions and preferences. Here are some delightful serving suggestions:
- Classic Crackers: Serve with an assortment of crackers, such as:
- Wheat crackers: Provide a hearty, nutty flavor that complements the cheese.
- Ritz crackers: Buttery and slightly sweet, a classic pairing with cheese balls.
- Water crackers: Plain and crisp, allowing the cheese ball flavor to shine through.
- Multigrain crackers: Offer a healthier and more textured option.
- Fresh Vegetables: Offer a colorful and healthy array of fresh vegetables for dipping:
- Carrot sticks: Playfully thematic and provide a crunchy contrast.
- Celery sticks: Crisp and refreshing, a classic vegetable for dips.
- Cucumber slices: Cool and mild, offering a light option.
- Bell pepper strips (red, yellow, orange): Sweet and vibrant, adding color to the platter.
- Cherry tomatoes: Juicy and slightly tangy, a burst of freshness.
- Broccoli florets: Lightly blanched or raw, offering a healthy and slightly bitter contrast.
- Bread and Crostini: For a more substantial serving option:
- Sliced baguette: Toasted or fresh, offering a classic bread option.
- Crostini: Thinly sliced and toasted baguette, providing a crisp and elegant base.
- Pita bread wedges: Warm or toasted, a soft and flavorful option.
- Pretzel bread bites: Soft and salty, a fun and savory choice.
- Fruit Pairings (for a sweet and savory twist):
- Apple slices (Granny Smith or Honeycrisp): Crisp and slightly tart, a surprising and delicious pairing.
- Pear slices: Sweet and juicy, offering a delicate fruit option.
- Grapes: Clusters of red or green grapes add sweetness and visual appeal.
- Arrange on a Platter: Create an attractive presentation by:
- Placing the Carrot Cheese Ball in the center of a large platter.
- Arranging the crackers, vegetables, and bread around the cheese ball in an appealing manner.
- Garnishing the platter with extra fresh herbs or carrot tops for added visual flair.
- Individual Servings: For a more formal setting or portion control:
- Scoop small portions of the cheese ball onto individual plates or crostini.
- Garnish each serving with a sprinkle of fresh herbs or a small vegetable stick.
- Cheese Board Addition: Incorporate the Carrot Cheese Ball into a larger cheese board display:
- Place it alongside other cheeses, charcuterie, olives, and nuts for a diverse and impressive spread.
- Themed Events: Tailor your serving suggestions to the occasion:
- Easter: Serve with pastel-colored crackers and spring vegetables.
- Spring Celebrations: Use fresh, seasonal vegetables and herbs for garnishing.
- Kid’s Parties: Offer fun dippers like pretzel sticks, mini crackers, and colorful veggie sticks.
Additional Tips for the Perfect Carrot Cheese Ball
To ensure your Carrot-Shaped Cheese Ball is a resounding success, here are eight helpful tips to keep in mind:
- Use Room Temperature Cream Cheese: This is absolutely crucial for a smooth, lump-free cheese ball. Allow your cream cheese to sit at room temperature for at least an hour before starting. Softened cream cheese blends seamlessly with the other ingredients.
- Shred Your Own Cheese (If Possible): While pre-shredded cheese is convenient, shredding your own cheese from a block results in a fresher flavor and better melting texture. Pre-shredded cheeses often contain cellulose to prevent clumping, which can affect the creaminess of the cheese ball.
- Don’t Overmix: Once all the ingredients are combined, mix just until everything is incorporated. Overmixing can make the cheese ball tough. Mix until smooth and uniform, but avoid prolonged beating.
- Taste and Adjust Seasonings: Before shaping and chilling, taste the cheese mixture and adjust seasonings to your liking. Need more garlic? A bit more dill? Now is the time to customize the flavor profile to your preferences.
- Chill Thoroughly: Chilling for at least 2 hours, or ideally overnight, is essential. This allows the cheese ball to firm up, making it easier to coat and serve, and it also allows the flavors to meld and deepen for a more delicious result.
- Damp Hands for Shaping: Lightly dampening your hands with water before shaping the cheese ball will prevent the mixture from sticking to your hands and make the shaping process much easier and smoother.
- Make Ahead of Time: The Carrot Cheese Ball is an excellent make-ahead appetizer. You can prepare it up to 2-3 days in advance. Just store it tightly wrapped in the refrigerator until you’re ready to coat and serve. This makes party prep much less stressful.
- Get Creative with Coatings: While parsley or dill is classic for the “carrot top,” feel free to experiment with other coatings! Consider finely chopped chives, green onions, or even a mix of herbs for a different look and flavor profile. You could also use finely chopped nuts for a different texture.
Frequently Asked Questions About Carrot Cheese Ball
Here are answers to some common questions you might have about making a Carrot-Shaped Cheese Ball:
Q1: Can I make this cheese ball ahead of time?
A: Absolutely! In fact, making it ahead of time is highly recommended. You can prepare the cheese ball, shape it, and chill it in the refrigerator for up to 2-3 days before serving. Coat it with herbs and add the stem just before serving for the freshest appearance.
Q2: Can I freeze the Carrot Cheese Ball?
A: While you can technically freeze a cheese ball, it’s not highly recommended. Freezing can sometimes alter the texture of cream cheese, making it slightly grainy upon thawing. For best quality, it’s best to make it a few days ahead and store it in the refrigerator.
Q3: Can I substitute any of the cheeses?
A: Yes, you can customize the cheese blend to your liking. For a milder flavor, you could use mild cheddar or Colby cheese in place of sharp cheddar. For a spicier kick, consider adding some pepper jack cheese. You can also experiment with other semi-hard cheeses like Gouda or Havarti.
Q4: I don’t have orange food coloring. Can I still make it?
A: Of course! While the orange food coloring is what gives it the classic “carrot” look, you can still make a delicious cheese ball without it. Simply omit the food coloring, and you’ll have a creamy white or slightly yellow cheese ball. You can still shape it into a cone and coat it with herbs for a visually appealing appetizer, even if it’s not carrot-colored.
Q5: What if I don’t like dill? Can I use a different herb for the coating?
A: Yes, definitely! Parsley is a popular alternative and provides a similar green color and fresh flavor. You could also use finely chopped chives, green onions, or even a blend of fresh herbs like parsley and chives.
Q6: Can I make this cheese ball spicier?
A: Yes, if you like a spicier cheese ball, there are several ways to add heat. You can increase the amount of hot sauce, add a pinch of cayenne pepper to the cheese mixture, or include finely diced jalapeños or pickled banana peppers.
Q7: What are some good vegetarian dipper options besides vegetables?
A: Besides vegetables, great vegetarian dipper options include pretzel crisps, pita chips, breadsticks, bagel chips, and even apple slices for a sweet and savory combination.
Q8: How long can the Carrot Cheese Ball sit out at room temperature?
A: Like any dairy-based appetizer, it’s best not to leave the Carrot Cheese Ball at room temperature for more than 2 hours. After 2 hours, bacteria can start to grow. If you’re serving it at an outdoor event in warm weather, keep it chilled in a cooler until serving time and try to keep it out of direct sunlight.

Carrot-Shaped Cheese Ball
Ingredients
To craft this charming and flavorful Carrot-Shaped Cheese Ball, you’ll need a selection of fresh and pantry-staple ingredients. Each component plays a crucial role in achieving the perfect taste and texture. Here’s what you’ll need:
- Cream Cheese (8 ounces, softened): The foundation of our cheese ball, providing a smooth and creamy base. Ensure it’s softened to room temperature for easy mixing.
- Sharp Cheddar Cheese (2 cups, shredded): Adds a bold and savory cheese flavor that complements the cream cheese beautifully. Sharp cheddar offers a delightful tang.
- Monterey Jack Cheese (1 cup, shredded): Contributes a mild and buttery flavor, along with excellent melting properties that enhance the cheese ball’s overall texture.
- Mayonnaise (1/2 cup): Lends moisture and richness, binding the cheeses together and creating a spreadable consistency. Use a good quality mayonnaise for the best flavor.
- Worcestershire Sauce (1 tablespoon): Provides a depth of umami flavor, enhancing the savory notes of the cheese and adding a touch of complexity.
- Garlic Powder (1 teaspoon): Infuses a subtle garlic flavor, adding warmth and aroma to the cheese ball without being overpowering.
- Onion Powder (1 teaspoon): Adds a mild onion flavor, complementing the garlic and contributing to the overall savory profile.
- Dried Dill Weed (1 tablespoon): Brings a fresh, herbaceous note that brightens the cheese ball and pairs wonderfully with cheese.
- Hot Sauce (1/2 teaspoon, optional): Adds a subtle kick of heat, optional for those who enjoy a little spice. Adjust to your preference or omit for a milder flavor.
- Orange Food Coloring (gel or liquid): To achieve that vibrant carrot color! Gel food coloring is recommended for intense color with less liquid.
- Finely Chopped Parsley or Fresh Dill (for coating): Mimics the green carrot top! Fresh herbs provide a vibrant green color and fresh flavor.
- Baby Carrots or Pretzel Sticks (for the stem): To create the carrot’s stem at the top, adding a final touch of realism and fun.
Instructions
Making this Carrot-Shaped Cheese Ball is easier than you might think! Follow these detailed instructions to create a stunning and delicious appetizer:
Step 1: Soften and Combine the Cheeses
Begin by ensuring your cream cheese is thoroughly softened to room temperature. This is crucial for creating a smooth and lump-free cheese ball. In a large mixing bowl, add the softened cream cheese, shredded sharp cheddar cheese, and shredded Monterey Jack cheese. Using a hand mixer or a sturdy spoon, beat the cheeses together until they are well combined and creamy. This initial mixing step ensures all the cheeses are evenly distributed and ready to absorb the other flavors.
Step 2: Incorporate Flavor Enhancers
Now it’s time to layer in the savory flavors that will make this cheese ball irresistible. Add the mayonnaise, Worcestershire sauce, garlic powder, onion powder, dried dill weed, and hot sauce (if using) to the cheese mixture. Continue to mix everything together until all the ingredients are thoroughly incorporated and the mixture is smooth and uniform. Take a moment to taste the mixture and adjust seasonings if needed. Perhaps you want a bit more garlic powder or a stronger dill flavor – now is the time to customize it to your liking.
Step 3: Add the Vibrant Carrot Color
This is where the magic happens and your cheese ball starts to transform into a carrot! Add a few drops of orange food coloring to the cheese mixture. Start with a small amount, as you can always add more to achieve your desired shade of vibrant carrot orange. Mix the food coloring in thoroughly, checking the color as you go. Continue adding food coloring, drop by drop, until you reach a rich, carrot-like orange hue. Remember, gel food coloring is more concentrated, so use it sparingly. Liquid food coloring will require more drops to achieve the same intensity.
Step 4: Shape the Cheese Ball into a Carrot
Once you have the perfect orange color, it’s time to shape your cheese ball. Lightly dampen your hands with water – this will prevent the cheese mixture from sticking to your hands and make shaping easier. Scoop the cheese mixture out of the bowl and begin to mold it into a carrot shape. Start by forming a cone shape, wider at the top and tapering down to a point at the bottom. Gently refine the shape, smoothing out any bumps and creating a nicely tapered carrot form. If the mixture feels too soft to handle easily, you can chill it in the refrigerator for about 15-20 minutes to firm up slightly before shaping.
Step 5: Chill the Shaped Cheese Ball
Place the shaped cheese ball on a plate or a parchment-lined baking sheet. Cover it loosely with plastic wrap. Refrigerate the cheese ball for at least 2 hours, or preferably overnight. Chilling is essential as it allows the cheese ball to firm up completely, making it easier to coat and serve. It also allows the flavors to meld together and deepen, resulting in a more flavorful final product.
Step 6: Coat with Fresh Herbs
Just before serving, it’s time to add the “carrot top”! Remove the chilled cheese ball from the refrigerator. In a shallow dish, spread out the finely chopped fresh parsley or fresh dill. Gently roll the cheese ball in the herbs, pressing lightly to ensure they adhere evenly to the surface. Completely coat the cheese ball in the green herbs, mimicking the leafy top of a carrot. The fresh herbs not only add visual appeal but also a burst of fresh, herbaceous flavor that complements the cheesy base.
Step 7: Add the Carrot Stem (Optional but Recommended)
For the final touch of realism and fun, add a “stem” to the top of your carrot cheese ball. You have a couple of options here:
- Baby Carrots: Insert 2-3 baby carrots into the top of the cheese ball, arranging them to resemble carrot stems. This is a simple and edible option.
- Pretzel Sticks: Alternatively, you can use pretzel sticks. Break pretzel sticks into shorter lengths and insert them into the top of the cheese ball to create a more twig-like stem effect.
Step 8: Serve and Enjoy!
Your Carrot-Shaped Cheese Ball is now ready to be the star of your appetizer spread! Place it on a serving platter surrounded by an assortment of crackers, vegetables, and bread for dipping. Watch as your guests admire its charming appearance and then dive in to enjoy its delicious flavor!
Nutrition
- Serving Size: one normal portion
- Calories: 180
- Fat: 15g