")

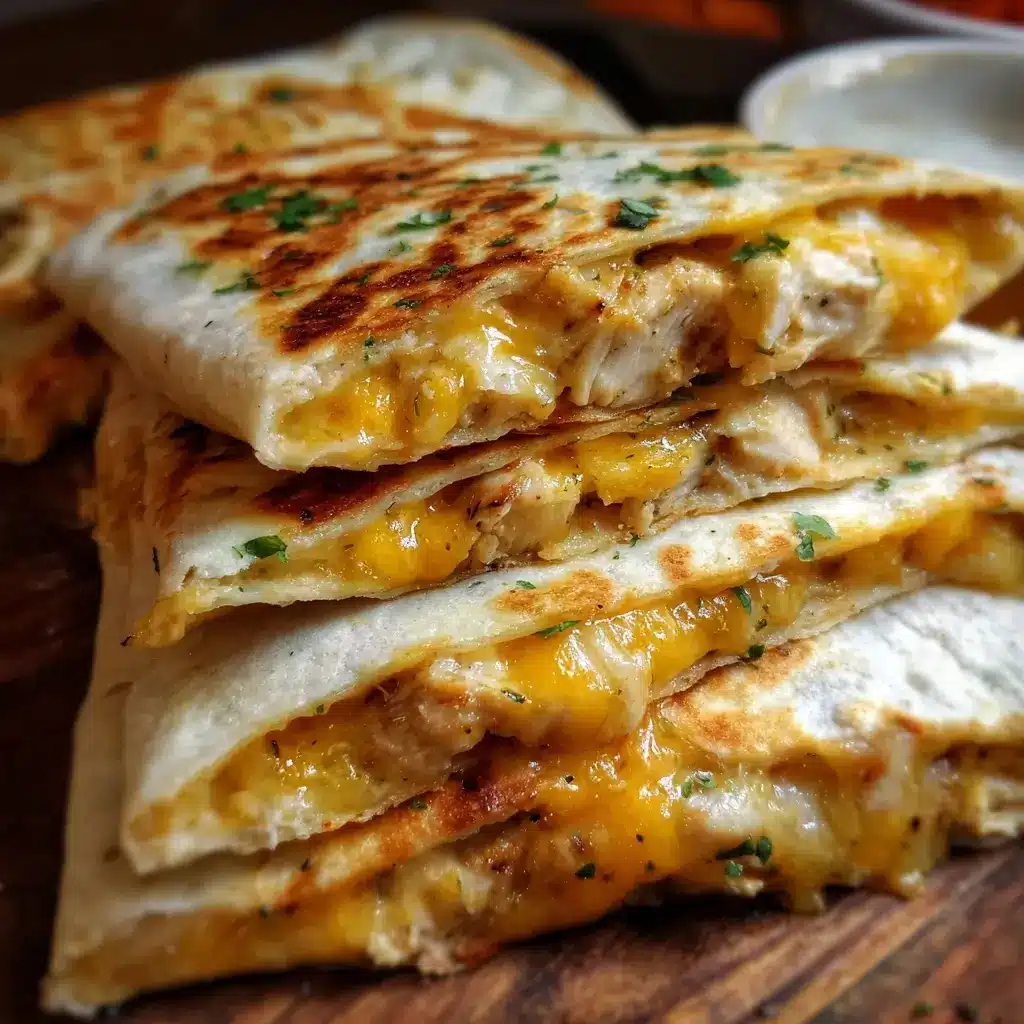

Of all the quick and easy weeknight dinners in my arsenal, there is one that reigns supreme, a dish so universally loved in my household that it guarantees clean plates and happy faces every single time: the Cheesy Chicken Quesadilla. This isn’t just a recipe; it’s a solution. It’s the answer to the dreaded “what’s for dinner?” question on a Tuesday night when energy is low, but cravings are high. I remember the first time I perfected this specific version. I had struggled with soggy tortillas and lackluster fillings for years. But this time, something magical happened. The tortilla was perfectly golden and shatteringly crisp. When I cut into it, the cheese stretched for what felt like miles—an epic “cheese pull” that had the kids cheering. The filling, a savory blend of seasoned chicken, sweet peppers, and onions, was perfectly balanced and distributed. It was a revelation. This recipe transformed the humble quesadilla from a simple snack into a satisfying, restaurant-quality meal that feels both indulgent and incredibly straightforward to prepare. It has since become our go-to for casual get-togethers, game-day feasts, and those nights when only a comforting, cheesy, crispy creation will do.
Ingredients
This Cheesy Chicken Quesadilla recipe relies on a handful of simple, high-quality ingredients that come together to create a symphony of flavor and texture. Each component is chosen specifically for its role in achieving the perfect balance of savory, cheesy, and crisp.
- 2 tablespoons Olive Oil: Used for sautéing the vegetables and chicken, creating a rich flavor base. You can also use butter or another neutral oil.
- 1 medium Yellow Onion, finely diced: When cooked, yellow onions lose their sharp bite and become sweet and translucent, adding a foundational layer of savory sweetness to the filling.
- 1 medium Red Bell Pepper, finely diced: Provides a pop of color, a hint of sweetness, and a tender texture that complements the chicken and cheese.
- 3 cups Cooked and Shredded Chicken: The star of the show. Using a pre-cooked rotisserie chicken is a fantastic time-saver. Alternatively, you can poach or pan-sear two large chicken breasts and shred them yourself. Thigh meat also works wonderfully for a richer flavor.
- 1 teaspoon Chili Powder: This adds a mild, smoky heat and a deep, earthy flavor that is central to classic Tex-Mex cuisine.
- 1 teaspoon Ground Cumin: Provides a warm, nutty, and slightly citrusy note that pairs beautifully with the chicken and chili powder.
- ½ teaspoon Garlic Powder: Offers a savory, aromatic kick without the fuss of mincing fresh garlic.
- ½ teaspoon Smoked Paprika: A secret weapon for flavor. It imparts a beautiful reddish hue and a deep, smoky taste that elevates the entire filling.
- Salt and Black Pepper, to taste: Essential for enhancing all the other flavors. Season the filling generously.
- 4 large (10-inch) Flour Tortillas: These are the vessel for our cheesy masterpiece. Large flour tortillas are pliable, brown beautifully, and hold a generous amount of filling without tearing.
- 4 cups Shredded Cheese Blend: The key to an “ooey-gooey” quesadilla. A blend of Monterey Jack (for its superior melting quality) and a medium Cheddar (for its sharp flavor) is ideal. For the best melt, buy blocks of cheese and shred them yourself.
- 2 tablespoons Unsalted Butter, melted (for cooking): Brushing the tortillas with melted butter before pan-frying is the secret to achieving that perfectly golden-brown, crispy, and flavorful exterior.
Instructions
Follow these step-by-step instructions carefully to build your perfect quesadilla. The key is to prepare your components first (a process known in kitchens as “mise en place”) and to control the heat during cooking to ensure a crispy tortilla and perfectly melted cheese.
Step 1: Prepare the Savory Chicken Filling
- Place a large skillet or frying pan over medium heat and add the 2 tablespoons of olive oil. Once the oil is shimmering, add the finely diced yellow onion and red bell pepper.
- Sauté the vegetables for 5-7 minutes, stirring occasionally, until they have softened and the onion is translucent and fragrant. This step is crucial for developing their natural sweetness.
- Add the 3 cups of shredded chicken to the skillet with the vegetables. Stir to combine everything well.
- Sprinkle the chili powder, ground cumin, garlic powder, and smoked paprika over the chicken and vegetable mixture. Add a generous pinch of salt and black pepper.
- Stir continuously for about 2-3 minutes, allowing the spices to toast and become deeply aromatic, coating every piece of chicken and vegetable. This awakens the flavors and ensures the filling is anything but bland.
- Once the filling is well-combined and heated through, remove the skillet from the heat and set it aside.
Step 2: Assemble the Quesadillas
- Lay a large flour tortilla flat on a clean work surface or cutting board.
- Sprinkle approximately ½ cup of the shredded cheese blend evenly over one half of the tortilla, leaving a small ½-inch border around the edge.
- Spoon about one-quarter of the prepared chicken and vegetable filling (roughly ¾ cup) evenly over the cheese.
- Top the filling with another ½ cup of the shredded cheese blend. This two-layer cheese method ensures that the filling is sealed in by a cocoon of melted cheese, which helps the quesadilla hold together.
- Carefully fold the empty half of the tortilla over the filling to create a half-moon shape. Gently press down to compact the ingredients slightly.
- Repeat this assembly process for the remaining three tortillas.
Step 3: Cook to Golden-Brown Perfection
- Wipe out the skillet you used for the filling or use a new large, non-stick skillet or cast-iron pan. Place it over medium-low heat. Using medium-low heat is critical; if the heat is too high, the tortilla will burn before the cheese has a chance to melt completely.
- Using a pastry brush, lightly brush the top-facing side of one assembled quesadilla with the melted butter.
- Carefully place the quesadilla in the preheated skillet, buttered-side down. As it begins to cook, brush the new top-facing side with more melted butter.
- Cook for 3-4 minutes per side. You are looking for a deep golden-brown color and a crispy texture on the outside. You should be able to see the cheese melting and bubbling around the edges.
- Use a large spatula to carefully flip the quesadilla and cook for another 3-4 minutes on the second side until it is equally golden and crisp.
- Once cooked, transfer the quesadilla to a cutting board and let it rest for a minute or two. This allows the cheese to set slightly, which makes for cleaner cuts.
- Repeat the cooking process with the remaining quesadillas, adding more butter to the pan as needed.
Step 4: Cut and Serve Immediately
- Using a sharp knife or a pizza cutter, slice the rested quesadilla into 3 or 4 wedges.
- Serve immediately while hot, crispy, and the cheese is delightfully gooey.
Nutrition Facts
This nutritional information is an estimate and can vary based on the specific ingredients used.
- Servings: 4 large quesadillas
- Calories per Serving: Approximately 750-850 kcal (per whole quesadilla)
- Protein (Approx. 45g): This dish is packed with protein from the chicken and cheese, which is essential for building and repairing tissues, and contributes to a feeling of fullness.
- Carbohydrates (Approx. 55g): Primarily from the flour tortilla, providing the necessary energy to power you through your day.
- Fat (Approx. 40g): A significant portion of the calories comes from fat in the cheese, oil, and butter, which adds rich flavor and is crucial for absorbing certain vitamins.
Preparation Time
This recipe is designed to be efficient, making it perfect for a weeknight meal.
- Total Preparation Time: 30-35 minutes
- Active Cooking Time: 20-25 minutes
- Time-Saving Tip: The total time can be reduced to under 20 minutes if you use a pre-cooked rotisserie chicken and have your vegetables pre-chopped. The filling can also be made a day or two in advance and stored in the refrigerator.
How to Serve
A great quesadilla becomes an unforgettable meal with the right accompaniments. The contrast of the hot, crispy quesadilla with cool, creamy, or fresh toppings is what makes it so satisfying. Here are some classic and creative ways to serve your cheesy chicken quesadillas:
- Classic Dipping Sauces:
- Sour Cream or Crema: A dollop of cool, tangy sour cream or a drizzle of thinner Mexican crema provides a perfect contrast to the rich, savory filling.
- Guacamole: A chunky, homemade guacamole with avocado, lime juice, onion, and cilantro adds a fresh, creamy, and flavorful element.
- Salsa: Whether you prefer a mild pico de gallo, a smoky salsa roja, or a tangy salsa verde, a side of salsa is non-negotiable for dipping.
- Fresh Garnishes:
- Sprinkle freshly chopped cilantro over the top just before serving for a burst of fresh, herbaceous flavor.
- Add a few slices of pickled or fresh jalapeños for those who enjoy an extra kick of heat.
- A squeeze of fresh lime juice over the top can brighten all the flavors.
- Complementary Side Dishes:
- Mexican-Style Rice: A flavorful side of seasoned rice helps turn the quesadillas into a more substantial and complete meal.
- Black Bean and Corn Salad: A simple salad of black beans, corn, diced red onion, and cilantro tossed in a lime vinaigrette adds a refreshing and healthy component.
- Simple Green Salad: A bed of crisp lettuce with a light citrus dressing can cut through the richness of the quesadilla.
Additional Tips
Take your quesadilla game from good to great with these eight pro tips that address common pitfalls and add a touch of culinary finesse.
- Grate Your Own Cheese: This is the single most important tip for a superior quesadilla. Pre-shredded cheeses are coated in starches like potato starch or cellulose to prevent clumping. This coating inhibits smooth melting and can result in a greasy or grainy texture. Buying a block of cheese and shredding it yourself takes a few extra minutes but guarantees the ultimate “cheese pull.”
- Master the Heat: The temptation is to crank up the heat for faster cooking, but this is a mistake. Medium-low heat is your best friend. It gives the cheese enough time to melt completely and become gooey while the tortilla slowly toasts to a perfect, even golden-brown. High heat will burn the outside before the inside is even warm.
- Don’t Overstuff Your Quesadilla: While it’s tempting to load it up, over-filling is the primary cause of quesadillas falling apart. The filling will spill out during flipping, and the tortilla may not seal properly. A thin, even layer of filling is all you need.
- Use a Cast-Iron Skillet: While a non-stick pan works well, a well-seasoned cast-iron skillet provides superior heat retention and distribution, resulting in an exceptionally crispy and evenly browned crust on your tortilla.
- Keep Them Warm for a Crowd: If you’re making a large batch, you can keep the finished quesadillas warm and crisp by placing them on a wire rack set over a baking sheet in an oven preheated to 200°F (95°C). Don’t stack them, as this will create steam and make them soggy.
- Make the Filling Ahead of Time: To make weeknight dinner even faster, prepare the entire chicken and vegetable filling up to 3 days in advance. Store it in an airtight container in the refrigerator. When you’re ready to eat, simply assemble and cook the quesadillas.
- For an Extra-Crispy “Frico” Crust: For an over-the-top cheesy and crispy exterior, sprinkle a little extra shredded cheese directly into the pan right before you place the quesadilla down. The cheese will melt and fry into a lacy, crispy cheese crust (known as a “frico”) on the outside of the tortilla.
- Customize Your Filling: This recipe is a fantastic base for creativity. Feel free to add other ingredients to the filling mixture. A ½ cup of drained and rinsed black beans, corn kernels, or sautéed mushrooms are all excellent additions that add texture and flavor.
FAQ Section
Here are answers to some of the most frequently asked questions about making the perfect Cheesy Chicken Quesadillas.
1. Can I use corn tortillas instead of flour tortillas?
Yes, you can, but the result will be different. Corn tortillas have a more robust, earthy corn flavor but are less pliable and more prone to cracking than flour tortillas. They also create a crunchier, more “tostada-like” texture rather than the chewy-crisp texture of a flour tortilla. If using corn tortillas, it’s best to warm them slightly before filling to make them more flexible.
2. How do I store and reheat leftover quesadillas?
Store leftover quesadillas in an airtight container in the refrigerator for up to 3 days. The best way to reheat them and bring back their crispiness is in a dry skillet over medium-low heat for a few minutes per side. You can also use an air fryer at 350°F (175°C) for 3-4 minutes. Avoid the microwave, as it will make the tortilla soft and soggy.
3. Can I make these quesadillas in an oven or air fryer?
Absolutely!
- For the oven: Assemble the quesadillas, brush both sides with melted butter, and place them on a baking sheet. Bake at 425°F (220°C) for 8-10 minutes, flipping halfway through, until golden and crispy.
- For the air fryer: Brush the assembled quesadilla with butter or oil. Place it in the air fryer basket and cook at 375°F (190°C) for 5-7 minutes, flipping halfway, until the cheese is melted and the tortilla is crisp.
4. What’s the best chicken to use for quesadillas?
A store-bought rotisserie chicken is the fastest and easiest option, and the meat is already seasoned and moist. If cooking from scratch, chicken thighs will provide a richer, more succulent flavor than chicken breasts, but both work beautifully. The key is to shred the chicken into bite-sized pieces so it distributes evenly.
5. My quesadillas always turn out soggy. What am I doing wrong?
Sogginess is usually caused by one of three things: 1) The filling is too wet (make sure you cook down the vegetables and don’t use watery salsa inside the quesadilla), 2) You’re cooking on heat that is too low, which steams the tortilla instead of frying it, or 3) You’re covering the pan with a lid, which traps steam. Cook in an open pan on steady medium-low heat for the best results.
6. Can I freeze chicken quesadillas for later?
Yes, quesadillas freeze surprisingly well. Cook them fully, let them cool completely, and then either wrap them individually in plastic wrap and foil or stack them between layers of parchment paper in a freezer-safe bag. They can be frozen for up to 2 months. Reheat directly from frozen in a skillet or in the oven until heated through and crisp.
7. What are some other good filling variations?
The possibilities are endless! For a vegetarian version, substitute the chicken with a can of black beans and a cup of corn. For a beef version, use seasoned ground beef or shredded beef barbacoa. Other great additions include sautéed spinach and mushrooms, caramelized onions, or different types of peppers like poblanos for a smokier flavor.
8. How can I make a quick and easy quesadilla sauce at home?
A simple and delicious cilantro-lime crema is the perfect sauce. In a bowl, mix ½ cup of sour cream (or Greek yogurt), the juice of half a lime, 2 tablespoons of chopped fresh cilantro, and a pinch of salt. Stir until smooth. For a spicier version, add a dash of hot sauce or a pinch of chipotle powder. It’s a fresh, tangy sauce that perfectly complements the rich quesadilla.

Cheesy Chicken Quesadilla Recipe
Ingredients
This Cheesy Chicken Quesadilla recipe relies on a handful of simple, high-quality ingredients that come together to create a symphony of flavor and texture. Each component is chosen specifically for its role in achieving the perfect balance of savory, cheesy, and crisp.
- 2 tablespoons Olive Oil: Used for sautéing the vegetables and chicken, creating a rich flavor base. You can also use butter or another neutral oil.
- 1 medium Yellow Onion, finely diced: When cooked, yellow onions lose their sharp bite and become sweet and translucent, adding a foundational layer of savory sweetness to the filling.
- 1 medium Red Bell Pepper, finely diced: Provides a pop of color, a hint of sweetness, and a tender texture that complements the chicken and cheese.
- 3 cups Cooked and Shredded Chicken: The star of the show. Using a pre-cooked rotisserie chicken is a fantastic time-saver. Alternatively, you can poach or pan-sear two large chicken breasts and shred them yourself. Thigh meat also works wonderfully for a richer flavor.
- 1 teaspoon Chili Powder: This adds a mild, smoky heat and a deep, earthy flavor that is central to classic Tex-Mex cuisine.
- 1 teaspoon Ground Cumin: Provides a warm, nutty, and slightly citrusy note that pairs beautifully with the chicken and chili powder.
- ½ teaspoon Garlic Powder: Offers a savory, aromatic kick without the fuss of mincing fresh garlic.
- ½ teaspoon Smoked Paprika: A secret weapon for flavor. It imparts a beautiful reddish hue and a deep, smoky taste that elevates the entire filling.
- Salt and Black Pepper, to taste: Essential for enhancing all the other flavors. Season the filling generously.
- 4 large (10-inch) Flour Tortillas: These are the vessel for our cheesy masterpiece. Large flour tortillas are pliable, brown beautifully, and hold a generous amount of filling without tearing.
- 4 cups Shredded Cheese Blend: The key to an “ooey-gooey” quesadilla. A blend of Monterey Jack (for its superior melting quality) and a medium Cheddar (for its sharp flavor) is ideal. For the best melt, buy blocks of cheese and shred them yourself.
- 2 tablespoons Unsalted Butter, melted (for cooking): Brushing the tortillas with melted butter before pan-frying is the secret to achieving that perfectly golden-brown, crispy, and flavorful exterior.
Instructions
Follow these step-by-step instructions carefully to build your perfect quesadilla. The key is to prepare your components first (a process known in kitchens as “mise en place”) and to control the heat during cooking to ensure a crispy tortilla and perfectly melted cheese.
Step 1: Prepare the Savory Chicken Filling
- Place a large skillet or frying pan over medium heat and add the 2 tablespoons of olive oil. Once the oil is shimmering, add the finely diced yellow onion and red bell pepper.
- Sauté the vegetables for 5-7 minutes, stirring occasionally, until they have softened and the onion is translucent and fragrant. This step is crucial for developing their natural sweetness.
- Add the 3 cups of shredded chicken to the skillet with the vegetables. Stir to combine everything well.
- Sprinkle the chili powder, ground cumin, garlic powder, and smoked paprika over the chicken and vegetable mixture. Add a generous pinch of salt and black pepper.
- Stir continuously for about 2-3 minutes, allowing the spices to toast and become deeply aromatic, coating every piece of chicken and vegetable. This awakens the flavors and ensures the filling is anything but bland.
- Once the filling is well-combined and heated through, remove the skillet from the heat and set it aside.
Step 2: Assemble the Quesadillas
- Lay a large flour tortilla flat on a clean work surface or cutting board.
- Sprinkle approximately ½ cup of the shredded cheese blend evenly over one half of the tortilla, leaving a small ½-inch border around the edge.
- Spoon about one-quarter of the prepared chicken and vegetable filling (roughly ¾ cup) evenly over the cheese.
- Top the filling with another ½ cup of the shredded cheese blend. This two-layer cheese method ensures that the filling is sealed in by a cocoon of melted cheese, which helps the quesadilla hold together.
- Carefully fold the empty half of the tortilla over the filling to create a half-moon shape. Gently press down to compact the ingredients slightly.
- Repeat this assembly process for the remaining three tortillas.
Step 3: Cook to Golden-Brown Perfection
- Wipe out the skillet you used for the filling or use a new large, non-stick skillet or cast-iron pan. Place it over medium-low heat. Using medium-low heat is critical; if the heat is too high, the tortilla will burn before the cheese has a chance to melt completely.
- Using a pastry brush, lightly brush the top-facing side of one assembled quesadilla with the melted butter.
- Carefully place the quesadilla in the preheated skillet, buttered-side down. As it begins to cook, brush the new top-facing side with more melted butter.
- Cook for 3-4 minutes per side. You are looking for a deep golden-brown color and a crispy texture on the outside. You should be able to see the cheese melting and bubbling around the edges.
- Use a large spatula to carefully flip the quesadilla and cook for another 3-4 minutes on the second side until it is equally golden and crisp.
- Once cooked, transfer the quesadilla to a cutting board and let it rest for a minute or two. This allows the cheese to set slightly, which makes for cleaner cuts.
- Repeat the cooking process with the remaining quesadillas, adding more butter to the pan as needed.
Step 4: Cut and Serve Immediately
- Using a sharp knife or a pizza cutter, slice the rested quesadilla into 3 or 4 wedges.
- Serve immediately while hot, crispy, and the cheese is delightfully gooey.
Nutrition
- Serving Size: one normal portion
- Calories: 850
- Fat: 40g
- Carbohydrates: 55g
- Protein: 45g