")

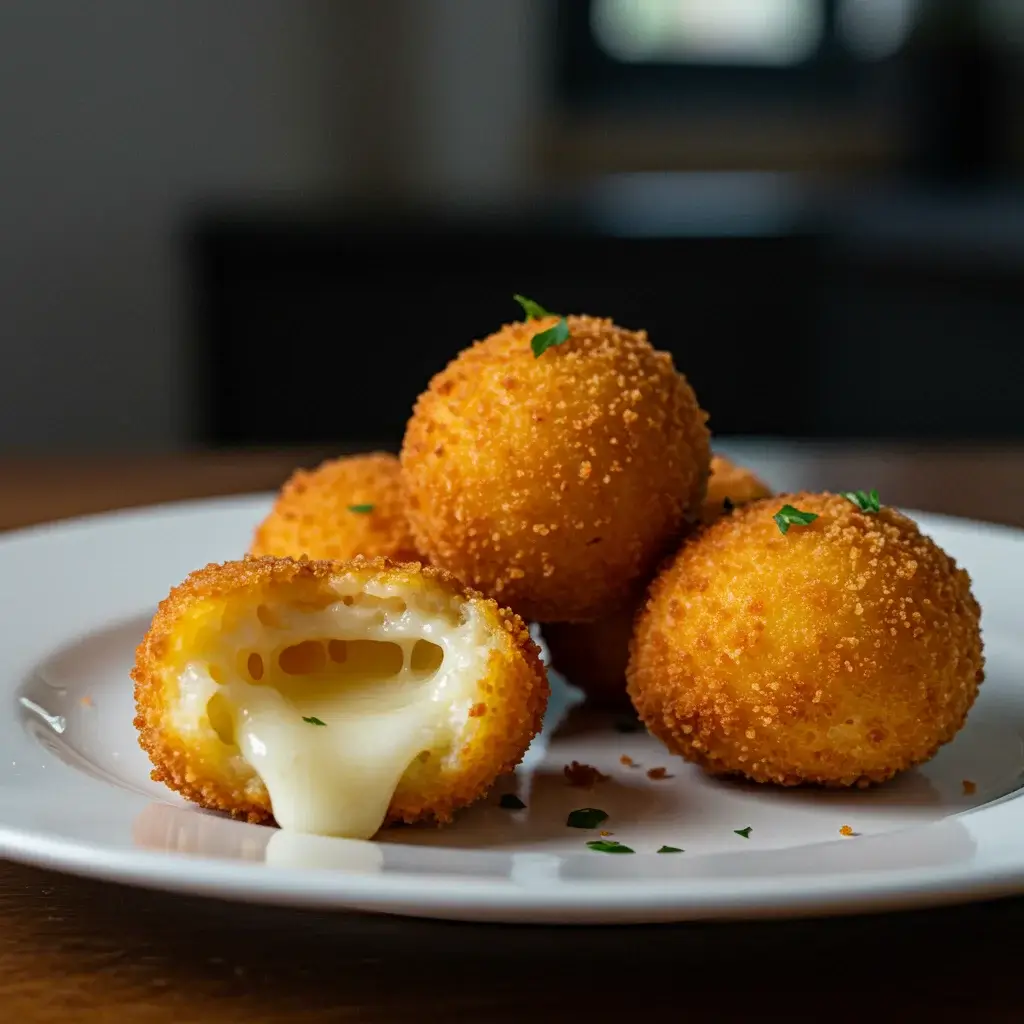

Honestly, I’ve always been a sucker for anything cheesy and deep-fried. So, when I stumbled upon the idea of Manchego Bombs, I knew I had to try them. Let me tell you, these aren’t your average mozzarella sticks. The moment I bit into one of these golden spheres, I was transported. The crispy panko crust gave way to a molten, savory heart of aged Manchego – that nutty, slightly tangy flavor was just incredible. My family? They devoured them! Even my picky eaters were reaching for seconds, and the compliments kept coming. These Cheesy Manchego Bombs are now a staple in our appetizer rotation, perfect for game nights, casual get-togethers, or frankly, any time we crave a little cheesy indulgence. They’re surprisingly easy to make, and the flavor payoff is HUGE. If you’re looking for a crowd-pleasing appetizer that’s both sophisticated and utterly addictive, you’ve just found it. Get ready to experience a bite of Spanish sunshine in every pop!
Ingredients: The Heart of the Manchego Bomb
To create these little pockets of cheesy heaven, you’ll need a handful of quality ingredients. The star of the show, of course, is Manchego cheese. But let’s break down everything you’ll need to make these Cheesy Manchego Bombs a resounding success:
- Aged Manchego Cheese (8 ounces): This is non-negotiable! Don’t be tempted to substitute with just any hard cheese. Manchego, specifically aged Manchego, is what gives these bombs their distinctive, nutty, and slightly sharp flavor. Look for Manchego that has been aged for at least 6 months for the best taste and melting properties. You’ll need about 8 ounces, which is roughly 225 grams. Ensure it’s a block that’s easy to grate.
- All-Purpose Flour (½ cup): Plain all-purpose flour forms the first layer of our breading, helping the egg wash adhere properly and creating a base for the crispy crust. ½ cup, or approximately 60 grams, should be sufficient.
- Large Eggs (2): Eggs are crucial for the breading process. They act as a binder, allowing the panko breadcrumbs to stick to the cheese balls. You’ll need 2 large eggs, lightly beaten.
- Panko Breadcrumbs (1 ½ cups): Panko breadcrumbs are the secret to that incredible crispy, golden crust. Unlike regular breadcrumbs, panko is coarser and flakier, resulting in a much lighter and crunchier texture when fried. 1 ½ cups, around 90 grams, will provide ample coating.
- Vegetable Oil (for frying): You’ll need a neutral-flavored oil with a high smoke point for deep frying. Vegetable oil, canola oil, or peanut oil are all excellent choices. You’ll need enough oil to fill your pan to a depth of about 2-3 inches, depending on the size of your pan. Approximately 3-4 cups should be adequate.
- Optional Seasonings (to taste): While the Manchego cheese is flavorful on its own, you can enhance the taste of your cheese bombs with a few optional seasonings:
- Smoked Paprika: A pinch of smoked paprika added to the panko breadcrumbs can impart a subtle smoky depth.
- Garlic Powder: A dash of garlic powder in the flour mixture can add a savory note.
- Dried Oregano or Thyme: For a hint of herbaceousness, consider adding a pinch of dried oregano or thyme to the flour or panko.
- Salt and Black Pepper: While Manchego is naturally salty, a little extra salt and freshly ground black pepper in the flour mixture and panko can balance the flavors. Taste and adjust seasoning to your preference.
Ingredient Quality Matters:
Don’t underestimate the importance of using good quality ingredients, especially the Manchego cheese. Investing in a well-aged Manchego will truly elevate the flavor of these cheese bombs. Fresh, good quality eggs and panko breadcrumbs will also contribute to the overall texture and deliciousness of the final product.
Instructions: Crafting the Perfect Cheesy Manchego Bombs
Now, let’s get to the fun part – making these delectable Cheesy Manchego Bombs! While they might seem a bit fancy, the process is actually quite straightforward. Follow these step-by-step instructions to create your own batch of golden, cheesy goodness:
Step 1: Prepare the Manchego Cheese
- Grate the Manchego: Begin by grating the aged Manchego cheese. Use a box grater or a food processor with a grating attachment. You want to achieve a medium to fine shred. This will ensure the cheese melts evenly and smoothly when fried.
- Form the Cheese Balls: Once grated, take about a tablespoon of grated Manchego at a time and roll it between your palms to form small, compact balls, roughly 1-inch in diameter. Aim for consistent size for even cooking. Don’t worry if they aren’t perfectly round; a slightly irregular shape is perfectly fine. Place the formed cheese balls on a plate or baking sheet lined with parchment paper.
Step 2: Chill the Cheese Balls (Crucial Step!)
- Chill for at least 30 minutes: This is a critical step! Place the plate or baking sheet of cheese balls in the freezer for at least 30 minutes, or even up to an hour. Chilling the cheese balls thoroughly is essential for preventing them from melting too quickly and losing their shape during frying. The colder the cheese, the better they will hold together.
Step 3: Set Up the Breading Station
- Prepare three shallow dishes: Set up a breading station with three shallow dishes or bowls.
- Dish 1: Flour Mixture: In the first dish, place the all-purpose flour. If using, add any dry seasonings like garlic powder, dried oregano, thyme, salt, and pepper to the flour and mix well to combine.
- Dish 2: Egg Wash: In the second dish, lightly beat the two large eggs with a fork until the yolks and whites are fully combined.
- Dish 3: Panko Breadcrumbs: In the third dish, place the panko breadcrumbs. If using, add smoked paprika, salt, and pepper to the panko and mix well.
Step 4: Bread the Cheese Balls
- First Coat: Flour: Remove the chilled cheese balls from the freezer. Working one at a time, gently roll each cheese ball in the flour mixture, ensuring it is evenly coated on all sides. Shake off any excess flour.
- Second Coat: Egg Wash: Dip the flour-coated cheese ball into the egg wash, ensuring it is fully submerged and coated. Allow any excess egg wash to drip off.
- Third Coat: Panko Breadcrumbs: Finally, roll the egg-washed cheese ball in the panko breadcrumbs, pressing gently to ensure the panko adheres well to the cheese. Make sure the cheese ball is completely covered in panko for maximum crispiness.
- Double Breading (Optional for Extra Crispness): For an even thicker and crispier crust, you can repeat the breading process: dip the panko-coated cheese ball back into the egg wash and then back into the panko breadcrumbs for a second layer of coating. This is recommended if you want a truly bomb-proof crust.
- Place on Baking Sheet: Place the breaded cheese balls back onto the parchment-lined baking sheet.
Step 5: Chill Breaded Cheese Balls Again (Recommended)
- Chill for another 15-20 minutes: For the best results, return the breaded cheese balls to the freezer for another 15-20 minutes. This second chilling helps the breading set and further prevents cheese leakage during frying. If you are short on time, you can skip this step, but chilling is highly recommended.
Step 6: Fry the Manchego Bombs
- Heat the Oil: Pour vegetable oil into a deep, heavy-bottomed saucepan or Dutch oven until it reaches a depth of about 2-3 inches. Heat the oil over medium-high heat until it reaches a temperature of 350°F (175°C). Use a deep-fry thermometer to ensure accurate temperature. If you don’t have a thermometer, you can test the oil by dropping a few panko breadcrumbs into it; they should sizzle and turn golden brown in about 15-20 seconds.
- Fry in Batches: Carefully add the breaded cheese balls to the hot oil in batches, being careful not to overcrowd the pan. Overcrowding will lower the oil temperature and result in less crispy cheese bombs. Fry in batches of 4-5 at a time, depending on the size of your pan.
- Fry until Golden Brown: Fry the cheese bombs for about 1-2 minutes per batch, or until they are golden brown and crispy on all sides. Keep a close eye on them, as they can brown quickly.
- Drain on Paper Towels: Remove the fried cheese bombs from the oil using a slotted spoon or spider strainer and place them on a plate lined with paper towels to drain excess oil.
Step 7: Serve Immediately and Enjoy!
- Serve Hot: Cheesy Manchego Bombs are best enjoyed immediately while they are hot and the cheese is molten and gooey. Serve them as an appetizer or snack with your favorite dipping sauces.
Important Notes for Success:
- Oil Temperature is Key: Maintaining the correct oil temperature is crucial for crispy, non-greasy cheese bombs. If the oil is too cold, the cheese bombs will absorb too much oil and become soggy. If the oil is too hot, the outside will brown too quickly before the cheese is fully melted inside.
- Don’t Overcrowd the Pan: Frying in batches is essential to maintain oil temperature and ensure even cooking and crispiness.
- Work Quickly: Once the cheese balls are breaded and ready to fry, work relatively quickly to prevent the cheese from warming up too much before frying.
- Handle with Care: Breaded cheese balls can be delicate before frying. Handle them gently during the breading and frying process to avoid breaking them.
Following these detailed instructions will guide you to create perfect Cheesy Manchego Bombs every time. The combination of the crispy panko crust and the melty, flavorful Manchego cheese is truly irresistible.
Nutrition Facts: A Cheesy Indulgence
While Cheesy Manchego Bombs are undeniably delicious, they are also an indulgent treat. Here’s an approximate nutritional breakdown per serving. Please note that these are estimates and can vary based on specific ingredients and portion sizes.
- Serving Size: Approximately 2-3 cheese bombs
- Calories per Serving: Approximately 250-350 calories
Approximate Macronutrient Breakdown (per serving):
- Fat: 18-25 grams
- Saturated Fat: 8-12 grams
- Cholesterol: 70-100 mg
- Sodium: 250-400 mg
- Carbohydrates: 15-20 grams
- Dietary Fiber: 1-2 grams
- Sugars: 1-2 grams
- Protein: 10-15 grams
Important Considerations:
- High in Fat: Due to the cheese and frying process, these cheese bombs are relatively high in fat, especially saturated fat. Enjoy them in moderation as part of a balanced diet.
- Source of Protein and Calcium: Manchego cheese provides a good source of protein and calcium.
- Calorie Dense: Be mindful of portion sizes, as these are calorie-dense snacks.
Disclaimer: These nutritional values are estimates and should be used as a general guideline only. For precise nutritional information, use a nutrition calculator and input the exact ingredients and quantities used in your recipe.
Preparation Time: From Prep to Pop in Minutes
Cheesy Manchego Bombs are surprisingly quick to prepare, especially considering the delicious results. Here’s a breakdown of the preparation time:
- Prep Time: 20-25 minutes (includes grating cheese, forming balls, and breading)
- Chilling Time: 45-75 minutes (30-60 minutes initial chill + 15-20 minutes after breading – can be slightly reduced if needed but recommended)
- Cook Time: 5-7 minutes (frying time, approximately 1-2 minutes per batch, assuming 3-4 batches)
- Total Time: Approximately 1 hour 10 minutes to 1 hour 30 minutes (including chilling)
Tips to Speed Up Prep Time:
- Use Pre-Grated Manchego (Not Recommended for Best Flavor): While not ideal for the absolute best flavor, you could use pre-grated Manchego to save a few minutes. However, freshly grated cheese melts better and tastes superior.
- Work Efficiently: Organize your breading station and work efficiently during the breading process.
- Chill Strategically: While chilling is important, you can use the chilling time to prepare dipping sauces or set the table, making the overall process feel quicker.
Despite the chilling time, the active preparation and cooking time is relatively short, making Cheesy Manchego Bombs a fantastic appetizer option even when you are somewhat pressed for time. The majority of the time is hands-off chilling, allowing you to multitask.
How to Serve: Elevating Your Manchego Bomb Experience
Cheesy Manchego Bombs are incredibly versatile and can be served in a variety of ways. Here are some fantastic serving suggestions to elevate your Manchego Bomb experience:
- Dipping Sauces: The right dipping sauce can take these cheese bombs to the next level. Consider offering a selection of sauces to cater to different tastes:
- Classic Marinara Sauce: A warm, rich marinara sauce is always a crowd-pleaser and complements the savory Manchego beautifully.
- Spicy Romesco Sauce: For a Spanish twist, serve with a vibrant Romesco sauce. Its smoky, nutty, and slightly spicy flavors are a perfect match for Manchego.
- Garlic Aioli: A creamy garlic aioli adds a luxurious touch and provides a cool contrast to the warm, cheesy bombs.
- Honey Mustard: The sweet and tangy notes of honey mustard offer a delightful balance to the richness of the cheese.
- Chipotle Mayo: For those who like a bit of heat, a chipotle mayo adds a smoky and spicy kick.
- Fig Jam or Chutney: For a more sophisticated pairing, a sweet fig jam or chutney offers a wonderful contrast to the savory cheese.
- Garnishes: A simple garnish can enhance the visual appeal and add a fresh touch:
- Fresh Parsley or Chives: Sprinkle chopped fresh parsley or chives over the cheese bombs for a pop of color and freshness.
- Smoked Paprika: A dusting of smoked paprika adds a subtle smoky aroma and visual appeal.
- Lemon Wedges: Serve with lemon wedges for a squeeze of brightness and acidity to cut through the richness.
- Serving Occasions: Cheesy Manchego Bombs are perfect for a variety of occasions:
- Appetizer: Ideal as a starter for dinner parties, holiday gatherings, or casual get-togethers.
- Party Snack: A guaranteed hit at game nights, birthday parties, or any celebration.
- Tapas Platter: Incorporate them into a Spanish-inspired tapas platter alongside olives, cured meats, and other Spanish delicacies.
- Cocktail Hour: Serve as a sophisticated snack during cocktail hour.
- Movie Night Treat: A fun and indulgent snack for a cozy movie night at home.
- Pairing Suggestions: Consider these pairings to complement your Cheesy Manchego Bombs:
- Spanish Wines: Pair with a crisp Spanish Albariño, a dry Sherry, or a light-bodied Rioja.
- Craft Beer: A light lager or a hoppy IPA can cut through the richness and complement the savory flavors.
- Sparkling Water or Lemonade: For non-alcoholic options, sparkling water with lemon or a refreshing lemonade are great choices.
- Presentation:
- Serve Immediately: For the best texture and flavor, serve Cheesy Manchego Bombs immediately after frying while they are hot and crispy.
- Arrange Attractively: Arrange the cheese bombs on a platter or serving dish lined with parchment paper or a doily. Garnish and serve with dipping sauces in small bowls alongside.
- Keep Warm (Optional): If you need to keep them warm for a short period, you can place them in a low oven (around 200°F or 95°C) for up to 15-20 minutes, but be aware they may lose some crispiness over time.
By considering these serving suggestions, you can create a memorable and delicious experience centered around your homemade Cheesy Manchego Bombs.
Additional Tips for Manchego Bomb Perfection
To ensure your Cheesy Manchego Bombs are absolutely perfect every time, here are five additional tips to keep in mind:
- Use Cold Cheese and Keep it Cold: The colder the Manchego cheese is when you start forming and breading the balls, the better they will hold their shape during frying. Keep the grated cheese and formed balls chilled in the freezer throughout the process. If you notice the cheese starting to soften while you are breading, pop them back into the freezer for a few minutes. This is the most crucial tip for preventing cheese leakage.
- Don’t Skip the Double Chilling (Especially if a Beginner): The two chilling stages – before breading and after breading – are not just suggestions; they are essential for success, especially if you are new to making fried cheese balls. The initial chilling hardens the cheese, and the second chilling sets the breading and further chills the cheese, minimizing melting and maximizing crispiness.
- Maintain Consistent Oil Temperature: Invest in a deep-fry thermometer and monitor the oil temperature throughout the frying process. Aim for a consistent 350°F (175°C). If the temperature drops too low when you add the cheese bombs, allow it to recover before adding more. Adjust the heat as needed to maintain the optimal temperature. Consistent temperature leads to even cooking and crispy results.
- Don’t Overcrowd the Frying Pan: Frying in batches is crucial. Overcrowding the pan will lower the oil temperature, resulting in soggy, greasy cheese bombs and uneven cooking. Fry in small batches, allowing ample space for the cheese bombs to fry evenly and maintain the oil temperature.
- Experiment with Flavor Variations (Subtly): While Manchego is the star, you can subtly enhance the flavor profile. Consider:
- Adding a pinch of cayenne pepper to the flour mixture for a touch of heat.
- Mixing finely chopped fresh herbs like rosemary or thyme into the grated cheese before forming balls.
- Using flavored panko breadcrumbs (garlic and herb, Italian seasoning) for an extra layer of flavor.
- A tiny speck of truffle oil mixed with the grated cheese (use sparingly as truffle oil can be overpowering).
- Serving with different dipping sauces as mentioned earlier is a fantastic way to offer flavor variety without altering the core recipe.
By incorporating these tips into your Manchego Bomb making process, you’ll be well on your way to creating appetizer perfection that will impress everyone who tries them.
FAQ: Your Cheesy Manchego Bomb Questions Answered
Here are answers to some frequently asked questions about making Cheesy Manchego Bombs:
Q1: Can I use a different type of cheese instead of Manchego?
A: While Manchego cheese is highly recommended for its unique flavor profile, you could potentially use other semi-hard to hard cheeses with good melting properties. Good alternatives might include:
- Aged Cheddar: Offers a sharp and tangy flavor, though less nutty than Manchego.
- Gruyere: A nutty and slightly sweet cheese that melts well, but milder than Manchego.
- Pecorino Romano: A sharper, saltier sheep’s milk cheese, which could be interesting, but use sparingly due to its intensity.
- Monterey Jack: A milder, more neutral cheese – less flavorful than Manchego but melts beautifully.
However, keep in mind that substituting Manchego will alter the overall flavor profile. For the authentic “Manchego Bomb” experience, sticking with aged Manchego is best.
Q2: Can I make Cheesy Manchego Bombs ahead of time?
A: You can prepare the cheese balls and bread them ahead of time. Up to the point of frying, they can be made ahead. Here are options:
- Breaded and Chilled (Short Term): You can bread the cheese balls completely and keep them chilled in the freezer for up to 2-3 hours before frying. This is ideal if you want to prep ahead for a party and fry them just before serving.
- Frozen (Longer Term): For longer storage, you can freeze the breaded cheese balls. Place them in a single layer on a baking sheet in the freezer until solid, then transfer them to an airtight freezer bag. They can be frozen for up to 1 month. Fry them directly from frozen, but you may need to add a minute or two to the frying time to ensure they are heated through and golden brown.
However, for the absolute best texture and flavor, frying them fresh is always recommended.
Q3: Can I bake Cheesy Manchego Bombs instead of frying?
A: While frying is what gives them their signature crispy crust and molten interior, you can attempt to bake them, but the results will be different. Baked Manchego Bombs will likely be less crispy and may not achieve the same golden-brown color and texture as fried ones. If baking:
- Preheat oven to 400°F (200°C).
- Place breaded cheese bombs on a baking sheet lined with parchment paper.
- Spray generously with cooking spray (oil).
- Bake for 10-15 minutes, or until golden brown and heated through, flipping halfway through.
Baking is a healthier alternative, but expect a less authentic “bomb” experience in terms of texture.
Q4: How do I prevent the cheese from leaking out during frying?
A: Cheese leakage is a common concern when frying cheese balls. The key is to follow these tips:
- Chill the cheese thoroughly: As mentioned earlier, chilling is crucial.
- Compact cheese balls: Ensure the cheese balls are tightly rolled and compact.
- Seal the breading well: Make sure the breading completely encases the cheese, with no gaps or cracks. Press the panko breadcrumbs on firmly.
- Maintain oil temperature: Fry at the correct temperature (350°F/175°C). Oil that’s too cold will cause the breading to absorb oil and become soggy, potentially leading to cheese leakage.
- Don’t overcook: Fry just until golden brown and crispy, about 1-2 minutes per batch. Overcooking can cause the cheese to melt too much and leak out.
Q5: What dipping sauces go best with Cheesy Manchego Bombs?
A: As mentioned in the “How to Serve” section, there are many delicious dipping sauces that complement Cheesy Manchego Bombs. Some top recommendations include:
- Marinara Sauce: Classic and versatile.
- Romesco Sauce: Spanish-inspired, smoky, nutty, and slightly spicy.
- Garlic Aioli: Creamy and garlicky.
- Honey Mustard: Sweet and tangy.
- Chipotle Mayo: Spicy and smoky.
- Fig Jam or Chutney: Sweet and sophisticated.

Cheesy Manchego Bombs Delight
Ingredients
To create these little pockets of cheesy heaven, you’ll need a handful of quality ingredients. The star of the show, of course, is Manchego cheese. But let’s break down everything you’ll need to make these Cheesy Manchego Bombs a resounding success:
- Aged Manchego Cheese (8 ounces): This is non-negotiable! Don’t be tempted to substitute with just any hard cheese. Manchego, specifically aged Manchego, is what gives these bombs their distinctive, nutty, and slightly sharp flavor. Look for Manchego that has been aged for at least 6 months for the best taste and melting properties. You’ll need about 8 ounces, which is roughly 225 grams. Ensure it’s a block that’s easy to grate.
- All-Purpose Flour (½ cup): Plain all-purpose flour forms the first layer of our breading, helping the egg wash adhere properly and creating a base for the crispy crust. ½ cup, or approximately 60 grams, should be sufficient.
- Large Eggs (2): Eggs are crucial for the breading process. They act as a binder, allowing the panko breadcrumbs to stick to the cheese balls. You’ll need 2 large eggs, lightly beaten.
- Panko Breadcrumbs (1 ½ cups): Panko breadcrumbs are the secret to that incredible crispy, golden crust. Unlike regular breadcrumbs, panko is coarser and flakier, resulting in a much lighter and crunchier texture when fried. 1 ½ cups, around 90 grams, will provide ample coating.
- Vegetable Oil (for frying): You’ll need a neutral-flavored oil with a high smoke point for deep frying. Vegetable oil, canola oil, or peanut oil are all excellent choices. You’ll need enough oil to fill your pan to a depth of about 2-3 inches, depending on the size of your pan. Approximately 3-4 cups should be adequate.
- Optional Seasonings (to taste): While the Manchego cheese is flavorful on its own, you can enhance the taste of your cheese bombs with a few optional seasonings:
- Smoked Paprika: A pinch of smoked paprika added to the panko breadcrumbs can impart a subtle smoky depth.
- Garlic Powder: A dash of garlic powder in the flour mixture can add a savory note.
- Dried Oregano or Thyme: For a hint of herbaceousness, consider adding a pinch of dried oregano or thyme to the flour or panko.
- Salt and Black Pepper: While Manchego is naturally salty, a little extra salt and freshly ground black pepper in the flour mixture and panko can balance the flavors. Taste and adjust seasoning to your preference.
Instructions
Now, let’s get to the fun part – making these delectable Cheesy Manchego Bombs! While they might seem a bit fancy, the process is actually quite straightforward. Follow these step-by-step instructions to create your own batch of golden, cheesy goodness:
Step 1: Prepare the Manchego Cheese
- Grate the Manchego: Begin by grating the aged Manchego cheese. Use a box grater or a food processor with a grating attachment. You want to achieve a medium to fine shred. This will ensure the cheese melts evenly and smoothly when fried.
- Form the Cheese Balls: Once grated, take about a tablespoon of grated Manchego at a time and roll it between your palms to form small, compact balls, roughly 1-inch in diameter. Aim for consistent size for even cooking. Don’t worry if they aren’t perfectly round; a slightly irregular shape is perfectly fine. Place the formed cheese balls on a plate or baking sheet lined with parchment paper.
Step 2: Chill the Cheese Balls (Crucial Step!)
- Chill for at least 30 minutes: This is a critical step! Place the plate or baking sheet of cheese balls in the freezer for at least 30 minutes, or even up to an hour. Chilling the cheese balls thoroughly is essential for preventing them from melting too quickly and losing their shape during frying. The colder the cheese, the better they will hold together.
Step 3: Set Up the Breading Station
- Prepare three shallow dishes: Set up a breading station with three shallow dishes or bowls.
- Dish 1: Flour Mixture: In the first dish, place the all-purpose flour. If using, add any dry seasonings like garlic powder, dried oregano, thyme, salt, and pepper to the flour and mix well to combine.
- Dish 2: Egg Wash: In the second dish, lightly beat the two large eggs with a fork until the yolks and whites are fully combined.
- Dish 3: Panko Breadcrumbs: In the third dish, place the panko breadcrumbs. If using, add smoked paprika, salt, and pepper to the panko and mix well.
Step 4: Bread the Cheese Balls
- First Coat: Flour: Remove the chilled cheese balls from the freezer. Working one at a time, gently roll each cheese ball in the flour mixture, ensuring it is evenly coated on all sides. Shake off any excess flour.
- Second Coat: Egg Wash: Dip the flour-coated cheese ball into the egg wash, ensuring it is fully submerged and coated. Allow any excess egg wash to drip off.
- Third Coat: Panko Breadcrumbs: Finally, roll the egg-washed cheese ball in the panko breadcrumbs, pressing gently to ensure the panko adheres well to the cheese. Make sure the cheese ball is completely covered in panko for maximum crispiness.
- Double Breading (Optional for Extra Crispness): For an even thicker and crispier crust, you can repeat the breading process: dip the panko-coated cheese ball back into the egg wash and then back into the panko breadcrumbs for a second layer of coating. This is recommended if you want a truly bomb-proof crust.
- Place on Baking Sheet: Place the breaded cheese balls back onto the parchment-lined baking sheet.
Step 5: Chill Breaded Cheese Balls Again (Recommended)
- Chill for another 15-20 minutes: For the best results, return the breaded cheese balls to the freezer for another 15-20 minutes. This second chilling helps the breading set and further prevents cheese leakage during frying. If you are short on time, you can skip this step, but chilling is highly recommended.
Step 6: Fry the Manchego Bombs
- Heat the Oil: Pour vegetable oil into a deep, heavy-bottomed saucepan or Dutch oven until it reaches a depth of about 2-3 inches. Heat the oil over medium-high heat until it reaches a temperature of 350°F (175°C). Use a deep-fry thermometer to ensure accurate temperature. If you don’t have a thermometer, you can test the oil by dropping a few panko breadcrumbs into it; they should sizzle and turn golden brown in about 15-20 seconds.
- Fry in Batches: Carefully add the breaded cheese balls to the hot oil in batches, being careful not to overcrowd the pan. Overcrowding will lower the oil temperature and result in less crispy cheese bombs. Fry in batches of 4-5 at a time, depending on the size of your pan.
- Fry until Golden Brown: Fry the cheese bombs for about 1-2 minutes per batch, or until they are golden brown and crispy on all sides. Keep a close eye on them, as they can brown quickly.
- Drain on Paper Towels: Remove the fried cheese bombs from the oil using a slotted spoon or spider strainer and place them on a plate lined with paper towels to drain excess oil.
Step 7: Serve Immediately and Enjoy!
- Serve Hot: Cheesy Manchego Bombs are best enjoyed immediately while they are hot and the cheese is molten and gooey. Serve them as an appetizer or snack with your favorite dipping sauces.
Nutrition
- Serving Size: one normal portion
- Calories: 350
- Sugar: 2 grams
- Sodium: 400 mg
- Saturated Fat: 12 grams
- Carbohydrates: 20 grams
- Fiber: 2 grams
- Protein: 15 grams
- Cholesterol: 100 mg