")

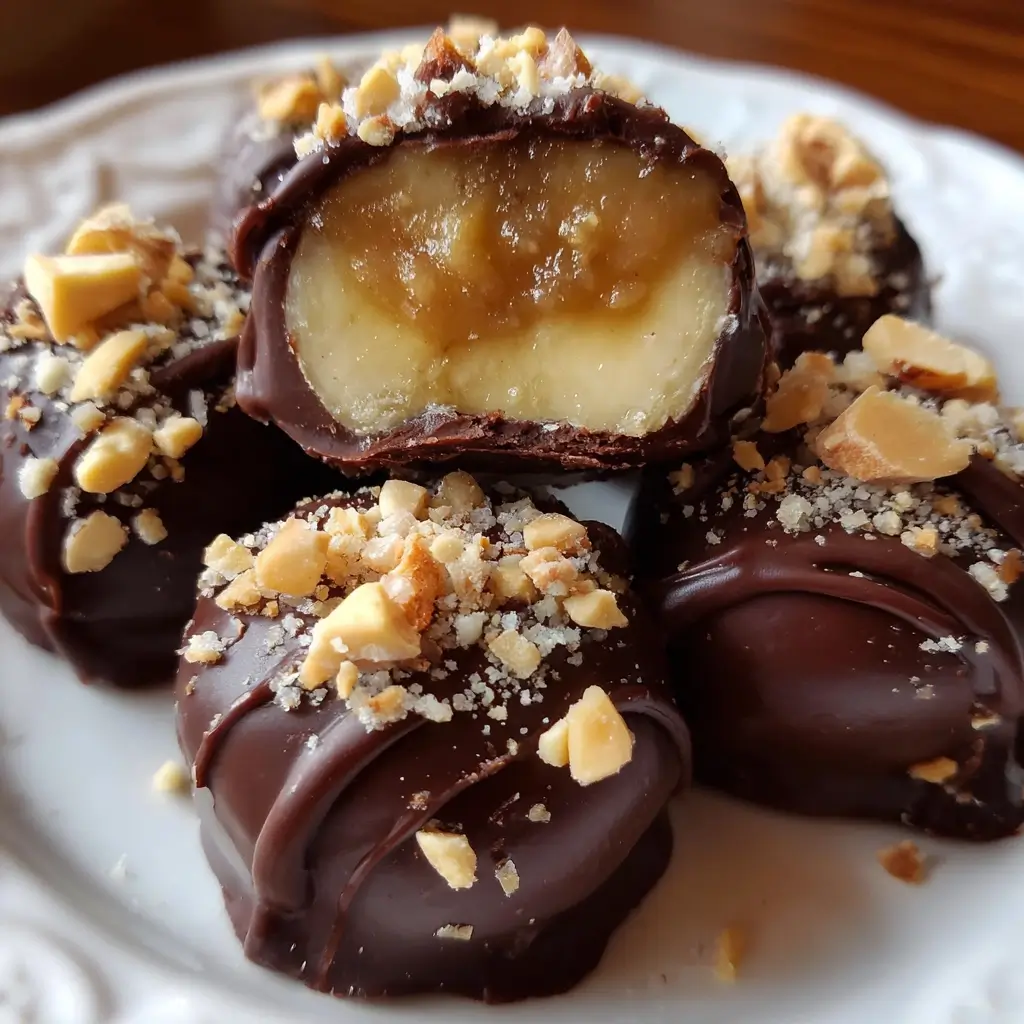

It started on one of those endlessly long afternoons, the kind where the clock seems to be moving backward. My kids were home from school, a whirlwind of energy and demands for snacks, and my creative culinary juices were running on empty. I stared into the pantry, hoping for a miracle. My eyes landed on a bunch of bananas, just past their prime yellow and speckled with the promise of sweetness. Next to them, a jar of creamy chocolate hazelnut spread, and in the baking cupboard, a bag of rich, dark chocolate chips. A lightbulb went off. What if I combined these three simple, universally loved ingredients into one perfect bite? Twenty minutes of active work and a little patience waiting for the freezer to work its magic later, I presented the result: Chocolate Hazelnut Banana Bites. The reaction was pure, unadulterated joy. The satisfying snap of the chocolate shell, followed by the creamy, cold banana and the rich, nutty spread was an instant sensation. It wasn’t just a snack; it was an experience. These little bites became our go-to treat, perfect for a quick energy boost, a healthy-ish dessert, or a fun weekend kitchen project. They are proof that sometimes, the most magnificent creations are born from the simplest of ideas and a desperate need to quell the “I’m hungry!” chorus.
Ingredients
- 3 large, ripe bananas: Choose bananas that are firm but have brown spots. These spots indicate a higher sugar content, which means a naturally sweeter and more flavorful bite without needing to add extra sugar.
- ½ cup creamy chocolate hazelnut spread: Use your favorite brand. The spread acts as a delicious, nutty “glue” and adds a wonderful layer of creamy texture and flavor that perfectly complements the banana.
- 1 ½ cups high-quality chocolate chips or melting wafers: You can use semi-sweet, dark, or milk chocolate. Dark chocolate (60-70% cacao) provides a rich, intense flavor that contrasts beautifully with the sweet banana, while semi-sweet or milk chocolate will result in a sweeter, more classic treat.
- ½ cup chopped hazelnuts, toasted: Toasting the hazelnuts is a crucial step that unlocks their deep, nutty aroma and provides an essential crunchy texture to the final bite.
- 1 teaspoon coconut oil (optional): This is a secret weapon for achieving a perfectly smooth, glossy chocolate shell. It helps the chocolate melt more evenly and thin out slightly, making it easier to coat the banana bites.
Instructions
- Prepare Your Workstation: Line a large baking sheet or tray with parchment paper. This is a critical step, as it will prevent the banana bites from sticking to the tray after freezing, ensuring they release easily and maintain their perfect shape. Make sure the baking sheet will fit comfortably in your freezer.
- Slice the Bananas: Peel the three ripe bananas and slice them into uniform rounds, approximately ½-inch thick. Consistency in thickness is key here, as it ensures that each bite freezes evenly and has a similar ratio of banana to chocolate.
- Assemble the Banana Sandwiches: Arrange half of the banana slices on the parchment-lined baking sheet in a single layer. Using a small spoon or a piping bag for extra precision, place a small dollop (about ½ teaspoon) of the chocolate hazelnut spread onto the center of each banana slice. Gently place another banana slice on top of the spread to create a small “sandwich.” Press down lightly to ensure the spread reaches the edges without oozing out too much.
- First Freeze (The Flash Freeze): Place the baking sheet with the assembled banana sandwiches into the freezer for at least 30-60 minutes. This initial freeze is essential. It firms up the banana and the hazelnut spread, making the bites solid enough to be dipped into the warm, melted chocolate without falling apart.
- Toast the Hazelnuts: While the banana bites are in their first freeze, prepare your hazelnuts. Place the chopped hazelnuts in a dry, small skillet over medium heat. Toast for 3-5 minutes, stirring or shaking the pan frequently to prevent burning. You’ll know they’re ready when they become fragrant and turn a light golden brown. Immediately transfer them to a small bowl to cool down.
- Melt the Chocolate: When the banana bites are nearly done with their initial freeze, it’s time to melt the chocolate. You can use one of two methods:
- Microwave Method: Place the chocolate chips and the optional coconut oil in a microwave-safe bowl. Heat in 30-second intervals, stirring well after each interval, until the chocolate is almost completely melted. Remove from the microwave and stir continuously until the residual heat melts the remaining chips and the mixture is silky smooth. Be careful not to overheat the chocolate, as it can become grainy or seize.
- Double Boiler Method: If you don’t have a microwave or prefer a gentler method, set up a double boiler. Fill a small saucepan with about an inch of water and bring it to a simmer. Place a heatproof bowl (that fits snugly over the saucepan without touching the water) on top. Add the chocolate chips and coconut oil to the bowl. Stir occasionally until the chocolate is completely melted and smooth. This method provides gentle, even heat, reducing the risk of scorching the chocolate.
- Dip and Coat: Remove the frozen banana sandwiches from the freezer. Working quickly, use a fork or two toothpicks to dip one banana bite at a time into the melted chocolate. Submerge it completely, then lift it out, allowing any excess chocolate to drip back into the bowl. This ensures a clean, even coating.
- Add the Crunch: Immediately after dipping, place the chocolate-coated bite back onto the parchment-lined baking sheet. While the chocolate is still wet, sprinkle the top generously with the toasted, chopped hazelnuts. This is your window to add the crunchy texture, so don’t delay. Repeat this process with all the remaining banana bites.
- Final Freeze: Once all the bites are coated and sprinkled with hazelnuts, place the baking sheet back into the freezer for the final set. Let them freeze for at least 1-2 hours, or until the chocolate shell is completely hard and the entire bite is frozen solid.
- Store and Enjoy: Once fully frozen, you can transfer the Chocolate Hazelnut Banana Bites to an airtight, freezer-safe container or a zip-top bag. Layering them with small squares of parchment paper will prevent them from sticking together. They are now ready to be enjoyed straight from the freezer whenever a craving strikes!
Nutrition Facts
- Servings: This recipe makes approximately 15-18 bites.
- Calories: Approximately 110-130 calories per bite.
- Potassium: Bananas are a fantastic source of potassium, which is vital for maintaining proper heart function, muscle contractions, and fluid balance in the body.
- Healthy Fats: The hazelnuts and optional coconut oil contribute monounsaturated and polyunsaturated fats, which are beneficial for heart health and can help you feel full and satisfied.
- Fiber: With contributions from the bananas and hazelnuts, these bites provide dietary fiber, which aids in digestion and helps to regulate blood sugar levels.
Preparation Time
The beauty of this recipe lies in its simplicity and minimal active time.
- Active Preparation Time: 20-25 minutes. This includes slicing the bananas, assembling the sandwiches, toasting the nuts, and melting/dipping the chocolate.
- Freezing Time: 2-3 hours (total). This is broken into a 30-60 minute initial freeze and a 1-2 hour final freeze to ensure the bites are perfectly solid.
How to Serve
These versatile bites can be served in a multitude of ways, elevating them from a simple snack to a sophisticated treat. Here are some creative ideas:
- The Ultimate Afternoon Snack:
- Serve them straight from the freezer for a refreshing and satisfying pick-me-up that curbs sugar cravings and provides a boost of energy to get you through the afternoon slump.
- As an Elegant Dessert Platter:
- Arrange them on a chilled slate or marble platter for a party.
- Garnish the platter with fresh mint leaves, a few whole toasted hazelnuts, and a light dusting of cocoa powder for a professional, restaurant-quality presentation.
- Deconstructed Sundae Topping:
- Roughly chop one or two frozen bites and use them as a topping for a bowl of vanilla bean or coffee-flavored ice cream.
- The mix of temperatures and textures (cold, crunchy, creamy) creates an incredibly decadent dessert experience.
- Elevated Yogurt Parfait:
- Layer crushed bites between Greek yogurt and fresh berries in a clear glass. It adds a delightful chocolatey crunch and transforms a simple breakfast or snack into something truly special.
- Kid-Friendly Lunchbox Treat:
- Pack one or two bites in an insulated lunchbox with an ice pack. They will thaw slightly by lunchtime, resulting in a soft, chilled treat that’s a guaranteed hit with the kids.
- Post-Workout Refuel:
- The combination of carbohydrates from the banana for energy replenishment and protein from the hazelnuts for muscle repair makes this a surprisingly effective and delicious post-workout snack.
- With a Hot Beverage:
- Pair a bite with a hot cup of coffee, espresso, or a chai latte. The contrast of the cold, frozen treat with the warm, comforting drink is a delightful sensory experience.
Additional Tips
To master this recipe and customize it to your liking, here are eight essential tips that will guarantee perfect results every time.
- Don’t Skip the Toast: Toasting the hazelnuts is a non-negotiable step for flavor. It intensifies their nuttiness, makes them crunchier, and removes any raw or slightly bitter taste. The aroma alone will tell you it’s worth the extra five minutes.
- The Lemon Juice Trick: If you’re concerned about the banana slices browning while you assemble them, lightly brush them with a small amount of lemon juice. The citric acid helps prevent oxidation. Use it sparingly to avoid altering the flavor profile.
- Experiment with Toppings: While toasted hazelnuts are the classic choice, don’t be afraid to get creative! Try sprinkling the wet chocolate with other delicious toppings like shredded coconut, flaky sea salt (for a sweet and salty kick), colorful sprinkles, finely chopped pistachios, or even crushed freeze-dried raspberries.
- Achieve the Perfect Dip: The key to a clean, even chocolate coating is to work efficiently. Use a dinner fork to lower and lift the banana bites from the chocolate. This allows the excess chocolate to drip off through the tines, preventing a thick, messy pool from forming at the base of your bite on the parchment paper.
- Make it Vegan and Allergy-Friendly: This recipe is incredibly easy to adapt. To make it vegan, simply use a dairy-free chocolate hazelnut spread (many brands are available) and ensure your chocolate chips are certified vegan. This recipe is also naturally gluten-free, but always double-check the labels on your chocolate and spread to be safe from cross-contamination.
- Control the Sweetness: The ripeness of your bananas directly impacts the sweetness of the final product. For a less sweet, more tart bite, use bananas that are perfectly yellow with no spots. For a candy-like sweetness, use very ripe bananas with plenty of brown spots.
- Proper Storage is Key: To prevent your bites from developing freezer burn or absorbing other freezer odors, store them in a high-quality, airtight container. Placing small sheets of parchment or wax paper between layers is an excellent way to stop them from freezing into one giant clump, making it easy to grab just one or two at a time.
- Chocolate Quality Matters: Since chocolate is a star ingredient, using a good quality brand will make a noticeable difference. Higher-quality chocolate and melting wafers not only taste better but also melt more smoothly and create a more satisfying “snap” when you bite into the frozen treat.
FAQ Section
1. How long will these Chocolate Hazelnut Banana Bites last in the freezer?
When stored correctly in an airtight container, these bites will maintain their best quality for up to two weeks. After that, they are still safe to eat, but you might notice some ice crystals forming (freezer burn), which can slightly alter the texture of the chocolate and banana.
2. Can I use a different kind of nut or leave them out entirely?
Absolutely! If you’re not a fan of hazelnuts or have an allergy, you can easily substitute them with other toasted nuts like chopped almonds, pecans, or walnuts. For a nut-free version, simply omit the nuts and the hazelnut spread. You can sprinkle them with shredded coconut, sprinkles, or just enjoy the simple perfection of a chocolate-covered banana bite.
3. My melted chocolate seems too thick for dipping. What can I do?
This is a common issue, especially with some brands of chocolate chips. The secret is to add a small amount of fat to thin it out. Stir in ½ to 1 teaspoon of coconut oil or another neutral-flavored oil into your melted chocolate. This will make it smoother and more fluid, creating a thinner, more elegant shell on your banana bites.
4. Can I use bananas that are already frozen?
It’s highly recommended to start with fresh, not frozen, bananas. Slicing and assembling the sandwiches with already-frozen bananas is extremely difficult. Furthermore, bananas that are frozen and then thawed tend to become very mushy and release a lot of water, which will prevent the chocolate from adhering properly.
5. Are these treats healthy?
“Healthy” is relative, but compared to many other desserts and processed snacks, these are a fantastic option. They are made with whole-food ingredients like fruit and nuts. Bananas provide potassium and fiber, while hazelnuts offer healthy fats and protein. Using dark chocolate can also add antioxidants. They are a wonderful choice for a balanced treat in moderation.
6. Why do I need to do a “flash freeze” before dipping in chocolate?
The initial 30-60 minute freeze is crucial because it solidifies the banana and the hazelnut spread. If you try to dip a room-temperature banana sandwich into warm melted chocolate, it will likely fall apart, creating a messy situation. The flash freeze ensures the bites are firm enough to withstand the dipping process and also helps the chocolate shell set almost instantly upon contact.
7. Can I make these ahead of time for a party?
Yes, these are the perfect make-ahead party dessert! You can prepare them completely up to a week in advance and store them in the freezer. This frees you up on the day of the event. Just pull them out of the freezer and arrange them on a platter right before your guests arrive. They are best served frozen, so don’t let them sit out at room temperature for too long.
8. Can I use a different type of spread inside?
Certainly! The chocolate hazelnut spread can be swapped out for other delicious options. Try using creamy peanut butter, almond butter, sunflower seed butter (for a nut-free option), or even cookie butter for a different flavor profile. Each variation will create a uniquely delicious bite.

Chocolate Hazelnut Banana Bites
Ingredients
- 3 large, ripe bananas: Choose bananas that are firm but have brown spots. These spots indicate a higher sugar content, which means a naturally sweeter and more flavorful bite without needing to add extra sugar.
- ½ cup creamy chocolate hazelnut spread: Use your favorite brand. The spread acts as a delicious, nutty “glue” and adds a wonderful layer of creamy texture and flavor that perfectly complements the banana.
- 1 ½ cups high-quality chocolate chips or melting wafers: You can use semi-sweet, dark, or milk chocolate. Dark chocolate (60-70% cacao) provides a rich, intense flavor that contrasts beautifully with the sweet banana, while semi-sweet or milk chocolate will result in a sweeter, more classic treat.
- ½ cup chopped hazelnuts, toasted: Toasting the hazelnuts is a crucial step that unlocks their deep, nutty aroma and provides an essential crunchy texture to the final bite.
- 1 teaspoon coconut oil (optional): This is a secret weapon for achieving a perfectly smooth, glossy chocolate shell. It helps the chocolate melt more evenly and thin out slightly, making it easier to coat the banana bites.
Instructions
- Prepare Your Workstation: Line a large baking sheet or tray with parchment paper. This is a critical step, as it will prevent the banana bites from sticking to the tray after freezing, ensuring they release easily and maintain their perfect shape. Make sure the baking sheet will fit comfortably in your freezer.
- Slice the Bananas: Peel the three ripe bananas and slice them into uniform rounds, approximately ½-inch thick. Consistency in thickness is key here, as it ensures that each bite freezes evenly and has a similar ratio of banana to chocolate.
- Assemble the Banana Sandwiches: Arrange half of the banana slices on the parchment-lined baking sheet in a single layer. Using a small spoon or a piping bag for extra precision, place a small dollop (about ½ teaspoon) of the chocolate hazelnut spread onto the center of each banana slice. Gently place another banana slice on top of the spread to create a small “sandwich.” Press down lightly to ensure the spread reaches the edges without oozing out too much.
- First Freeze (The Flash Freeze): Place the baking sheet with the assembled banana sandwiches into the freezer for at least 30-60 minutes. This initial freeze is essential. It firms up the banana and the hazelnut spread, making the bites solid enough to be dipped into the warm, melted chocolate without falling apart.
- Toast the Hazelnuts: While the banana bites are in their first freeze, prepare your hazelnuts. Place the chopped hazelnuts in a dry, small skillet over medium heat. Toast for 3-5 minutes, stirring or shaking the pan frequently to prevent burning. You’ll know they’re ready when they become fragrant and turn a light golden brown. Immediately transfer them to a small bowl to cool down.
- Melt the Chocolate: When the banana bites are nearly done with their initial freeze, it’s time to melt the chocolate. You can use one of two methods:
- Microwave Method: Place the chocolate chips and the optional coconut oil in a microwave-safe bowl. Heat in 30-second intervals, stirring well after each interval, until the chocolate is almost completely melted. Remove from the microwave and stir continuously until the residual heat melts the remaining chips and the mixture is silky smooth. Be careful not to overheat the chocolate, as it can become grainy or seize.
- Double Boiler Method: If you don’t have a microwave or prefer a gentler method, set up a double boiler. Fill a small saucepan with about an inch of water and bring it to a simmer. Place a heatproof bowl (that fits snugly over the saucepan without touching the water) on top. Add the chocolate chips and coconut oil to the bowl. Stir occasionally until the chocolate is completely melted and smooth. This method provides gentle, even heat, reducing the risk of scorching the chocolate.
- Dip and Coat: Remove the frozen banana sandwiches from the freezer. Working quickly, use a fork or two toothpicks to dip one banana bite at a time into the melted chocolate. Submerge it completely, then lift it out, allowing any excess chocolate to drip back into the bowl. This ensures a clean, even coating.
- Add the Crunch: Immediately after dipping, place the chocolate-coated bite back onto the parchment-lined baking sheet. While the chocolate is still wet, sprinkle the top generously with the toasted, chopped hazelnuts. This is your window to add the crunchy texture, so don’t delay. Repeat this process with all the remaining banana bites.
- Final Freeze: Once all the bites are coated and sprinkled with hazelnuts, place the baking sheet back into the freezer for the final set. Let them freeze for at least 1-2 hours, or until the chocolate shell is completely hard and the entire bite is frozen solid.
- Store and Enjoy: Once fully frozen, you can transfer the Chocolate Hazelnut Banana Bites to an airtight, freezer-safe container or a zip-top bag. Layering them with small squares of parchment paper will prevent them from sticking together. They are now ready to be enjoyed straight from the freezer whenever a craving strikes!
Nutrition
- Serving Size: one normal portion
- Calories: 130