")


There are certain recipes that become woven into the fabric of a family, and for us, these Chocolate Peanut Butter Oat Bars are one of them. I first made them on a frantic Tuesday afternoon, needing a quick, no-fuss snack that could satisfy a house full of hungry kids and a perpetually snacky husband. I was skeptical that something so simple, with no baking required, could really be that good. I was wrong. The moment I pulled the chilled pan from the fridge and cut into that perfect, glossy chocolate topping, I knew we had a winner. The base was dense and chewy, bursting with the nutty flavor of peanut butter and the wholesome texture of oats. The chocolate layer on top cracked just slightly before melting in your mouth, creating a perfect balance of sweet and salty. That first batch disappeared in less than a day, with requests for a second before the last bar was even gone. Now, it’s our go-to for everything: a quick breakfast on the run, a packed lunchbox treat, a post-workout energy boost, and even a simple dessert to serve guests. It’s the kind of reliable, crowd-pleasing recipe that makes you feel like a kitchen hero with minimal effort.
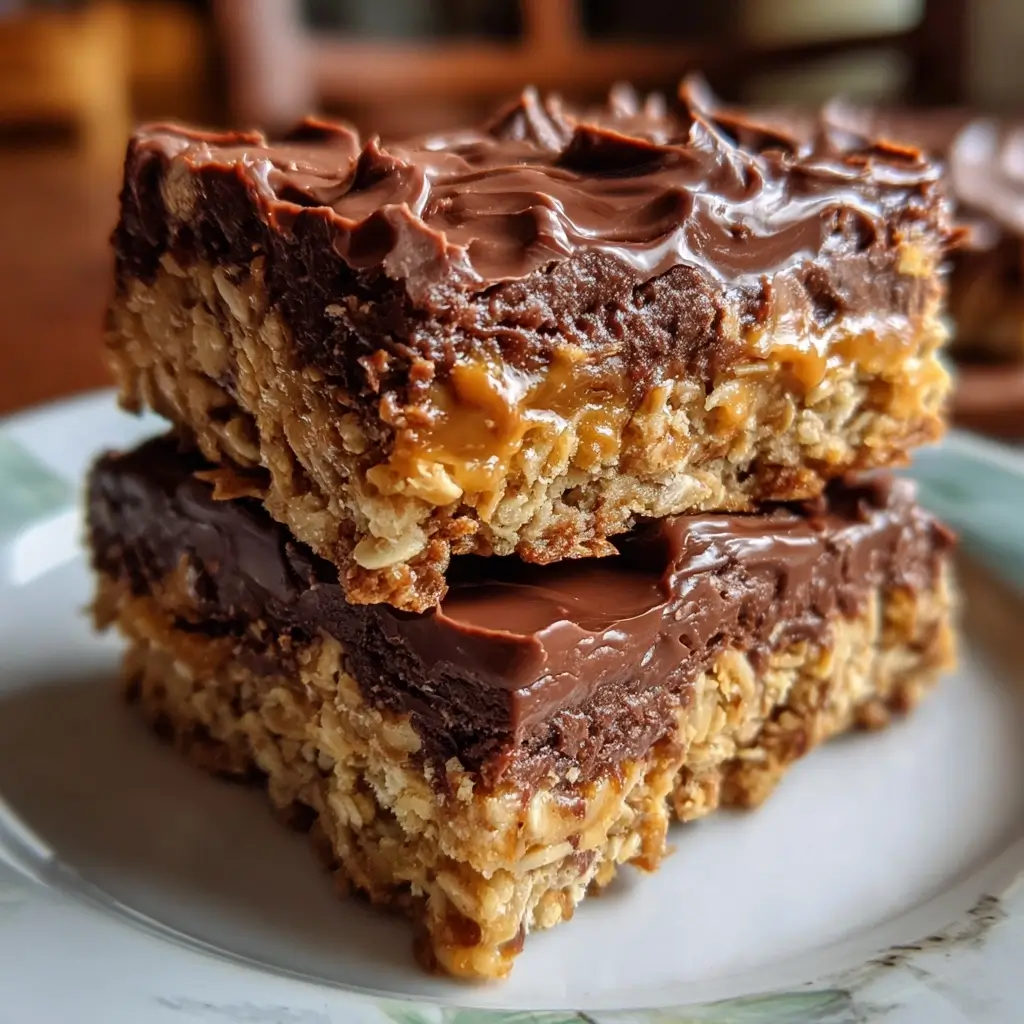
The Ultimate Chocolate Peanut Butter Oat Bars: A No-Bake Delight
Welcome to what will surely become one of your most treasured recipes. These Chocolate Peanut Butter Oat Bars are the epitome of simple indulgence. They perfectly capture the timeless, irresistible combination of rich chocolate and creamy peanut butter, all held together by the hearty, chewy goodness of rolled oats. What makes this recipe truly exceptional is its simplicity and versatility. It’s a no-bake recipe, which means you can whip up a batch without ever turning on your oven—a true blessing on warm days or when you’re short on time.
The beauty of these bars lies in their texture and flavor profile. The base is a dense, satisfyingly chewy layer that’s sweetened just enough to feel like a treat but packed with enough wholesome ingredients to function as a legitimate snack. The peanut butter provides healthy fats and protein, while the oats offer slow-release energy and fiber, keeping you full and satisfied for hours. Then comes the topping: a smooth, decadent layer of melted chocolate that sets into a firm, fudgy blanket over the oat base. The final, optional sprinkle of flaky sea salt cuts through the richness and elevates the entire experience from a simple snack to a gourmet-level treat.
This recipe is incredibly forgiving and endlessly customizable. Whether you’re dealing with dietary restrictions, looking to use up ingredients in your pantry, or simply want to experiment with new flavor combinations, these bars provide the perfect canvas. From making them vegan and gluten-free to adding in nuts, seeds, or dried fruit, you can easily tailor them to your specific tastes and needs. In this guide, we will walk you through everything you need to know to create the most perfect Chocolate Peanut Butter Oat Bars every single time, from the essential ingredients to expert tips and answers to all your burning questions. Get ready to fall in love with your new favorite no-bake recipe.
Ingredients You’ll Need
Crafting these delectable bars requires just a handful of simple, wholesome pantry staples. Each ingredient plays a crucial role in creating the perfect balance of flavor and texture. Here’s what you’ll need:
- 2 cups Old-Fashioned Rolled Oats: These are the structural backbone of the bars, providing a hearty, chewy texture and a dose of healthy fiber. Avoid using instant or steel-cut oats, as they will not yield the same consistency.
- 1 cup Creamy Peanut Butter, divided: The star of the show! It binds the oat base together and provides a rich, nutty flavor and a boost of protein. You will use most of it in the base and a little in the chocolate topping for a fudgy texture.
- 1/2 cup Honey or Maple Syrup: This is your primary sweetener and also acts as a crucial binder. Honey offers a classic flavor, while pure maple syrup provides a slightly different, richer sweetness and keeps the recipe vegan.
- 1/4 cup Unsalted Butter or Coconut Oil: This ingredient adds moisture and richness, helping to create a tender, cohesive bar. Coconut oil is a great dairy-free and vegan alternative.
- 1 teaspoon Vanilla Extract: A small amount of pure vanilla extract enhances all the other flavors in the bars, adding a layer of aromatic warmth.
- 1/4 teaspoon Fine Sea Salt: Salt is essential for balancing the sweetness of the honey or maple syrup and amplifying the flavors of the peanut butter and chocolate.
- 1 1/4 cups Semi-Sweet Chocolate Chips: This creates the decadent, glossy topping. Semi-sweet chocolate provides a nice balance, but you can use milk chocolate for a sweeter bar or dark chocolate for a richer, more intense flavor.
- 1 tablespoon Flaky Sea Salt (Optional): A finishing touch that takes these bars to the next level. The crunchy salt crystals provide a delightful textural contrast and a burst of flavor that cuts through the richness.
Step-by-Step Instructions
This no-bake recipe is incredibly straightforward. Follow these simple steps for perfect, chewy, and delicious bars that hold together beautifully.
Step 1: Prepare Your Pan
First, prepare your baking pan to ensure the bars come out easily. Take an 8×8 inch or 9×9 inch square baking pan and line it with parchment paper. Allow the parchment paper to hang over two of the sides, creating “handles.” This will make it incredibly easy to lift the entire slab of bars out of the pan for clean, precise cutting later. Set the prepared pan aside.
Step 2: Combine the Wet Ingredients for the Base
In a medium-sized saucepan, combine 3/4 cup of the creamy peanut butter, the honey or maple syrup, the unsalted butter or coconut oil, and the fine sea salt. Place the saucepan over medium-low heat.
Step 3: Gently Heat and Stir
Heat the mixture, stirring frequently with a spatula or wooden spoon. Your goal is not to boil the mixture, but to gently melt everything together until it is smooth, well-combined, and slightly runny. This process should only take a few minutes. Once the mixture is homogenous and glossy, remove it from the heat immediately.
Step 4: Incorporate the Oats and Vanilla
Pour the vanilla extract into the warm peanut butter mixture and stir to combine. Now, add the rolled oats to the saucepan. Use your spatula to fold the oats into the wet ingredients until every oat is completely coated. The mixture will become thick and sticky. Work quickly while the mixture is still warm, as it will be easier to spread.
Step 5: Press the Base into the Pan
Transfer the oat mixture into your prepared baking pan. Using the back of your spatula or your hands (you can lightly grease them or cover them with a piece of plastic wrap to prevent sticking), press the mixture down firmly and evenly across the entire bottom of the pan. This step is critical—the firmer you press, the better your bars will hold together. Make sure you get into the corners and create a flat, level surface.
Step 6: Prepare the Chocolate Topping
In a microwave-safe bowl, combine the semi-sweet chocolate chips and the remaining 1/4 cup of creamy peanut butter. The peanut butter not only adds more flavor but also helps the chocolate set into a softer, fudgier texture that is easier to cut without cracking. Microwave the mixture in 30-second intervals, stirring well after each interval. Continue this process until the chocolate is almost completely melted. Remove it from the microwave and stir until it is completely smooth and glossy. Be careful not to overheat the chocolate, as it can become grainy. Alternatively, you can melt the chocolate and peanut butter in a double boiler over simmering water.
Step 7: Pour and Spread the Topping
Pour the melted chocolate mixture over the pressed oat base in the pan. Use an offset spatula or the back of a spoon to spread it into a smooth, even layer that covers the entire surface from edge to edge.
Step 8: Chill for Perfection
If you are using it, now is the time to sprinkle the flaky sea salt evenly over the top of the melted chocolate. Place the pan in the refrigerator, uncovered, and let it chill for at least 2 to 3 hours, or until the chocolate is completely firm and the bars are set. This chilling time is essential for the bars to solidify.
Step 9: Cut and Serve
Once the bars are fully chilled and firm, use the parchment paper “handles” to lift the entire slab out of the pan and onto a cutting board. Use a large, sharp knife to cut the slab into squares or rectangles. For the cleanest cuts, you can run the knife under hot water and wipe it dry between each slice. Your delicious Chocolate Peanut Butter Oat Bars are now ready to be served!
Nutrition Facts (Approximate)
While these bars are an indulgent treat, they also pack a surprising nutritional punch thanks to their wholesome ingredients. The following values are an approximation based on the recipe yielding 16 bars.
- Servings: 16 bars
- Calories Per Serving: Approximately 250-290 kcal
Key Nutritional Highlights:
- Protein (Approx. 7g per bar): A significant portion of the protein comes from the peanut butter, making these bars a satisfying snack that helps with muscle repair and keeps you feeling full and energized.
- Healthy Fats (Approx. 15g per bar): The peanut butter and coconut oil provide a good dose of heart-healthy monounsaturated and polyunsaturated fats, which are essential for brain function and overall health.
- Dietary Fiber (Approx. 3g per bar): The old-fashioned rolled oats are an excellent source of soluble fiber. Fiber aids in digestion, helps regulate blood sugar levels, and contributes to a feeling of fullness.
- Carbohydrates (Approx. 25g per bar): The oats and natural sweeteners provide a source of complex and simple carbohydrates, offering both a quick and a sustained release of energy, making these bars great for a pre-workout or afternoon pick-me-up.
- Iron (Approx. 1.5mg per bar): Oats and dark chocolate are decent sources of iron, a vital mineral that helps transport oxygen throughout the body and prevent fatigue.
Preparation and Chilling Time
One of the best aspects of this recipe is how quickly it comes together. There is no active baking time, just a simple assembly and a necessary chilling period.
- Preparation Time: 15-20 minutes. This includes gathering your ingredients, preparing the pan, mixing the base, and melting the chocolate topping.
- Chilling Time: 2-3 hours. This is the most crucial part of the process. The time in the refrigerator allows the oat base to firm up and the chocolate topping to set completely. Rushing this step may result in bars that are soft and difficult to cut. For best results, allow them to chill for the full recommended time, or even a little longer.
How to Serve Your Chocolate Peanut Butter Oat Bars
These bars are wonderfully versatile and can be enjoyed in many different ways. Here are some serving suggestions to inspire you:
- The Perfect Lunchbox Treat:
- Cut them into small, manageable squares and pack them in your child’s (or your own!) lunchbox. They are a much healthier and more satisfying alternative to store-bought granola bars.
- An Energizing Afternoon Snack:
- Pair a bar with a cup of coffee or tea for the ultimate 3 PM pick-me-up. The combination of protein, healthy fats, and carbs will help you power through the rest of your day.
- A Post-Workout Refuel:
- The carbohydrates and protein make these bars an excellent choice for replenishing your energy stores after a workout. Enjoy one within 30-60 minutes of finishing your exercise.
- A Simple, Elegant Dessert:
- Elevate the bars by serving them as a dessert. Place a square on a plate, add a small scoop of vanilla bean ice cream or a dollop of whipped cream, and drizzle with a little extra melted peanut butter or chocolate sauce.
- Crumble as a Topping:
- Break up a bar and crumble it over a bowl of Greek yogurt, a smoothie bowl, or even oatmeal. It adds a delightful crunch, texture, and flavor.
- On-the-Go Breakfast:
- For those hectic mornings, grab a bar as you head out the door. It’s a quick, convenient, and satisfying breakfast that will keep you going until lunch.
Additional Tips for Perfect Bars Every Time
Master this recipe with these eight expert tips that ensure foolproof results and open the door for creative variations.
- Press Firmly for Cohesive Bars: The most common reason for crumbly oat bars is not pressing the base mixture firmly enough into the pan. Use the bottom of a measuring cup or glass, or your own hands, to compact the mixture as tightly as possible. This compression is what helps the bars hold their shape.
- Always Line Your Pan: Don’t skip the step of lining your pan with parchment paper. Allowing it to overhang on the sides creates handles that make lifting the entire block out for cutting a breeze. This prevents you from having to dig the first bar out and ensures every single piece is perfectly square.
- Toast the Oats for Deeper Flavor: For an extra layer of nutty, complex flavor, spread the rolled oats on a baking sheet and toast them in a 350°F (175°C) oven for 8-10 minutes, or until they are fragrant and lightly golden. Let them cool completely before adding them to the wet ingredients. This small step makes a huge difference.
- Choose Your Peanut Butter Wisely: The type of peanut butter you use matters. A conventional, stabilized creamy peanut butter (like Jif or Skippy) will yield the firmest, most consistent results. If you use natural peanut butter (where the oil separates), make sure it is extremely well-stirred before measuring. Crunchy peanut butter also works well if you want extra texture and nutty bits in your base.
- Ingredient Temperature is Key: Ensure your melted peanut butter mixture is still warm when you add the oats. This warmth helps the oats absorb the liquid and makes the mixture easier to spread. Conversely, let the base cool slightly before pouring hot melted chocolate over it to prevent the two layers from mixing too much.
- Get Creative with Add-ins: This recipe is a fantastic base for customization. Feel free to mix in up to 1/2 cup of add-ins along with the oats. Some great options include mini chocolate chips, chopped walnuts or pecans, sunflower seeds, shredded coconut, or dried cranberries.
- Don’t Underestimate the Flaky Salt: If you have it, use it. The sprinkle of flaky sea salt on top of the chocolate is not just for looks. It provides a delightful crunchy texture and its sharp saltiness perfectly balances the sweetness of the chocolate and the richness of the peanut butter, making the flavors pop.
- Patience During Chilling is a Virtue: It can be tempting to cut into the bars before they are fully set, but resist the urge. Proper chilling is absolutely essential for the bars to firm up. If you cut them too early, you’ll have a soft, gooey mess. If you’re in a hurry, you can place them in the freezer for about 45-60 minutes to speed up the process.
Frequently Asked Questions (FAQ)
Here are answers to some of the most common questions about making these Chocolate Peanut Butter Oat Bars.
1. Can I make these bars vegan?
Absolutely! This recipe is very easy to adapt for a vegan diet. Simply substitute the honey with pure maple syrup or agave nectar. For the butter, use a plant-based butter substitute or coconut oil. Finally, ensure you use dairy-free chocolate chips for the topping. With these simple swaps, you’ll have delicious vegan bars.
2. How can I make this recipe gluten-free?
Oats are naturally gluten-free, but they are often processed in facilities that also handle wheat, leading to cross-contamination. To make these bars certified gluten-free, simply purchase and use rolled oats that are explicitly labeled “certified gluten-free.” All other ingredients in the base recipe are naturally gluten-free.
3. How do I properly store these oat bars?
These bars are best stored in the refrigerator. Place them in an airtight container, separated by layers of parchment paper to prevent sticking. They will stay fresh and delicious for up to one week in the fridge. Their texture is best when chilled, as they can become soft at room temperature.
4. Can I freeze these Chocolate Peanut Butter Oat Bars?
Yes, they freeze exceptionally well! After cutting the bars, wrap them individually in plastic wrap and then place them in a freezer-safe bag or container. They can be frozen for up to 3 months. To enjoy, simply let a bar thaw at room temperature for about 15-20 minutes or in the refrigerator for an hour.
5. Why are my bars falling apart and crumbly?
There are a few potential culprits. The most common reason is that the oat base was not pressed down firmly enough in the pan. Another reason could be that you didn’t use enough of the wet “binder” ingredients (peanut butter, honey/syrup). Lastly, make sure you let them chill for the full recommended time, as they need to be completely cold to solidify and hold their shape.
6. Can I use a different kind of nut or seed butter?
Yes, you can easily substitute the peanut butter with other nut or seed butters. Creamy almond butter or cashew butter would be delicious alternatives. For a nut-free version, sunflower seed butter (sunflower butter) is an excellent choice. Just be aware that different butters have slightly different consistencies, so the final texture may vary slightly.
7. Is it okay to use quick-cooking or instant oats?
It is strongly recommended to use old-fashioned rolled oats for this recipe. Quick-cooking oats are thinner and more processed, which will result in a softer, mushier texture. Steel-cut oats are too hard and will not soften properly in this no-bake recipe. For that classic chewy granola bar texture, rolled oats are the best choice.
8. Can I reduce the amount of sugar in this recipe?
Yes, you can adjust the sweetness to your liking. You can slightly reduce the amount of honey or maple syrup, but be careful not to reduce it too much, as it also acts as a binder. To reduce sugar further, use a high-percentage dark chocolate (70% cacao or higher) for the topping and ensure you are using an unsweetened, natural peanut butter with no added sugar.
Chocolate Peanut Butter Oat Bars
Ingredients
Crafting these delectable bars requires just a handful of simple, wholesome pantry staples. Each ingredient plays a crucial role in creating the perfect balance of flavor and texture. Here’s what you’ll need:
- 2 cups Old-Fashioned Rolled Oats: These are the structural backbone of the bars, providing a hearty, chewy texture and a dose of healthy fiber. Avoid using instant or steel-cut oats, as they will not yield the same consistency.
- 1 cup Creamy Peanut Butter, divided: The star of the show! It binds the oat base together and provides a rich, nutty flavor and a boost of protein. You will use most of it in the base and a little in the chocolate topping for a fudgy texture.
- 1/2 cup Honey or Maple Syrup: This is your primary sweetener and also acts as a crucial binder. Honey offers a classic flavor, while pure maple syrup provides a slightly different, richer sweetness and keeps the recipe vegan.
- 1/4 cup Unsalted Butter or Coconut Oil: This ingredient adds moisture and richness, helping to create a tender, cohesive bar. Coconut oil is a great dairy-free and vegan alternative.
- 1 teaspoon Vanilla Extract: A small amount of pure vanilla extract enhances all the other flavors in the bars, adding a layer of aromatic warmth.
- 1/4 teaspoon Fine Sea Salt: Salt is essential for balancing the sweetness of the honey or maple syrup and amplifying the flavors of the peanut butter and chocolate.
- 1 1/4 cups Semi-Sweet Chocolate Chips: This creates the decadent, glossy topping. Semi-sweet chocolate provides a nice balance, but you can use milk chocolate for a sweeter bar or dark chocolate for a richer, more intense flavor.
- 1 tablespoon Flaky Sea Salt (Optional): A finishing touch that takes these bars to the next level. The crunchy salt crystals provide a delightful textural contrast and a burst of flavor that cuts through the richness.
Instructions
This no-bake recipe is incredibly straightforward. Follow these simple steps for perfect, chewy, and delicious bars that hold together beautifully.
Step 1: Prepare Your Pan
First, prepare your baking pan to ensure the bars come out easily. Take an 8×8 inch or 9×9 inch square baking pan and line it with parchment paper. Allow the parchment paper to hang over two of the sides, creating “handles.” This will make it incredibly easy to lift the entire slab of bars out of the pan for clean, precise cutting later. Set the prepared pan aside.
Step 2: Combine the Wet Ingredients for the Base
In a medium-sized saucepan, combine 3/4 cup of the creamy peanut butter, the honey or maple syrup, the unsalted butter or coconut oil, and the fine sea salt. Place the saucepan over medium-low heat.
Step 3: Gently Heat and Stir
Heat the mixture, stirring frequently with a spatula or wooden spoon. Your goal is not to boil the mixture, but to gently melt everything together until it is smooth, well-combined, and slightly runny. This process should only take a few minutes. Once the mixture is homogenous and glossy, remove it from the heat immediately.
Step 4: Incorporate the Oats and Vanilla
Pour the vanilla extract into the warm peanut butter mixture and stir to combine. Now, add the rolled oats to the saucepan. Use your spatula to fold the oats into the wet ingredients until every oat is completely coated. The mixture will become thick and sticky. Work quickly while the mixture is still warm, as it will be easier to spread.
Step 5: Press the Base into the Pan
Transfer the oat mixture into your prepared baking pan. Using the back of your spatula or your hands (you can lightly grease them or cover them with a piece of plastic wrap to prevent sticking), press the mixture down firmly and evenly across the entire bottom of the pan. This step is critical—the firmer you press, the better your bars will hold together. Make sure you get into the corners and create a flat, level surface.
Step 6: Prepare the Chocolate Topping
In a microwave-safe bowl, combine the semi-sweet chocolate chips and the remaining 1/4 cup of creamy peanut butter. The peanut butter not only adds more flavor but also helps the chocolate set into a softer, fudgier texture that is easier to cut without cracking. Microwave the mixture in 30-second intervals, stirring well after each interval. Continue this process until the chocolate is almost completely melted. Remove it from the microwave and stir until it is completely smooth and glossy. Be careful not to overheat the chocolate, as it can become grainy. Alternatively, you can melt the chocolate and peanut butter in a double boiler over simmering water.
Step 7: Pour and Spread the Topping
Pour the melted chocolate mixture over the pressed oat base in the pan. Use an offset spatula or the back of a spoon to spread it into a smooth, even layer that covers the entire surface from edge to edge.
Step 8: Chill for Perfection
If you are using it, now is the time to sprinkle the flaky sea salt evenly over the top of the melted chocolate. Place the pan in the refrigerator, uncovered, and let it chill for at least 2 to 3 hours, or until the chocolate is completely firm and the bars are set. This chilling time is essential for the bars to solidify.
Step 9: Cut and Serve
Once the bars are fully chilled and firm, use the parchment paper “handles” to lift the entire slab out of the pan and onto a cutting board. Use a large, sharp knife to cut the slab into squares or rectangles. For the cleanest cuts, you can run the knife under hot water and wipe it dry between each slice. Your delicious Chocolate Peanut Butter Oat Bars are now ready to be served!
Nutrition
- Serving Size: one normal portion
- Calories: 290
- Fat: 15g
- Carbohydrates: 25g
- Fiber: 3g
- Protein: 7g