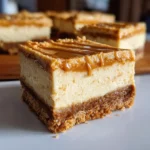
Ingredients
This recipe is broken down into three simple components: the crunchy crust, the velvety filling, and the luscious topping. Using high-quality, full-fat ingredients is key to achieving the perfect texture and flavor.
For the Buttery Biscoff Crust
- 250g (about 8.8 oz or 1 standard pack) Lotus Biscoff Cookies: These are the heart of the recipe. Their unique caramelized, slightly spicy flavor is irreplaceable and forms the perfect base.
- 100g (7 tablespoons) Unsalted Butter, melted: The butter acts as the glue that binds the cookie crumbs together, creating a firm, sliceable crust that doesn’t crumble apart.
For the Creamy Cheesecake Filling
- 680g (24 oz or three 8-oz blocks) Full-Fat Block Cream Cheese, softened to room temperature: This is non-negotiable for a rich, dense, and creamy cheesecake. Do not use whipped or low-fat cream cheese, as it will result in a runny filling. Bringing it to room temperature is crucial for a lump-free texture.
- 200g (1 cup) Powdered Sugar, sifted: Powdered sugar dissolves instantly into the cream cheese, ensuring a silky-smooth consistency without any graininess. Sifting prevents clumps.
- 250g (1 cup) Creamy Biscoff Spread (Cookie Butter): This is the star flavor. It gets mixed directly into the cheesecake batter to infuse every bite with that irresistible speculoos taste.
- 1 teaspoon Pure Vanilla Extract: Vanilla enhances the other flavors in the cheesecake, adding a layer of aromatic depth that complements the spiced cookie butter.
- 240ml (1 cup) Cold Heavy Whipping Cream: Whipped to stiff peaks, the heavy cream is folded into the filling to give it a light, airy, yet stable structure. The cold temperature helps it whip up faster and hold its shape.
For the Luscious Biscoff Topping
- 200g (¾ cup + 1 tablespoon) Creamy Biscoff Spread (Cookie Butter): This final layer provides an intense punch of Biscoff flavor and a beautiful, glossy finish.
- Optional: Extra Biscoff Cookies, crushed: For a decorative and crunchy garnish on top.
Instructions
Follow these step-by-step instructions carefully for flawless Biscoff cheesecake bars. The most important ingredient here is patience, especially during the chilling stages, which are essential for the bars to set properly.
First, prepare your 9×9 inch (23×23 cm) square baking pan. To ensure easy removal later, create a parchment paper “sling.” Cut two long strips of parchment paper. Lay one strip in the pan, pressing it down into the bottom and up the sides, leaving an overhang on two opposite ends. Lay the second strip perpendicular to the first, creating an overhang on the other two sides. This will allow you to lift the entire cheesecake out of the pan effortlessly once it’s set. Lightly grease the bottom of the pan before laying down the parchment to help it stick.
Place the entire pack of Biscoff cookies into the bowl of a food processor. Pulse them until they are broken down into fine, consistent crumbs, resembling sand. If you don’t have a food processor, place the cookies in a large, sealed zip-top bag and crush them with a rolling pin or a heavy-bottomed pan. Ensure there are no large cookie chunks left. Transfer the fine crumbs to a medium-sized mixing bowl. Pour the melted unsalted butter over the crumbs. Using a fork or a spatula, mix until all the crumbs are evenly moistened. The final texture should be similar to wet sand.
Pour the buttered crumb mixture into your prepared 9×9 inch pan. Using the flat bottom of a measuring cup or a glass, press the crumbs down firmly and evenly across the entire bottom of the pan. Pay special attention to the corners and edges to create a solid, compact base. A firm crust is the foundation of a good cheesecake bar. Once pressed, place the pan in the freezer for at least 15-20 minutes while you prepare the filling. Chilling the crust helps the butter solidify, preventing the crust from becoming soggy when you add the filling.
In a large mixing bowl, place the three blocks of softened, room-temperature cream cheese. It is absolutely vital that the cream cheese is soft, as cold cream cheese will result in a lumpy, unpleasant filling. Using an electric hand mixer or a stand mixer fitted with the paddle attachment, beat the cream cheese on medium speed for 2-3 minutes until it is completely smooth, creamy, and free of any lumps. Scrape down the sides and bottom of the bowl periodically to ensure everything is incorporated.
Once the cream cheese is perfectly smooth, add the sifted powdered sugar and the pure vanilla extract. Beat on low speed initially to prevent a sugar cloud, then increase to medium speed and mix until fully combined and smooth. Add the 1 cup of creamy Biscoff spread to the mixture. Continue to beat on medium speed for another 1-2 minutes until the Biscoff spread is fully incorporated and the filling is a uniform, pale caramel color. Scrape the bowl down one more time. Set this bowl aside.
In a separate, clean, and chilled mixing bowl, pour in the cold heavy whipping cream. Using clean beaters, whip the cream on medium-high speed. It will go from bubbly to frothy, then to soft peaks. Continue beating until stiff peaks form. You’ll know you’ve reached stiff peaks when the cream holds its shape firmly and the peaks stand straight up when you lift the beaters out. Be careful not to over-whip, or it will turn into butter. Whipping the cream separately and then folding it in is the secret to a light-yet-rich no-bake cheesecake texture.
Gently add about one-third of the whipped cream to the Biscoff and cream cheese mixture. Using a rubber spatula, carefully fold it in to lighten the base. “Folding” means using a gentle, sweeping motion from the bottom, up, and over the top. Once that is mostly combined, add the remaining whipped cream. Continue to fold gently until no white streaks remain. It’s important to fold, not stir or beat, at this stage. You want to keep all the air you just whipped into the cream, as this gives the bars their luscious, stable structure.
Retrieve the chilled crust from the freezer. Pour the prepared cheesecake filling over the crust. Using an offset spatula or the back of a spoon, spread the filling into an even, smooth layer, making sure it reaches all the corners.
Place the remaining ¾ cup of Biscoff spread into a microwave-safe bowl. Microwave in 15-second intervals, stirring in between, until it is melted, smooth, and pourable. This should only take about 30-45 seconds. Do not overheat it. Pour the melted Biscoff spread over the cheesecake filling. Gently tilt the pan or use your offset spatula to spread it evenly over the entire surface.
Cover the pan loosely with plastic wrap or foil, being careful not to let it touch the surface. Place the cheesecake in the refrigerator to set for a minimum of 6-8 hours, but overnight is highly recommended. This chilling time is not optional; it is essential for the cheesecake to firm up completely so you can get clean, beautiful slices.
Once the cheesecake is fully set, remove it from the refrigerator. Use the parchment paper overhangs to lift the entire block of cheesecake out of the pan and onto a cutting board. For perfectly clean slices, use a large, sharp knife. Dip the knife in hot water and wipe it dry between each cut. Cut the block into 16 small squares. If you like, you can garnish with extra crushed Biscoff cookies or a dollop of whipped cream before serving.
Nutrition
- Serving Size: one normal portion
- Calories: 450