")

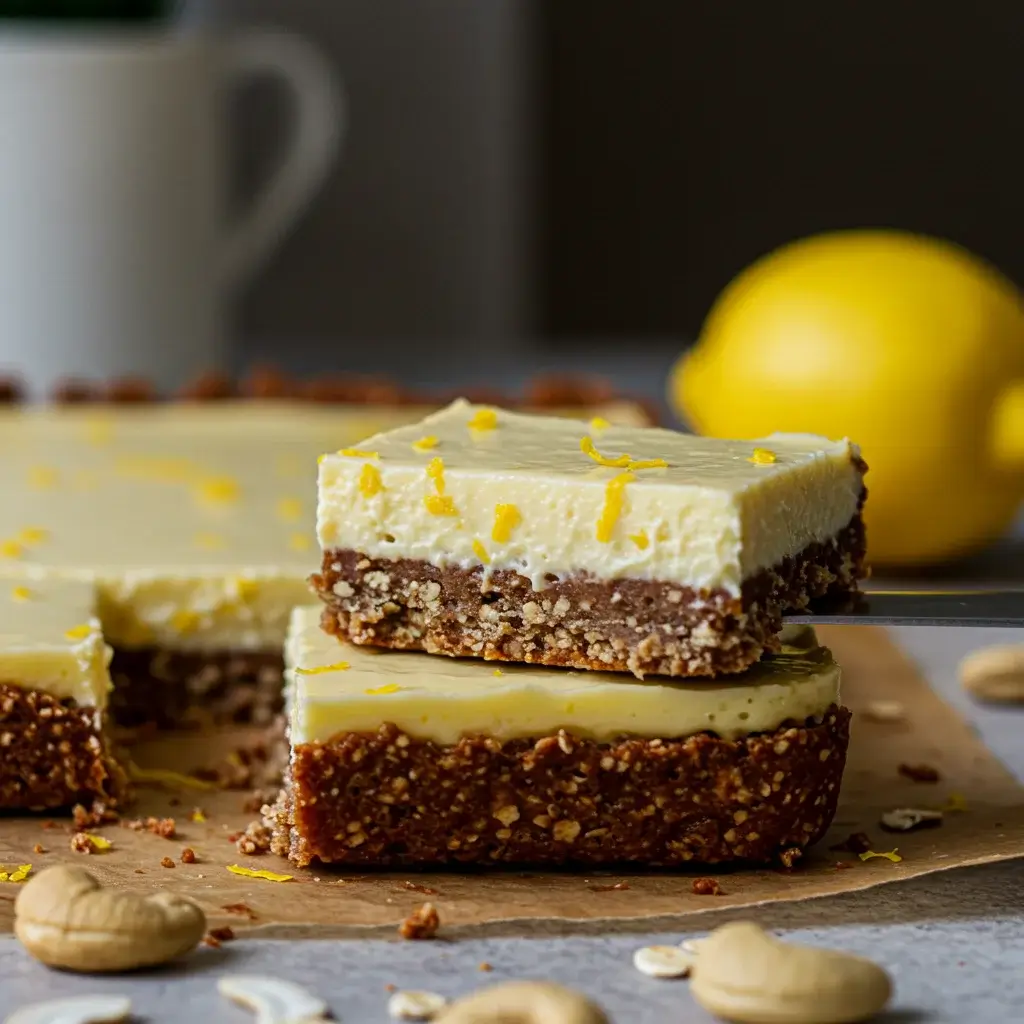

If you’re on the hunt for a dessert that’s luscious, tangy, and guilt-free, look no further than Creamy Cashew Lemon Cheesecake Bars. These bars are not only delicious but also vegan, gluten-free, and packed with wholesome ingredients. Whether you’re catering to specific dietary needs or simply want to try something new and refreshing, these cheesecake bars are sure to tantalize your taste buds.
Ingredients: Nature’s Best in Every Bite
These bars are made with simple, wholesome ingredients that combine to create a rich, creamy texture with a refreshing lemon zing. Here’s what you’ll need:
- 1 cup cashews, soaked for 4 hours
- 1/2 cup coconut milk
- 1/4 cup maple syrup
- 1/4 cup lemon juice
- Zest of 1 lemon
- 1 tsp vanilla extract
- 1 cup oats
- 1/4 cup almond flour
- 2 tbsp coconut oil, melted
- 2 tbsp maple syrup for the crust
Instructions: Your Step-by-Step Guide to Perfection
Creating these delectable bars is easier than you might think. Follow these steps for a perfect outcome:
- Preheat the Oven: Start by preheating your oven to 350°F (175°C). This ensures that it’s at the right temperature when your bars are ready to bake.
- Prepare the Filling: In a high-speed blender, combine the soaked cashews, coconut milk, 1/4 cup maple syrup, lemon juice, lemon zest, and vanilla extract. Blend these ingredients until you achieve a smooth, creamy consistency. This mixture will form the luscious filling of your cheesecake bars.
- Make the Crust: In a mixing bowl, combine the oats, almond flour, melted coconut oil, and 2 tablespoons of maple syrup. Mix until the ingredients are well combined. Press this mixture firmly into the bottom of a lined baking dish to form the crust.
- Assemble the Bars: Pour the creamy cashew mixture over the prepared crust. Use a spatula to spread it evenly, ensuring that it covers the crust completely.
- Bake: Place the baking dish in the preheated oven and bake for 25-30 minutes, or until the filling is set.
- Cool and Chill: Remove the bars from the oven and allow them to cool at room temperature. Once cooled, transfer them to the refrigerator and chill for at least 2 hours. This helps the bars firm up and makes them easier to cut.
- Serve: Once chilled, cut the cheesecake into bars and serve. Enjoy your creamy, tangy treat!
Nutrition Facts: Indulge Mindfully
Each bar is a delightful blend of flavors and nutrients. Here’s a look at the nutritional profile per serving (makes 12 bars):
- Calories: 180
- Fat: 9g
- Carbohydrates: 22g
- Fiber: 3g
- Protein: 4g
- Sugar: 6g
These bars are not just a treat for your taste buds but also a nutritious option that fits well into a balanced diet.
How to Serve: Creating the Perfect Presentation
The way you present a dessert can significantly elevate its appeal and enhance the overall dining experience. A well-plated dessert not only delights the eyes but also prepares the palate for an exquisite taste journey. Here are some detailed serving suggestions to help you create an unforgettable presentation for your sweet creations:
1. Garnish with Lemon Zest
A sprinkle of fresh lemon zest is a simple yet impactful way to enhance your dessert. Not only does it add a vibrant pop of color, but it also introduces a refreshing citrus aroma that can awaken the senses. To achieve the best results:
- Select Fresh Lemons: Choose firm, bright lemons that have a smooth skin. Organic lemons are preferred, as they are less likely to have pesticide residues.
- Zesting Technique: Use a microplane or a fine grater to carefully zest the lemons. Be sure to only remove the bright yellow outer layer, avoiding the bitter white pith underneath.
- Presentation Tips: Sprinkle the zest evenly over the dessert just before serving to maintain its freshness. Consider creating a decorative swirl or a pattern for added visual interest.
2. Add Fresh Berries
Incorporating fresh berries not only adds vibrant color but also introduces a burst of flavor that beautifully complements desserts with lemon or creamy textures. Here’s how to effectively use berries in your presentation:
- Choosing the Right Berries: Opt for a mix of seasonal berries such as blueberries, raspberries, strawberries, or blackberries. Ensure they are fresh, firm, and free of blemishes.
- Arrangement: Strategically place the berries around the dessert or on top to create a balanced look. For a more artistic flair, consider using a ring of berries to frame the dessert or create a cascading effect.
- Enhance Flavor: Consider lightly tossing the berries in a bit of sugar or a splash of lemon juice before serving. This not only brightens their flavor but also gives them a glossy finish.
3. Drizzle Maple Syrup
A light drizzle of maple syrup can enhance the overall flavor profile of your dessert while adding a touch of warmth and sweetness. Here’s how to incorporate this delicious element:
- Choosing Maple Syrup: Use pure maple syrup for the best flavor. The depth of flavor varies with grade; darker syrups (Grade B) have a more robust taste that can complement desserts beautifully.
- Drizzling Technique: Use a squeeze bottle or a small spoon to create an elegant drizzle over the dessert. Aim for a light hand to avoid overwhelming the other flavors.
- Creative Patterns: Experiment with different drizzling techniques, such as zig-zags or spirals. You can also create a pool of syrup on the plate and place the dessert on top for a more dramatic presentation.
4. Plate Selection
The choice of plate can profoundly affect the presentation of your dessert. A well-chosen plate can enhance the color and texture of the dessert. Consider:
- Contrast: Use plates in colors that contrast with your dessert. For example, a white plate can make colorful desserts pop, while a dark plate can add elegance to lighter desserts.
- Size and Shape: Opt for a plate that provides ample space for the dessert and garnishes without overcrowding. Unique shapes, such as square or asymmetrical plates, can also add a modern touch.
5. Incorporate Textures
Incorporating different textures can add an exciting dimension to your dessert presentation:
- Crunchy Elements: Consider adding a sprinkle of crushed nuts or a biscuit crumble to provide a crunchy contrast to creamy or soft elements.
- Creamy Drizzles: A dollop of whipped cream or a scoop of ice cream can introduce a luscious texture that balances the overall experience.
- Edible Flowers: These can add not only a pop of color but also a delicate touch. Choose flowers that are safe for consumption, like nasturtiums or violets, and scatter them artfully around the plate.
6. Final Touches
The finishing touches can make all the difference in elevating your dessert presentation:
- Dusting of Powdered Sugar: A light dusting of powdered sugar can create a whimsical effect, especially on cakes and pastries.
- Chocolate Shavings or Curls: Adding chocolate shavings or curls can add sophistication and a hint of indulgence. Use a vegetable peeler on a chocolate bar for perfect curls.
- Temperature Consideration: Serve desserts at the ideal temperature. Chilled desserts should be served cold, while warm desserts should be enjoyed fresh from the oven to maintain their warmth and texture.
By paying attention to these details, you can create an aesthetically pleasing and flavorful presentation that enhances not only the dessert itself but the entire dining experience. The goal is to engage all the senses, making your dessert an unforgettable highlight of the meal.
Additional Tips: Expert Advice for the Best Bars
Creating the perfect bars requires attention to detail and a few expert tips that can elevate your culinary creations. Here’s a comprehensive guide to ensure your bars are not only delicious but also visually appealing and satisfying.
Soak Cashews Properly
To achieve the smoothest and creamiest texture in your bars, the soaking of cashews is a crucial step that should not be overlooked. Soak cashews for at least 4 hours—this timeframe allows the nuts to absorb water, swell, and soften significantly. If you’re pressed for time, consider a quick soak method: place the cashews in boiling water for about 30 minutes. However, the traditional soaking method tends to yield a superior texture.
After soaking, drain and rinse the cashews thoroughly to remove any anti-nutrients and enhance their flavor. Utilizing a high-speed blender or food processor will further ensure that the cashews blend into a silky, creamy consistency, which is essential for the base of your bars. This creamy base will not only provide a rich mouthfeel but also help bind other ingredients together effectively, creating a harmonious blend of flavors.
Use Fresh Lemons
When it comes to enhancing the flavor profile of your bars, fresh lemons are an indispensable ingredient. The bright acidity of fresh lemon juice, paired with the aromatic zest, brings a vibrant and zesty flavor that bottled lemon juice simply cannot replicate.
For the most impactful flavor, select organic lemons when possible. Wash them thoroughly before zesting to remove any wax or residues. When zesting, use a microplane grater or a zester, being careful to avoid the bitter white pith underneath the skin. Once zested, juice the lemons using a citrus juicer or reamer to extract every bit of that refreshing liquid. The combination of fresh lemon juice and zest not only brightens the overall flavor of the bars but also adds a delightful aroma that can elevate the eating experience.
Chill Thoroughly
The chilling process is an often underestimated yet pivotal step in achieving the ideal texture for your bars. Do not rush the chilling process; allowing your bars to chill thoroughly in the refrigerator or freezer significantly improves their structure.
After assembling your bars, cover them properly—using parchment paper or plastic wrap—to prevent any absorption of odors from your refrigerator. Ideally, let them chill for at least 4-6 hours, or even overnight, to ensure they set firmly. This extended chilling time allows the flavors to meld beautifully while the ingredients firm up, creating a slice that holds its shape rather than crumbling.
For a cleaner cut, consider utilizing a sharp knife heated under hot water. Wipe the knife clean between cuts to maintain a neat appearance. Additionally, if you plan to store the bars for an extended period, wrapping them individually in parchment paper and placing them in an airtight container can help preserve their freshness and prevent freezer burn.
Bonus Tips
- Experiment with Flavorings: To further enhance your bars, consider adding natural flavorings such as vanilla extract, almond extract, or spices like cinnamon or nutmeg. These additions can create unique flavor combinations that set your bars apart.
- Texture Variation: Incorporating different textures can make your bars more interesting. Consider adding chopped nuts, seeds, or dried fruits to the mixture before setting. These can provide a delightful crunch and additional flavors that complement the creamy base.
- Portion Control: When cutting your bars, think about portion sizes. Smaller bars can be perfect for snacks, while larger pieces might serve as a dessert. This not only helps in managing serving sizes but also caters to different occasions and preferences.
By implementing these expert tips into your bar-making process, you can ensure that your final product is not only delicious but also visually appealing and satisfying to eat. Embrace experimentation and enjoy the journey of creating the best bars possible!
FAQs: Your Questions Answered
Q: Can I use a different nut instead of cashews?
A: While cashews provide a creamy texture, you can substitute them with macadamia nuts for a similar effect. Keep in mind that this may slightly alter the flavor.
Q: Is there a substitute for coconut milk?
A: Yes, you can use almond milk or any other plant-based milk, although coconut milk contributes to the creaminess.
Q: Can these bars be stored in the freezer?
A: Absolutely! These bars freeze well. Simply wrap them tightly and store them in an airtight container for up to a month.
Q: What can I use instead of maple syrup?
A: Agave nectar or honey (if not vegan) can be used as alternatives to maple syrup.
Conclusion: A Delightful Dessert for Every Occasion
Creamy Cashew Lemon Cheesecake Bars are more than just a dessert—they’re a celebration of flavors and a testament to how delicious vegan, gluten-free treats can be. With their creamy texture and refreshing lemon zest, these bars are perfect for any occasion, whether it’s a family gathering, a potluck, or a quiet evening at home. Enjoy the process of making them, savor every bite, and share this delightful treat with loved ones.
Print
Creamy Cashew Lemon Cheesecake Bars
Ingredients
These bars are made with simple, wholesome ingredients that combine to create a rich, creamy texture with a refreshing lemon zing. Here’s what you’ll need:
- 1 cup cashews, soaked for 4 hours
- 1/2 cup coconut milk
- 1/4 cup maple syrup
- 1/4 cup lemon juice
- Zest of 1 lemon
- 1 tsp vanilla extract
- 1 cup oats
- 1/4 cup almond flour
- 2 tbsp coconut oil, melted
- 2 tbsp maple syrup for the crust
Instructions
Creating these delectable bars is easier than you might think. Follow these steps for a perfect outcome:
- Preheat the Oven: Start by preheating your oven to 350°F (175°C). This ensures that it’s at the right temperature when your bars are ready to bake.
- Prepare the Filling: In a high-speed blender, combine the soaked cashews, coconut milk, 1/4 cup maple syrup, lemon juice, lemon zest, and vanilla extract. Blend these ingredients until you achieve a smooth, creamy consistency. This mixture will form the luscious filling of your cheesecake bars.
- Make the Crust: In a mixing bowl, combine the oats, almond flour, melted coconut oil, and 2 tablespoons of maple syrup. Mix until the ingredients are well combined. Press this mixture firmly into the bottom of a lined baking dish to form the crust.
- Assemble the Bars: Pour the creamy cashew mixture over the prepared crust. Use a spatula to spread it evenly, ensuring that it covers the crust completely.
- Bake: Place the baking dish in the preheated oven and bake for 25-30 minutes, or until the filling is set.
- Cool and Chill: Remove the bars from the oven and allow them to cool at room temperature. Once cooled, transfer them to the refrigerator and chill for at least 2 hours. This helps the bars firm up and makes them easier to cut.
- Serve: Once chilled, cut the cheesecake into bars and serve. Enjoy your creamy, tangy treat!
Nutrition
- Serving Size: one normal portion
- Calories: 180
- Sugar: 6g
- Fat: 9g
- Carbohydrates: 22g
- Fiber: 3g
- Protein: 4g