")


I still remember the first time I made these Crispy Baked Zucchini Fries. It was a Tuesday night, one of those evenings where you’re craving something satisfying and “snacky” but trying to stay on the healthier side. My kids, notorious skeptics of anything green, eyed the zucchini on the counter with suspicion. “We’re not eating that,” my youngest declared, crossing his arms. I just smiled and told them to trust me. An hour later, the scene was completely different. The aroma of garlic, parmesan, and toasted Panko filled the kitchen. A platter of golden-brown, impossibly crispy fries sat on the table, and those same skeptical children were now in a race to see who could grab the last one. The sound of the crunch was so satisfying, followed by a chorus of “Wow, this is actually good!” and “Can you make these again tomorrow?” Since that day, these zucchini fries have become a legend in our house. They are our go-to for movie nights, our favorite side dish for burgers, and the one appetizer everyone requests for game day. They’ve single-handedly converted my family into zucchini lovers, proving that healthy food can be unbelievably delicious and fun. This recipe isn’t just about making a snack; it’s about creating a moment of pure, crunchy, guilt-free joy that brings everyone to the table.
Ingredients
Here is the simple, yet powerful, list of ingredients you’ll need to create the crispiest, most flavorful baked zucchini fries you’ve ever had. Each component plays a crucial role in achieving that perfect texture and taste.
- 2 Medium Zucchini: The star of the show. Look for zucchini that are firm to the touch with smooth, vibrant green skin. Medium-sized ones are ideal as they have fewer seeds and a lower water content, which is key for crispiness.
- 1/2 cup All-Purpose Flour: This is the first step in our three-part breading process. The flour creates a dry surface on the zucchini, allowing the egg wash to adhere perfectly.
- 2 Large Eggs: Acting as the essential binder, the eggs will create a sticky layer that locks the delicious Panko and Parmesan coating onto each fry.
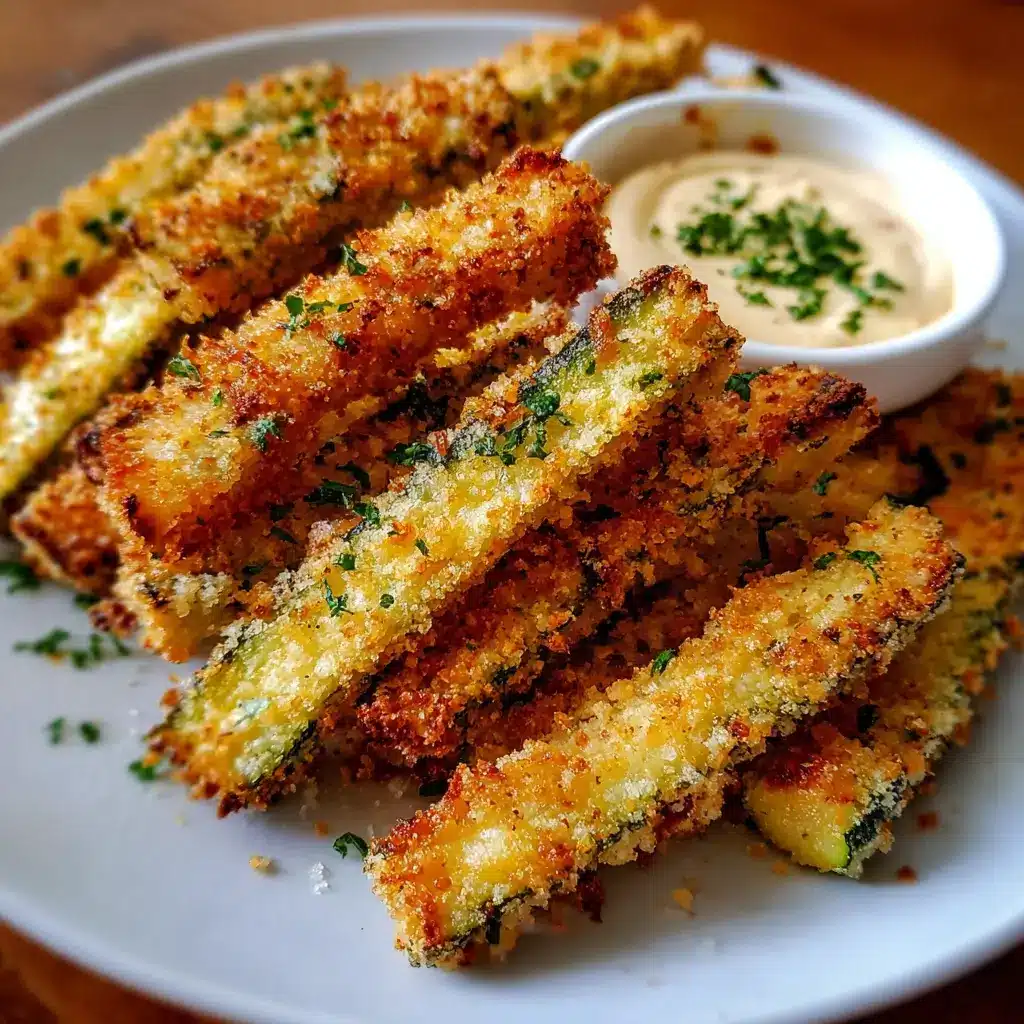
- 1 cup Panko Breadcrumbs: This is the secret to an ultra-crispy finish. Panko breadcrumbs are lighter and flakier than traditional breadcrumbs, so they absorb less oil and bake up into an airy, crunchy coating that shatters with every bite.
- 1/2 cup Grated Parmesan Cheese: Finely grated Parmesan adds a wonderful salty, nutty flavor and helps the fries achieve a beautiful golden-brown color in the oven. It also contributes to the overall crunch.
- 1 teaspoon Garlic Powder: For that savory, aromatic flavor that pairs so perfectly with zucchini and cheese. It provides a foundational flavor that makes these fries irresistible.
- 1 teaspoon Onion Powder: This adds a subtle, sweet, and savory depth of flavor that complements the garlic powder without being overpowering.
- 1/2 teaspoon Smoked Paprika: Not just for color! Smoked paprika adds a hint of smokiness and warmth, elevating the fries from a simple snack to a gourmet treat.
- 1 teaspoon Kosher Salt (plus more for sweating): Essential for both flavor and texture. We will use a bit of salt initially to draw excess water out of the zucchini, which is the most critical step for avoiding sogginess.
- 1/2 teaspoon Black Pepper: Freshly ground black pepper provides a mild, woody spice that balances the other seasonings.
- Olive Oil Spray or 2 tablespoons Melted Butter: A light spritz of olive oil or a drizzle of melted butter before baking helps the Panko breadcrumbs toast to a perfect golden brown and enhances the crispiness.
Instructions
Follow these step-by-step instructions carefully to ensure your zucchini fries are perfectly crispy and delicious every single time. The secret lies in the preparation, so don’t be tempted to skip any steps!
Step 1: Prepare the Zucchini
First, wash and thoroughly dry your zucchini. Patting them completely dry is crucial. Trim off both ends. Now, cut each zucchini in half crosswise. Then, take each half and slice it lengthwise into sticks that are about 1/2-inch thick, resembling the shape of classic French fries. Uniformity in size is important as it ensures all the fries will cook evenly.
Step 2: The Crucial “Sweating” Step
Place the cut zucchini sticks in a colander set over a bowl or in the sink. Sprinkle them generously with about 1 teaspoon of kosher salt and toss gently to coat. Let them sit for 20-30 minutes. During this time, you will see beads of water forming on the zucchini. This process, known as “sweating,” draws out a significant amount of excess moisture. This is the single most important step to prevent your fries from becoming soggy. After 30 minutes, rinse the zucchini sticks briefly under cold water to remove the excess salt, then use paper towels to pat them as dry as you possibly can. The drier they are, the crispier they will be.
Step 3: Preheat Oven and Prepare Baking Sheet
Preheat your oven to 425°F (220°C). Place a wire cooling rack inside a large, rimmed baking sheet. Lightly spray the wire rack with non-stick cooking spray. Using a wire rack allows hot air to circulate all around the zucchini fries, ensuring they get crispy on all sides and preventing the bottoms from getting steamy and soft.
Step 4: Set Up Your Breading Station
You will need three shallow dishes or plates for an organized breading process.
- Dish 1 (Flour): In the first dish, place the 1/2 cup of all-purpose flour.
- Dish 2 (Egg): In the second dish, crack the 2 large eggs and whisk them lightly with a fork until the yolks and whites are fully combined.
- Dish 3 (Panko Coating): In the third dish, combine the 1 cup of Panko breadcrumbs, 1/2 cup of grated Parmesan cheese, 1 teaspoon of garlic powder, 1 teaspoon of onion powder, 1/2 teaspoon of smoked paprika, and 1/2 teaspoon of black pepper. Mix thoroughly until all the seasonings are evenly distributed throughout the breadcrumbs.
Step 5: Bread the Zucchini Fries
Now for the fun part! Work with one zucchini stick at a time. It’s helpful to use the “dry hand, wet hand” method to keep your fingers from becoming a clumpy mess.
- Using your “dry hand,” take a zucchini stick and dredge it in the flour, shaking off any excess. The stick should have a light, even coating.
- Transfer the flour-dusted stick to your “wet hand” and dip it into the whisked egg, making sure it’s completely coated. Let any excess egg drip off.
- Finally, transfer the egg-coated stick back to your “dry hand” and press it firmly into the Panko and Parmesan mixture. Turn it over and press again to ensure it is generously and evenly coated on all sides.
Step 6: Arrange and Bake
As you bread each fry, place it on the prepared wire rack on your baking sheet. Arrange the fries in a single layer, making sure none of them are touching. Overcrowding the pan will cause the fries to steam instead of roast, leading to a softer result. You may need to use two baking sheets if necessary. Once all the fries are arranged, lightly spritz them with olive oil spray or drizzle with melted butter.
Step 7: Bake to Golden Perfection
Place the baking sheet in the preheated oven and bake for 15-20 minutes. You can flip the fries halfway through the baking time to promote even browning, though it’s often not necessary when using a wire rack. The fries are done when they are a deep golden brown, crispy, and sizzling.
Step 8: Serve Immediately
For the best texture and crunch, serve the Crispy Baked Zucchini Fries immediately while they are hot from the oven. They will lose their crispiness as they cool down.
Nutrition Facts
This recipe provides a much lighter, nutrient-dense alternative to traditional deep-fried snacks. The values below are an approximation and can vary based on the exact size of the zucchini and ingredients used.
- Servings: This recipe makes approximately 4 servings.
- Calories Per Serving: Approximately 220 calories per serving.
- High in Fiber: Zucchini is a great source of dietary fiber, which is essential for digestive health and helps you feel full and satisfied.
- Good Source of Protein: With contributions from the eggs and Parmesan cheese, these fries offer a decent amount of protein, which helps in building and repairing tissues.
- Rich in Vitamins: Zucchini provides essential vitamins like Vitamin A and Vitamin C, which are important for immune function and skin health.
- Lower in Fat: By baking instead of deep-frying, this recipe significantly reduces the overall fat content, especially unhealthy saturated and trans fats, making it a heart-friendlier choice.
- Lower in Carbohydrates: Compared to potato-based fries, zucchini fries are naturally lower in carbohydrates, making them a suitable option for those monitoring their carb intake.
Preparation time
The total time to get these delicious fries from the counter to the table is manageable for a weeknight, with most of the time being hands-off.
- Prep Time: 15 minutes (for washing, cutting, and setting up the breading station).
- Resting Time: 30 minutes (for the crucial “sweating” step to remove moisture).
- Cook Time: 15-20 minutes.
- Total Time: Approximately 1 hour to 1 hour and 5 minutes.
How to Serve
These Crispy Baked Zucchini Fries are incredibly versatile. They can be the star of the show as an appetizer or play a supporting role as a fantastic side dish. Here are some of our favorite ways to serve them:
- With a Trio of Dipping Sauces: Serving them with a variety of dips makes them a perfect party appetizer.
- Classic Marinara: The acidity and sweetness of a good marinara sauce cut through the richness of the Parmesan coating beautifully.
- Creamy Garlic Aioli: A simple mix of mayonnaise, minced garlic, lemon juice, and a pinch of salt creates a luxurious and flavorful dip.
- Spicy Ranch Dressing: Combine your favorite ranch dressing with a dash of sriracha or a pinch of cayenne pepper for a cool and spicy kick.
- Yogurt-Dill Sauce: For a fresher, lighter option, mix plain Greek yogurt with fresh chopped dill, lemon juice, and a little garlic powder.
- As a Healthy Side Dish: Move over, French fries! These zucchini sticks are a fantastic accompaniment to a variety of main courses.
- Burger Night: Serve alongside classic beef burgers, turkey burgers, or veggie burgers.
- Grilled Meats: They pair wonderfully with grilled chicken breast, steak, or fish.
- Sandwich Companion: A perfect partner for a hearty panini or a deli-style sandwich.
- On a Snack Platter: Create the ultimate snack board for game day or a casual get-together.
- Arrange the hot zucchini fries on a large platter.
- Add other finger foods like chicken wings, mozzarella sticks, and fresh vegetable crudités.
- Place small bowls of your chosen dipping sauces around the platter for easy access.
- As a “Fry” Bowl Topping: For a fun and modern twist, use them to add crunch and flavor to a grain bowl or a loaded salad.
Additional tips
Master this recipe with these eight expert tips designed to guarantee the crispiest, most flavorful results every single time.
- Don’t You Dare Skip the Salting Step: This cannot be overstated. Zucchini is over 90% water. Salting and letting the zucchini “sweat” for 30 minutes is the non-negotiable secret to drawing out that excess moisture. Skipping this step is a one-way ticket to soggy fries.
- Uniformity is Your Best Friend: Try to cut all your zucchini sticks to a similar size and thickness. This ensures that they all bake at the same rate, so you won’t have some fries that are burnt while others are still soft.
- Panko is Paramount: For that signature light, airy, and ultra-crispy crust, you must use Panko breadcrumbs. Regular breadcrumbs are much denser and will result in a heavier, less crunchy coating.
- Give Them Space: Do not overcrowd your baking sheet. The zucchini fries need space for the hot air to circulate around them. If they are too close together, they will trap steam and will not crisp up properly. Use two baking sheets if you have to; it’s worth it.
- Elevate with a Wire Rack: Baking the fries on a wire rack set inside the baking sheet is a game-changer. It elevates the fries, allowing heat to get underneath them and ensuring a 360-degree crunch without having to flip them as often.
- Ensure Your Oven is Hot: Make sure your oven is fully preheated to 425°F (220°C) before you put the baking sheet in. Placing the fries into a very hot oven immediately starts the crisping process and helps prevent them from becoming limp.
- Serve Hot and Fresh: These baked zucchini fries are at their peak of crispiness right out of the oven. Like most “fried” foods, they will lose their crunch as they sit and cool. Plan to serve them immediately for the best experience.
- Get Creative with Your Seasonings: The spice blend in this recipe is a fantastic starting point, but feel free to customize it. Try adding a pinch of cayenne for heat, some lemon zest for brightness, or swap the Italian seasoning for a Cajun or taco spice blend for a completely different flavor profile.
FAQ section
Here are answers to some of the most frequently asked questions about making Crispy Baked Zucchini Fries.
1. Why did my zucchini fries turn out soggy?
This is the most common issue and it almost always comes down to one thing: moisture. There are a few likely culprits: you may have skipped the crucial salting and sweating step, you didn’t pat the zucchini dry enough after rinsing, or you overcrowded the baking pan, which caused the fries to steam instead of roast.
2. Can I make these in an air fryer?
Absolutely! Air frying is a fantastic method for making zucchini fries. Prepare them exactly as described in the recipe. Preheat your air fryer to 400°F (200°C). Place the breaded fries in the air fryer basket in a single layer (you’ll need to work in batches). Air fry for 8-10 minutes, flipping halfway through, until they are golden brown and crispy.
3. How can I make this recipe gluten-free?
It’s very easy to adapt this recipe to be gluten-free. Simply substitute the all-purpose flour with a gluten-free all-purpose flour blend, and use gluten-free Panko breadcrumbs, which are now widely available in most grocery stores. The results will be just as crispy and delicious.
4. How do I store and reheat leftovers?
For best results, store leftover zucchini fries in an airtight container in the refrigerator for up to 2 days. Be aware that they will lose their crispiness. To reheat and bring back some of the crunch, do not use the microwave. Instead, place them in a single layer on a baking sheet and bake in a 400°F (200°C) oven or in an air fryer for 5-7 minutes until heated through and re-crisped.
5. Can I prepare these ahead of time?
You can do some of the prep ahead. You can wash and cut the zucchini sticks a day in advance and store them in an airtight container in the fridge. However, you should not salt or bread them until you are ready to bake. Breading them ahead of time will result in a very soggy coating as the zucchini releases its moisture.
6. Can I use other vegetables with this same breading?
Yes, this breading technique is wonderful on a variety of vegetables. Try it with yellow summer squash, asparagus spears, green beans, thick-cut onion rings, or sticks of sweet potato or carrots. You may need to adjust the baking time depending on the density and water content of the vegetable you choose.
7. What’s the best way to get the breading to stick?
The three-step breading process is key. First, the light coating of flour gives the egg something to cling to. Second, the egg acts as the glue. Third, be sure to press the zucchini stick firmly into the Panko mixture on all sides. Also, make sure your zucchini is patted very dry before starting; if it’s too wet, the flour will just slide off.
8. Can I make these vegan or dairy-free?
Yes, you can. To make them dairy-free, simply omit the Parmesan cheese or replace it with a dairy-free Parmesan alternative or nutritional yeast for a cheesy, savory flavor. To make them vegan, you’ll need to replace the eggs as well. A “flax egg” (1 tablespoon ground flaxseed mixed with 3 tablespoons water, left to sit for 5 minutes) works well as a binder in place of the two large eggs.

Crispy Baked Zucchini Fries
Ingredients
Here is the simple, yet powerful, list of ingredients you’ll need to create the crispiest, most flavorful baked zucchini fries you’ve ever had. Each component plays a crucial role in achieving that perfect texture and taste.
- 2 Medium Zucchini: The star of the show. Look for zucchini that are firm to the touch with smooth, vibrant green skin. Medium-sized ones are ideal as they have fewer seeds and a lower water content, which is key for crispiness.
- 1/2 cup All-Purpose Flour: This is the first step in our three-part breading process. The flour creates a dry surface on the zucchini, allowing the egg wash to adhere perfectly.
- 2 Large Eggs: Acting as the essential binder, the eggs will create a sticky layer that locks the delicious Panko and Parmesan coating onto each fry.
- 1 cup Panko Breadcrumbs: This is the secret to an ultra-crispy finish. Panko breadcrumbs are lighter and flakier than traditional breadcrumbs, so they absorb less oil and bake up into an airy, crunchy coating that shatters with every bite.
- 1/2 cup Grated Parmesan Cheese: Finely grated Parmesan adds a wonderful salty, nutty flavor and helps the fries achieve a beautiful golden-brown color in the oven. It also contributes to the overall crunch.
- 1 teaspoon Garlic Powder: For that savory, aromatic flavor that pairs so perfectly with zucchini and cheese. It provides a foundational flavor that makes these fries irresistible.
- 1 teaspoon Onion Powder: This adds a subtle, sweet, and savory depth of flavor that complements the garlic powder without being overpowering.
- 1/2 teaspoon Smoked Paprika: Not just for color! Smoked paprika adds a hint of smokiness and warmth, elevating the fries from a simple snack to a gourmet treat.
- 1 teaspoon Kosher Salt (plus more for sweating): Essential for both flavor and texture. We will use a bit of salt initially to draw excess water out of the zucchini, which is the most critical step for avoiding sogginess.
- 1/2 teaspoon Black Pepper: Freshly ground black pepper provides a mild, woody spice that balances the other seasonings.
- Olive Oil Spray or 2 tablespoons Melted Butter: A light spritz of olive oil or a drizzle of melted butter before baking helps the Panko breadcrumbs toast to a perfect golden brown and enhances the crispiness.
Instructions
Follow these step-by-step instructions carefully to ensure your zucchini fries are perfectly crispy and delicious every single time. The secret lies in the preparation, so don’t be tempted to skip any steps!
Step 1: Prepare the Zucchini
First, wash and thoroughly dry your zucchini. Patting them completely dry is crucial. Trim off both ends. Now, cut each zucchini in half crosswise. Then, take each half and slice it lengthwise into sticks that are about 1/2-inch thick, resembling the shape of classic French fries. Uniformity in size is important as it ensures all the fries will cook evenly.
Step 2: The Crucial “Sweating” Step
Place the cut zucchini sticks in a colander set over a bowl or in the sink. Sprinkle them generously with about 1 teaspoon of kosher salt and toss gently to coat. Let them sit for 20-30 minutes. During this time, you will see beads of water forming on the zucchini. This process, known as “sweating,” draws out a significant amount of excess moisture. This is the single most important step to prevent your fries from becoming soggy. After 30 minutes, rinse the zucchini sticks briefly under cold water to remove the excess salt, then use paper towels to pat them as dry as you possibly can. The drier they are, the crispier they will be.
Step 3: Preheat Oven and Prepare Baking Sheet
Preheat your oven to 425°F (220°C). Place a wire cooling rack inside a large, rimmed baking sheet. Lightly spray the wire rack with non-stick cooking spray. Using a wire rack allows hot air to circulate all around the zucchini fries, ensuring they get crispy on all sides and preventing the bottoms from getting steamy and soft.
Step 4: Set Up Your Breading Station
You will need three shallow dishes or plates for an organized breading process.
- Dish 1 (Flour): In the first dish, place the 1/2 cup of all-purpose flour.
- Dish 2 (Egg): In the second dish, crack the 2 large eggs and whisk them lightly with a fork until the yolks and whites are fully combined.
- Dish 3 (Panko Coating): In the third dish, combine the 1 cup of Panko breadcrumbs, 1/2 cup of grated Parmesan cheese, 1 teaspoon of garlic powder, 1 teaspoon of onion powder, 1/2 teaspoon of smoked paprika, and 1/2 teaspoon of black pepper. Mix thoroughly until all the seasonings are evenly distributed throughout the breadcrumbs.
Step 5: Bread the Zucchini Fries
Now for the fun part! Work with one zucchini stick at a time. It’s helpful to use the “dry hand, wet hand” method to keep your fingers from becoming a clumpy mess.
- Using your “dry hand,” take a zucchini stick and dredge it in the flour, shaking off any excess. The stick should have a light, even coating.
- Transfer the flour-dusted stick to your “wet hand” and dip it into the whisked egg, making sure it’s completely coated. Let any excess egg drip off.
- Finally, transfer the egg-coated stick back to your “dry hand” and press it firmly into the Panko and Parmesan mixture. Turn it over and press again to ensure it is generously and evenly coated on all sides.
Step 6: Arrange and Bake
As you bread each fry, place it on the prepared wire rack on your baking sheet. Arrange the fries in a single layer, making sure none of them are touching. Overcrowding the pan will cause the fries to steam instead of roast, leading to a softer result. You may need to use two baking sheets if necessary. Once all the fries are arranged, lightly spritz them with olive oil spray or drizzle with melted butter.
Step 7: Bake to Golden Perfection
Place the baking sheet in the preheated oven and bake for 15-20 minutes. You can flip the fries halfway through the baking time to promote even browning, though it’s often not necessary when using a wire rack. The fries are done when they are a deep golden brown, crispy, and sizzling.
Step 8: Serve Immediately
For the best texture and crunch, serve the Crispy Baked Zucchini Fries immediately while they are hot from the oven. They will lose their crispiness as they cool down.
Nutrition
- Serving Size: one normal portion
- Calories: 220