")

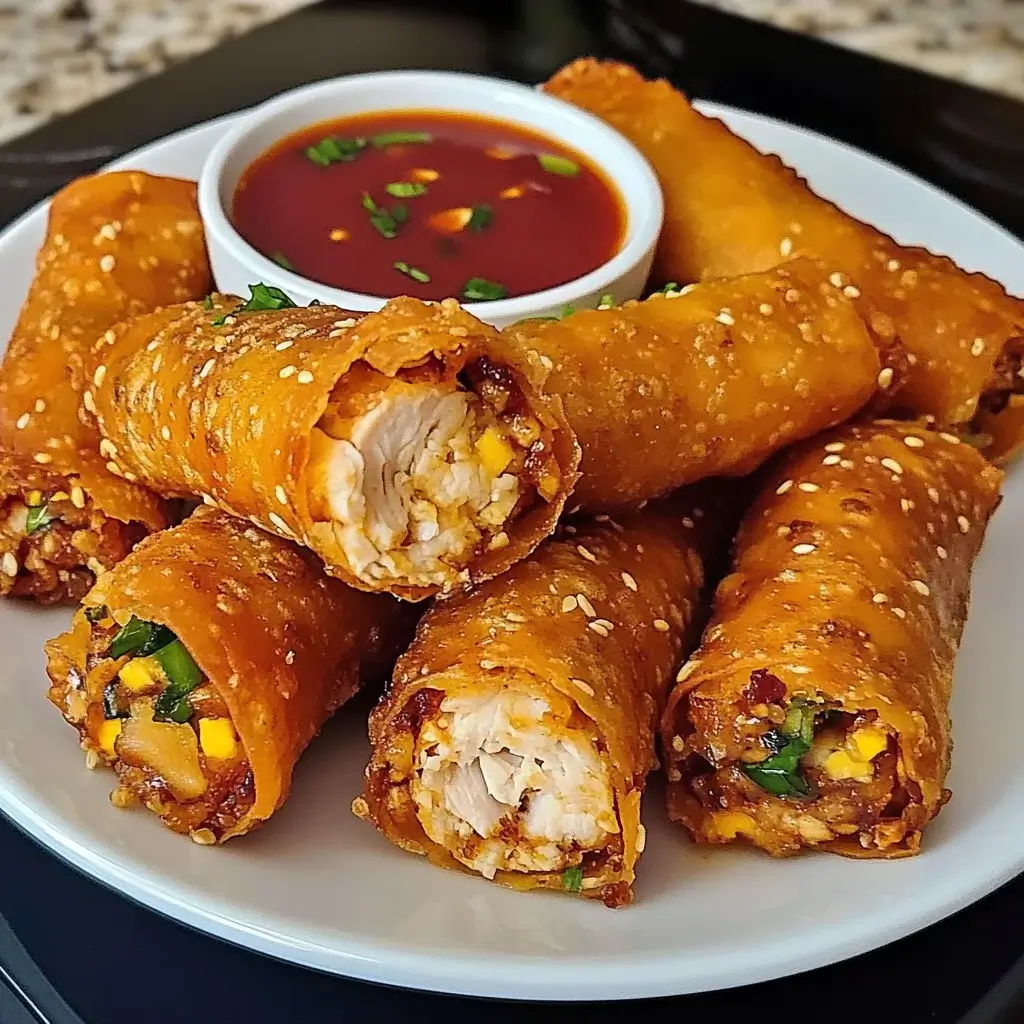

The first time I made these Crispy Chicken Spring Rolls for a family gathering, I wasn’t sure what to expect. Spring rolls can be fiddly, and getting that perfect, shatteringly crisp exterior without them becoming greasy is an art form. But let me tell you, the moment of truth arrived when my notoriously picky nephew, who usually eyes anything homemade with suspicion, took a bite. His eyes widened, a satisfying crunch echoed slightly, and he immediately reached for another, declaring them “better than takeout!” That, right there, was the ultimate seal of approval. Since then, this recipe has become a staple for potlucks, game nights, or even just a fun weekend cooking project. They disappear faster than I can fry them! The combination of savory, well-seasoned chicken and tender-crisp vegetables, all wrapped in that incredibly delicate, golden-brown, crispy shell, is simply irresistible. It’s a recipe that looks impressive but is surprisingly manageable once you get the hang of the rolling technique. Prepare for rave reviews – these homemade Crispy Chicken Spring Rolls genuinely elevate the appetizer game.
Ingredients for Perfect Crispy Chicken Spring Rolls
Here’s what you’ll need to create these delectable bites. Using fresh ingredients and the right type of wrappers is key to achieving that signature crispiness and flavor.
- Ground Chicken (1 lb / 450g): Provides the savory protein base. Using ground chicken ensures it cooks quickly and integrates well with the vegetables. You can also finely mince chicken breast or thigh meat.
- Spring Roll Wrappers (Approx. 20-25 sheets, 8×8 inch / 20×20 cm): Crucial for the crispy texture. Look for thin, wheat-based wrappers specifically labeled “spring roll wrappers” (not egg roll wrappers, which are thicker). Usually found in the frozen section of Asian markets or larger supermarkets. Thaw according to package directions.
- Shredded Cabbage (2 cups, tightly packed): Adds bulk, subtle sweetness, and a tender texture. Green cabbage is standard, but Napa cabbage works well too.
- Shredded Carrots (1 cup): Provide color, sweetness, and a slight crunch. Pre-shredded works, but freshly shredded often has better texture.
- Bean Sprouts (1 cup, optional but recommended): Add a classic spring roll crunch and freshness. Ensure they are fresh and crisp.
- Glass Noodles (Vermicelli) (2 oz / 55g, dry): Cooked and chopped, these add a pleasant chewy texture and help bind the filling. Sometimes called cellophane noodles.
- Yellow Onion (1 medium, finely chopped): Forms the aromatic base of the filling.
- Garlic (3-4 cloves, minced): Essential aromatic for depth of flavor.
- Ginger (1 tablespoon, freshly grated): Adds a warm, zesty kick that complements the chicken.
- Soy Sauce (3 tablespoons): Provides salty, umami depth. Use low-sodium if preferred.
- Oyster Sauce (2 tablespoons): Adds a savory, slightly sweet, and complex flavor.
- Sesame Oil (1 teaspoon): Offers a nutty aroma and distinct flavor; a little goes a long way.
- Black Pepper (1/2 teaspoon, or to taste): For a touch of warmth.
- Vegetable Oil (or other high smoke point oil like Canola, Peanut, Grapeseed): Approximately 3-4 cups for deep frying. The amount needed depends on the size of your frying pot.
- Egg (1, beaten) or Cornstarch Slurry (1 tbsp cornstarch + 2 tbsp water): Used as a ‘glue’ to seal the spring rolls securely.
Step-by-Step Instructions for Making Crispy Chicken Spring Rolls
Follow these steps carefully for perfectly rolled and fried spring rolls every time. Patience during the rolling process is key!
1. Prepare the Filling:
- Cook the Aromatics: Heat 1-2 tablespoons of vegetable oil in a large skillet or wok over medium-high heat. Add the finely chopped onion and sauté for 2-3 minutes until softened and translucent. Add the minced garlic and grated ginger, cooking for another minute until fragrant. Be careful not to burn the garlic.
- Cook the Chicken: Add the ground chicken to the skillet. Break it apart with a spoon and cook, stirring occasionally, until it’s browned and cooked through (no longer pink). Drain off any excess fat if necessary.
- Add Vegetables: Stir in the shredded cabbage and shredded carrots. Cook for 3-5 minutes, stirring frequently, until the vegetables soften slightly but still retain some crunch. You don’t want them to become mushy.
- Prepare Noodles & Bean Sprouts: While the vegetables cook, prepare the glass noodles according to package directions (usually involves soaking in hot water for a few minutes until pliable). Drain them well and roughly chop them into shorter, manageable lengths (about 1-2 inches). If using bean sprouts, add them to the skillet during the last minute of cooking the vegetables, just to warm them through slightly.
- Combine and Season: Add the cooked and chopped glass noodles to the skillet with the chicken and vegetable mixture. Stir in the soy sauce, oyster sauce, sesame oil, and black pepper. Mix everything thoroughly until well combined.
- Cool the Filling Completely: This is a CRUCIAL step. Transfer the filling to a large bowl or spread it out on a baking sheet. Allow it to cool completely to room temperature (or even chill it slightly in the refrigerator). A hot or warm filling will create steam inside the wrapper, making it difficult to roll and potentially causing sogginess or bursting during frying. This cooling step can take 30-60 minutes. Taste and adjust seasoning if needed once cool.
2. Prepare for Rolling:
- Set Up Your Station: Clear a large, clean work surface. Place the cooled filling bowl, the stack of spring roll wrappers (covered with a damp cloth or paper towel to prevent drying), the small bowl of beaten egg or cornstarch slurry, and a large plate or baking sheet to hold the rolled spring rolls.
- Handle Wrappers Carefully: Gently separate one spring roll wrapper. Keep the remaining wrappers covered. They dry out very quickly!
3. Roll the Spring Rolls:
- Position the Wrapper: Place one wrapper on your work surface in a diamond shape (one corner pointing towards you).
- Add Filling: Spoon about 2-3 tablespoons of the cooled filling onto the bottom third of the wrapper, near the corner closest to you. Shape the filling into a compact log, leaving about an inch of border on each side. Don’t overfill, or the wrapper may tear.
- First Fold: Bring the bottom corner (the one pointing towards you) up and tightly over the filling.
- Fold the Sides: Fold the left and right corners snugly towards the center, like an envelope. Try to keep the sides straight and parallel. This step is important to prevent oil from seeping into the filling.
- Roll Tightly: Continue rolling the wrapper tightly upwards from the bottom towards the top corner. A tight roll is essential for a crispy result and prevents bursting.
- Seal: When you have about 2 inches of the top corner remaining, brush the edges of that corner generously with the beaten egg or cornstarch slurry. Finish rolling tightly to seal the spring roll completely. Ensure the edge is well-adhered.
- Place and Cover: Place the finished spring roll seam-side down on the prepared plate or baking sheet. Immediately cover the rolled spring rolls with plastic wrap or another damp cloth to prevent them from drying out while you roll the rest. Repeat with the remaining wrappers and filling.
4. Fry the Spring Rolls:
- Heat the Oil: Pour about 2-3 inches of vegetable oil (or your chosen high-smoke-point oil) into a deep, heavy-bottomed pot, Dutch oven, or wok. Heat the oil over medium-high heat until it reaches 350-375°F (175-190°C). Use a deep-fry thermometer for accuracy. If you don’t have one, test by dipping the handle of a wooden spoon or a bamboo skewer into the oil – if small, steady bubbles form around it immediately, the oil is likely ready. If it bubbles violently, it’s too hot; if bubbles are slow and lazy, it’s not hot enough.
- Fry in Batches: Carefully lower 3-5 spring rolls into the hot oil, depending on the size of your pot. Do NOT overcrowd the pot, as this will significantly lower the oil temperature, leading to greasy, soggy spring rolls. Fry the spring rolls for about 3-5 minutes per batch, turning them occasionally with tongs or a slotted spoon, until they are beautifully golden brown, crispy, and cooked through.
- Drain Thoroughly: Once golden and crispy, use tongs or a spider strainer to carefully remove the spring rolls from the hot oil, allowing excess oil to drip back into the pot for a moment.
- Cool on a Wire Rack: Transfer the fried spring rolls immediately to a wire rack placed over a baking sheet or paper towels. Draining them on a wire rack allows air to circulate underneath, preventing the bottoms from becoming soggy as they cool. Avoid placing them directly on paper towels initially, as this can trap steam.
- Maintain Oil Temperature: Check the oil temperature between batches and allow it to return to the target range (350-375°F / 175-190°C) before adding the next batch.
- Repeat: Continue frying the remaining spring rolls in batches until all are cooked.
5. Serve:
- Serve the Crispy Chicken Spring Rolls hot and fresh for the best texture, alongside your favorite dipping sauces.
Nutrition Facts (Approximate)
Please note that these values are estimates and can vary based on specific ingredients, wrapper thickness, oil absorption during frying, and portion size.
- Servings: Makes approximately 20-25 spring rolls. Serving size typically 2-3 rolls.
- Calories per Serving (approx. 2 rolls): 250-350 kcal (highly dependent on oil absorption)
- Protein: Good source from chicken, contributing to satiety.
- Fat: Primarily from the cooking oil used for frying and a small amount from the chicken and sesame oil. Deep frying significantly increases fat content.
- Carbohydrates: Mainly from the spring roll wrappers, vegetables, and glass noodles.
Preparation and Cooking Time
Making spring rolls involves several steps, but it becomes faster with practice.
- Preparation Time: Approximately 45-60 minutes (includes chopping vegetables, cooking filling, cooling filling, and rolling the spring rolls). Cooling the filling is essential and adds passive time.
- Cooking Time: Approximately 20-30 minutes (frying in batches, 3-5 minutes per batch).
- Total Time: Approximately 1 hour 15 minutes to 1 hour 45 minutes (including filling cooling time).
How to Serve Your Crispy Chicken Spring Rolls
Presentation and accompaniments enhance the enjoyment of these crispy delights.
- Serve Hot: Spring rolls are undeniably best when served immediately after frying for maximum crispiness.
- Platter Presentation: Arrange them attractively on a platter. You can stand them upright in a glass or bowl for a dramatic effect, or lay them neatly side-by-side.
- Garnishes: Consider garnishing the platter with fresh herbs like cilantro sprigs, mint leaves, or thinly sliced scallions for a pop of color and freshness. A sprinkle of sesame seeds also looks nice.
- Dipping Sauces are Essential: Offer a variety of dipping sauces to cater to different tastes. Here are some popular choices:
- Sweet Chili Sauce: The classic pairing – sweet, tangy, with a mild kick. Widely available pre-made, or you can make your own.
- Peanut Sauce: Creamy, savory, and slightly sweet. Excellent with chicken. Often made with peanut butter, hoisin sauce, lime juice, soy sauce, and a touch of sweetness.
- Soy-Ginger Dipping Sauce: A simple yet flavorful mix of soy sauce, rice vinegar, grated ginger, minced garlic, and a dash of sesame oil.
- Hoisin Sauce: A thick, sweet, and savory sauce often used in Chinese cuisine. Can be served as is or thinned slightly with water or rice vinegar.
- Nuoc Cham (Vietnamese Dipping Sauce): A lighter, fish-sauce based sauce that’s salty, sweet, sour, and spicy. Typically includes fish sauce, lime juice, sugar, water, garlic, and chili.
- As Part of a Meal: While great appetizers, 3-4 spring rolls served with a side salad or some steamed rice can make a satisfying light lunch or dinner.
- Party Food: Cut larger spring rolls in half diagonally for easier handling and serving at parties or gatherings.
Additional Tips for Spring Roll Success
Mastering crispy spring rolls involves a few key techniques. These tips will help you achieve perfection:
- Ensure Filling is DRY and COOL: This is arguably the most critical tip. Excess moisture in the filling translates to steam inside the wrapper during frying. Steam prevents crisping and can cause the wrapper to become soggy or even burst. Cook out excess liquid from the vegetables and always let the filling cool completely before rolling. Patting ingredients like bean sprouts dry can also help.
- Handle Wrappers Properly: Spring roll wrappers are delicate and dry out incredibly fast. Keep the stack covered with a genuinely damp (not soaking wet) paper towel or clean kitchen towel while you work. Only take out one wrapper at a time. If a wrapper feels brittle, it might be too dry.
- Don’t Overfill: It’s tempting to load up each roll, but overfilling makes them difficult to roll tightly, increases the risk of tearing the wrapper, and can lead to uneven cooking or bursting in the hot oil. Stick to about 2-3 tablespoons of filling per standard 8×8 inch wrapper.
- Roll Tightly and Consistently: A loose roll allows oil to seep in, making the spring roll greasy. It also won’t hold its shape well. Practice rolling tightly from the first fold, ensuring the side folds are snug, and maintaining tension as you roll upwards. Consistency ensures they cook evenly.
- Seal Securely: Use a good sealant like beaten egg or a cornstarch slurry (mix 1 tbsp cornstarch with 2 tbsp water until smooth) on the final corner flap. Ensure the entire edge is coated and press gently to seal. A poorly sealed roll can unravel during frying.
- Maintain Correct Oil Temperature: Frying oil that’s too cool results in greasy, heavy spring rolls because they absorb too much oil before the exterior can crisp up. Oil that’s too hot will burn the wrapper before the filling heats through. Aim for a steady 350-375°F (175-190°C). Use a thermometer, and fry in small batches to prevent the temperature from dropping drastically.
- Fry in Small Batches: Overcrowding the pot significantly lowers the oil temperature. Give the spring rolls space to swim freely in the oil. This ensures even cooking and helps maintain that crucial high temperature needed for crispiness. Be patient and fry in multiple batches if necessary.
- Drain on a Wire Rack, Not Paper Towels: While paper towels are useful under the rack, placing hot spring rolls directly onto them traps steam underneath, making the bottom side soggy. A wire rack allows air to circulate all around, preserving that hard-earned crispiness as they cool slightly.
Frequently Asked Questions (FAQ)
Here are answers to common questions about making Crispy Chicken Spring Rolls:
1. Why did my spring rolls turn out soggy instead of crispy?
Answer: Sogginess is usually caused by a few factors:
Wet Filling: Excess moisture in the filling creates steam, preventing crisping. Ensure your filling is cooked down and cooled completely.
Oil Temperature Too Low: Frying below 350°F (175°C) allows the rolls to absorb oil before crisping. Use a thermometer and fry in batches.
Overcrowding the Pot: Too many rolls at once drastically lowers oil temperature.
Improper Draining: Placing hot rolls directly on paper towels traps steam. Use a wire rack.
2. Can I make spring rolls ahead of time?
Answer: Yes, with caveats.
Filling: You can make the filling 1-2 days in advance and store it covered in the refrigerator.
Assembled (Uncooked): You can assemble the spring rolls a few hours ahead. Place them in a single layer on a baking sheet lined with parchment paper, cover tightly with plastic wrap (ensure it touches the rolls to prevent drying), and refrigerate. Fry just before serving. They might not be quite as perfect as freshly rolled, but still very good. Avoid storing uncooked for more than 4-6 hours as wrappers can get gummy.
Fried: Fried spring rolls are best fresh. Reheating can work (oven or air fryer at around 375°F/190°C until hot and re-crisped), but they may not be as shatteringly crisp as when first fried.
3. Can I freeze Crispy Chicken Spring Rolls?
Answer: Yes, freezing uncooked spring rolls works well! After rolling, place them in a single layer on a parchment-lined baking sheet and freeze until solid (about 1-2 hours). Then, transfer the frozen rolls to an airtight freezer bag or container. They can be stored for up to 2-3 months. Do NOT thaw before cooking. Fry directly from frozen, adding a few extra minutes to the cooking time. Ensure the oil temperature doesn’t drop too much when adding frozen rolls.
4. Can I bake or air fry these spring rolls instead of deep frying?
Answer: Absolutely! The texture won’t be identical to deep-fried (less uniformly golden and blistered, potentially a bit drier), but still delicious and much lighter.
Baking: Preheat oven to 400°F (200°C). Place rolls on a parchment-lined baking sheet. Brush or spray them generously with oil (like vegetable or canola). Bake for 15-25 minutes, flipping halfway through, until golden brown and crispy.
Air Frying: Preheat air fryer to 380°F (190°C). Spray the spring rolls lightly with oil. Place them in the air fryer basket in a single layer (don’t overcrowd). Air fry for 10-15 minutes, flipping or shaking the basket halfway, until golden and crisp. Cooking time may vary by machine.
5. Can I make these vegetarian or vegan?
Answer: Yes, easily!
Vegetarian: Substitute the chicken with crumbled firm or extra-firm tofu (press it well first!), finely chopped mushrooms (shiitake or cremini work well), or simply increase the amount and variety of vegetables (add bell peppers, bamboo shoots, water chestnuts).
* Vegan: Make the vegetarian substitution above. Ensure your spring roll wrappers are vegan (most traditional thin ones are, but check ingredients – avoid those with egg). Use a cornstarch slurry instead of egg wash for sealing. Verify your oyster sauce is vegan (mushroom-based versions exist) or substitute with more soy sauce/ a vegan stir-fry sauce.
6. What’s the difference between spring roll wrappers and egg roll wrappers?
Answer: Spring roll wrappers are typically thinner, smoother, and made primarily from wheat flour and water. They fry up very light and crispy. Egg roll wrappers are thicker, often contain egg (hence the name), have a slightly bubbly texture when fried, and result in a chewier, more substantial bite. For this specific “crispy” style, spring roll wrappers are preferred.
7. What’s the best oil for frying spring rolls?
Answer: You need a neutral-flavored oil with a high smoke point (the temperature at which it starts to burn and smoke). Good choices include: Peanut Oil (classic choice, great flavor but allergen concern), Canola Oil, Vegetable Oil, Grapeseed Oil, or Corn Oil. Avoid oils with low smoke points like extra virgin olive oil.
8. My spring rolls keep bursting open when frying. What am I doing wrong?
Answer: Bursting can happen for several reasons:
Overfilling: Too much filling puts stress on the wrapper.
Rolling Too Loosely: Allows oil to seep in and steam to build excessively.
Filling Too Wet/Hot: Creates too much internal steam pressure.
Poor Sealing: The seam wasn’t properly glued shut with egg wash or slurry.
Tears in Wrapper: Small nicks or tears can expand in the hot oil. Handle wrappers gently.
Sudden Temperature Change: Adding very cold (especially frozen) rolls to extremely hot oil can sometimes cause rapid expansion and bursting, though usually frying from frozen is fine if done carefully. Ensure oil temp is correct, not excessively high.