")


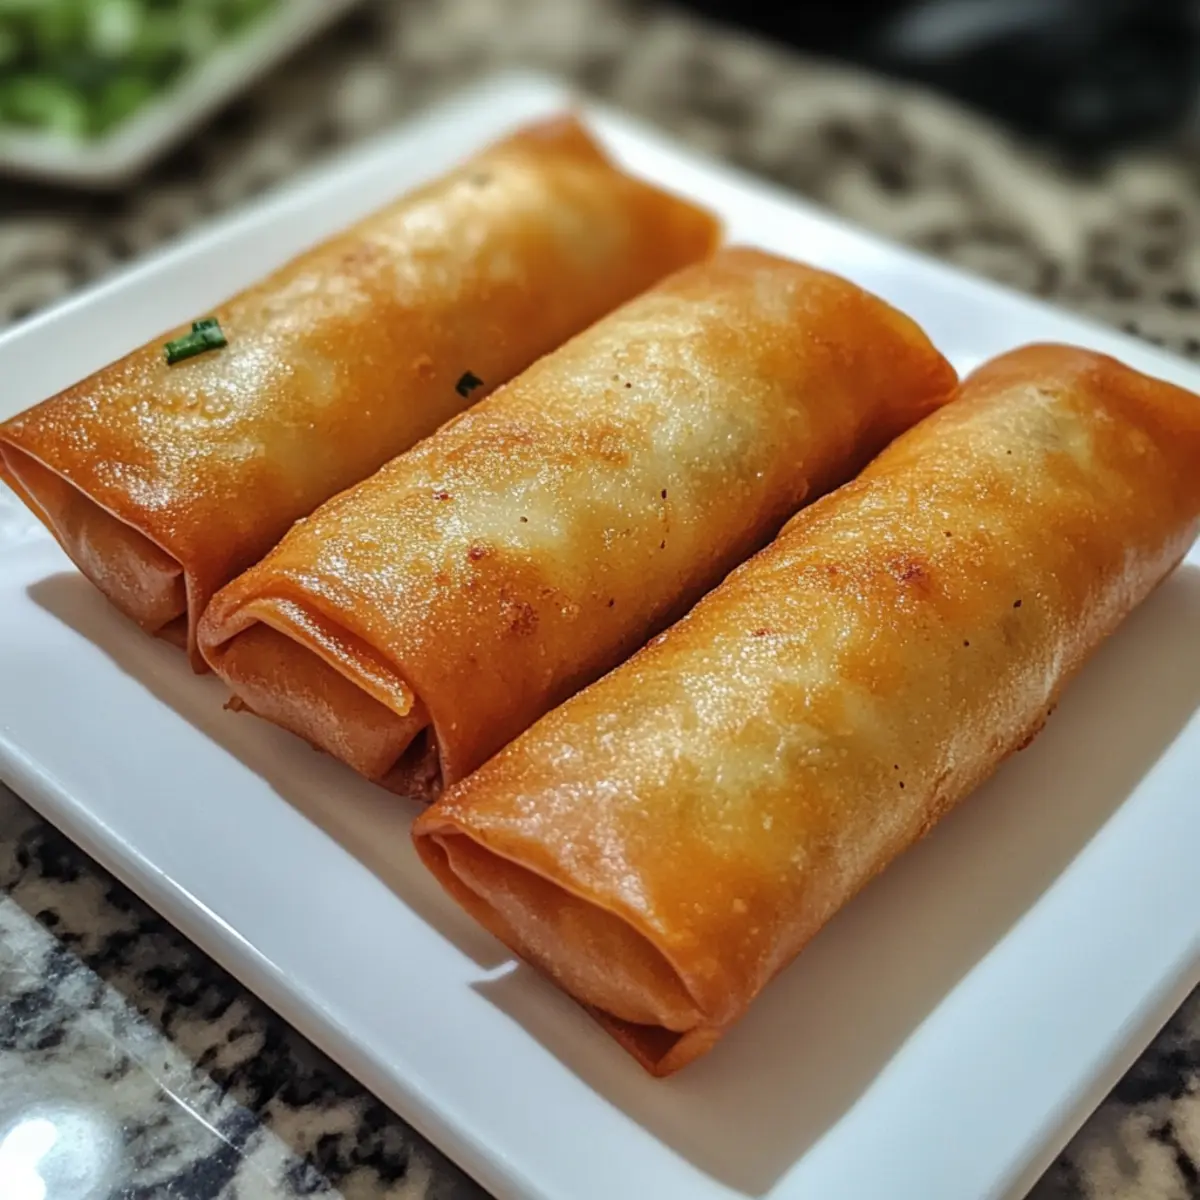
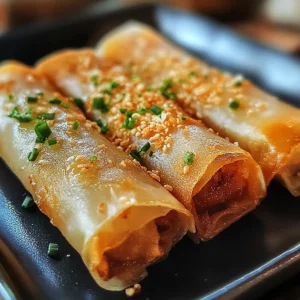
There’s something truly irresistible about the crisp crackle of lumpia frying in a hot pan—the golden wrappers hiding a savory treasure inside. I stumbled upon this recipe after craving a homemade snack that’s both comforting and bursting with flavor, far from the usual fast food fare. What makes lumpia so special? It’s the perfect balance of crunchy texture and savory filling, making it a crowd-pleaser at any gathering or a cozy treat for yourself. Whether you’re a seasoned chef or just love rolling up your sleeves in the kitchen, this recipe is delightfully simple yet endlessly satisfying. Let me show you how easy it is to bring a taste of this Filipino classic right to your table, no fancy ingredients required!
Why choose lumpia for snacks?
Crunchy Delight: Lumpia boasts an irresistible crispy shell that crackles with every bite. Simple Preparation: You don’t need complicated skills or fancy tools to make this homemade snack. Versatile Filling: Customize the savory interior with your favorite veggies, meat, or seafood for endless flavor combinations. Time-Saver: Quick to assemble and fry, perfect for busy days or last-minute guests. Crowd-Pleaser: Loved by all ages, it’s a guaranteed hit for parties or cozy nights in. Comfort Food Charm: Enjoy a warm, satisfying treat that beats fast food every time!
Lumpia Ingredients You’ll Need
For the Filling
- Ground pork – Use lean pork for a juicy yet not greasy filling.
- Carrots – Finely grated to add sweetness and crunch.
- Green beans – Chopped small for fresh texture and color.
- Onion – Minced to release that savory aroma.
- Garlic – Crushed for a punchy, classic flavor.
- Soy sauce – Adds depth and salty umami to the mixture.
- Salt and pepper – Season lightly to enhance all flavors without overpowering.
For Wrapping and Frying
- Lumpia wrappers – Thin and delicate for that prized crispy shell.
- Egg – Beaten, used as glue to seal each lumpia perfectly.
- Vegetable oil – Plenty for deep frying to achieve the signature golden crunch.
Optional Dipping Sauce
- Vinegar – Tangy base for a traditional dipping sauce.
- Soy sauce – Balances acidity with salty undertones.
- Chili flakes – For a spicy kick that complements the lumpia just right.
How to Make Lumpia
- Heat In a large skillet, warm 1 tablespoon vegetable oil over medium heat, allowing it to shimmer before adding aromatics for golden, evenly cooked filling.
- Sauté Add the minced onion and crushed garlic to the pan, sautéing for 2–3 minutes until tender, fragrant, and lightly golden around the edges.
- Combine Stir in ground pork, grated carrots, and chopped green beans, cooking 5–6 minutes until vegetables soften and meat turns no longer pink.
- Season Pour in soy sauce, then sprinkle salt and pepper; cook for another minute until flavors meld before transferring filling to a bowl to cool slightly.
For Assembly:
- Arrange Place a wrapper on a work surface with one corner facing you, keeping extras covered with a damp towel to prevent drying.
- Fill & Roll Spoon two tablespoons of the cooled filling along the bottom edge, fold in the sides, then roll up tightly, sealing the edge with a dab of beaten egg.
For Frying:
- Heat In a deep pot or wok, heat enough vegetable oil to reach 350°F (180°C), ensuring wrappers will float and cook evenly without sticking.
- Fry Working in batches, carefully lower rolls into hot oil, frying 3–4 minutes each batch until golden brown and crisp on all sides.
- Drain Use a slotted spoon to transfer rolls to a paper towel–lined plate, letting them rest briefly to remove excess oil and maintain crispiness.
Optional: Serve with extra dipping sauce on the side for perfect pairing.
Exact quantities are listed in the recipe card below.
What to Serve with Lumpia?
Brighten your dining experience with flavorful side dishes that perfectly accompany these crunchy delights.
-
Sweet Chili Sauce: This sticky, sweet sauce adds a delightful kick, enhancing the savory lumpia with its playful heat.
-
Cilantro Lime Rice: The fresh, zesty flavors of cilantro and lime create a bright contrast to the rich filling, making every bite refreshing.
-
Asian Slaw: A mix of colorful veggies in a tangy dressing offers a crunchy counterbalance, adding brightness and texture alongside each crispy roll.
-
Pineapple Salsa: The sweetness of pineapple lends a tropical flair, perfectly complementing the savory notes of lumpia while adding a juicy freshness.
-
Mango Dipping Sauce: With its fruity sweetness and subtle spice, this sauce elevates the flavor profile, harmonizing beautifully with the crispy exterior.
-
Coconut Soup: A warm, soothing bowl of coconut soup wraps your meal in creamy comfort, creating a delightful pairing that warms the soul.
For drinks, consider pairing with a chilled Thai iced tea for a sweet, creamy complement that perfectly balances the crispiness of the lumpia. Enjoy these delicious combinations for a truly satisfying meal!
How to Store and Freeze Lumpia
Fridge: Keep leftover lumpia in an airtight container for up to 3 days. Reheat in the oven at 350°F (175°C) for a few minutes to regain crispiness.
Freezer: For longer storage, freeze uncooked lumpia on a baking sheet until solid, then transfer to a zip-top bag. They’ll keep well for up to 3 months.
Reheating: Frozen lumpia can be cooked straight from the freezer. Fry them in hot oil for 4–5 minutes until golden and crispy, ensuring a delightful crunch.
Wraps Protection: Always wrap lumpia tightly in parchment or foil before freezing to prevent freezer burn and maintain that perfect lumpia flavor.
Variations & Substitutions for lumpia
Feel free to explore these creative twists and substitutions to personalize your lumpia experience!
- Vegetarian: Swap the ground pork for a mixture of crumbled tofu and finely chopped mushrooms for a meatless delight. The texture remains amazing, and it’s a great way to pack in more veggies!
- Spicy: Add minced jalapeños or sriracha to the filling for a kick that elevates each bite. A touch of heat can make the crispy exterior even more exciting!
- Gluten-Free: Use gluten-free lumpia wrappers, ensuring everyone at your table can enjoy this treat without worry. Simple adjustments can open the door to deliciousness for all dietary needs!
- Seafood: Substitute the ground pork with minced shrimp or crab for a delightful seafood twist. This variation adds a burst of flavor and a touch of sophistication to your lumpia.
- Herb-Infused: Toss in chopped fresh herbs such as cilantro or Thai basil into the filling for a fresh, vibrant taste. It’s like a garden party in every crisp bite!
- Sweet: Create a dessert version by using sweetened grated coconut and chocolate chips as the filling. Fry these delicacies for a unique and indulgent treat!
- Baked: For a healthier option, brush the wrapped lumpia with oil and bake them at 400°F (200°C) for about 20 minutes until crispy. It’s a lighter take that still satisfies!
- Loaded: Stuff each lumpia with a mix of fillings like cheese, beans, and corn for a fun twist on traditional flavors. This fusion approach can bring your taste buds on a journey!
Make Ahead Options
These crispy lumpia are perfect for busy home cooks looking to save time without sacrificing flavor! You can prepare the filling up to 3 days in advance; simply cook and cool it, then store it in an airtight container in the refrigerator. The lumpia wrappers can also be filled and rolled ahead of time, keeping them covered with a damp towel to prevent drying out, if desired, for up to 24 hours. When you’re ready to enjoy your homemade lumpia, just heat oil in a pot and fry them straight from the fridge for that fresh, crispy taste—just like they were made in the moment!
Expert Tips for Perfect Lumpia
- Use Fresh Wrappers: Always keep lumpia wrappers covered with a damp cloth to prevent drying and cracking while assembling your rolls.
- Cool Filling Thoroughly: Let the cooked filling cool slightly before wrapping to avoid soggy lumpia and make rolling easier.
- Seal Edges Firmly: Use beaten egg as glue to tightly seal all edges, preventing filling from leaking during frying.
- Maintain Oil Temperature: Fry at steady 350°F (180°C) so lumpia cooks evenly without absorbing excess oil or burning.
- Fry in Batches: Avoid overcrowding the pot to keep oil temperature stable and achieve that signature crispiness.
Crispy Lumpia Recipe: Easy Homemade Filipino Snack Perfection Recipe FAQs
How do I know if the lumpia wrappers are good to use?
Look for lumpia wrappers that are soft, pliable, and free from any cracks or dark spots. Fresh wrappers will be slightly translucent and won’t tear easily when you fold them. If you notice dryness or brittleness, cover them with a damp cloth before use or purchase a fresher batch for best results.
What’s the best way to store leftover cooked lumpia?
Absolutely store leftover lumpia in an airtight container and keep it in the fridge. They stay delicious for about 3 to 4 days. When ready to eat, reheat them in a preheated oven at 350°F (175°C) for 5–7 minutes—this revives the crunch beautifully, much better than a microwave, which can make them soggy.
Can I freeze lumpia, and how should I do it?
Yes, freezing lumpia is a smart way to enjoy them later! First, assemble but don’t fry the lumpia. Arrange them in a single layer on a parchment-lined baking sheet and freeze until firm, about 2 hours. Then transfer to a zip-top freezer bag or airtight container, sealing tightly to prevent freezer burn. Label with date and store for up to 3 months. When you’re ready, fry them straight from the freezer for 4–5 minutes until golden and crisp.
My lumpia filling sometimes tastes watery or soggy, what can I do?
This is a common challenge! To avoid sogginess, make sure the filling is cool before wrapping. Also, don’t overload the wrappers—just 2 tablespoons of filling per roll is perfect. After cooking your veggies and meat, drain any excess liquid before mixing in the seasonings. These steps will help you achieve that signature crispiness and rich flavor every time.
Are lumpia safe for pets or people with common allergies?
Lumpia typically contains pork, garlic, and soy sauce, which aren’t ideal for pets, so it’s best to keep them away from dogs or cats. For people with allergies, the soy sauce is a common allergen, and some lumpia wrappers contain wheat gluten. You can find gluten-free wrappers and use tamari or coconut aminos as soy sauce substitutes to make a more allergy-friendly version. Always adjust fillings according to dietary needs—the more the merrier when customizing!

Crispy Lumpia Recipe: Easy Homemade Filipino Snack Perfection
Ingredients
Equipment
Method
- Heat vegetable oil in a large skillet over medium heat.
- Sauté minced onion and crushed garlic for 2–3 minutes.
- Combine ground pork, grated carrots, and chopped green beans, cooking for 5–6 minutes.
- Season with soy sauce, salt, and pepper; cook for another minute and transfer to a bowl.
- Place a wrapper on a work surface with one corner facing you.
- Spoon two tablespoons of cooled filling, fold in sides, and roll up tightly, sealing with a dab of beaten egg.
- Heat enough vegetable oil in a deep pot or wok to reach 350°F (180°C).
- Fry lumpia in batches for 3–4 minutes until golden brown and crisp.
- Transfer rolls to a paper towel-lined plate to drain excess oil.