")

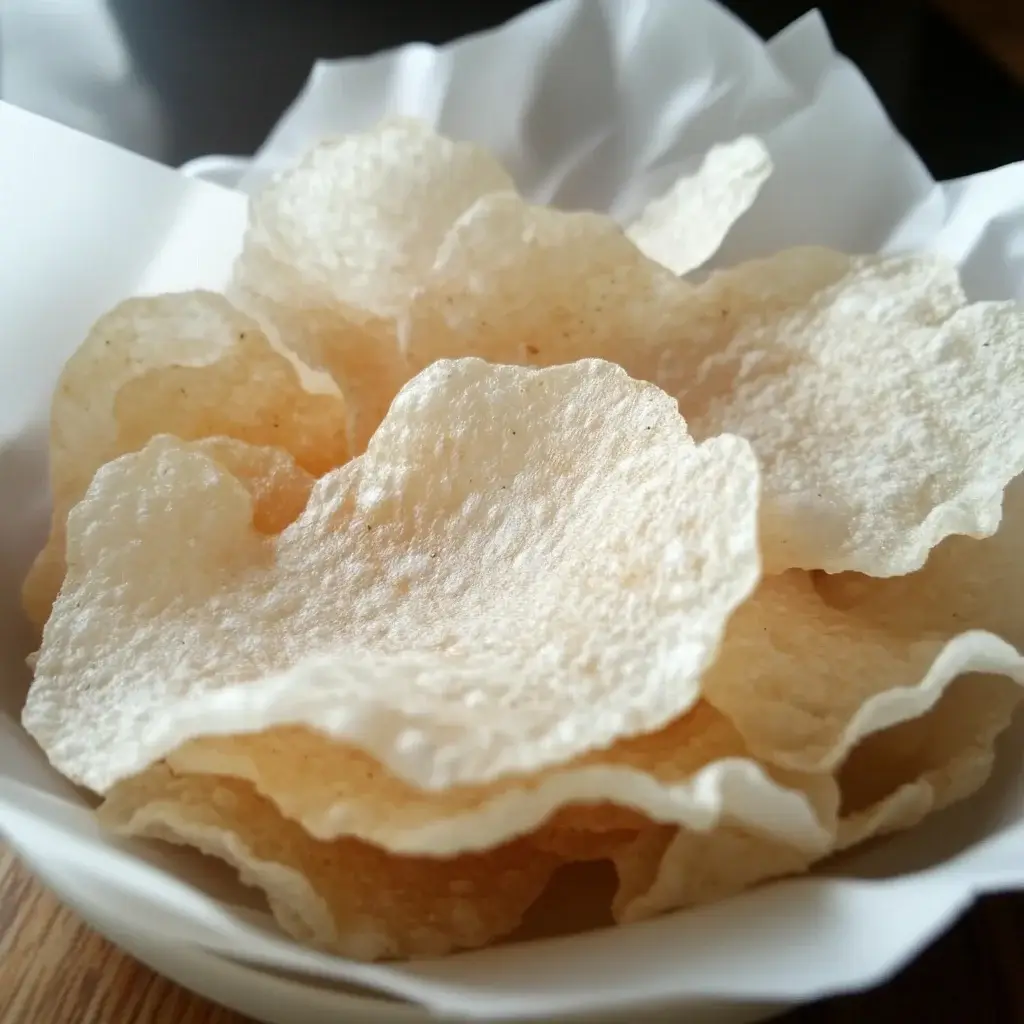

Okay, let’s get cracking on these unbelievably addictive Crispy Rice Paper Chips! Honestly, the first time I made these, I was skeptical. Rice paper? Crispy? It sounded… delicate. But my kids had been begging for a new crunchy snack, and I was tired of the usual store-bought options. I grabbed a pack of rice paper wrappers languishing in the pantry, some oil, and a bit of salt. Twenty minutes later, the aroma filled the kitchen, and the sound of ecstatic crunching filled the house. They vanished. Poof. Gone in minutes. My husband, usually a potato chip purist, was hovering over the cooling rack asking when the next batch would be ready. They were light, airy, shatteringly crisp, and ridiculously easy to make. Since that day, these “magic chips,” as my youngest calls them, have become a staple. They’re our go-to for movie nights, a quick side for lunches, and even a fancy-looking appetizer when guests pop over unexpectedly. They satisfy that crunch craving like nothing else, and the fact that I control the ingredients makes me feel a whole lot better about snack time. Prepare to be amazed – and possibly addicted!
Ingredients
- Rice Paper Wrappers (approx. 10-15 sheets): These are the thin, translucent sheets typically used for fresh spring rolls. Choose round or square, depending on your preference. They are the foundation of our chips.
- Neutral Flavored Oil (approx. 2-4 tablespoons for brushing/baking/air frying, or 1-2 cups for frying): Options like vegetable, canola, grapeseed, or light olive oil work best. You need enough for a thin coating if baking/air frying, or for shallow/deep frying. The oil helps them crisp up beautifully.
- Fine Sea Salt (to taste): Essential for bringing out the flavor. Adjust the amount based on your preference and any other seasonings you might add.
- Optional Seasonings (to taste): Get creative! Garlic powder, onion powder, paprika (smoked or sweet), nutritional yeast (for a cheesy flavour), chili powder, black pepper, dried herbs (like rosemary or thyme), everything bagel seasoning, or even furikake add extra layers of deliciousness.
Instructions
Making these crispy delights is simpler than you might think! Here’s a step-by-step guide:
- Prepare Your Workspace: Set up a clean, flat work surface. Have a shallow dish or pie plate filled with about an inch of warm water (not hot, just comfortably warm). Place a clean kitchen towel or paper towels next to the water bath. Have your baking sheets (lined with parchment paper if baking/air frying) or frying setup ready.
- Hydrate the Rice Paper: Working one sheet at a time, dip a rice paper wrapper into the warm water. Submerge it completely for about 10-15 seconds, just until it becomes pliable and soft but not floppy or overly delicate. It should still hold its shape slightly. Over-soaking will make it difficult to handle and prone to tearing.
- Dry Gently: Carefully lift the softened rice paper wrapper from the water, letting excess water drip off. Lay it flat on the clean kitchen towel or paper towels. Gently pat the top surface dry with another towel or paper towel. Removing surface moisture is key for maximum crispiness, especially if frying.
- Layering (Optional but Recommended for Sturdier Chips): For a slightly thicker, sturdier chip (great for dipping!), you can layer two hydrated sheets. After hydrating the first sheet, hydrate a second sheet and carefully place it directly on top of the first one, smoothing out any air bubbles. Pat the layered sheet dry as described above. Note: Single layers work perfectly well too and result in a lighter, more delicate chip.
- Cut into Shapes: Using kitchen shears or a sharp pizza cutter, cut the hydrated (and potentially layered) rice paper into your desired chip shapes. Triangles (like tortilla chips), squares, rectangles, or long strips all work well. Aim for relatively uniform sizes for even cooking.
- Choose Your Cooking Method:
- a) Pan-Frying/Deep-Frying (Fastest & Crispiest):
- Heat about ½ inch (for shallow frying) to 1-2 inches (for deep frying) of neutral oil in a heavy-bottomed skillet or pot over medium-high heat. The oil is ready when a small piece of rice paper dropped in sizzles and puffs up instantly (around 350-375°F or 175-190°C).
- Carefully add the rice paper pieces to the hot oil in a single layer, being careful not to overcrowd the pan. They will puff up dramatically and turn golden brown very quickly – usually within 15-30 seconds per side.
- Use tongs or a spider strainer to flip them once if needed and remove them promptly once they are golden and crispy. Overcooking will make them taste burnt.
- Transfer the fried chips immediately to a wire rack set over paper towels to drain excess oil.
- b) Baking (Healthier Option):
- Preheat your oven to 400°F (200°C). Line baking sheets with parchment paper for easy cleanup.
- Arrange the cut rice paper pieces in a single layer on the prepared baking sheets, ensuring they don’t overlap.
- Lightly brush or spray both sides of the rice paper pieces with a thin layer of neutral oil. Too much oil can make them greasy rather than crispy.
- Bake for 5-8 minutes, watching closely. They should puff up slightly and turn light golden brown around the edges. They cook quickly, so keep an eye on them to prevent burning. They might not puff as dramatically as fried chips but will still be crispy.
- Let them cool on the baking sheet or transfer to a wire rack.
- c) Air Frying (Good Balance):
- Preheat your air fryer to 375°F (190°C).
- Lightly brush or spray the cut rice paper pieces with oil on both sides.
- Place the pieces in the air fryer basket in a single layer, ensuring air can circulate. You may need to work in batches. Use an air fryer rack accessory if you have one to prevent them from flying around too much as they lighten.
- Air fry for 4-6 minutes, checking frequently after the 3-minute mark. They should puff up and become golden and crispy. The exact time will vary depending on your air fryer model.
- Transfer to a wire rack to cool.
- a) Pan-Frying/Deep-Frying (Fastest & Crispiest):
- Season Immediately: While the chips are still warm (especially important for fried chips so the seasoning adheres), sprinkle them generously with fine sea salt and any other desired seasonings. Toss gently in a large bowl to coat evenly, or sprinkle over them on the cooling rack.
- Cool Completely: Allow the chips to cool completely on the wire rack. They will become even crispier as they cool.
- Serve and Enjoy: Serve immediately for the best texture, or store following the tips below.
Nutrition Facts
(Approximate values per serving, assuming 4 servings per batch of 10-12 sheets, baked/air-fried method with minimal oil)
- Servings: 4
- Calories per serving: Approximately 80-120 kcal (highly dependent on oil usage and cooking method; frying significantly increases calorie count)
- Gluten-Free: Rice paper is naturally gluten-free, making these chips an excellent option for those with celiac disease or gluten sensitivity.
- Lower in Fat (Baked/Air-Fried): When baked or air-fried with minimal oil, these chips are significantly lower in fat compared to traditional deep-fried potato or tortilla chips.
- Source of Carbohydrates: Primarily composed of carbohydrates from the rice flour in the wrappers, providing quick energy.
- Customizable Sodium: You have complete control over the amount of salt added, allowing for a lower-sodium snack compared to many processed options.
- Vegan: Made entirely from plant-based ingredients (rice paper, oil, seasonings), these chips are suitable for vegan diets.
Preparation Time
- Prep time: 10-15 minutes (for hydrating, drying, and cutting the rice paper)
- Cook time: 5-10 minutes per batch (frying is fastest per batch, baking/air frying takes slightly longer overall due to potential batch cooking)
- Total time: Approximately 20-30 minutes (depending on batch size and cooking method)
How to Serve
These versatile Crispy Rice Paper Chips are fantastic on their own, but they truly shine when paired with dips, toppings, or used in creative ways. Here are some serving suggestions:
- With Dips:
- Classic Guacamole: The creamy avocado is a perfect contrast to the crispiness.
- Salsa: Choose your favorite style – pico de gallo, roasted tomato, or salsa verde.
- Hummus: Creamy classic, roasted red pepper, or garlic hummus works beautifully.
- Creamy Yogurt or Sour Cream Dips: Think French onion dip, ranch dip, or a spicy sriracha mayo.
- Asian-Inspired Dips: Peanut sauce, sweet chili sauce, soy-ginger dipping sauce, or a spicy gochujang dip.
- Whipped Feta or Cream Cheese Dips: Savory and satisfying.
- As a Base:
- Mini Nachos: Top chips with cheese (dairy or vegan), beans, jalapeños, and bake briefly until melted. Top with salsa and guacamole.
- Appetizer Base: Top individual chips with smoked salmon and dill, tuna tartare, or a dollop of herbed cream cheese.
- As a Crunchy Topping:
- Salads: Crumble the chips over Asian-inspired salads or any salad needing a gluten-free crunch instead of croutons.
- Soups: Sprinkle over creamy tomato soup, butternut squash soup, or Asian noodle soups for textural contrast.
- Bowls: Add crunch to Buddha bowls, poke bowls, or rice bowls.
- Alongside Meals:
- Serve as a side instead of bread or crackers with curries or stews.
- Offer them as a light alternative to potato chips with sandwiches or wraps.
- Sweet Variation:
- For a dessert twist, skip savory seasonings and sprinkle warm chips with cinnamon sugar. Serve with fruit salsa, chocolate hummus, or a caramel dip.
Additional Tips
Maximize your Crispy Rice Paper Chip success with these helpful tips:
- Water Temperature Matters: Use warm, not hot, water for hydrating. Hot water can make the rice paper too sticky and fragile almost instantly. If the water cools down too much, refresh it.
- Don’t Over-Soak: A quick dip (10-15 seconds) is usually sufficient. The paper should be pliable but not completely limp. It will continue to soften slightly as it sits. Over-soaked paper tears easily and absorbs more oil if frying.
- Pat Dry Thoroughly: Especially crucial for frying! Excess surface water will cause dangerous splattering when it hits hot oil and can prevent the chips from getting maximally crispy.
- Oil Temperature is Key (for Frying): If the oil is too cool, the chips will absorb too much oil and become greasy. If it’s too hot, they’ll burn before cooking through. Test with a small piece – it should sizzle and puff immediately. Maintain a consistent temperature.
- Work in Batches: Whether frying, baking, or air frying, avoid overcrowding the pan, baking sheet, or air fryer basket. Give the chips space to cook evenly and crisp up properly. Overlapping prevents crisping.
- Season While Warm: Seasonings stick best to warm, freshly cooked chips, especially if oil was used. Have your salt and desired spices ready to sprinkle as soon as they come out of the oil/oven/air fryer.
- Experiment with Seasonings: Don’t be afraid to get creative! Try nutritional yeast for cheesy flavour, smoked paprika for smokiness, everything bagel seasoning for complexity, or even cinnamon sugar for a sweet treat. Apply seasonings after cooking.
- Storage Savvy: Store completely cooled chips in an airtight container at room temperature. They are best enjoyed within 1-2 days as they tend to lose their crispness over time due to humidity. If they soften slightly, you might be able to briefly re-crisp them in a warm oven or air fryer for a minute or two, but freshness is key.
FAQ
1. Are Crispy Rice Paper Chips healthy?
Their healthiness largely depends on the cooking method and seasoning. When baked or air-fried with minimal oil and controlled salt, they can be a lighter, lower-fat, gluten-free alternative to many deep-fried snacks. Deep-fried versions will be higher in fat and calories, similar to traditional chips. They are primarily carbohydrates.
2. Can I make these ahead of time?
They are definitely best enjoyed fresh, ideally within a few hours of making, for maximum crispiness. While you can store them in an airtight container at room temperature for 1-2 days, they tend to absorb moisture from the air and lose their signature crunch. Re-crisping slightly in an oven or air fryer might help but isn’t always fully effective.
3. Why are my rice paper chips chewy instead of crispy?
This usually happens for a few reasons: a) they weren’t cooked long enough, b) the cooking temperature was too low (especially if frying, causing oil absorption), c) they were overcrowded during cooking, preventing even crisping, or d) they absorbed moisture during storage. Ensure proper cooking time/temp and allow them to cool completely.
4. Can I use old or slightly dried-out rice paper wrappers?
Yes, generally. As long as the wrappers aren’t completely brittle and cracking apart before hydration, they should still work fine. The hydration process softens them regardless of their initial dryness.
5. What’s the difference between single-layer and double-layer chips?
Single-layer chips are incredibly light, thin, and delicate – almost ethereal. Double-layer chips (made by layering two hydrated sheets before cutting and cooking) are sturdier, slightly thicker, and hold up better to heavier dips. Both are delicious, just different textures!
6. My chips stuck together while cooking. How can I prevent this?
Ensure the hydrated rice paper pieces aren’t overlapping when you place them in the hot oil, on the baking sheet, or in the air fryer basket. Work in batches if necessary to give them enough space. Also, ensure the paper is patted relatively dry before cooking.
7. Can I flavour the water used for hydrating?
While technically possible (e.g., adding a splash of soy sauce), it’s generally not recommended. It can make the rice paper stickier and harder to handle, and the flavour impact is minimal compared to seasoning after cooking. Stick to plain warm water for hydration and season the finished chips.
8. What are some unique seasoning ideas for rice paper chips?
Beyond the basics, try: Furikake (Japanese seaweed and sesame blend), Za’atar (Middle Eastern herb and spice mix), nutritional yeast with dill, lemon pepper, curry powder, Chinese five-spice powder (use sparingly), or even powdered ranch seasoning. For a sweet version, cinnamon sugar or pumpkin spice works well.

Crispy Rice Paper Chips
Ingredients
- Rice Paper Wrappers (approx. 10-15 sheets): These are the thin, translucent sheets typically used for fresh spring rolls. Choose round or square, depending on your preference. They are the foundation of our chips.
- Neutral Flavored Oil (approx. 2-4 tablespoons for brushing/baking/air frying, or 1-2 cups for frying): Options like vegetable, canola, grapeseed, or light olive oil work best. You need enough for a thin coating if baking/air frying, or for shallow/deep frying. The oil helps them crisp up beautifully.
- Fine Sea Salt (to taste): Essential for bringing out the flavor. Adjust the amount based on your preference and any other seasonings you might add.
- Optional Seasonings (to taste): Get creative! Garlic powder, onion powder, paprika (smoked or sweet), nutritional yeast (for a cheesy flavour), chili powder, black pepper, dried herbs (like rosemary or thyme), everything bagel seasoning, or even furikake add extra layers of deliciousness.
Instructions
Making these crispy delights is simpler than you might think! Here’s a step-by-step guide:
- Prepare Your Workspace: Set up a clean, flat work surface. Have a shallow dish or pie plate filled with about an inch of warm water (not hot, just comfortably warm). Place a clean kitchen towel or paper towels next to the water bath. Have your baking sheets (lined with parchment paper if baking/air frying) or frying setup ready.
- Hydrate the Rice Paper: Working one sheet at a time, dip a rice paper wrapper into the warm water. Submerge it completely for about 10-15 seconds, just until it becomes pliable and soft but not floppy or overly delicate. It should still hold its shape slightly. Over-soaking will make it difficult to handle and prone to tearing.
- Dry Gently: Carefully lift the softened rice paper wrapper from the water, letting excess water drip off. Lay it flat on the clean kitchen towel or paper towels. Gently pat the top surface dry with another towel or paper towel. Removing surface moisture is key for maximum crispiness, especially if frying.
- Layering (Optional but Recommended for Sturdier Chips): For a slightly thicker, sturdier chip (great for dipping!), you can layer two hydrated sheets. After hydrating the first sheet, hydrate a second sheet and carefully place it directly on top of the first one, smoothing out any air bubbles. Pat the layered sheet dry as described above. Note: Single layers work perfectly well too and result in a lighter, more delicate chip.
- Cut into Shapes: Using kitchen shears or a sharp pizza cutter, cut the hydrated (and potentially layered) rice paper into your desired chip shapes. Triangles (like tortilla chips), squares, rectangles, or long strips all work well. Aim for relatively uniform sizes for even cooking.
- Choose Your Cooking Method:
- a) Pan-Frying/Deep-Frying (Fastest & Crispiest):
- Heat about ½ inch (for shallow frying) to 1-2 inches (for deep frying) of neutral oil in a heavy-bottomed skillet or pot over medium-high heat. The oil is ready when a small piece of rice paper dropped in sizzles and puffs up instantly (around 350-375°F or 175-190°C).
- Carefully add the rice paper pieces to the hot oil in a single layer, being careful not to overcrowd the pan. They will puff up dramatically and turn golden brown very quickly – usually within 15-30 seconds per side.
- Use tongs or a spider strainer to flip them once if needed and remove them promptly once they are golden and crispy. Overcooking will make them taste burnt.
- Transfer the fried chips immediately to a wire rack set over paper towels to drain excess oil.
- b) Baking (Healthier Option):
- Preheat your oven to 400°F (200°C). Line baking sheets with parchment paper for easy cleanup.
- Arrange the cut rice paper pieces in a single layer on the prepared baking sheets, ensuring they don’t overlap.
- Lightly brush or spray both sides of the rice paper pieces with a thin layer of neutral oil. Too much oil can make them greasy rather than crispy.
- Bake for 5-8 minutes, watching closely. They should puff up slightly and turn light golden brown around the edges. They cook quickly, so keep an eye on them to prevent burning. They might not puff as dramatically as fried chips but will still be crispy.
- Let them cool on the baking sheet or transfer to a wire rack.
- c) Air Frying (Good Balance):
- Preheat your air fryer to 375°F (190°C).
- Lightly brush or spray the cut rice paper pieces with oil on both sides.
- Place the pieces in the air fryer basket in a single layer, ensuring air can circulate. You may need to work in batches. Use an air fryer rack accessory if you have one to prevent them from flying around too much as they lighten.
- Air fry for 4-6 minutes, checking frequently after the 3-minute mark. They should puff up and become golden and crispy. The exact time will vary depending on your air fryer model.
- Transfer to a wire rack to cool.
- a) Pan-Frying/Deep-Frying (Fastest & Crispiest):
- Season Immediately: While the chips are still warm (especially important for fried chips so the seasoning adheres), sprinkle them generously with fine sea salt and any other desired seasonings. Toss gently in a large bowl to coat evenly, or sprinkle over them on the cooling rack.
- Cool Completely: Allow the chips to cool completely on the wire rack. They will become even crispier as they cool.
- Serve and Enjoy: Serve immediately for the best texture, or store following the tips below.
Nutrition
- Serving Size: one normal portion
- Calories: 120