")

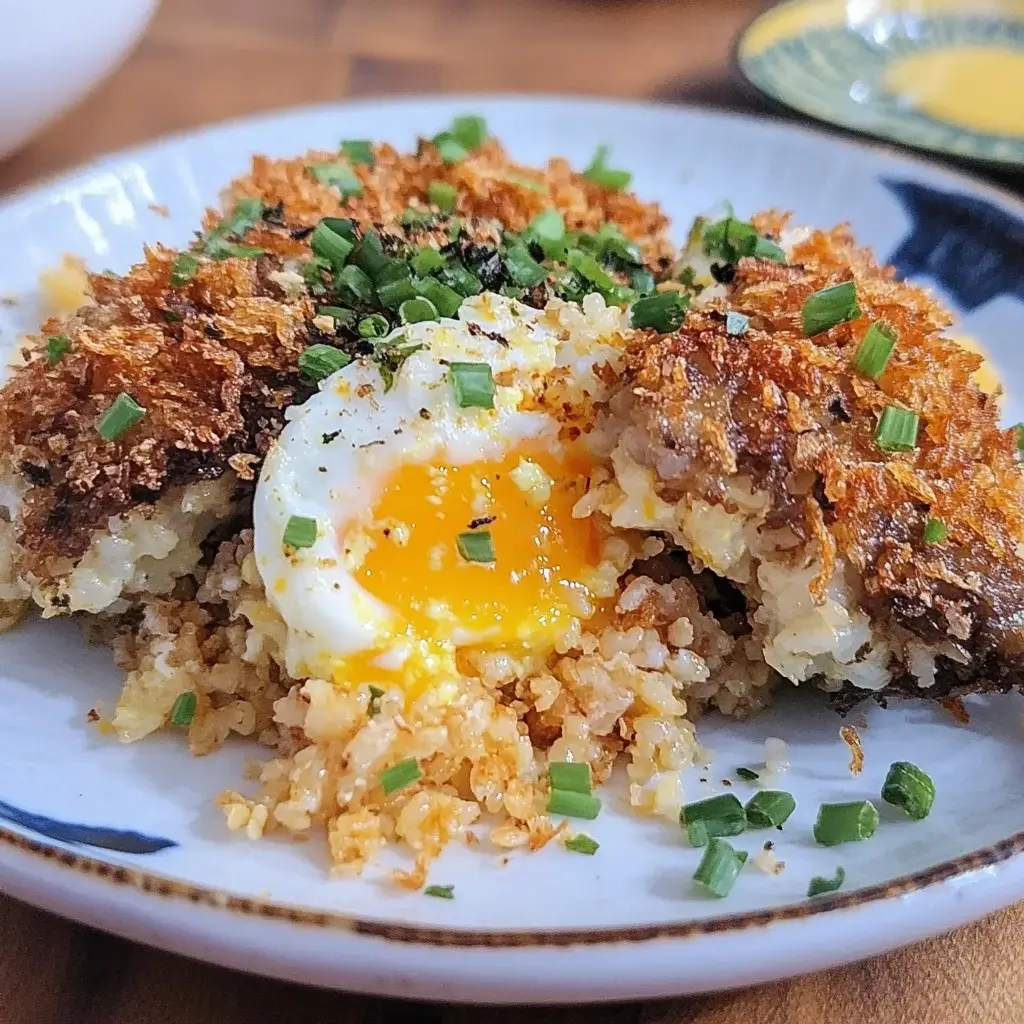

This crispy rice with egg recipe has become an absolute game-changer in our household. What started as a simple experiment to use up leftover rice quickly transformed into a weekly, sometimes twice-weekly, staple. The first time I made it, the silence that fell over the dinner table was punctuated only by the satisfying crunch of the rice and the contented sighs as everyone broke into their perfectly runny egg yolks. My kids, who can be notoriously picky, now specifically request “that crunchy rice thing with the yummy egg.” It’s the ultimate comfort food – quick to whip up, incredibly satisfying, and uses ingredients I almost always have on hand. The textural contrast between the shatteringly crisp rice, the soft, yielding egg, and any fresh garnishes is simply divine. It’s a testament to how simple ingredients, treated with a little care, can create something truly special.
The Allure of Crispy Rice: More Than Just Leftovers
Before we dive into the nitty-gritty of the recipe, let’s talk about why crispy rice is so universally beloved. It’s not just about salvaging day-old rice; it’s about transforming it. The process of pan-frying cooked rice until it forms a golden, crunchy crust creates an incredible textural experience. This technique is celebrated in various cuisines around the world – think of the coveted socarrat at the bottom of a paella pan, the crispy tahdig in Persian cuisine, or the sizzling rice in Asian hot pots.
What makes it so addictive?
- Texture Contrast: The primary appeal is the delightful play between the crispy exterior and the still-tender interior of the rice grains, further enhanced by the soft, runny yolk of a perfectly cooked egg.
- Maillard Reaction: As the rice fries, the starches and sugars undergo the Maillard reaction, developing complex, savory, and slightly nutty flavors that are far more interesting than plain steamed rice.
- Versatility: Crispy rice serves as a fantastic canvas for a myriad of toppings and flavor profiles, making it adaptable to whatever you have in your fridge or pantry.
- Comfort Factor: There’s something inherently comforting about a warm, savory, and texturally exciting rice dish. It’s simple, unpretentious, and deeply satisfying.
Our recipe focuses on achieving that perfect crispiness and pairing it with the richness of a fried egg, creating a dish that’s both humble and extraordinarily delicious.
Ingredients for Irresistible Crispy Rice with Egg
Here’s what you’ll need to create this delightful dish:
- Cooked Rice: 2 cups, preferably day-old, cold, and slightly dry. (Jasmine or medium-grain rice works best for optimal crispiness.)
- Neutral Cooking Oil: 2-3 tablespoons (e.g., vegetable, canola, grapeseed, or light olive oil – something with a high smoke point).
- Large Eggs: 2-4 (depending on how many servings or if you want one or two eggs per person).
- Soy Sauce (or Tamari for gluten-free): 1-2 tablespoons, or to taste (for seasoning the rice).
- Sesame Oil: 1 teaspoon (toasted sesame oil adds a wonderful nutty aroma).
- Garlic: 1-2 cloves, minced (optional, but adds a lovely aromatic base).
- Green Onions: 2 stalks, thinly sliced (for garnish and fresh flavor).
- Sesame Seeds: 1 teaspoon, toasted (for garnish and added texture, optional).
- Salt and Freshly Ground Black Pepper: To taste (for seasoning the eggs and rice).
- Optional Flavor Enhancers:
- Ginger: 1 teaspoon, freshly grated (for an extra layer of aromatic warmth).
- Chili Flakes or Sriracha/Gochujang: To taste (if you like a bit of heat).
- Butter: 1 teaspoon (can be added with the oil for extra richness when crisping the rice, or for frying the eggs).
Step-by-Step Guide to Crispy Rice Perfection
Follow these instructions carefully for the crispiest rice and perfectly cooked eggs:
- Prepare the Rice: If your day-old rice is in a large clump, gently break it apart with your fingers or a fork. You want individual grains as much as possible, but don’t mash it.
- Aromatics (Optional): If using garlic and/or ginger, have them minced and ready.
- Heat the Pan for Rice: Place a large non-stick skillet or well-seasoned cast-iron pan over medium-high heat. Add 2 tablespoons of neutral cooking oil (and butter, if using). Allow the oil to get hot enough that it shimmers.
- Crisp the Rice: Add the cold rice to the hot pan. If using garlic/ginger, you can quickly sauté them for 30 seconds before adding the rice, or mix them into the rice before adding to the pan. Spread the rice in an even layer. Drizzle with soy sauce and sesame oil. Press down gently with a spatula to ensure good contact with the pan.
- Cook Undisturbed: This is crucial for crispiness. Cook the rice for 4-6 minutes without stirring, allowing a golden-brown crust to form on the bottom. You might hear it crackling – that’s a good sign! Resist the urge to move it around too much.
- Check for Crispiness: After 4-6 minutes, use a spatula to peek underneath. If it’s golden brown and crispy, you can either flip sections of the rice to crisp the other side (if you prefer all-around crispness) or break it up slightly and stir, cooking for another 2-3 minutes until heated through and some more bits get crispy. For a “rice pancake” style, keep it mostly intact.
- Season and Remove Rice: Taste the rice and season with a pinch of salt and pepper if needed (soy sauce is already salty). Remove the crispy rice from the pan and divide it among serving bowls or plates. Keep warm.
- Cook the Eggs: Reduce the heat to medium or medium-low. Add the remaining 1 tablespoon of oil (or a little butter) to the same skillet if needed. Crack the eggs directly into the pan.
- Fry to Your Liking: Cook the eggs to your desired doneness. For a classic sunny-side-up with a runny yolk, cook for 2-4 minutes until the whites are set but the yolk is still liquid. You can baste the whites with hot oil from the pan to help them cook faster, or cover the pan with a lid for a minute to steam the tops. Season the eggs with a pinch of salt and pepper.
- Assemble and Garnish: Carefully place one or two fried eggs on top of each serving of crispy rice. Garnish generously with sliced green onions and toasted sesame seeds. Add a drizzle of Sriracha, gochujang, or chili oil if you like a spicy kick. Serve immediately and enjoy the glorious crunch!
Understanding the Nutritional Profile
While this dish is undeniably delicious, here’s a general idea of its nutritional content (values are approximate and can vary based on specific ingredients and portion sizes):
- Servings: This recipe typically makes 2 generous servings.
- Calories per Serving: Approximately 450-600 kcal (depending on the amount of oil used, number of eggs, and rice portion).
- Protein: Around 15-25g (Primarily from the eggs, with some contribution from the rice. Essential for muscle repair and satiety.)
- Carbohydrates: Around 50-70g (Mainly from the rice, providing energy.)
- Fats: Around 18-30g (From cooking oil and egg yolks. Includes both saturated and unsaturated fats. Important for hormone production and nutrient absorption.)
- Sodium: Can be significant depending on the amount of soy sauce used. (Important for fluid balance, but high intake should be monitored.)
This dish offers a good balance of macronutrients, making it a reasonably wholesome meal, especially when portion sizes are kept in mind and perhaps paired with some vegetables.
Time Investment: Quick and Rewarding
This recipe is a champion of weeknight cooking due to its minimal time commitment:
- Preparation Time: 5-10 minutes (This includes mincing garlic, slicing green onions, and breaking up the rice if needed. If your rice is already prepped, it’s even faster.)
- Cook Time: 10-15 minutes (About 6-9 minutes for the rice to crisp and 2-4 minutes for the eggs to cook.)
- Total Time: Approximately 15-25 minutes from start to finish.
It’s one of those wonderful recipes where the effort-to-reward ratio is incredibly high, delivering maximum flavor and satisfaction with minimal fuss.
Elevate Your Meal: How to Serve Crispy Rice with Egg
While fantastic on its own, here are some ways to serve and enhance your crispy rice with egg experience:
- The Classic Way: Simply serve hot from the pan with the runny egg yolk creating a natural sauce as it mixes with the crispy rice.
- Add Steamed or Sautéed Greens:
- A side of steamed broccoli florets.
- Sautéed spinach with garlic.
- Stir-fried bok choy or other Asian greens.
- Introduce More Protein:
- Shredded leftover cooked chicken or pork.
- Crispy fried tofu cubes.
- A few cooked shrimp.
- Sauce it Up:
- Sriracha or Gochujang: For a spicy kick.
- Chili Crisp/Chili Oil: Adds heat, umami, and crunchy bits.
- Sweet Chili Sauce: For a touch of sweetness and mild spice.
- Hoisin Sauce: For a sweet and savory depth.
- Make it a Bowl:
- Serve as the base of a more elaborate rice bowl, adding pickled vegetables (like kimchi or pickled radishes), avocado slices, or edamame.
- Garnish Galore:
- Furikake: A Japanese seasoning blend typically containing seaweed, sesame seeds, and dried fish – adds immense umami.
- Fresh Herbs: Cilantro or Thai basil can add a fresh, aromatic lift.
- Crispy Fried Shallots or Garlic: For an extra layer of crunch and flavor.
- With a Side of Soup: A small bowl of miso soup or a light broth can complement the dish beautifully.
Pro Tips for Crispy Rice Domination (8 Tips)
Achieving that perfectly crisp rice texture is an art and a science. Here are eight tips to help you master it:
- Day-Old, Cold Rice is Your Best Friend: Freshly cooked, warm rice is too moist and will steam rather than fry, resulting in a mushy texture. Cold, slightly dried-out rice has less surface moisture, allowing it to crisp up beautifully. If you only have fresh rice, spread it on a baking sheet and let it air dry for an hour or refrigerate it uncovered for a few hours.
- Don’t Crowd the Pan: Overcrowding the pan lowers the temperature and causes the rice to steam instead of fry. If making a larger batch, cook the rice in batches to ensure each grain has space to crisp.
- Hot Pan, Sufficient Oil: The pan needs to be properly preheated, and there should be enough oil to coat the bottom evenly. This ensures the rice fries rather than sticks or steams. The oil should be shimmering before you add the rice.
- Patience is a Virtue (Hands Off!): Once the rice is in the pan and spread into an even layer, resist the urge to stir it constantly. Let it sit undisturbed for several minutes to develop that golden-brown, crispy crust on the bottom.
- Season the Rice Layer: Drizzle soy sauce, sesame oil, or other seasonings directly onto the rice in the pan. This allows the flavors to meld and caramelize slightly as it crisps.
- Egg Your Way: While a sunny-side-up egg with a runny yolk is classic, feel free to cook your egg how you prefer – over easy, over medium, or even a softly scrambled egg served alongside. A poached egg also works beautifully.
- Aromatic Power: Don’t underestimate the impact of simple aromatics. Sautéing a little minced garlic or ginger in the oil before adding the rice infuses the entire dish with incredible flavor.
- Garnish Generously: Fresh green onions, toasted sesame seeds, a sprinkle of chili flakes, or a dash of your favorite hot sauce can elevate the dish from simple to spectacular. Garnishes add flavor, texture, and visual appeal.
Beyond the Basic: Creative Variations to Explore
Once you’ve mastered the basic crispy rice with egg, the sky’s the limit for customization. Here are a few ideas to get your creative juices flowing:
- Kimchi Crispy Rice: Chop up some kimchi and kimchi juice and stir it into the rice during the last few minutes of crisping. The tangy, spicy, fermented flavors are a fantastic complement. Top with a sprinkle of gochugaru (Korean chili flakes).
- Spicy Tuna Crispy Rice (Inspired by Sushi Trends): Mix canned tuna (drained) with sriracha mayo and a little soy sauce. Serve a dollop of this spicy tuna mixture alongside or on top of your crispy rice and egg. Garnish with furikake and thinly sliced avocado.
- Mushroom and Herb Crispy Rice: Sauté sliced mushrooms (cremini, shiitake, or oyster) with garlic and thyme until golden brown. Stir them into the crispy rice. A fried egg on top makes it a hearty vegetarian meal.
- Bacon or Sausage Crispy Rice: Cook chopped bacon or crumbled breakfast sausage until crispy. Remove from the pan, reserving some of the rendered fat to crisp the rice in. Stir the cooked bacon/sausage back into the rice before topping with the egg.
- Garlic Chili Oil Crispy Rice: Drizzle generously with your favorite garlic chili oil or chili crisp before serving. The combination of crispy rice, runny egg, and aromatic, spicy oil is addictive.
- Mediterranean-Inspired Crispy Rice: After crisping, toss the rice with crumbled feta cheese, chopped Kalamata olives, sun-dried tomatoes, and fresh oregano. Serve with a lemon-tahini drizzle instead of or alongside the egg.
- Leftover Remix Crispy Rice: This is the perfect vehicle for using up small amounts of leftover cooked vegetables (like peas, corn, diced carrots) or proteins (shredded chicken, crumbled tofu). Toss them in with the rice during the last couple of minutes of cooking.
- Sweet & Savory Teriyaki Crispy Rice: Drizzle a little teriyaki sauce over the rice as it crisps for a sweet and savory glaze. Top with the egg and garnish with shredded nori.
The Science of Crispy: Why This Recipe Works So Well
Understanding a bit of the science behind why certain techniques yield delicious results can make you a better cook. Here’s what’s happening when you make crispy rice:
- Starch Retrogradation (The Day-Old Rice Factor): When cooked rice cools and is stored (especially in the refrigerator), its starch molecules undergo a process called retrogradation. The starches realign and become firmer, and the rice grains lose some of their surface moisture. This firmer, drier structure is less prone to clumping and becoming mushy, making it ideal for frying to a crisp.
- Maillard Reaction & Caramelization: As the rice cooks in hot oil, two key browning reactions occur. The Maillard reaction happens between amino acids and reducing sugars, creating a complex array of savory, roasted, and nutty flavor compounds and a desirable golden-brown color. If there are enough sugars present, caramelization can also occur, contributing to sweetness and browning.
- Dehydration: The hot oil drives off surface moisture from the rice grains. As water evaporates, the exterior of the rice becomes dry and brittle, leading to that coveted crispy texture.
- Oil as a Heat Transfer Medium: Oil is much more efficient at transferring heat than air. When the rice hits the hot oil, the surface temperature rapidly increases, facilitating quick dehydration and browning. The oil also helps to conduct heat evenly, provided the pan isn’t overcrowded.
- The Importance of “No Stirring”: Allowing the rice to sit undisturbed in direct contact with the hot pan surface maximizes the Maillard reaction and dehydration on that side, leading to the formation of a crispy crust. Constant stirring prevents this crust from developing.
By understanding these principles, you can troubleshoot any issues and consistently achieve perfectly crispy rice.
A Dish for All Occasions: The Versatility of Crispy Rice with Egg
This crispy rice with egg recipe isn’t just a quick fix; it’s a versatile culinary chameleon that can adapt to almost any mealtime or craving:
- Speedy Breakfast/Brunch: A far more exciting and satisfying alternative to toast or cereal. It provides protein, carbs, and healthy fats to kickstart your day.
- Quick Weeknight Dinner: When you’re short on time and energy, this dish comes together in minutes, providing a complete and comforting meal.
- Satisfying Lunch: Pack the crispy rice and cook an egg fresh at lunchtime if facilities allow, or enjoy it with a hard-boiled egg if not.
- Late-Night Snack: For those moments when hunger strikes after dinner, it’s a relatively wholesome and incredibly gratifying option.
- Budget-Friendly Meal: Rice and eggs are inexpensive staples, making this a fantastic option for stretching your food budget without sacrificing flavor or satisfaction.
- A Base for “Clean Out The Fridge” Meals: Use it as a delicious foundation for leftover vegetables, meats, or sauces.
Its simplicity is its strength, allowing it to be dressed up or down as desired. Whether you stick to the basic recipe or venture into more elaborate variations, crispy rice with egg is a reliable, delicious, and endlessly adaptable dish that deserves a permanent spot in your cooking repertoire. Enjoy the crunch!
Your Crispy Rice Questions Answered: FAQ
Here are answers to some frequently asked questions about making crispy rice with egg:
- Q: Can I use freshly cooked rice for this recipe?
A: It’s highly recommended to use day-old, cold rice. Freshly cooked rice is too moist and soft, and it tends to steam and become mushy rather than crisp up when fried. If you must use fresh rice, spread it on a baking sheet in a thin layer and let it air dry for at least an hour, or ideally, chill it in the refrigerator uncovered for a few hours to help it dry out. - Q: What’s the best type of rice to use for crispy rice?
A: Medium-grain or short-grain rice, like Jasmine or Calrose, tends to work best. They have a good starch content that helps them crisp up nicely while maintaining a slightly chewy interior. Long-grain rice like Basmati can also work, but it might be a bit more delicate. - Q: How can I make my crispy rice spicier?
A: There are several ways! You can add red pepper flakes or a pinch of cayenne pepper to the rice while it’s crisping. Alternatively, drizzle Sriracha, gochujang, chili oil, or your favorite hot sauce over the finished dish. Sautéing some fresh chili with the garlic also works. - Q: Can I make this recipe vegan?
A: Absolutely! For a vegan version, simply omit the egg or replace it with a vegan egg alternative. You can also use a tofu scramble, pan-fried crispy tofu slices, or sautéed mushrooms as a topping. Ensure your soy sauce or tamari is vegan. - Q: How do I store and reheat leftover crispy rice?
A: Store leftover crispy rice (without the egg, if possible) in an airtight container in the refrigerator for up to 2-3 days. To reheat and re-crisp, heat a little oil in a non-stick skillet over medium heat and fry the rice again until warmed through and crispy. It’s best to cook eggs fresh when serving. - Q: What kind of oil is best for making crispy rice?
A: A neutral-flavored oil with a high smoke point is ideal. Good choices include vegetable oil, canola oil, grapeseed oil, peanut oil, or light/refined olive oil. Toasted sesame oil is used more for flavor than for high-heat frying. - Q: My rice isn’t getting crispy. What am I doing wrong?
A: Several factors could be at play:- Your rice might be too moist (fresh rice or not properly cooled).
- Your pan isn’t hot enough, or you haven’t used enough oil.
- You’re overcrowding the pan, causing the rice to steam.
- You’re stirring it too frequently, not allowing a crust to form.
- Q: Can I add other vegetables or proteins directly into the rice?
A: Yes! This recipe is very adaptable. You can add diced cooked chicken, pork, shrimp, or tofu. Small, quick-cooking vegetables like peas, corn, finely diced carrots, or bell peppers can be tossed in during the last few minutes of the rice crisping. Pre-cooked or blanched heartier vegetables also work well.

Crispy Rice with Egg Recipe
Ingredients
Here’s what you’ll need to create this delightful dish:
- Cooked Rice: 2 cups, preferably day-old, cold, and slightly dry. (Jasmine or medium-grain rice works best for optimal crispiness.)
- Neutral Cooking Oil: 2-3 tablespoons (e.g., vegetable, canola, grapeseed, or light olive oil – something with a high smoke point).
- Large Eggs: 2-4 (depending on how many servings or if you want one or two eggs per person).
- Soy Sauce (or Tamari for gluten-free): 1-2 tablespoons, or to taste (for seasoning the rice).
- Sesame Oil: 1 teaspoon (toasted sesame oil adds a wonderful nutty aroma).
- Garlic: 1-2 cloves, minced (optional, but adds a lovely aromatic base).
- Green Onions: 2 stalks, thinly sliced (for garnish and fresh flavor).
- Sesame Seeds: 1 teaspoon, toasted (for garnish and added texture, optional).
- Salt and Freshly Ground Black Pepper: To taste (for seasoning the eggs and rice).
- Optional Flavor Enhancers:
- Ginger: 1 teaspoon, freshly grated (for an extra layer of aromatic warmth).
- Chili Flakes or Sriracha/Gochujang: To taste (if you like a bit of heat).
- Butter: 1 teaspoon (can be added with the oil for extra richness when crisping the rice, or for frying the eggs).
Instructions
Follow these instructions carefully for the crispiest rice and perfectly cooked eggs:
- Prepare the Rice: If your day-old rice is in a large clump, gently break it apart with your fingers or a fork. You want individual grains as much as possible, but don’t mash it.
- Aromatics (Optional): If using garlic and/or ginger, have them minced and ready.
- Heat the Pan for Rice: Place a large non-stick skillet or well-seasoned cast-iron pan over medium-high heat. Add 2 tablespoons of neutral cooking oil (and butter, if using). Allow the oil to get hot enough that it shimmers.
- Crisp the Rice: Add the cold rice to the hot pan. If using garlic/ginger, you can quickly sauté them for 30 seconds before adding the rice, or mix them into the rice before adding to the pan. Spread the rice in an even layer. Drizzle with soy sauce and sesame oil. Press down gently with a spatula to ensure good contact with the pan.
- Cook Undisturbed: This is crucial for crispiness. Cook the rice for 4-6 minutes without stirring, allowing a golden-brown crust to form on the bottom. You might hear it crackling – that’s a good sign! Resist the urge to move it around too much.
- Check for Crispiness: After 4-6 minutes, use a spatula to peek underneath. If it’s golden brown and crispy, you can either flip sections of the rice to crisp the other side (if you prefer all-around crispness) or break it up slightly and stir, cooking for another 2-3 minutes until heated through and some more bits get crispy. For a “rice pancake” style, keep it mostly intact.
- Season and Remove Rice: Taste the rice and season with a pinch of salt and pepper if needed (soy sauce is already salty). Remove the crispy rice from the pan and divide it among serving bowls or plates. Keep warm.
- Cook the Eggs: Reduce the heat to medium or medium-low. Add the remaining 1 tablespoon of oil (or a little butter) to the same skillet if needed. Crack the eggs directly into the pan.
- Fry to Your Liking: Cook the eggs to your desired doneness. For a classic sunny-side-up with a runny yolk, cook for 2-4 minutes until the whites are set but the yolk is still liquid. You can baste the whites with hot oil from the pan to help them cook faster, or cover the pan with a lid for a minute to steam the tops. Season the eggs with a pinch of salt and pepper.
- Assemble and Garnish: Carefully place one or two fried eggs on top of each serving of crispy rice. Garnish generously with sliced green onions and toasted sesame seeds. Add a drizzle of Sriracha, gochujang, or chili oil if you like a spicy kick. Serve immediately and enjoy the glorious crunch!
Nutrition
- Serving Size: one normal portion
- Calories: 600
- Fat: 30g
- Carbohydrates: 70g
- Protein: 25g