")


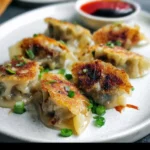
Of all the culinary projects I undertake in my kitchen, few bring the entire family together quite like a dumpling-making session. The ritual itself is a joy—the rhythmic chopping of vegetables, the delicate process of folding each precious parcel, and the collective anticipation as they sizzle in the pan. But this specific recipe for Crispy Veggie-Stuffed Dumplings has become our undisputed champion. I’ll never forget the first time I perfected it. The kitchen filled with the nutty aroma of toasted sesame oil and the sharp scent of fresh ginger. The sound was what got everyone’s attention first: a loud, aggressive sizzle that promised an unbelievably crunchy crust. When I finally brought the platter to the table, adorned with glistening, golden-brown bottoms, a hush fell over the room. The first bite was a symphony of textures—an shatteringly crisp base giving way to a soft, chewy wrapper, and then an explosion of savory, umami-rich vegetable filling. My kids, who sometimes approach vegetables with suspicion, devoured them without a second thought, asking for more before their first ones were even gone. This recipe is more than just food; it’s an experience. It’s the perfect weekend activity, a guaranteed crowd-pleaser for guests, and a delightfully wholesome alternative to your favorite takeout spot. It transforms simple, humble vegetables into something truly spectacular, proving that with a little time and technique, you can create restaurant-quality magic right in your own home.
Ingredients
This recipe relies on a balance of fresh vegetables for texture and powerful aromatics for a deeply savory flavor profile. Using high-quality ingredients will significantly elevate the final taste.
For the Dumpling Filling (Makes approximately 40-50 dumplings):
- Dumpling Wrappers: 1 package (approx. 40-50 round wrappers). Store-bought wrappers are a fantastic time-saver. Look for the round “gyoza” or “potsticker” style wrappers in the refrigerated section of most grocery stores or at an Asian market.
- Napa Cabbage: 4 cups, finely shredded (about ½ a medium head). Napa cabbage is ideal because it has a mild, slightly sweet flavor and releases a lot of water, which is key to managing the filling’s consistency.
- Carrots: 2 medium carrots, finely grated. These add a subtle sweetness, a vibrant color, and a pleasant textural contrast to the softer cabbage.
- Shiitake Mushrooms: 8 oz fresh shiitake mushrooms, finely chopped. Shiitake mushrooms are the umami powerhouse of this filling, providing a deep, savory, and almost “meaty” flavor. Do not substitute with button mushrooms if you can help it.
- Scallions (Green Onions): 4-5 stalks, finely sliced (both white and green parts). They provide a fresh, mild oniony bite that brightens the entire mixture.
- Fresh Ginger: 2-inch piece, peeled and finely minced or grated. Essential for its warm, zesty, and aromatic spice that cuts through the richness.
- Fresh Garlic: 4-5 cloves, finely minced. Provides a pungent, savory base note that is fundamental to Asian cuisine.
- Low-Sodium Soy Sauce: ¼ cup. This is our primary source of salt and umami. Using a low-sodium version allows you to control the saltiness more effectively.
- Toasted Sesame Oil: 2 tablespoons. This is a finishing oil, not a cooking oil. Its nutty, fragrant aroma is iconic and adds incredible depth of flavor.
- Rice Vinegar: 1 tablespoon. A touch of acidity is crucial for balancing the savory flavors and adding a little tang.
- White Pepper: ½ teaspoon. White pepper has a more earthy, complex heat than black pepper and is a classic choice for dumpling fillings.
- Salt: 1 teaspoon (for drawing water from the cabbage).
For Pan-Frying:
- Neutral Oil: 2-3 tablespoons (such as canola, grapeseed, or avocado oil). You need an oil with a high smoke point for achieving that crispy bottom.
- Water: Approximately ½ to ¾ cup per batch. This is for steaming the dumplings after the initial fry.
Instructions
Follow these steps carefully, paying close attention to the technique for preparing the filling and pan-frying. The method is what transforms these from simple dumplings into true crispy-bottom potstickers.
Step 1: Prepare the Vegetable Filling
- Sweat the Cabbage: In a large bowl, combine the 4 cups of finely shredded Napa cabbage with 1 teaspoon of salt. Toss well to coat. Set it aside for 20-30 minutes. The salt will draw a significant amount of water out of the cabbage. This is the single most important step to prevent a soggy filling and ensure your dumplings don’t burst while cooking.
- Squeeze the Vegetables: While the cabbage is sweating, you can finely chop your shiitake mushrooms, grate the carrots, and slice the scallions. After the cabbage has rested, you will see a pool of water at the bottom of the bowl. Place the wilted cabbage in the center of a clean kitchen towel or a few layers of cheesecloth. Gather the corners and twist tightly, squeezing out as much liquid as humanly possible over the sink. You’ll be amazed at how much water comes out.
- Combine the Filling Ingredients: In the now-empty large bowl, add the squeezed cabbage, grated carrots, chopped shiitake mushrooms, and sliced scallions.
- Add the Aromatics and Seasonings: To the vegetable mixture, add the minced ginger, minced garlic, ¼ cup of low-sodium soy sauce, 2 tablespoons of toasted sesame oil, 1 tablespoon of rice vinegar, and ½ teaspoon of white pepper.
- Mix Thoroughly: Using your hands or a spatula, mix everything together until it is completely combined. Your filling is now ready. The aroma should be incredibly fragrant and savory.
Step 2: Fill and Fold the Dumplings
- Set Up Your Workstation: Arrange your workspace with the bowl of filling, the package of dumpling wrappers, and a small bowl of water. Have a baking sheet lined with parchment paper ready to place the finished dumplings on.
- Fill the Wrapper: Hold a single dumpling wrapper flat in the palm of your non-dominant hand. Spoon about 1 to 1.5 teaspoons of the vegetable filling into the center. Be careful not to overfill, as this will make sealing them difficult and can cause them to burst during cooking.
- Seal the Dumpling (The Pleated Fold):
- Dip your finger in the small bowl of water and trace it along the entire outer edge of the wrapper. This water acts as a glue.
- Fold the wrapper in half over the filling to create a half-moon shape, but only pinch it shut at the very top center point to hold it in place.
- Starting from one side (e.g., the right side), use your thumb and index finger to create a small pleat in the front layer of the wrapper, folding it towards the center. Press this pleat firmly against the flat back layer of the wrapper to seal it.
- Create another pleat right next to the first one, overlapping slightly, and press it sealed. Continue creating 2-4 pleats on this side until you reach the end of the dumpling.
- Repeat the process on the other side, always pleating the front layer of the wrapper and pressing it against the flat back layer.
- The finished dumpling should be able to sit upright on its flat bottom, with a beautiful curved, pleated top.
- Place on Baking Sheet: As you finish each dumpling, place it on the parchment-lined baking sheet, making sure they don’t touch each other, or they might stick together.
Step 3: The Pan-Frying and Steaming Method
- Heat the Pan: Place a large, non-stick skillet with a tight-fitting lid over medium-high heat. Add about 1-2 tablespoons of neutral oil and swirl to coat the bottom of the pan evenly. The oil should be shimmering but not smoking.
- Arrange the Dumplings: Carefully place the dumplings in the pan in a single layer, flat-side down. You can arrange them in a circular pattern. Make sure not to overcrowd the pan; cook in batches if necessary. Let them fry undisturbed for 2-3 minutes.
- Check for the Golden Crust: Lift one dumpling to check the bottom. You are looking for a deep golden-brown, crispy crust. Once this is achieved, move to the next step immediately.
- Add Water and Steam: Have your lid and water ready. Carefully and quickly pour about ½ to ¾ cup of water into the hot pan (it will sizzle and steam aggressively, so be cautious). Immediately cover the pan with the lid to trap the steam.
- Cook Through: Reduce the heat to medium and let the dumplings steam for 5-7 minutes. The steam cooks the filling and the top part of the wrapper. You’ll know they are done when the wrappers become translucent and tender.
- Final Crisp-Up: Remove the lid. Most of the water should have evaporated. If there is still a bit of water left, continue to cook with the lid off until it’s all gone. This final stage allows the bottoms to re-crisp and get even crunchier.
- Serve Immediately: Once the water is gone and the bottoms are perfectly crisp, remove the dumplings from the pan and serve them immediately with your favorite dipping sauce.
Nutrition Facts
This nutritional information is an estimate and can vary based on the specific ingredients and portion sizes used.
- Servings: This recipe yields approximately 8 servings (about 5-6 dumplings per serving).
- Calories Per Serving: Approximately 220-260 kcal.
- Protein: Around 6g per serving. While primarily a vegetable dish, the mushrooms and wrappers contribute to the protein content. Adding finely crumbled firm tofu to the filling can significantly boost this number.
- Fiber: Approximately 4g per serving. The high vegetable content, particularly from the cabbage, carrots, and mushrooms, makes these dumplings a good source of dietary fiber, which is excellent for digestive health.
- Sodium: Around 450mg per serving. This is calculated using low-sodium soy sauce. Using regular soy sauce will increase this value significantly. Be mindful of the sodium in your dipping sauce as well.
Preparation time
Crafting homemade dumplings is a labor of love, but the process can be broken down into manageable steps.
- Active Preparation Time: 45-60 minutes. This includes chopping all the vegetables, preparing the filling, and the assembly/folding process. The folding time will decrease as you get more practice.
- Cooking Time: 8-10 minutes per batch.
- Total Time: Approximately 1 hour and 15 minutes. This does not include the 20-30 minute resting time for the cabbage.
How to Serve
Serving these dumplings is all about complementing their amazing texture and flavor. Presentation can turn a simple meal into a memorable feast.
- The Essential Dipping Sauce: A good dipping sauce is non-negotiable. Create a simple, classic sauce by mixing:
- 4 tablespoons low-sodium soy sauce
- 2 tablespoons rice vinegar
- 1 teaspoon toasted sesame oil
- 1 teaspoon chili crisp or chili garlic sauce (adjust to your spice preference)
- Optional: A small amount of grated fresh ginger or finely sliced scallions.
- Garnishes for a Final Flourish: Sprinkle the finished platter of dumplings with a combination of:
- Toasted white or black sesame seeds
- Thinly sliced fresh scallions (green parts only)
- A drizzle of extra chili oil for a pop of color and heat
- As an Appetizer: Serve a platter of 6-8 dumplings per person as a fantastic starter for a larger Asian-inspired meal.
- As a Main Course: To make this a complete and satisfying meal, serve a larger portion of dumplings (10-12 per person) alongside:
- A bowl of fluffy steamed jasmine rice.
- A simple, refreshing side salad like a smashed cucumber salad or a quick-pickled carrot and daikon slaw.
- A side of steamed greens like bok choy or gai lan (Chinese broccoli) with a drizzle of oyster sauce.
- A comforting bowl of miso soup or egg drop soup.
Additional tips
These extra tips will help you troubleshoot common issues and elevate your dumpling game from great to extraordinary.
- The Squeeze is Truly Non-Negotiable: I cannot stress this enough. If your filling is wet, the steam created inside the dumpling during cooking will make the wrapper soggy from the inside out and can even cause it to burst. Use a cheesecloth or a sturdy, clean kitchen towel and put some muscle into it.
- Don’t Overfill: It’s tempting to create plump, generously filled dumplings, but this is a common beginner’s mistake. Overfilling makes it nearly impossible to get a good seal, leading to them opening up in the pan. A scant 1.5 teaspoons is the perfect amount.
- The Wrapper Matters: While this recipe uses store-bought wrappers for convenience, the type you buy matters. Look for wrappers that are thin but not so thin they tear easily. If you feel adventurous, making homemade wrappers takes these to another level of tenderness and chewiness.
- Batch and Freeze for the Future: Dumplings are the perfect food to make in a large batch and freeze. Place the freshly folded, uncooked dumplings on a parchment-lined baking sheet, making sure they aren’t touching. Freeze them solid for 1-2 hours. Once frozen, you can transfer them to a freezer-safe bag or container. They can be cooked directly from frozen; just add 2-3 extra minutes to the steaming time.
- Pan Temperature is Paramount: For a crispy bottom, the pan must be properly preheated before the dumplings go in. A medium-high heat that makes the oil shimmer is perfect. If the pan is too cool, the dumplings will absorb oil and become greasy. If it’s too hot, the bottoms will burn before the filling has a chance to cook.
- Give Them Space to Sizzle: Do not overcrowd the pan. The dumplings need space for the hot air and steam to circulate. If they are packed too tightly, they will steam each other instead of frying, and you will end up with soft, pale bottoms instead of crispy, golden ones. Cook in two or even three batches if necessary.
- Get Creative with the Filling: This vegetable base is a fantastic canvas for experimentation. Consider adding finely crumbled firm tofu or extra-firm tofu (pressed well to remove water) for a protein boost. Other great additions include rehydrated wood ear mushrooms for a crunchy texture, edamame, or finely chopped water chestnuts.
- Master the Dipping Sauce Customization: The dipping sauce is half the experience. Encourage everyone to customize their own. Set out small bowls of chili oil, black vinegar (a fantastic alternative to rice vinegar), minced garlic, and sugar so people can create their perfect balance of salty, sour, spicy, and sweet.
FAQ section
Here are answers to some of the most frequently asked questions about making crispy vegetable dumplings.
1. Why are my dumplings soggy instead of crispy?
This is almost always caused by one of two things. First, and most likely, the filling was too wet. You must squeeze as much water as possible out of the cabbage. Second, you may have overcrowded the pan, causing the dumplings to steam rather than pan-fry, or you didn’t cook them long enough with the lid off at the end to evaporate all the excess water and re-crisp the bottom.
2. Can I make these dumplings vegan?
Yes, absolutely! This recipe as written is naturally vegan. Just ensure the store-bought dumpling wrappers you purchase do not contain egg. Most standard gyoza/potsticker wrappers found in the refrigerated section are egg-free, but it’s always best to check the ingredients list to be certain.
3. Can I bake or air fry these dumplings instead?
You can, but you won’t achieve the classic “potsticker” texture (crispy bottom, soft top). For air frying, lightly spray the dumplings with oil and air fry at 375°F (190°C) for 8-10 minutes, flipping halfway, until golden and cooked through. For baking, brush them with oil, place them on a baking sheet, and bake at 400°F (200°C) for 15-20 minutes, flipping once. The texture will be more uniformly crisp and a bit drier.
4. How do I store and reheat leftover cooked dumplings?
Store leftover cooked dumplings in an airtight container in the refrigerator for up to 3 days. The best way to reheat them and revive the crispy bottom is to pan-fry them again. Add a little oil to a non-stick skillet over medium heat, place the dumplings in, and fry for a couple of minutes until the bottom is crisp. You can add a tablespoon of water and cover the pan for a minute to re-steam the tops if they seem dry. Microwaving will make them soft and chewy, not crispy.
5. What is the difference between dumplings, potstickers, and gyoza?
“Dumpling” is a very broad term for a piece of dough wrapped around a filling. “Potsticker” is a specific type of Chinese dumpling that is pan-fried and then steamed, so it “sticks to the pot” and develops a crispy bottom. “Gyoza” are the Japanese version of potstickers; they are very similar but often have thinner wrappers and a more finely textured filling. This recipe uses the potsticker/gyoza cooking method.
6. My dumpling wrappers keep tearing while I fold them. What am I doing wrong?
This can happen if the wrappers are drying out or if you are overfilling them. Work with only a few wrappers at a time, keeping the rest of the package covered with a damp paper towel to prevent them from drying. Also, be gentle and use just a small amount of filling, as mentioned in the tips. If they still tear, you may have a brand with overly delicate wrappers.
7. Can I prepare the vegetable filling in advance?
Yes, you can prepare the filling up to 24 hours in advance and store it in an airtight container in the refrigerator. However, do not salt the cabbage until you are ready to assemble the dumplings. It’s best to chop all the vegetables and mix them with the aromatics (ginger, garlic, scallions) and seasonings (soy sauce, etc.), but wait to salt and squeeze the cabbage until just before you start folding. This ensures the filling is as dry as possible.
8. What are the best store-bought dumpling wrappers to use?
For this recipe, look for thin, round, white wrappers labeled “Gyoza Wrappers” or “Potsticker Wrappers.” These are typically found in the refrigerated produce section or near the tofu in most large supermarkets. Brands found at Asian grocery stores are often of higher quality and offer a better texture. Avoid using square wonton wrappers, as they are thinner and better suited for boiling in soup.
Crispy Veggie-Stuffed Dumplings
Ingredients
This recipe relies on a balance of fresh vegetables for texture and powerful aromatics for a deeply savory flavor profile. Using high-quality ingredients will significantly elevate the final taste.
For the Dumpling Filling (Makes approximately 40-50 dumplings):
- Dumpling Wrappers: 1 package (approx. 40-50 round wrappers). Store-bought wrappers are a fantastic time-saver. Look for the round “gyoza” or “potsticker” style wrappers in the refrigerated section of most grocery stores or at an Asian market.
- Napa Cabbage: 4 cups, finely shredded (about ½ a medium head). Napa cabbage is ideal because it has a mild, slightly sweet flavor and releases a lot of water, which is key to managing the filling’s consistency.
- Carrots: 2 medium carrots, finely grated. These add a subtle sweetness, a vibrant color, and a pleasant textural contrast to the softer cabbage.
- Shiitake Mushrooms: 8 oz fresh shiitake mushrooms, finely chopped. Shiitake mushrooms are the umami powerhouse of this filling, providing a deep, savory, and almost “meaty” flavor. Do not substitute with button mushrooms if you can help it.
- Scallions (Green Onions): 4-5 stalks, finely sliced (both white and green parts). They provide a fresh, mild oniony bite that brightens the entire mixture.
- Fresh Ginger: 2-inch piece, peeled and finely minced or grated. Essential for its warm, zesty, and aromatic spice that cuts through the richness.
- Fresh Garlic: 4-5 cloves, finely minced. Provides a pungent, savory base note that is fundamental to Asian cuisine.
- Low-Sodium Soy Sauce: ¼ cup. This is our primary source of salt and umami. Using a low-sodium version allows you to control the saltiness more effectively.
- Toasted Sesame Oil: 2 tablespoons. This is a finishing oil, not a cooking oil. Its nutty, fragrant aroma is iconic and adds incredible depth of flavor.
- Rice Vinegar: 1 tablespoon. A touch of acidity is crucial for balancing the savory flavors and adding a little tang.
- White Pepper: ½ teaspoon. White pepper has a more earthy, complex heat than black pepper and is a classic choice for dumpling fillings.
- Salt: 1 teaspoon (for drawing water from the cabbage).
For Pan-Frying:
- Neutral Oil: 2-3 tablespoons (such as canola, grapeseed, or avocado oil). You need an oil with a high smoke point for achieving that crispy bottom.
- Water: Approximately ½ to ¾ cup per batch. This is for steaming the dumplings after the initial fry.
Instructions
Follow these steps carefully, paying close attention to the technique for preparing the filling and pan-frying. The method is what transforms these from simple dumplings into true crispy-bottom potstickers.
Step 1: Prepare the Vegetable Filling
- Sweat the Cabbage: In a large bowl, combine the 4 cups of finely shredded Napa cabbage with 1 teaspoon of salt. Toss well to coat. Set it aside for 20-30 minutes. The salt will draw a significant amount of water out of the cabbage. This is the single most important step to prevent a soggy filling and ensure your dumplings don’t burst while cooking.
- Squeeze the Vegetables: While the cabbage is sweating, you can finely chop your shiitake mushrooms, grate the carrots, and slice the scallions. After the cabbage has rested, you will see a pool of water at the bottom of the bowl. Place the wilted cabbage in the center of a clean kitchen towel or a few layers of cheesecloth. Gather the corners and twist tightly, squeezing out as much liquid as humanly possible over the sink. You’ll be amazed at how much water comes out.
- Combine the Filling Ingredients: In the now-empty large bowl, add the squeezed cabbage, grated carrots, chopped shiitake mushrooms, and sliced scallions.
- Add the Aromatics and Seasonings: To the vegetable mixture, add the minced ginger, minced garlic, ¼ cup of low-sodium soy sauce, 2 tablespoons of toasted sesame oil, 1 tablespoon of rice vinegar, and ½ teaspoon of white pepper.
- Mix Thoroughly: Using your hands or a spatula, mix everything together until it is completely combined. Your filling is now ready. The aroma should be incredibly fragrant and savory.
Step 2: Fill and Fold the Dumplings
- Set Up Your Workstation: Arrange your workspace with the bowl of filling, the package of dumpling wrappers, and a small bowl of water. Have a baking sheet lined with parchment paper ready to place the finished dumplings on.
- Fill the Wrapper: Hold a single dumpling wrapper flat in the palm of your non-dominant hand. Spoon about 1 to 1.5 teaspoons of the vegetable filling into the center. Be careful not to overfill, as this will make sealing them difficult and can cause them to burst during cooking.
- Seal the Dumpling (The Pleated Fold):
- Dip your finger in the small bowl of water and trace it along the entire outer edge of the wrapper. This water acts as a glue.
- Fold the wrapper in half over the filling to create a half-moon shape, but only pinch it shut at the very top center point to hold it in place.
- Starting from one side (e.g., the right side), use your thumb and index finger to create a small pleat in the front layer of the wrapper, folding it towards the center. Press this pleat firmly against the flat back layer of the wrapper to seal it.
- Create another pleat right next to the first one, overlapping slightly, and press it sealed. Continue creating 2-4 pleats on this side until you reach the end of the dumpling.
- Repeat the process on the other side, always pleating the front layer of the wrapper and pressing it against the flat back layer.
- The finished dumpling should be able to sit upright on its flat bottom, with a beautiful curved, pleated top.
- Place on Baking Sheet: As you finish each dumpling, place it on the parchment-lined baking sheet, making sure they don’t touch each other, or they might stick together.
Step 3: The Pan-Frying and Steaming Method
- Heat the Pan: Place a large, non-stick skillet with a tight-fitting lid over medium-high heat. Add about 1-2 tablespoons of neutral oil and swirl to coat the bottom of the pan evenly. The oil should be shimmering but not smoking.
- Arrange the Dumplings: Carefully place the dumplings in the pan in a single layer, flat-side down. You can arrange them in a circular pattern. Make sure not to overcrowd the pan; cook in batches if necessary. Let them fry undisturbed for 2-3 minutes.
- Check for the Golden Crust: Lift one dumpling to check the bottom. You are looking for a deep golden-brown, crispy crust. Once this is achieved, move to the next step immediately.
- Add Water and Steam: Have your lid and water ready. Carefully and quickly pour about ½ to ¾ cup of water into the hot pan (it will sizzle and steam aggressively, so be cautious). Immediately cover the pan with the lid to trap the steam.
- Cook Through: Reduce the heat to medium and let the dumplings steam for 5-7 minutes. The steam cooks the filling and the top part of the wrapper. You’ll know they are done when the wrappers become translucent and tender.
- Final Crisp-Up: Remove the lid. Most of the water should have evaporated. If there is still a bit of water left, continue to cook with the lid off until it’s all gone. This final stage allows the bottoms to re-crisp and get even crunchier.
- Serve Immediately: Once the water is gone and the bottoms are perfectly crisp, remove the dumplings from the pan and serve them immediately with your favorite dipping sauce.
Nutrition
- Serving Size: one normal portion
- Calories: 260
- Sodium: 450mg
- Fiber: 4g
- Protein: 6g