")

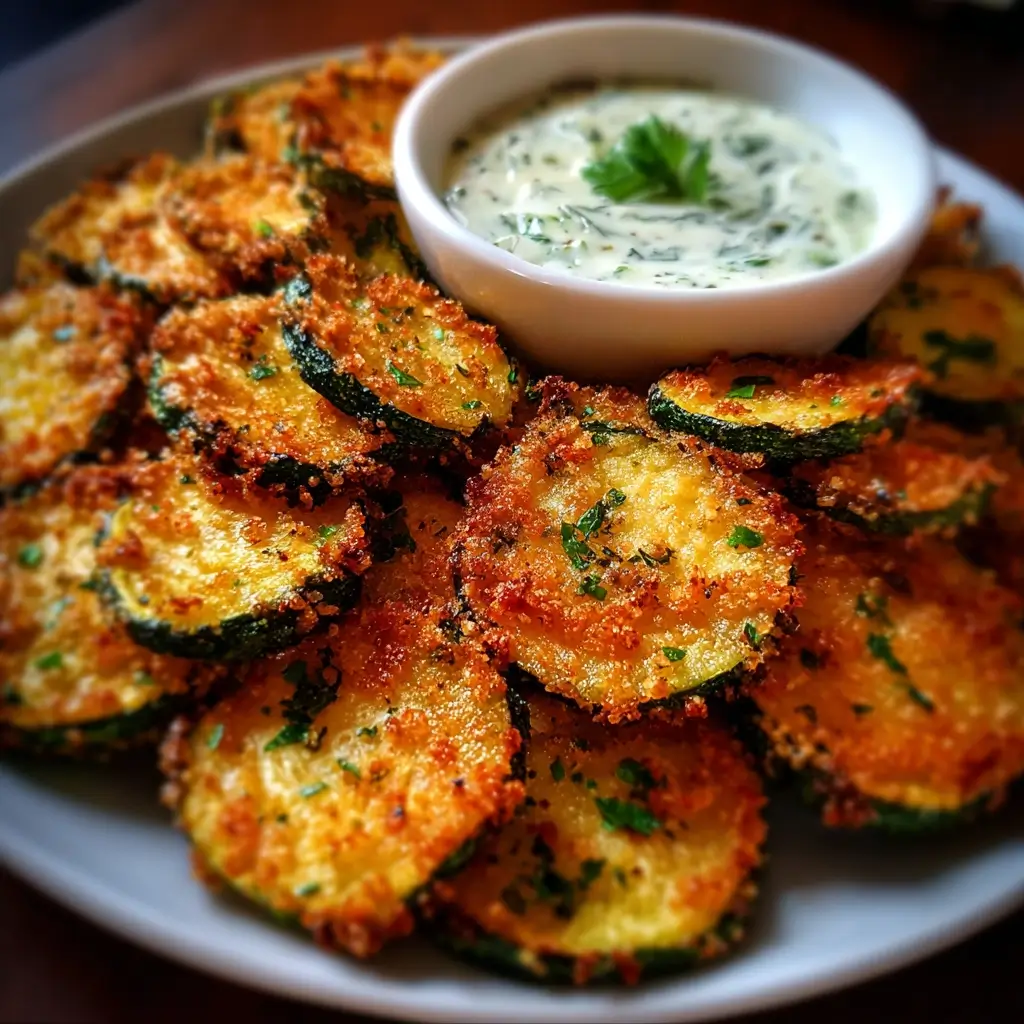

It started, as it often does, with an overabundance of zucchini. My garden, in a fit of wild generosity, had produced a tidal wave of green, and my kitchen counter was beginning to look like a farmer’s market stall. We had grilled it, sautéed it, and spiralized it into noodles, but my family’s enthusiasm was starting to wane. I needed a game-changer, something that would transform this humble summer squash into a snack so irresistible that even my kids, notorious vegetable skeptics, would be begging for more. That’s when the idea for Crispy Zucchini Chips struck. I wasn’t just aiming for good; I was aiming for legendary. I wanted that perfect, audible crunch, a savory, seasoned coating, and a cool, creamy dip to balance it all out. The result was nothing short of a culinary triumph. These chips emerged from the oven golden-brown and impossibly crispy, disappearing from the cooling rack in minutes. My husband, who typically reserves his snacking passion for potato chips, declared them “addictively delicious,” and the kids devoured them, completely oblivious to the fact they were eating a vegetable. The vibrant, fresh herb dip was the perfect partner, its creamy tang cutting through the savory richness of the chips. This recipe didn’t just solve my zucchini problem; it created a new family-favorite snack that we now make on repeat, whether the garden is overflowing or not.
Ingredients
This recipe is divided into two simple, yet flavorful components: the crispy baked zucchini chips and the fresh, creamy herb dip. Each ingredient is chosen to create a perfect harmony of texture and taste.
For the Crispy Zucchini Chips:
- 2 medium Zucchini (about 1.5 lbs total): Choose firm, smooth-skinned zucchini. This size is ideal for creating perfectly round, bite-sized chips.
- 1/2 cup All-Purpose Flour: This initial light coating is crucial for helping the egg wash and breadcrumb mixture adhere properly to the zucchini slices.
- 2 large Eggs: Beaten to create an egg wash, this acts as the essential “glue” that binds the crispy panko coating to the zucchini.
- 1 1/2 cups Panko Breadcrumbs: These Japanese-style breadcrumbs are lighter and flakier than traditional breadcrumbs, guaranteeing an exceptionally crispy, crunchy texture when baked.
- 1/2 cup Grated Parmesan Cheese: Finely grated Parmesan adds a salty, nutty, and savory depth of flavor (umami) directly into the coating.
- 1 tsp Garlic Powder: Provides a warm, aromatic base flavor that complements both the zucchini and the herbs in the dip.
- 1 tsp Dried Oregano: Adds a classic, slightly peppery Mediterranean note to the chip’s seasoning blend.
- 1/2 tsp Smoked Paprika: Lends a beautiful golden-red color and a subtle, smoky flavor that elevates the chips beyond simple seasoning.
- Salt and freshly ground Black Pepper to taste: Essential for enhancing all the other flavors.
- Olive Oil Spray or 2 tbsp Olive Oil: For greasing the baking sheets and lightly coating the chips to ensure they brown evenly and become perfectly crisp.
For the Creamy Herb Dip:
- 1 cup Plain Greek Yogurt: Use full-fat or 2% for the creamiest texture and richest flavor. It provides a tangy, protein-packed base for the dip.
- 1/4 cup chopped Fresh Dill: Its unique, slightly anise-like flavor is incredibly refreshing and pairs beautifully with zucchini.
- 1/4 cup chopped Fresh Parsley: Flat-leaf or curly parsley adds a clean, bright, and slightly peppery taste that lightens the entire dip.
- 2 tbsp chopped Fresh Chives: These offer a delicate, mild onion flavor without the harsh bite of regular onions.
- 1 clove Garlic, minced: A small amount of fresh garlic provides a pungent kick that deepens the dip’s flavor profile.
- 1 tbsp Lemon Juice: Freshly squeezed lemon juice is key for adding a bright acidity that cuts through the creaminess and makes all the flavors pop.
- Salt and freshly ground Black Pepper to taste: To season the dip and bring all the fresh herb flavors into focus.
Instructions
Follow these detailed steps to achieve perfectly golden and crispy zucchini chips every single time. The key is in the preparation and ensuring the zucchini slices are dry and well-coated.
Part 1: Preparing the Zucchini Chips
- Preheat and Prepare: Begin by preheating your oven to 425°F (220°C). Line two large baking sheets with parchment paper. The parchment paper is essential to prevent the chips from sticking and makes cleanup a breeze. Lightly grease the parchment paper with olive oil spray or a thin layer of olive oil.
- Slice the Zucchini: Wash and dry the zucchini thoroughly. Trim off the ends. Using a sharp knife or a mandoline slicer for ultimate consistency, slice the zucchini into uniform 1/4-inch thick rounds. Uniform thickness is the most critical step for even baking; if some slices are thicker than others, the thinner ones will burn before the thicker ones are cooked.
- Draw Out Moisture: Arrange the zucchini slices in a single layer on a clean kitchen towel or a layer of paper towels. Sprinkle them lightly with salt. Let them sit for 15-20 minutes. You will see beads of moisture forming on the surface. This process, known as “sweating,” draws out excess water from the zucchini, which is the secret to preventing soggy chips and achieving maximum crispiness. After 15-20 minutes, use another towel to gently pat each slice completely dry.
- Set Up the Breading Station: You will need three shallow dishes or bowls.
- Dish 1 (Flour): Combine the 1/2 cup of all-purpose flour with a pinch of salt and pepper.
- Dish 2 (Egg): In the second dish, whisk the two large eggs until they are smooth and uniform.
- Dish 3 (Panko Mixture): In the third dish, combine the 1 1/2 cups of panko breadcrumbs, 1/2 cup of grated Parmesan cheese, 1 teaspoon of garlic powder, 1 teaspoon of dried oregano, and 1/2 teaspoon of smoked paprika. Mix thoroughly until all the seasonings are evenly distributed throughout the panko.
- Coat the Zucchini Slices: Working with one zucchini slice at a time, follow this three-step process for a perfect coating:
- First, dredge the dry zucchini slice in the flour mixture, shaking off any excess. The thin flour layer helps the egg wash stick.
- Next, dip the flour-dusted slice into the beaten egg, ensuring it’s fully coated on all sides. Allow any excess egg to drip off.
- Finally, press the egg-coated slice firmly into the panko-Parmesan mixture, patting it down to ensure a thick, even crust forms on both sides.
- Arrange on Baking Sheets: As you coat each chip, place it on the prepared baking sheet in a single layer. It is crucial that the chips do not touch or overlap. Overcrowding the pan will cause the zucchini to steam instead of bake, resulting in a soft, soggy texture. Use two baking sheets if necessary to give them plenty of space.
- Bake to Golden Perfection: Lightly spray the tops of the coated zucchini chips with olive oil spray. This helps them become golden-brown and extra crispy. Place the baking sheets in the preheated oven and bake for 15-20 minutes. Then, carefully remove the sheets, flip each chip over using tongs, and bake for another 10-15 minutes, or until the chips are deeply golden, crispy, and cooked through.
Part 2: Making the Creamy Herb Dip
- Combine Ingredients: While the zucchini chips are baking, you can prepare the dip. In a medium bowl, combine the 1 cup of Greek yogurt, 1/4 cup of chopped fresh dill, 1/4 cup of chopped fresh parsley, 2 tablespoons of chopped fresh chives, 1 minced garlic clove, and 1 tablespoon of fresh lemon juice.
- Mix and Season: Stir everything together until well combined. The dip should be flecked with green from the fresh herbs. Season with salt and freshly ground black pepper to your liking. Taste and adjust the seasoning if needed—you might want a little more lemon juice for brightness or a bit more salt to enhance the flavors.
- Chill (Optional but Recommended): For the best flavor, cover the dip and let it chill in the refrigerator for at least 20 minutes before serving. This allows the flavors of the garlic and herbs to meld and deepen into the creamy yogurt base.
Nutrition Facts
This recipe offers a much healthier alternative to deep-fried snacks, packed with flavor and beneficial nutrients.
- Servings: This recipe yields approximately 6 servings.
- Calories Per Serving: Approximately 250 calories per serving (including about 2 tablespoons of dip).
- High in Fiber: Zucchini is a great source of dietary fiber, which is essential for digestive health and can help you feel full and satisfied.
- Good Source of Protein: Thanks to the Greek yogurt in the dip and the Parmesan cheese in the coating, each serving provides a decent amount of protein, which is vital for muscle repair and overall body function.
- Rich in Vitamin C: Zucchini provides a good dose of Vitamin C, a powerful antioxidant that supports the immune system.
- Lower in Saturated Fat: By baking instead of deep-frying, this recipe significantly cuts down on unhealthy saturated fats compared to traditional potato chips or other fried snacks.
- Source of Calcium: The Parmesan cheese and Greek yogurt contribute to your daily calcium intake, which is important for strong bones and teeth.
Preparation Time
Enjoy this gourmet-style snack without spending all day in the kitchen. The process is straightforward and much of the time is hands-off while the chips bake.
- Active Preparation Time: Approximately 25 minutes. This includes slicing the zucchini, allowing it to sweat, setting up the breading station, and coating each chip.
- Cooking Time: Approximately 25-35 minutes. This is the time the chips spend in the oven to become perfectly crispy.
- Total Time: Approximately 50-60 minutes from start to finish.
How to Serve
These versatile zucchini chips are more than just a snack. Their incredible crunch and savory flavor make them a fantastic addition to any meal or gathering. Here are some creative ways to serve them:
- The Classic Appetizer:
- Arrange the hot, crispy zucchini chips on a large platter or wooden board.
- Place the bowl of creamy herb dip in the center for easy dipping.
- Garnish with a sprinkle of extra fresh parsley or chives for a pop of color.
- As a Healthy Side Dish:
- Serve them alongside grilled chicken, fish, or a juicy burger as a lighter, more nutritious alternative to french fries.
- Their crunchy texture provides a wonderful contrast to tender main courses.
- A Fun Salad Topper:
- Break up a few chips and sprinkle them over your favorite green salad. They act as a flavorful, gluten-free alternative to croutons, adding an amazing crunch and savory kick.
- In a Lunchbox:
- Pack the cooled chips in an airtight container with a small, separate container of the herb dip for a delicious and healthy school or work lunch. Note that they will lose some crispness over time.
- On a Snack Board:
- Make them the star of a vibrant snack or charcuterie board. Pair them with other dips like hummus or marinara, along with cheeses, olives, and fresh vegetable sticks.
Additional Tips
Unlock the full potential of this recipe and ensure flawless results with these eight expert tips.
- The Mandoline is Your Best Friend: For perfectly uniform slices, a mandoline slicer is an invaluable tool. It ensures every chip is the same thickness, which is the key to even cooking and consistent crispiness. If you don’t have one, just take your time with a sharp knife.
- Don’t Skip the Sweating Step: It might seem like an extra, fussy step, but salting and patting the zucchini dry is the most important secret to avoiding soggy chips. Zucchini holds a lot of water, and removing it is essential for a truly crispy result.
- Press the Panko Firmly: When coating the zucchini in the panko mixture, don’t be shy. Use your fingers to gently but firmly press the breadcrumbs onto the slice. This helps create a thick, durable crust that won’t fall off during baking.
- Give Them Space to Breathe: Do not overcrowd your baking sheets. If the chips are too close together, they will trap steam and will not crisp up properly. Use two or even three baking sheets if necessary to ensure there is space between each chip.
- Experiment with Spices: This recipe is a fantastic canvas for other flavors. Feel free to customize the panko mixture. Try adding a pinch of cayenne for heat, some Italian seasoning for a more herbaceous note, or onion powder for extra savory depth.
- Make the Dip Ahead of Time: The herb dip’s flavor actually improves with time. You can make it up to 2 days in advance and store it in an airtight container in the refrigerator. This allows the flavors to meld beautifully.
- Reheating for Maximum Crispiness: Zucchini chips are best enjoyed fresh from the oven. If you do have leftovers, they will soften in the fridge. To bring back their crunch, reheat them in an air fryer at 375°F (190°C) for 3-5 minutes or in a single layer in a 400°F (200°C) oven for 5-7 minutes.
- Panko is Non-Negotiable for Crunch: While you might be tempted to use regular breadcrumbs, panko breadcrumbs are specifically designed to absorb less oil and create a lighter, crispier coating. For that signature crunch, stick with panko.
FAQ Section
Here are answers to some of the most common questions about making Crispy Zucchini Chips.
1. Why did my zucchini chips come out soggy?
Sogginess is the most common issue and it’s almost always caused by excess moisture. There are two main culprits: you either skipped the step of “sweating” the zucchini slices with salt to draw out water, or you overcrowded the baking pan. Ensure you pat the slices completely dry and give them plenty of space on the sheet to bake, not steam.
2. Can I make these zucchini chips in an air fryer?
Absolutely! An air fryer is perfect for this recipe. Prepare the chips as directed. Preheat your air fryer to 380°F (195°C). Place the coated chips in a single layer in the air fryer basket (you’ll need to cook in batches). Cook for 8-12 minutes, flipping halfway through, until golden and crispy.
3. Are baked zucchini chips actually healthy?
Yes, they are a significantly healthier option compared to deep-fried potato chips. They are lower in fat and calories, baked instead of fried, and provide fiber and vitamins from the zucchini. The Greek yogurt dip also adds protein and probiotics, making it a well-rounded and nutritious snack.
4. Can I prepare these ahead of time for a party?
These chips are at their absolute best when served fresh and hot from the oven. Their crispiness diminishes as they cool and sit. You can, however, do all the prep work ahead of time: slice the zucchini, prepare the breading station, and make the dip. Then, just before your guests arrive, you can quickly coat and bake them for a fresh, hot appetizer.
5. How should I store leftovers?
Store any leftover zucchini chips in an airtight container in the refrigerator for up to 2 days. Be aware that they will lose their crispness and become soft. To revive them, follow the reheating instructions in the “Additional Tips” section using an oven or air fryer. The dip can be stored in an airtight container in the fridge for up to 3 days.
6. Can I make this recipe gluten-free?
Yes, this recipe is easily adaptable to be gluten-free. Simply substitute the all-purpose flour with a gluten-free all-purpose blend and use gluten-free panko breadcrumbs, which are available in most major grocery stores. The rest of the ingredients are naturally gluten-free.
7. My breading keeps falling off. What am I doing wrong?
If the breading isn’t sticking, it’s likely an issue with the coating process. Ensure your zucchini slices are patted very dry after sweating. The dry surface helps the initial flour layer stick. Also, make sure to shake off excess flour before dipping in the egg, and let excess egg drip off before pressing firmly into the panko. A complete, three-step coating is key.
8. What other dips would work well with these chips?
While the herb dip is a perfect match, these chips are delicious with a variety of dips! Try serving them with a classic marinara sauce for a mozzarella stick vibe, a spicy sriracha aioli for a kick of heat, a light and tangy tzatziki sauce, or even a simple side of ranch dressing.

Crispy Zucchini Chips with Herb Dip
Ingredients
This recipe is divided into two simple, yet flavorful components: the crispy baked zucchini chips and the fresh, creamy herb dip. Each ingredient is chosen to create a perfect harmony of texture and taste.
For the Crispy Zucchini Chips:
- 2 medium Zucchini (about 1.5 lbs total): Choose firm, smooth-skinned zucchini. This size is ideal for creating perfectly round, bite-sized chips.
- 1/2 cup All-Purpose Flour: This initial light coating is crucial for helping the egg wash and breadcrumb mixture adhere properly to the zucchini slices.
- 2 large Eggs: Beaten to create an egg wash, this acts as the essential “glue” that binds the crispy panko coating to the zucchini.
- 1 1/2 cups Panko Breadcrumbs: These Japanese-style breadcrumbs are lighter and flakier than traditional breadcrumbs, guaranteeing an exceptionally crispy, crunchy texture when baked.
- 1/2 cup Grated Parmesan Cheese: Finely grated Parmesan adds a salty, nutty, and savory depth of flavor (umami) directly into the coating.
- 1 tsp Garlic Powder: Provides a warm, aromatic base flavor that complements both the zucchini and the herbs in the dip.
- 1 tsp Dried Oregano: Adds a classic, slightly peppery Mediterranean note to the chip’s seasoning blend.
- 1/2 tsp Smoked Paprika: Lends a beautiful golden-red color and a subtle, smoky flavor that elevates the chips beyond simple seasoning.
- Salt and freshly ground Black Pepper to taste: Essential for enhancing all the other flavors.
- Olive Oil Spray or 2 tbsp Olive Oil: For greasing the baking sheets and lightly coating the chips to ensure they brown evenly and become perfectly crisp.
For the Creamy Herb Dip:
- 1 cup Plain Greek Yogurt: Use full-fat or 2% for the creamiest texture and richest flavor. It provides a tangy, protein-packed base for the dip.
- 1/4 cup chopped Fresh Dill: Its unique, slightly anise-like flavor is incredibly refreshing and pairs beautifully with zucchini.
- 1/4 cup chopped Fresh Parsley: Flat-leaf or curly parsley adds a clean, bright, and slightly peppery taste that lightens the entire dip.
- 2 tbsp chopped Fresh Chives: These offer a delicate, mild onion flavor without the harsh bite of regular onions.
- 1 clove Garlic, minced: A small amount of fresh garlic provides a pungent kick that deepens the dip’s flavor profile.
- 1 tbsp Lemon Juice: Freshly squeezed lemon juice is key for adding a bright acidity that cuts through the creaminess and makes all the flavors pop.
- Salt and freshly ground Black Pepper to taste: To season the dip and bring all the fresh herb flavors into focus.
Instructions
Follow these detailed steps to achieve perfectly golden and crispy zucchini chips every single time. The key is in the preparation and ensuring the zucchini slices are dry and well-coated.
Part 1: Preparing the Zucchini Chips
- Preheat and Prepare: Begin by preheating your oven to 425°F (220°C). Line two large baking sheets with parchment paper. The parchment paper is essential to prevent the chips from sticking and makes cleanup a breeze. Lightly grease the parchment paper with olive oil spray or a thin layer of olive oil.
- Slice the Zucchini: Wash and dry the zucchini thoroughly. Trim off the ends. Using a sharp knife or a mandoline slicer for ultimate consistency, slice the zucchini into uniform 1/4-inch thick rounds. Uniform thickness is the most critical step for even baking; if some slices are thicker than others, the thinner ones will burn before the thicker ones are cooked.
- Draw Out Moisture: Arrange the zucchini slices in a single layer on a clean kitchen towel or a layer of paper towels. Sprinkle them lightly with salt. Let them sit for 15-20 minutes. You will see beads of moisture forming on the surface. This process, known as “sweating,” draws out excess water from the zucchini, which is the secret to preventing soggy chips and achieving maximum crispiness. After 15-20 minutes, use another towel to gently pat each slice completely dry.
- Set Up the Breading Station: You will need three shallow dishes or bowls.
-
- Dish 1 (Flour): Combine the 1/2 cup of all-purpose flour with a pinch of salt and pepper.
- Dish 2 (Egg): In the second dish, whisk the two large eggs until they are smooth and uniform.
- Dish 3 (Panko Mixture): In the third dish, combine the 1 1/2 cups of panko breadcrumbs, 1/2 cup of grated Parmesan cheese, 1 teaspoon of garlic powder, 1 teaspoon of dried oregano, and 1/2 teaspoon of smoked paprika. Mix thoroughly until all the seasonings are evenly distributed throughout the panko.
Kitchen remodeling -
- Coat the Zucchini Slices: Working with one zucchini slice at a time, follow this three-step process for a perfect coating:
- First, dredge the dry zucchini slice in the flour mixture, shaking off any excess. The thin flour layer helps the egg wash stick.
- Next, dip the flour-dusted slice into the beaten egg, ensuring it’s fully coated on all sides. Allow any excess egg to drip off.
- Finally, press the egg-coated slice firmly into the panko-Parmesan mixture, patting it down to ensure a thick, even crust forms on both sides.
- Arrange on Baking Sheets: As you coat each chip, place it on the prepared baking sheet in a single layer. It is crucial that the chips do not touch or overlap. Overcrowding the pan will cause the zucchini to steam instead of bake, resulting in a soft, soggy texture. Use two baking sheets if necessary to give them plenty of space.
- Bake to Golden Perfection: Lightly spray the tops of the coated zucchini chips with olive oil spray. This helps them become golden-brown and extra crispy. Place the baking sheets in the preheated oven and bake for 15-20 minutes. Then, carefully remove the sheets, flip each chip over using tongs, and bake for another 10-15 minutes, or until the chips are deeply golden, crispy, and cooked through.
Part 2: Making the Creamy Herb Dip
- Combine Ingredients: While the zucchini chips are baking, you can prepare the dip. In a medium bowl, combine the 1 cup of Greek yogurt, 1/4 cup of chopped fresh dill, 1/4 cup of chopped fresh parsley, 2 tablespoons of chopped fresh chives, 1 minced garlic clove, and 1 tablespoon of fresh lemon juice.
- Mix and Season: Stir everything together until well combined. The dip should be flecked with green from the fresh herbs. Season with salt and freshly ground black pepper to your liking. Taste and adjust the seasoning if needed—you might want a little more lemon juice for brightness or a bit more salt to enhance the flavors.
- Chill (Optional but Recommended): For the best flavor, cover the dip and let it chill in the refrigerator for at least 20 minutes before serving. This allows the flavors of the garlic and herbs to meld and deepen into the creamy yogurt base.
Nutrition
- Serving Size: one normal portion
- Calories: 250