")


The first time I made these Crunchy Shrimp Poppers, it was for a casual Friday night gathering with friends. I wanted something easy to prepare but impressive enough to feel like a treat. Frankly, I was a bit nervous – finger foods can be hit or miss, and soggy shrimp is a culinary crime I wasn’t willing to commit. I’d tinkered with various breadings and cooking methods before settling on this specific combination, hoping the double crunch from the panko and the perfectly cooked, juicy shrimp inside would deliver. As I pulled the first batch, golden brown and sizzling, from the air fryer (my weapon of choice for maximum crispiness with minimal guilt), the aroma alone drew people to the kitchen. I barely had time to arrange them on a platter with a trio of dipping sauces before they were being snatched up. The feedback was immediate and unanimous: “These are incredible!” “What’s in this coating?” “Can I have the recipe?” Seeing my friends’ eyes light up with that first crunchy bite, followed by the succulent pop of the shrimp, was incredibly satisfying. They disappeared faster than anything else on the table that night, and the kids, who can sometimes be picky about seafood, were asking for seconds and thirds. Since then, these Crunchy Shrimp Poppers have become a staple in our house – requested for game days, potlucks, holiday appetizers, and even sometimes as a fun weeknight dinner alongside a simple salad. They are surprisingly versatile, consistently delicious, and achieve that perfect balance of textures and flavors that makes an appetizer truly memorable. The process is straightforward, the results are reliably fantastic, and the sheer joy they bring to the table makes them a recipe I’m always excited to share. They aren’t just shrimp; they’re little bites of crunchy, juicy happiness.
Ingredients
Here’s what you’ll need to create these irresistible Crunchy Shrimp Poppers:
- 1 lb Large Shrimp (about 21-25 count per pound): Peeled, deveined, tails on or off (personal preference, tails make good handles). Using large shrimp ensures a juicy, substantial bite that stands up to the crunchy coating. Ensure they are thoroughly thawed if previously frozen.
- 1 cup All-Purpose Flour: Forms the base layer of our coating, helping the egg wash adhere properly. You can season this layer for extra flavor depth.
- 2 Large Eggs: Beaten well to create an egg wash, acting as the crucial binder between the flour layer and the panko breadcrumbs.
- 2 cups Panko Breadcrumbs: Japanese-style breadcrumbs that are lighter, airier, and absorb less oil than traditional breadcrumbs, resulting in a superior, super-crispy texture. This is key to the “crunch.”
- 1 tsp Salt (divided): Essential for enhancing all the flavors. We’ll divide it between the flour and panko mixtures.
- 1 tsp Black Pepper (freshly ground preferred): Adds a gentle warmth and spice. Divided between flour and panko.
- 1 tsp Garlic Powder: Provides a savory, aromatic undertone that pairs perfectly with shrimp. Divided between flour and panko.
- 1 tsp Paprika (Sweet or Smoked): Adds color and a subtle sweetness or smokiness depending on the type you choose. Divided between flour and panko.
- ½ tsp Onion Powder: Complements the garlic powder for a well-rounded savory base. Divided between flour and panko.
- Optional: ¼ – ½ tsp Cayenne Pepper: For those who like a little kick of heat. Add this to the flour or panko mixture based on your preference.
- Vegetable Oil or Canola Oil (for frying, approx. 3-4 cups): A neutral oil with a high smoke point is necessary if you choose to deep-fry. Ensure you have enough for the shrimp to be mostly submerged. (Skip if baking or air frying).
- Cooking Spray (for baking or air frying): A light coating helps the panko brown nicely and become extra crispy without deep frying. Olive oil or avocado oil spray works well.
Instructions
Follow these steps carefully for perfectly crunchy and juicy shrimp poppers every time:
- Prepare the Shrimp: Rinse the peeled and deveined shrimp under cold water. Most importantly, pat them thoroughly dry with paper towels. Excess moisture is the enemy of crispiness, preventing the coating from adhering properly and potentially causing oil splattering if frying. Set aside.
- Set Up Dredging Station: You’ll need three shallow dishes or plates.
- Dish 1 (Flour Mixture): Combine the all-purpose flour with ½ tsp salt, ½ tsp black pepper, ½ tsp garlic powder, ½ tsp paprika, and ¼ tsp onion powder (and half the cayenne, if using). Whisk together until evenly distributed. Seasoning this initial layer is crucial for overall flavor.
- Dish 2 (Egg Wash): Crack the large eggs into the second dish and beat them lightly with a fork until the yolks and whites are fully combined. A tablespoon of water or milk can be added to thin it slightly if desired.
- Dish 3 (Panko Mixture): Combine the panko breadcrumbs with the remaining ½ tsp salt, ½ tsp black pepper, ½ tsp garlic powder, ½ tsp paprika, and ¼ tsp onion powder (and the other half of the cayenne, if using). Mix well. Ensuring the panko is seasoned adds another layer of deliciousness.
- Bread the Shrimp: Work with one shrimp at a time for the best coating.
- First, dredge a shrimp thoroughly in the seasoned flour mixture, shaking off any excess. Ensure it’s fully coated.
- Next, dip the flour-coated shrimp into the egg wash, letting any excess drip off. Make sure the entire surface is moistened by the egg.
- Finally, press the shrimp firmly into the seasoned panko breadcrumbs, ensuring it’s generously and evenly coated on all sides. Gently pressing helps the panko adhere securely. Place the breaded shrimp on a clean plate, baking sheet lined with parchment paper, or a wire rack. Repeat with all remaining shrimp, arranging them in a single layer without touching.
- Chill (Optional but Recommended): For an even more secure coating that stays put during cooking, you can place the breaded shrimp in the refrigerator for 15-30 minutes. This helps the breading set.
- Cook the Shrimp (Choose Your Method):
- Method 1: Deep Frying (Classic Crunch)
- Heat about 2-3 inches of vegetable or canola oil in a heavy-bottomed pot or Dutch oven over medium-high heat until it reaches 350-360°F (175-180°C). Use a thermometer for accuracy.
- Carefully lower a few shrimp into the hot oil, being careful not to overcrowd the pot (this lowers the oil temperature, leading to greasy shrimp).
- Fry for 2-3 minutes per side, or until the coating is deep golden brown and crispy, and the shrimp is opaque and cooked through. Shrimp cooks quickly, so watch carefully.
- Using a slotted spoon or spider strainer, remove the cooked shrimp poppers and transfer them to a wire rack set over paper towels to drain excess oil. This helps maintain crispiness. Repeat with remaining shrimp, ensuring the oil returns to temperature between batches.
- Method 2: Baking (Healthier Option)
- Preheat your oven to 425°F (220°C).
- Place a wire rack inside a baking sheet. This allows air to circulate around the shrimp for better crisping. Alternatively, line a baking sheet with parchment paper.
- Arrange the breaded shrimp in a single layer on the wire rack or prepared baking sheet, ensuring they are not touching.
- Generously spray the tops of the shrimp with cooking spray. This helps the panko brown and crisp up.
- Bake for 10-14 minutes, flipping the shrimp halfway through and spraying the other side, until the coating is golden brown and crispy, and the shrimp is cooked through.
- Method 3: Air Frying (Fast & Crispy)
- Preheat your air fryer to 400°F (200°C).
- Arrange the breaded shrimp in a single layer in the air fryer basket. You will likely need to cook in batches to avoid overcrowding. Overcrowding prevents proper air circulation and results in uneven cooking and less crispiness.
- Generously spray the tops of the shrimp with cooking spray.
- Air fry for 8-10 minutes, flipping the shrimp (or shaking the basket vigorously) halfway through cooking, until golden brown, crispy, and cooked through. Adjust time based on your specific air fryer model.
- Method 1: Deep Frying (Classic Crunch)
- Rest and Serve: Let the cooked shrimp poppers rest for a minute or two before serving. This allows the internal temperature to even out slightly and the coating to set fully. Serve immediately while hot and crispy with your favorite dipping sauces.
Nutrition Facts
(Estimates per serving; assumes a serving size of approximately 6 shrimp poppers. Actual values vary significantly based on shrimp size, oil absorption during frying vs. baking/air frying, and specific ingredients used.)
- Servings: Approximately 4 servings (adjust based on appetite and meal context)
- Calories per Serving: Roughly 300-450 kcal (significantly lower if baked or air-fried, higher if deep-fried due to oil absorption). This provides a basic energy measure for the dish.
- Protein: Approximately 20-25g. Shrimp is an excellent source of lean protein, crucial for muscle repair, immune function, and satiety.
Disclaimer: These are estimates. For precise nutritional information, use a recipe calculator with your specific ingredients and cooking method.
Preparation Time
- Active Preparation Time: Approximately 20-25 minutes. This includes patting the shrimp dry, setting up the dredging station, and breading all the shrimp. If you need to peel and devein the shrimp yourself, add an extra 10-15 minutes.
- Chilling Time (Optional): 15-30 minutes. Recommended for the best coating adhesion.
- Cooking Time: Approximately 8-15 minutes, depending on the chosen cooking method (frying is fastest per batch, baking takes longest, air frying is moderate) and the number of batches required.
- Total Time: Roughly 45 minutes to 1 hour 10 minutes (including optional chilling). This makes it a feasible appetizer or even a quick weeknight meal component.
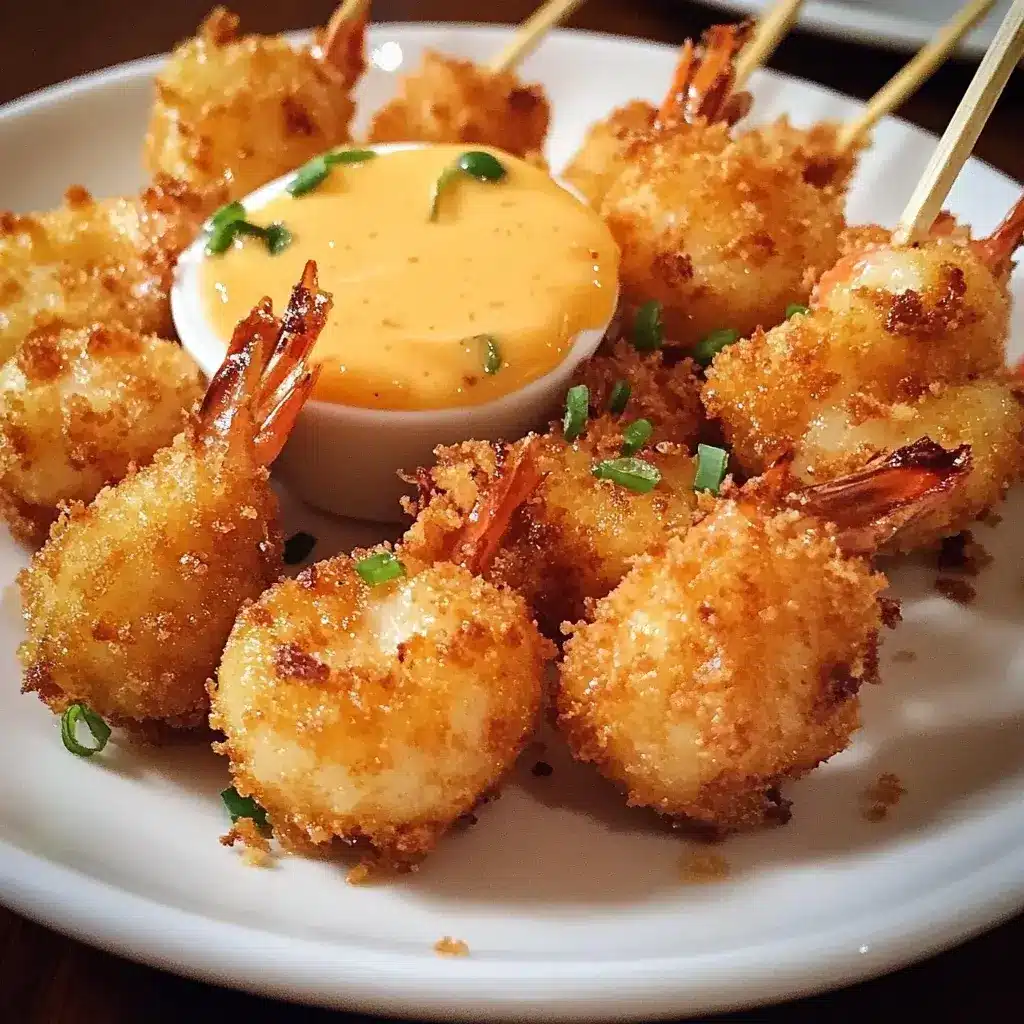
How to Serve
These Crunchy Shrimp Poppers are incredibly versatile. Here are some fantastic ways to serve them:
- Classic Appetizer Platter:
- Arrange the hot, crispy shrimp poppers attractively on a large platter.
- Garnish generously with chopped fresh parsley or cilantro for a pop of color and freshness.
- Include lemon or lime wedges on the side for squeezing over the shrimp – the acidity cuts through the richness beautifully.
- Offer a variety of dipping sauces in small bowls alongside the shrimp.
- Must-Have Dipping Sauces:
- Sweet Chili Sauce: A classic pairing offering sweet heat.
- Cocktail Sauce: Tangy and zesty, traditional with shrimp.
- Creamy Garlic Aioli: Rich, garlicky, and sophisticated. (Easy to make: mayo, minced garlic, lemon juice, salt, pepper).
- Spicy Mayo/Sriracha Aioli: Mayo mixed with Sriracha or your favorite hot sauce for a creamy kick.
- Tartar Sauce: Creamy, tangy, with bits of pickle and capers.
- Ranch Dressing: Cool and herbaceous, always a crowd-pleaser.
- Remoulade Sauce: A complex, creamy, Cajun-inspired sauce.
- Incorporate into Meals:
- Shrimp Po’ Boy Style: Stuff them into a soft baguette with shredded lettuce, tomatoes, pickles, and a generous drizzle of remoulade sauce.
- Shrimp Tacos: Fill warm corn or flour tortillas with the shrimp poppers, crunchy slaw (cabbage, carrots, cilantro-lime dressing), avocado slices, and a drizzle of chipotle crema.
- Salad Topping: Add a crunchy, protein-packed element to a Caesar salad or a mixed green salad with a vinaigrette dressing.
- Surf and Turf Component: Serve alongside a small steak or grilled chicken breast.
- Buddha Bowls: Add them as the protein element to a bowl filled with rice or quinoa, roasted vegetables, and a tasty dressing.
- Lettuce Wraps: Serve in crisp lettuce cups (like butter lettuce or romaine) with shredded carrots, cucumber, and a peanut or sweet chili dipping sauce.
- Presentation Enhancements:
- Serve in individual small bowls or cones for easier handling at parties.
- Skewer 2-3 shrimp poppers together with a cherry tomato or a piece of pineapple for a different look.
Additional Tips
Maximize your Crunchy Shrimp Popper success with these extra tips:
- Shrimp Size Matters: While large shrimp (21-25 count) are recommended for a juicy interior, medium shrimp (31-35 count) also work well. Adjust cooking times slightly downwards for smaller shrimp to avoid overcooking. Avoid very small shrimp, as they can easily dry out.
- Dry Shrimp is Key: Cannot stress this enough! Pat the shrimp completely dry with paper towels before starting the breading process. Any surface moisture will create steam during cooking and prevent the coating from getting truly crispy and adhering properly.
- Season Every Layer: Don’t just season the panko. Adding salt, pepper, and other spices to the flour mixture and the panko ensures the flavor penetrates throughout the coating, not just on the surface. Taste your seasoned flour and panko lightly to adjust seasoning if needed.
- Panko Perfection: For the ultimate crunch, stick with Panko breadcrumbs. Their jagged, airy structure creates a much crispier coating than standard fine breadcrumbs. If unavailable, coarse standard breadcrumbs are a second-best option, but the texture won’t be quite the same.
- Oil Temperature Control (for Frying): If deep-frying, maintaining the oil temperature between 350-360°F (175-180°C) is critical. Too low, and the shrimp absorb excess oil and become greasy. Too high, and the breading burns before the shrimp cooks through. Use a deep-fry thermometer and adjust the heat as needed, allowing the oil to recover temperature between batches.
- Press Panko Firmly: When coating the shrimp in the panko, gently but firmly press the breadcrumbs onto the surface. This helps create a thicker, more uniform crust that is less likely to fall off during cooking. Use your hands to ensure good coverage.
- Don’t Overcrowd Your Cooking Vessel: Whether frying, baking, or air frying, cook the shrimp in batches, leaving space between each piece. Overcrowding lowers the temperature (of oil or air) and leads to steaming rather than crisping, resulting in soggy shrimp. Give them room to breathe!
- Reheat Like a Pro: Microwaving leftover shrimp poppers will make them rubbery and soggy. To restore their crispiness, reheat them in a preheated oven (around 375°F/190°C) or an air fryer (around 350°F/175°C) for just a few minutes until heated through and crispy again. Watch carefully to prevent burning.
FAQ Section
Here are answers to common questions about making Crunchy Shrimp Poppers:
- Q: Can I make these shrimp poppers gluten-free?
- A: Absolutely! Substitute the all-purpose flour with a good quality gluten-free all-purpose blend (one containing xanthan gum usually works well). For the breadcrumbs, use gluten-free panko breadcrumbs, which are readily available in most supermarkets now. The result will be just as crunchy and delicious. Ensure your seasonings are also certified gluten-free if necessary.
- Q: Can I use frozen shrimp?
- A: Yes, frozen shrimp work perfectly well for this recipe. Ensure you thaw them completely and safely before starting. The best way is to thaw them overnight in the refrigerator. For a quicker method, place the frozen shrimp in a colander and run cold (not warm or hot) water over them for 5-10 minutes until thawed. Crucially, after thawing, pat them extremely dry with paper towels before breading.
- Q: What’s the best way to store leftover shrimp poppers?
- A: Let the shrimp poppers cool completely to room temperature. Store them in an airtight container in the refrigerator for up to 2-3 days. Placing a paper towel in the container can help absorb some excess moisture, but expect them to lose their initial crispness during storage.
- Q: How do I get the breading to stick better?
- A: There are a few key factors: 1) Ensure the shrimp are very dry before flouring. 2) Shake off excess flour before dipping in egg. 3) Let excess egg drip off before coating in panko. 4) Press the panko firmly onto the shrimp. 5) Optionally, chill the breaded shrimp for 15-30 minutes in the fridge before cooking; this helps the coating set and adhere better.
- Q: Can I prepare these ahead of time?
- A: Yes, you can bread the shrimp up to a few hours ahead of time. Arrange the breaded shrimp in a single layer on a parchment-lined baking sheet, cover loosely with plastic wrap, and refrigerate. Cook them just before serving for the best texture. You can also freeze the breaded, uncooked shrimp: place them on a baking sheet in the freezer until solid, then transfer to a freezer bag for up to 1 month. Cook directly from frozen, adding a few extra minutes to the cooking time.
- Q: My shrimp poppers came out soggy, what went wrong?
- A: Soggy shrimp poppers are usually due to a few common issues: 1) The shrimp weren’t patted dry enough. 2) The oil temperature was too low (if frying). 3) The pan, oven, or air fryer basket was overcrowded, causing the shrimp to steam instead of crisping. 4) They weren’t drained properly on a wire rack after frying (letting them sit on paper towels can trap steam). 5) Using regular breadcrumbs instead of panko can lead to a less crispy result.
- Q: Can I add different spices or flavors?
- A: Definitely! This recipe is a great base for customization. Try adding Old Bay seasoning, Cajun or Creole seasoning blends, lemon pepper, dried herbs like dill or oregano, or even some grated Parmesan cheese to the panko mixture for different flavor profiles. Adjust the heat by adding more or less cayenne, or try chipotle powder for a smoky spice.
- Q: Tails on or tails off for the shrimp?
- A: This is purely personal preference! Keeping the tails on provides a convenient “handle” for picking up and dipping the shrimp, which is great for appetizers. If you plan to use the shrimp in tacos or salads, removing the tails before breading might be more convenient for eating. The taste won’t be significantly affected either way.


