")


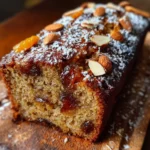
Of all the recipes that have graced my kitchen over the years, some are fleeting passions, while others become woven into the very fabric of our family life. This Easy Almond Date Loaf falls firmly into the latter category. I still remember the first time I baked it. The house began to fill with a scent so intoxicatingly warm and comforting—a rich blend of caramelizing dates, toasty nuts, and sweet spices—that my kids emerged from their rooms, drawn by the aroma like a cartoon character to a pie on a windowsill. When it came out of the oven, a beautiful deep brown with a rustic, cracked top, it was almost too pretty to slice. But we did, of course, while it was still warm enough to melt a pat of butter instantly. The first bite was a revelation. It wasn’t just a sweet bread; it was a symphony of textures and flavors. Incredibly moist from the soaked dates, with a tender crumb that held together perfectly, studded with the satisfying crunch of almonds and a subtle warmth from a hint of cinnamon. It became an instant hit. Now, it’s our go-to for everything: a quick weekday breakfast, a welcome-home snack for the kids after school, and the star of our weekend brunch table when friends visit. It’s the recipe I share most often, the one that never fails to elicit a request for the recipe, and the one that truly feels like a hug in loaf form.
Ingredients
- Pitted Medjool Dates – 1 ½ cups, roughly chopped. These are the heart of the loaf, providing natural sweetness, moisture, and a delightful jammy texture. Medjool dates are preferred for their soft, caramel-like flavor.
- Boiling Water – 1 cup. This is used to soak the dates, rehydrating them to ensure they are plump and easy to incorporate, which is the secret to an incredibly moist loaf.
- Baking Soda – 1 teaspoon. When combined with the hot water and acidic elements, this helps to break down the dates further and provides the primary leavening for a light, tender crumb.
- All-Purpose Flour – 1 ¾ cups. The structural foundation of our loaf. Standard all-purpose flour provides the perfect balance of tenderness and strength.
- Baking Powder – 1 teaspoon. A secondary leavening agent that works with the baking soda to give the loaf a beautiful rise and an even texture.
- Ground Cinnamon – 1 teaspoon. This warm spice beautifully complements the sweetness of the dates and the nuttiness of the almonds, adding aromatic depth.
- Salt – ½ teaspoon. Essential in any baking recipe, salt enhances all the other flavors and balances the sweetness.
- Unsalted Butter – ½ cup (1 stick), softened to room temperature. Butter adds richness, flavor, and contributes to the tender crumb of the loaf.
- Light Brown Sugar – ½ cup, packed. This adds a layer of molasses-like sweetness that pairs perfectly with the dates and provides additional moisture.
- Large Egg – 1, at room temperature. The egg acts as a binder, holding the ingredients together, adding richness, and helping with leavening.
- Vanilla Extract – 1 teaspoon. A classic flavor enhancer that elevates the overall taste profile of the loaf.
- Whole Almonds – 1 cup, roughly chopped. These provide a wonderful textural contrast with their satisfying crunch and add a rich, nutty flavor that is the perfect partner for the sweet dates.
Instructions
Follow these detailed steps to create a perfect, moist, and flavorful almond date loaf every time. The key is in the preparation and not overmixing the batter.
Step 1: Prepare the Dates and Oven
First, preheat your oven to 350°F (175°C). Generously grease a 9×5 inch loaf pan with butter or a non-stick spray, and then lightly dust it with flour, tapping out any excess. This two-step process creates a non-stick barrier that guarantees your loaf will release easily after baking.
Step 2: Soak the Dates
Place your chopped dates in a medium-sized heatproof bowl. In a separate kettle or pot, bring 1 cup of water to a rolling boil. Pour the boiling water directly over the chopped dates. Immediately sprinkle the 1 teaspoon of baking soda over the mixture. Give it a quick stir. The baking soda will react with the hot water, causing it to fizz slightly. This helps to soften the skins of the dates, making them almost melt into the batter. Let this mixture sit and cool for at least 15-20 minutes. This soaking step is non-negotiable for a truly moist loaf.
Step 3: Combine the Dry Ingredients
While the dates are soaking, prepare your dry ingredients. In a large bowl, whisk together the 1 ¾ cups of all-purpose flour, 1 teaspoon of baking powder, 1 teaspoon of ground cinnamon, and ½ teaspoon of salt. Whisking is important as it aerates the flour and ensures the leavening agents and spices are evenly distributed, preventing any pockets of salt or baking powder in the finished loaf.
Step 4: Cream the Butter and Sugar
In a separate large bowl, using an electric hand mixer or a stand mixer fitted with the paddle attachment, beat the softened ½ cup of unsalted butter and ½ cup of packed light brown sugar together on medium-high speed. Continue beating for about 2-3 minutes, until the mixture is light, fluffy, and pale in color. This process, known as creaming, incorporates air into the batter, which is crucial for a tender texture.
Step 5: Add the Egg and Vanilla
Add the room temperature egg and 1 teaspoon of vanilla extract to the creamed butter and sugar mixture. Beat again on medium speed until the egg is fully incorporated and the mixture is smooth. Scrape down the sides and bottom of the bowl with a spatula to ensure everything is evenly mixed.
Step 6: Combine Wet and Dry Ingredients
Now it’s time to bring everything together. Pour the soaked date mixture (including all the soaking liquid) into the butter and sugar mixture. Stir it gently with a spatula just to combine; it might look a little separated at this point, which is perfectly fine. Add the dry flour mixture to the wet ingredients in two or three additions, mixing on low speed or folding gently with a spatula after each addition. Be careful to mix only until the flour streaks have just disappeared. It is crucial not to overmix the batter, as this can develop the gluten in the flour and result in a tough, dense loaf.
Step 7: Fold in the Almonds
Gently fold in the 1 cup of chopped almonds using a spatula, distributing them evenly throughout the batter. Reserve a small handful of chopped almonds to sprinkle on top if you desire a nuttier crust.
Step 8: Bake the Loaf
Pour the finished batter into your prepared loaf pan and use the spatula to spread it evenly. If you reserved some almonds, sprinkle them over the top now. Place the pan on the center rack of your preheated oven. Bake for 50 to 60 minutes. The loaf is done when it is a deep golden brown and a wooden skewer or toothpick inserted into the center comes out clean or with a few moist crumbs attached (but no wet batter).
Step 9: Cool Completely
Once baked, remove the loaf pan from the oven and place it on a wire cooling rack. Let the loaf cool in the pan for 15 minutes. This allows it to set up slightly, making it easier to remove. After 15 minutes, carefully run a knife around the edges of the pan and invert the loaf onto the wire rack. Let it cool completely before slicing. This final cooling period is vital; slicing a warm quick bread can cause it to crumble and have a gummy texture. Patience will be rewarded with perfect slices.
Nutrition Facts
- Servings: 12 slices
- Calories per serving: Approximately 295 kcal
- Fiber: This loaf is a good source of dietary fiber, primarily from the dates and almonds. Fiber is essential for digestive health and can help you feel full and satisfied.
- Healthy Fats: The almonds and butter contribute monounsaturated and polyunsaturated fats. These are beneficial fats that support heart health and brain function.
- Natural Sugars: While there is added brown sugar, a significant portion of the sweetness comes from the natural sugars in the dates, which are released as they bake.
- Potassium: Dates are a great source of potassium, an important mineral and electrolyte that helps regulate fluid balance, nerve signals, and muscle contractions.
Preparation Time
The total time to prepare and bake this delightful loaf is approximately 1 hour and 20 minutes. This consists of about 20 minutes of active preparation time—measuring ingredients, chopping nuts, and mixing the batter—and around 55-60 minutes of hands-off baking time, allowing you to relax while your kitchen fills with its wonderful aroma.
How to Serve
This Easy Almond Date Loaf is incredibly versatile and can be enjoyed in numerous ways, from a simple snack to an elegant dessert. Here are some of our favorite ways to serve it:
- For a Wholesome Breakfast or Brunch:
- Simply Toasted: Slice the loaf and lightly toast it. The heat warms the dates and makes the almonds even crunchier.
- With a Spread: Serve a warm slice with a generous pat of high-quality salted butter that melts right in.
- Cream Cheese Delight: A schmear of plain or honey-nut cream cheese turns this into a truly decadent breakfast treat.
- Yogurt and Fruit: Serve a slice alongside a bowl of Greek yogurt and fresh berries for a balanced and satisfying morning meal.
- As an Elegant Afternoon Tea Snack:
- Classic Style: Serve thin slices at room temperature alongside a pot of hot black tea (like Earl Grey or English Breakfast) or a freshly brewed coffee.
- With a Drizzle: Lightly drizzle slices with honey or maple syrup for an extra touch of sweetness.
- Clotted Cream: For a British-inspired treat, serve it with a dollop of clotted cream and a spoonful of orange marmalade.
- For a Simple and Satisfying Dessert:
- A La Mode: Warm a thick slice in the microwave for 15-20 seconds and top it with a scoop of vanilla bean or salted caramel ice cream.
- Caramel Sauce: Drizzle a warm slice with a rich, homemade or store-bought caramel sauce for the ultimate indulgence.
- With a Cheese Board: The loaf’s sweet and nutty profile makes it a fantastic addition to a cheese platter. It pairs beautifully with sharp cheddar, creamy goat cheese, or a tangy blue cheese.
Additional Tips
To ensure your almond date loaf is a stunning success every single time, here are eight additional tips from my own kitchen experiments:
- Don’t Skimp on Soaking: The most critical step for a moist date loaf is soaking the dates in boiling water with baking soda. Do not rush this process. Letting them sit for the full 20 minutes (or even longer) allows them to soften completely, infusing the entire loaf with moisture and their rich, caramel flavor.
- Toast Your Almonds: For an even deeper, nuttier flavor, take a few extra minutes to toast your almonds before chopping them. Spread them on a baking sheet and toast at 350°F (175°C) for 5-7 minutes, or until they are fragrant and lightly golden. Let them cool completely before chopping and adding to the batter. This small step makes a huge difference.
- The Importance of Room Temperature Ingredients: Using room temperature butter, egg, and even the cooled date mixture is crucial. Cold ingredients don’t emulsify properly, which can lead to a dense, heavy loaf. Room temperature ingredients blend together seamlessly, creating a lighter, more uniform crumb.
- Spice It Up Your Way: While cinnamon is a classic pairing, feel free to customize the spices. Add a pinch of nutmeg, a ¼ teaspoon of ground ginger, or a pinch of cardamom to the dry ingredients for a different aromatic profile. A little orange zest can also be added to the batter to brighten the flavors.
- Achieving the Perfect “Doneness”: Ovens can vary. Start checking your loaf around the 45-minute mark. Besides the skewer test, you can gently press on the top of the loaf; it should feel firm and spring back. Another sign is that the edges of the loaf will start to pull away slightly from the sides of the pan.
- Storage for Lasting Freshness: This loaf stores beautifully. Keep it well-wrapped in plastic wrap or in an airtight container at room temperature for up to 4 days. Its flavor actually deepens by the second day. For longer storage, you can refrigerate it for up to a week, though it may be slightly less moist.
- Freeze for Future Cravings: This loaf freezes exceptionally well. You can freeze the entire loaf or individual slices. Wrap it tightly in plastic wrap, then a layer of aluminum foil, and place it in a freezer-safe bag. It will keep for up to 3 months. Thaw at room temperature or toast slices directly from the freezer.
- Variations and Add-ins: Don’t be afraid to experiment! You can substitute the almonds with other nuts like walnuts or pecans. For extra texture and flavor, consider adding ½ cup of shredded coconut, chocolate chips, or even some chopped dried apricots along with the dates.
FAQ Section
Here are answers to some of the most frequently asked questions about making this Easy Almond Date Loaf.
1. Can I use a different type of flour, like whole wheat or gluten-free?
Yes, you can. For a nuttier, heartier loaf, you can substitute up to half of the all-purpose flour with whole wheat flour. If you substitute all of it, the loaf will be denser. For a gluten-free version, use a high-quality 1-to-1 gluten-free baking flour blend that contains xanthan gum. The texture will be slightly different but still delicious.
2. My loaf came out dry. What did I do wrong?
The most common culprits for a dry loaf are: overbaking, inaccurate flour measurement, or skipping the date-soaking step. Be sure to measure your flour by spooning it into the measuring cup and leveling it off, rather than scooping directly from the bag (which compacts it). Also, start checking for doneness early and ensure you let the dates soak properly to add that essential moisture.
3. Why did my loaf sink in the middle after baking?
A sunken center is usually caused by one of three things: underbaking, opening the oven door too frequently during baking (which causes a sudden drop in temperature), or overmixing the batter. Mix the batter only until the ingredients are just combined. Overmixing develops too much gluten and incorporates excess air that later collapses.
4. How can I chop sticky dates without them clumping together?
Chopping sticky dates can be a messy task. The easiest way to manage this is to lightly dust your knife and the dates with a little bit of the flour from your measured amount. The flour prevents the knife and the date pieces from sticking to each other, making the process much cleaner and easier.
5. Can I make this recipe as muffins instead of a loaf?
Absolutely! This recipe works wonderfully for muffins. Simply divide the batter evenly among 12 standard-sized muffin cups lined with paper liners or greased well. The baking time will be significantly shorter, around 20-25 minutes. Check for doneness with a toothpick, just as you would for the loaf.
6. Is this Almond Date Loaf considered healthy?
“Healthy” is subjective, but this loaf has many positive attributes. It gets a large amount of its sweetness and moisture from natural dates, which also provide fiber and minerals. The almonds contribute healthy fats and protein. While it contains butter and sugar, it can certainly be part of a balanced diet, especially when enjoyed in moderation as a homemade treat.
7. Can I reduce the amount of sugar in the recipe?
Yes, you can. The Medjool dates provide a lot of natural sweetness. You can reduce the brown sugar to ¼ cup without drastically affecting the final product’s structure, though it will result in a less sweet and slightly less moist loaf. I would not recommend eliminating it completely, as it contributes to both flavor and texture.
8. Do I have to use Medjool dates, or will other varieties work?
Medjool dates are recommended for their superior flavor and soft, fleshy texture, which makes for a more luxurious loaf. However, you can certainly use other varieties like Deglet Noor. If you use a drier variety of dates, you might want to let them soak for a little longer (around 30 minutes) to ensure they are fully rehydrated.
Easy Almond Date Loaf
Ingredients
- Pitted Medjool Dates – 1 ½ cups, roughly chopped. These are the heart of the loaf, providing natural sweetness, moisture, and a delightful jammy texture. Medjool dates are preferred for their soft, caramel-like flavor.
- Boiling Water – 1 cup. This is used to soak the dates, rehydrating them to ensure they are plump and easy to incorporate, which is the secret to an incredibly moist loaf.
- Baking Soda – 1 teaspoon. When combined with the hot water and acidic elements, this helps to break down the dates further and provides the primary leavening for a light, tender crumb.
- All-Purpose Flour – 1 ¾ cups. The structural foundation of our loaf. Standard all-purpose flour provides the perfect balance of tenderness and strength.
- Baking Powder – 1 teaspoon. A secondary leavening agent that works with the baking soda to give the loaf a beautiful rise and an even texture.
- Ground Cinnamon – 1 teaspoon. This warm spice beautifully complements the sweetness of the dates and the nuttiness of the almonds, adding aromatic depth.
- Salt – ½ teaspoon. Essential in any baking recipe, salt enhances all the other flavors and balances the sweetness.
- Unsalted Butter – ½ cup (1 stick), softened to room temperature. Butter adds richness, flavor, and contributes to the tender crumb of the loaf.
- Light Brown Sugar – ½ cup, packed. This adds a layer of molasses-like sweetness that pairs perfectly with the dates and provides additional moisture.
- Large Egg – 1, at room temperature. The egg acts as a binder, holding the ingredients together, adding richness, and helping with leavening.
- Vanilla Extract – 1 teaspoon. A classic flavor enhancer that elevates the overall taste profile of the loaf.
- Whole Almonds – 1 cup, roughly chopped. These provide a wonderful textural contrast with their satisfying crunch and add a rich, nutty flavor that is the perfect partner for the sweet dates.
Instructions
Follow these detailed steps to create a perfect, moist, and flavorful almond date loaf every time. The key is in the preparation and not overmixing the batter.
Step 1: Prepare the Dates and Oven
First, preheat your oven to 350°F (175°C). Generously grease a 9×5 inch loaf pan with butter or a non-stick spray, and then lightly dust it with flour, tapping out any excess. This two-step process creates a non-stick barrier that guarantees your loaf will release easily after baking.
Step 2: Soak the Dates
Place your chopped dates in a medium-sized heatproof bowl. In a separate kettle or pot, bring 1 cup of water to a rolling boil. Pour the boiling water directly over the chopped dates. Immediately sprinkle the 1 teaspoon of baking soda over the mixture. Give it a quick stir. The baking soda will react with the hot water, causing it to fizz slightly. This helps to soften the skins of the dates, making them almost melt into the batter. Let this mixture sit and cool for at least 15-20 minutes. This soaking step is non-negotiable for a truly moist loaf.
Step 3: Combine the Dry Ingredients
While the dates are soaking, prepare your dry ingredients. In a large bowl, whisk together the 1 ¾ cups of all-purpose flour, 1 teaspoon of baking powder, 1 teaspoon of ground cinnamon, and ½ teaspoon of salt. Whisking is important as it aerates the flour and ensures the leavening agents and spices are evenly distributed, preventing any pockets of salt or baking powder in the finished loaf.
Step 4: Cream the Butter and Sugar
In a separate large bowl, using an electric hand mixer or a stand mixer fitted with the paddle attachment, beat the softened ½ cup of unsalted butter and ½ cup of packed light brown sugar together on medium-high speed. Continue beating for about 2-3 minutes, until the mixture is light, fluffy, and pale in color. This process, known as creaming, incorporates air into the batter, which is crucial for a tender texture.
Step 5: Add the Egg and Vanilla
Add the room temperature egg and 1 teaspoon of vanilla extract to the creamed butter and sugar mixture. Beat again on medium speed until the egg is fully incorporated and the mixture is smooth. Scrape down the sides and bottom of the bowl with a spatula to ensure everything is evenly mixed.
Step 6: Combine Wet and Dry Ingredients
Now it’s time to bring everything together. Pour the soaked date mixture (including all the soaking liquid) into the butter and sugar mixture. Stir it gently with a spatula just to combine; it might look a little separated at this point, which is perfectly fine. Add the dry flour mixture to the wet ingredients in two or three additions, mixing on low speed or folding gently with a spatula after each addition. Be careful to mix only until the flour streaks have just disappeared. It is crucial not to overmix the batter, as this can develop the gluten in the flour and result in a tough, dense loaf.
Step 7: Fold in the Almonds
Gently fold in the 1 cup of chopped almonds using a spatula, distributing them evenly throughout the batter. Reserve a small handful of chopped almonds to sprinkle on top if you desire a nuttier crust.
Step 8: Bake the Loaf
Pour the finished batter into your prepared loaf pan and use the spatula to spread it evenly. If you reserved some almonds, sprinkle them over the top now. Place the pan on the center rack of your preheated oven. Bake for 50 to 60 minutes. The loaf is done when it is a deep golden brown and a wooden skewer or toothpick inserted into the center comes out clean or with a few moist crumbs attached (but no wet batter).
Step 9: Cool Completely
Once baked, remove the loaf pan from the oven and place it on a wire cooling rack. Let the loaf cool in the pan for 15 minutes. This allows it to set up slightly, making it easier to remove. After 15 minutes, carefully run a knife around the edges of the pan and invert the loaf onto the wire rack. Let it cool completely before slicing. This final cooling period is vital; slicing a warm quick bread can cause it to crumble and have a gummy texture. Patience will be rewarded with perfect slices.
Nutrition
- Serving Size: one normal portion
- Calories: 295