")


There’s a particular magic that fills the kitchen when autumn begins to whisper its arrival. The air gets a little crisper, the leaves start to blush with color, and my cravings shift from light, summery treats to warm, cozy, and comforting desserts. This Easy Baked Pear Crisp Recipe is the absolute embodiment of that feeling. I remember the first time I made it for my family on a chilly Sunday afternoon. The house filled with the most incredible aroma of sweet, baked pears, warm cinnamon, and buttery oats. When I pulled the bubbly, golden-brown dish from the oven, everyone gathered around the counter, spoons in hand. The verdict was unanimous: it was a triumph. The pears were perfectly tender and jammy, swimming in a lightly spiced syrup, while the topping provided the most satisfyingly crunchy, chewy contrast. It wasn’t just a dessert; it was an experience. Since that day, it has become our official “welcome fall” tradition and our go-to dessert for everything from holiday gatherings to a simple weeknight indulgence. It’s wonderfully forgiving for novice bakers, yet impressive enough to wow any guest. This is more than just a recipe; it’s a slice of pure comfort, guaranteed to bring warmth and smiles to your table.
Ingredients
This recipe uses simple, wholesome ingredients to create a truly spectacular dessert. Each component plays a crucial role, from the sweetness of the fruit to the buttery crunch of the oat topping.
For the Pear Filling:
- 6 medium-sized, ripe but firm pears (about 3 lbs): Bosc or Anjou pears are ideal as they hold their shape well when baked, becoming tender without turning to mush. They provide the sweet, floral base of the crisp.
- 2 tablespoons lemon juice: This is essential for tossing with the pears immediately after slicing to prevent them from browning. It also adds a touch of brightness that balances the sweetness.
- 1/4 cup granulated sugar: This macerates the pears, drawing out their natural juices to create a luscious syrup. The amount can be adjusted slightly depending on the sweetness of your pears.
- 2 tablespoons cornstarch: The secret weapon for a perfect, non-watery filling. Cornstarch thickens the pear juices as they bake, resulting in a rich, syrupy consistency rather than a soupy one.
- 1 teaspoon ground cinnamon: The quintessential autumn spice. It infuses the pears with warmth and a familiar, comforting aroma that pairs beautifully with the fruit.
- 1/4 teaspoon ground nutmeg: Adds a layer of nutty, sweet complexity to the filling, enhancing the cinnamon and rounding out the flavor profile.
For the Crisp Topping:
- 1 1/2 cups old-fashioned rolled oats: Do not use quick-cooking or instant oats. Old-fashioned oats provide the signature chewy, hearty texture that defines a “crisp.”
- 1 cup all-purpose flour: This acts as the binder for the topping, giving it structure and helping it brown beautifully.
- 1 cup packed light brown sugar: Provides a deep, caramel-like sweetness and moisture, which helps the topping clump together into those irresistible crunchy clusters.
- 1 teaspoon ground cinnamon: More cinnamon in the topping ensures that every single bite is infused with warm spice.
- 1/2 teaspoon salt: A small amount of salt is crucial in sweet recipes. It doesn’t make the topping salty; instead, it enhances all the other flavors, making the sweetness and spices pop.
- 1/2 cup (1 stick) cold unsalted butter, cut into small cubes: The key to a truly crisp topping is using cold butter. As it melts in the oven, it creates steam pockets, resulting in a lighter, crunchier texture.
Instructions
Follow these detailed steps to create the perfect baked pear crisp. The process is straightforward, breaking down into two main parts: preparing the filling and mixing the topping.
Step 1: Preheat Oven and Prepare Baking Dish
Begin by preheating your oven to 375°F (190°C). Position a rack in the middle of the oven to ensure even baking. Lightly grease a 9×13 inch baking dish or a similar 3-quart casserole dish with butter or a non-stick cooking spray. This will prevent the crisp from sticking and make cleanup much easier.
Step 2: Prepare the Pears
Wash and dry your pears thoroughly. Using a vegetable peeler, peel the skin from all the pears. Cut each pear in half lengthwise, from the stem to the base. Use a small spoon or a melon baller to carefully scoop out the core and seeds from each half. Slice the pear halves into uniform 1/2-inch thick slices. Consistency in slicing is important for even cooking.
Step 3: Make the Pear Filling
Place all your prepared pear slices into a large mixing bowl. Immediately pour the 2 tablespoons of lemon juice over the pears and toss gently to coat. This is a critical step to prevent oxidation and browning while you prepare the other ingredients. In a separate small bowl, whisk together the 1/4 cup of granulated sugar, 2 tablespoons of cornstarch, 1 teaspoon of cinnamon, and 1/4 teaspoon of nutmeg. This ensures the spices and thickener are evenly distributed. Sprinkle this dry mixture over the lemon-coated pears and toss gently until every slice is evenly coated.
Step 4: Assemble the Filling in the Baking Dish
Pour the pear filling mixture into your prepared baking dish. Spread the pears into an even layer, making sure they reach all the corners of the dish. Set the dish aside while you prepare the topping.
Step 5: Make the Crisp Topping
In a separate large bowl (you can reuse the pear bowl after a quick wipe), combine all the dry ingredients for the topping: 1 1/2 cups of rolled oats, 1 cup of all-purpose flour, 1 cup of packed light brown sugar, 1 teaspoon of cinnamon, and 1/2 teaspoon of salt. Use a whisk or a fork to mix them together thoroughly until the color is uniform.
Step 6: Cut in the Butter
Add the cold, cubed butter to the dry topping mixture. Using a pastry blender, two knives in a crisscross motion, or your fingertips, cut the butter into the flour and oat mixture. Continue working the butter in until the mixture resembles coarse crumbs with some pea-sized pieces of butter still visible. Do not overmix or let the butter get warm; those cold butter pieces are what make the topping light and crispy.
Step 7: Add the Topping to the Pears
Evenly sprinkle the crisp topping mixture over the layer of pears in the baking dish. Gently pat it down just slightly, but don’t pack it firmly. You want to cover the fruit completely, creating a thick, generous blanket of topping.
Step 8: Bake to Perfection
Place the baking dish on a baking sheet to catch any potential drips or bubbling over, which will save you from cleaning a messy oven. Bake in the preheated 375°F (190°C) oven for 40 to 50 minutes. The crisp is done when the fruit filling is hot and bubbly around the edges and the topping is a deep golden brown and fragrant.
Step 9: Cool and Rest
Once baked, carefully remove the pear crisp from the oven. It will be extremely hot. Let it cool on a wire rack for at least 15-20 minutes before serving. This resting period is crucial; it allows the filling to set up and thicken properly, so it’s perfectly syrupy rather than runny when you serve it.
Nutrition Facts
While this is an indulgent dessert, it also offers some nutritional benefits from its whole-food ingredients. The following is an approximation and can vary based on ingredient size and specific brands used.
- Servings: This recipe makes approximately 8-10 servings.
- Calories per Serving: Approximately 400-450 calories per serving.
- Fiber: A good source of dietary fiber, primarily from the pears and old-fashioned oats. Fiber is essential for digestive health and can help you feel full and satisfied.
- Vitamin C: Pears are a source of Vitamin C, a powerful antioxidant that supports the immune system and skin health.
- Manganese: The old-fashioned oats contribute manganese, a trace mineral that plays a role in bone formation, metabolism, and antioxidant defense.
Preparation Time
This recipe is prized for its simplicity and relatively quick active preparation, making it perfect for both planned events and last-minute dessert cravings.
The total time is broken down into active prep and passive baking. You can expect to spend about 20-25 minutes on active preparation. This includes peeling and slicing the pears, mixing the filling, and preparing the crumbly oat topping. The baking time is approximately 40-50 minutes, during which your kitchen will fill with the most delightful autumn aroma. Finally, remember to factor in about 15-20 minutes of cooling time before serving for the best texture and consistency.
How to Serve
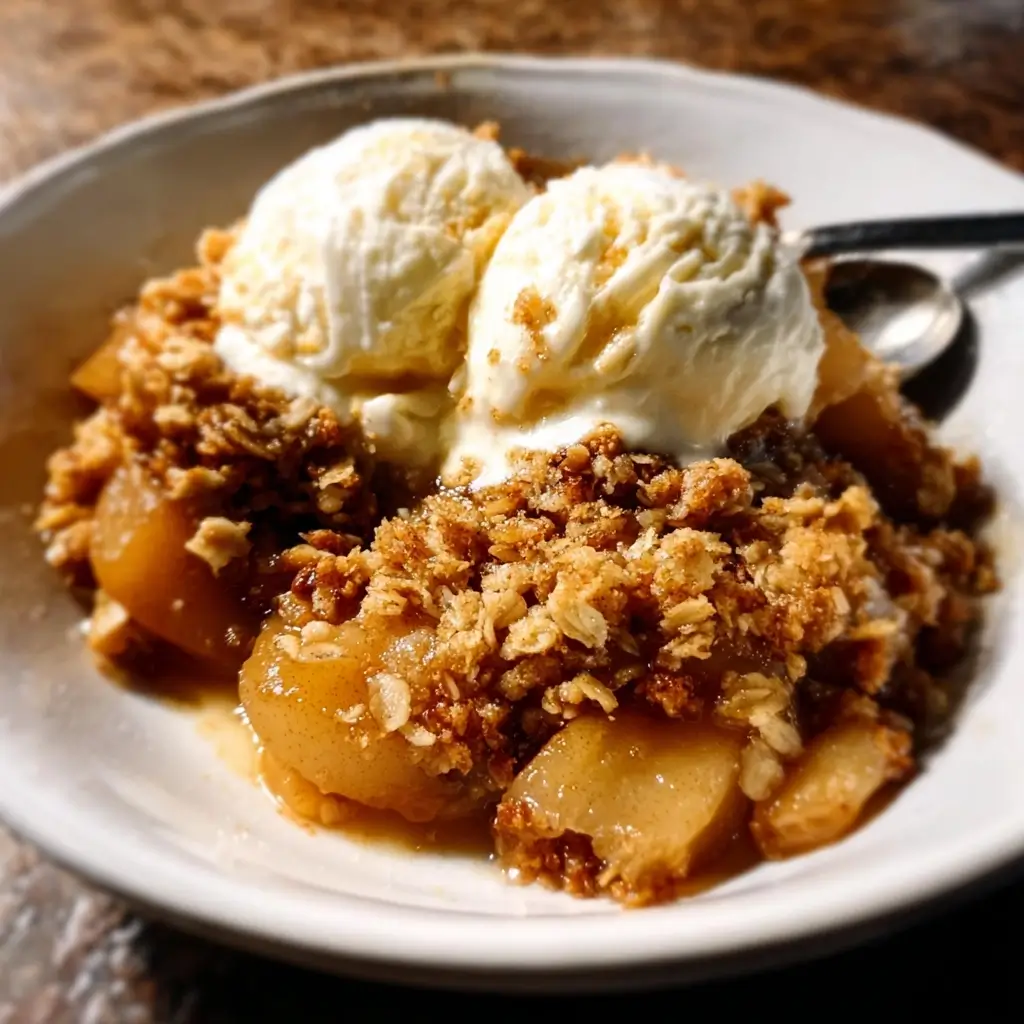
Serving this Easy Baked Pear Crisp warm is the best way to enjoy the delightful contrast between the hot, tender fruit and the crunchy topping. Here are some classic and creative ways to serve it:
- The Classic A La Mode:
- Serve a generous scoop of the warm pear crisp in a bowl.
- Top with a large scoop of high-quality vanilla bean ice cream. The cold, creamy ice cream melting into the warm, spiced fruit is a timeless and unbeatable combination.
- Creamy Accompaniments:
- Freshly Whipped Cream: A dollop of lightly sweetened, homemade whipped cream adds a light, airy contrast.
- Crème Fraîche: For a more sophisticated and tangy flavor, serve with a spoonful of crème fraîche. Its slight sourness beautifully cuts through the sweetness of the crisp.
- Greek Yogurt: For a healthier, protein-packed option that still provides a creamy element, top with a scoop of plain or vanilla Greek yogurt.
- Sauce Drizzles:
- Elevate the dessert by drizzling a rich caramel sauce over the top of the crisp and ice cream.
- A high-quality, thick maple syrup can also be drizzled over the top for an extra layer of rustic, earthy sweetness.
- As a Special Breakfast or Brunch:
- Who says dessert can’t be for breakfast? Serve smaller portions of the pear crisp alongside a dollop of Greek yogurt and a sprinkle of extra nuts for a decadent and hearty start to a special weekend morning.
Additional Tips
Unlock the full potential of your pear crisp and customize it to your liking with these eight expert tips.
1. Choose Your Pears Wisely: The type of pear you use matters. Bosc and Anjou pears are the champions for baking because their flesh is dense and holds its shape beautifully. Bartlett pears can also be used, but make sure they are on the firmer side of ripe, as very ripe Bartletts can become mushy.
2. Don’t Overwork the Topping: The secret to a “crisp” topping, rather than a dense, cookie-like one, is cold butter. When you mix the topping, work quickly and stop as soon as you have coarse crumbs with some larger butter pieces remaining. Overmixing or using softened butter will result in a greasy, less crunchy topping.
3. Go Nuts for Extra Crunch: Elevate the texture and flavor by adding 1/2 cup of chopped nuts to the topping mixture. Pecans and walnuts are classic choices that toast beautifully and add a rich, nutty flavor. Sliced or slivered almonds also work wonderfully.
4. Experiment with Spices: While cinnamon and nutmeg are a perfect pair, don’t be afraid to experiment. Add 1/4 teaspoon of ground ginger for a zesty kick, a pinch of cardamom for a floral, complex aroma, or a dash of allspice for even deeper warmth.
5. Make-Ahead Magic: You can prepare this dessert in advance. Prepare the pear filling and the oat topping, but store them in separate airtight containers in the refrigerator for up to 24 hours. When ready to bake, simply assemble as directed and add about 5-10 minutes to the baking time since the ingredients will be cold.
6. Make It Gluten-Free Friendly: This recipe is easily adapted for a gluten-free diet. Simply substitute the all-purpose flour with a good quality 1-to-1 gluten-free baking flour blend. Also, ensure you use certified gluten-free rolled oats, as regular oats can be subject to cross-contamination.
7. Control the Sweetness: The ripeness of your pears will dictate their natural sugar content. If your pears are exceptionally sweet and juicy, you can reduce the granulated sugar in the filling to just 2-3 tablespoons. Conversely, if your pears are a bit tart, you might want to stick with the full amount.
8. Prevent a Soggy Bottom: The cornstarch in the filling is key to preventing a watery mess. Ensure it’s thoroughly mixed with the sugar before tossing with the pears. Another tip is to avoid letting the pear filling sit for too long before adding the topping and baking, as the sugar will draw out excessive moisture over time. Baking until the filling is visibly bubbly ensures the thickener has been fully activated.
FAQ Section
Here are answers to some of the most frequently asked questions about making the perfect Easy Baked Pear Crisp.
1. Can I use canned or frozen pears for this recipe?
You can, but with adjustments. If using canned pears, make sure they are packed in juice, not heavy syrup. Drain them very well and pat them dry. You will likely need to omit or significantly reduce the granulated sugar in the filling. For frozen pears, you can use them directly from the freezer without thawing. You may need to add an extra tablespoon of cornstarch and increase the baking time by 10-15 minutes to account for the extra moisture.
2. How do I store leftover pear crisp?
Let the crisp cool completely to room temperature. Cover the baking dish tightly with plastic wrap or aluminum foil, or transfer the leftovers to an airtight container. Store it in the refrigerator for up to 4-5 days. The topping will soften over time.
3. Can I freeze pear crisp?
Yes, pear crisp freezes beautifully! You can freeze it either baked or unbaked.
- To freeze baked: Let it cool completely, cover tightly with a double layer of plastic wrap and a layer of foil, and freeze for up to 3 months. Thaw overnight in the refrigerator and reheat in a 350°F (175°C) oven for 20-25 minutes, or until warmed through.
- To freeze unbaked: Assemble the crisp completely in a freezer-safe baking dish. Cover tightly and freeze for up to 3 months. You can bake it directly from frozen; just add 20-30 minutes to the original baking time.
4. My crisp topping isn’t crispy. What did I do wrong?
The most common culprits for a non-crispy topping are: using melted or softened butter instead of cold butter, overmixing the topping until it forms a paste, or using instant/quick-cook oats which lack the structure of old-fashioned oats. Ensure your butter is cold and you leave some small, visible pieces in the mixture before baking.
5. Can I make this recipe vegan?
Absolutely! This recipe is very easy to make vegan. Simply substitute the unsalted butter with a high-quality vegan butter substitute (the kind that comes in sticks works best) or with cold, solid coconut oil. The rest of the ingredients are naturally plant-based.
6. What is the difference between a pear crisp and a pear crumble?
The terms are often used interchangeably, but there is a traditional difference. A “crisp” topping, like the one in this recipe, almost always contains oats, which “crisp up” during baking. A “crumble” topping is typically a simpler mixture of flour, sugar, and butter, resulting in a more sandy or clumpy texture without the chewiness of oats.
7. Can I use other fruits along with the pears?
Yes, this recipe is a fantastic base for fruit combinations. Apples are a natural partner for pears. A mix of half apples and half pears is delicious. For a tart and festive twist, try adding a cup of fresh or frozen cranberries to the pear filling. A handful of raspberries or blackberries can also be folded in for a pop of color and flavor.
8. My pear filling came out too watery. How can I fix this next time?
A watery filling usually happens for a few reasons: your pears were exceptionally juicy, you didn’t use enough thickener, or you didn’t bake the crisp long enough for the thickener to activate. Next time, you can add an extra tablespoon of cornstarch. Most importantly, make sure you bake until you see the filling actively bubbling around the edges of the dish, as this is the sign that the cornstarch is working its magic.
Easy Baked Pear Crisp Recipe
Ingredients
This recipe uses simple, wholesome ingredients to create a truly spectacular dessert. Each component plays a crucial role, from the sweetness of the fruit to the buttery crunch of the oat topping.
For the Pear Filling:
- 6 medium-sized, ripe but firm pears (about 3 lbs): Bosc or Anjou pears are ideal as they hold their shape well when baked, becoming tender without turning to mush. They provide the sweet, floral base of the crisp.
- 2 tablespoons lemon juice: This is essential for tossing with the pears immediately after slicing to prevent them from browning. It also adds a touch of brightness that balances the sweetness.
- 1/4 cup granulated sugar: This macerates the pears, drawing out their natural juices to create a luscious syrup. The amount can be adjusted slightly depending on the sweetness of your pears.
- 2 tablespoons cornstarch: The secret weapon for a perfect, non-watery filling. Cornstarch thickens the pear juices as they bake, resulting in a rich, syrupy consistency rather than a soupy one.
- 1 teaspoon ground cinnamon: The quintessential autumn spice. It infuses the pears with warmth and a familiar, comforting aroma that pairs beautifully with the fruit.
- 1/4 teaspoon ground nutmeg: Adds a layer of nutty, sweet complexity to the filling, enhancing the cinnamon and rounding out the flavor profile.
For the Crisp Topping:
- 1 1/2 cups old-fashioned rolled oats: Do not use quick-cooking or instant oats. Old-fashioned oats provide the signature chewy, hearty texture that defines a “crisp.”
- 1 cup all-purpose flour: This acts as the binder for the topping, giving it structure and helping it brown beautifully.
- 1 cup packed light brown sugar: Provides a deep, caramel-like sweetness and moisture, which helps the topping clump together into those irresistible crunchy clusters.
- 1 teaspoon ground cinnamon: More cinnamon in the topping ensures that every single bite is infused with warm spice.
- 1/2 teaspoon salt: A small amount of salt is crucial in sweet recipes. It doesn’t make the topping salty; instead, it enhances all the other flavors, making the sweetness and spices pop.
- 1/2 cup (1 stick) cold unsalted butter, cut into small cubes: The key to a truly crisp topping is using cold butter. As it melts in the oven, it creates steam pockets, resulting in a lighter, crunchier texture.
Instructions
Follow these detailed steps to create the perfect baked pear crisp. The process is straightforward, breaking down into two main parts: preparing the filling and mixing the topping.
Step 1: Preheat Oven and Prepare Baking Dish
Begin by preheating your oven to 375°F (190°C). Position a rack in the middle of the oven to ensure even baking. Lightly grease a 9×13 inch baking dish or a similar 3-quart casserole dish with butter or a non-stick cooking spray. This will prevent the crisp from sticking and make cleanup much easier.
Step 2: Prepare the Pears
Wash and dry your pears thoroughly. Using a vegetable peeler, peel the skin from all the pears. Cut each pear in half lengthwise, from the stem to the base. Use a small spoon or a melon baller to carefully scoop out the core and seeds from each half. Slice the pear halves into uniform 1/2-inch thick slices. Consistency in slicing is important for even cooking.
Step 3: Make the Pear Filling
Place all your prepared pear slices into a large mixing bowl. Immediately pour the 2 tablespoons of lemon juice over the pears and toss gently to coat. This is a critical step to prevent oxidation and browning while you prepare the other ingredients. In a separate small bowl, whisk together the 1/4 cup of granulated sugar, 2 tablespoons of cornstarch, 1 teaspoon of cinnamon, and 1/4 teaspoon of nutmeg. This ensures the spices and thickener are evenly distributed. Sprinkle this dry mixture over the lemon-coated pears and toss gently until every slice is evenly coated.
Step 4: Assemble the Filling in the Baking Dish
Pour the pear filling mixture into your prepared baking dish. Spread the pears into an even layer, making sure they reach all the corners of the dish. Set the dish aside while you prepare the topping.
Step 5: Make the Crisp Topping
In a separate large bowl (you can reuse the pear bowl after a quick wipe), combine all the dry ingredients for the topping: 1 1/2 cups of rolled oats, 1 cup of all-purpose flour, 1 cup of packed light brown sugar, 1 teaspoon of cinnamon, and 1/2 teaspoon of salt. Use a whisk or a fork to mix them together thoroughly until the color is uniform.
Step 6: Cut in the Butter
Add the cold, cubed butter to the dry topping mixture. Using a pastry blender, two knives in a crisscross motion, or your fingertips, cut the butter into the flour and oat mixture. Continue working the butter in until the mixture resembles coarse crumbs with some pea-sized pieces of butter still visible. Do not overmix or let the butter get warm; those cold butter pieces are what make the topping light and crispy.
Step 7: Add the Topping to the Pears
Evenly sprinkle the crisp topping mixture over the layer of pears in the baking dish. Gently pat it down just slightly, but don’t pack it firmly. You want to cover the fruit completely, creating a thick, generous blanket of topping.
Step 8: Bake to Perfection
Place the baking dish on a baking sheet to catch any potential drips or bubbling over, which will save you from cleaning a messy oven. Bake in the preheated 375°F (190°C) oven for 40 to 50 minutes. The crisp is done when the fruit filling is hot and bubbly around the edges and the topping is a deep golden brown and fragrant.
Step 9: Cool and Rest
Once baked, carefully remove the pear crisp from the oven. It will be extremely hot. Let it cool on a wire rack for at least 15-20 minutes before serving. This resting period is crucial; it allows the filling to set up and thicken properly, so it’s perfectly syrupy rather than runny when you serve it.
Nutrition
- Serving Size: one normal portion
- Calories: 450