Ingredients
Scale
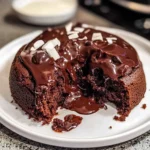
Here’s what you’ll need to create these molten masterpieces. Each ingredient plays a crucial role in achieving that perfect balance of rich chocolate flavor and gooey, flowing center.
- 6 oz Semi-Sweet or Dark Chocolate: (High-quality chocolate is key! Choose a chocolate you enjoy eating on its own for the best flavor. Semi-sweet offers a classic balance, while dark chocolate provides a richer, more intense flavor.)
- 1/2 cup (1 stick) Unsalted Butter: (Butter is the soul of this cake, adding richness, moisture, and that melt-in-your-mouth texture. Unsalted butter allows you to control the salt level in the recipe.)
- 2 Large Eggs: (Eggs provide structure and richness to the cake. They help bind the ingredients together and contribute to the overall texture.)
- 2 Large Egg Yolks: (Adding extra egg yolks enhances the richness and gooeyness of the lava center. They create a more decadent and luxurious texture.)
- 1/4 cup Granulated Sugar: (Sugar adds sweetness and also helps with the cake’s texture. Granulated sugar is ideal for this recipe as it dissolves well and creates a smooth batter.)
- 1/4 cup All-Purpose Flour: (Flour provides structure to the cake. We use a minimal amount to keep the cake tender and ensure the molten center remains prominent.)
- Pinch of Salt: (Salt enhances the flavors of the chocolate and butter, balancing the sweetness and creating a more complex taste profile.)
- 1 teaspoon Vanilla Extract: (Vanilla extract elevates the chocolate flavor, adding a warm and aromatic note that complements the richness beautifully.)
- Optional: Powdered Sugar for dusting: (A light dusting of powdered sugar adds a touch of elegance and visual appeal to the finished lava cakes.)
Instructions
Follow these simple steps to create perfectly molten lava cakes every time. Don’t be intimidated – this recipe is designed for ease and success!
- Preheat Your Oven & Prepare Ramekins: Begin by preheating your oven to 425°F (220°C). This high temperature is crucial for achieving the molten center and set edges. While the oven is preheating, prepare your ramekins. You’ll need four 6-ounce ramekins. Grease them generously with butter and then lightly dust with cocoa powder or flour. This step ensures the cakes release easily after baking and adds a subtle chocolatey note. Tapping out any excess cocoa or flour is important to prevent a powdery coating on your cakes.
- Melt Chocolate and Butter: In a heatproof bowl set over a saucepan of simmering water (making sure the bottom of the bowl doesn’t touch the water), combine the semi-sweet or dark chocolate and unsalted butter. Stir continuously until both are completely melted and smooth. Alternatively, you can melt the chocolate and butter in the microwave in 30-second intervals, stirring after each interval, until smooth. Be careful not to overheat the chocolate, as it can seize. The goal is a glossy, melted mixture.
- Whisk Eggs, Yolks, and Sugar: In a separate bowl, whisk together the whole eggs, egg yolks, and granulated sugar until the mixture is pale yellow and slightly thickened. This step incorporates air and helps create a light and airy texture in the cake. Whisk vigorously for about 2-3 minutes until the mixture ribbons slightly when you lift the whisk.
- Combine Wet and Dry Ingredients: Gently pour the melted chocolate and butter mixture into the egg mixture. Whisk until just combined. Be careful not to overmix at this stage. Overmixing can develop gluten in the flour and result in a tougher cake. Now, sift the all-purpose flour and salt over the wet ingredients. Sifting helps prevent lumps and ensures the flour is evenly distributed. Gently fold the flour mixture into the wet ingredients until just combined. Fold in the vanilla extract. Again, avoid overmixing; just ensure everything is incorporated.
- Divide Batter into Ramekins: Evenly divide the batter among the prepared ramekins. Each ramekin should be about three-quarters full. This allows room for the cake to rise slightly during baking without overflowing. If you want to add a surprise center, now is the time! You can gently press a square of dark chocolate, a truffle, or a small piece of caramel into the center of each ramekin.
- Bake to Molten Perfection: Place the ramekins on a baking sheet and transfer them to the preheated oven. Bake for 12-15 minutes. Baking time is crucial and can vary slightly depending on your oven. The cakes are done when the edges are set and the center is still slightly soft and jiggly. The tops should look just set, not fully cooked through. For a truly molten center, err on the side of slightly underbaked.
- Rest and Invert (Optional): Let the lava cakes cool in the ramekins for about 1-2 minutes after removing them from the oven. This allows them to set slightly and makes them easier to handle. If you wish to invert the cakes onto plates, carefully run a thin knife or spatula around the edges of each ramekin to loosen the cake. Place a plate upside down over the ramekin, then quickly flip it over. Gently tap the bottom of the ramekin to release the cake. If you prefer, you can serve them directly in the ramekins for a more rustic presentation.
- Garnish and Serve Immediately: Dust the warm lava cakes with powdered sugar, if desired. Serve immediately while the center is still molten and gooey. These cakes are best enjoyed warm, as the molten center will solidify as they cool. Pair them with your favorite accompaniments for an even more delightful dessert experience.
Nutrition
- Serving Size: one normal portion
- Calories: 550
- Fat: 35g