")

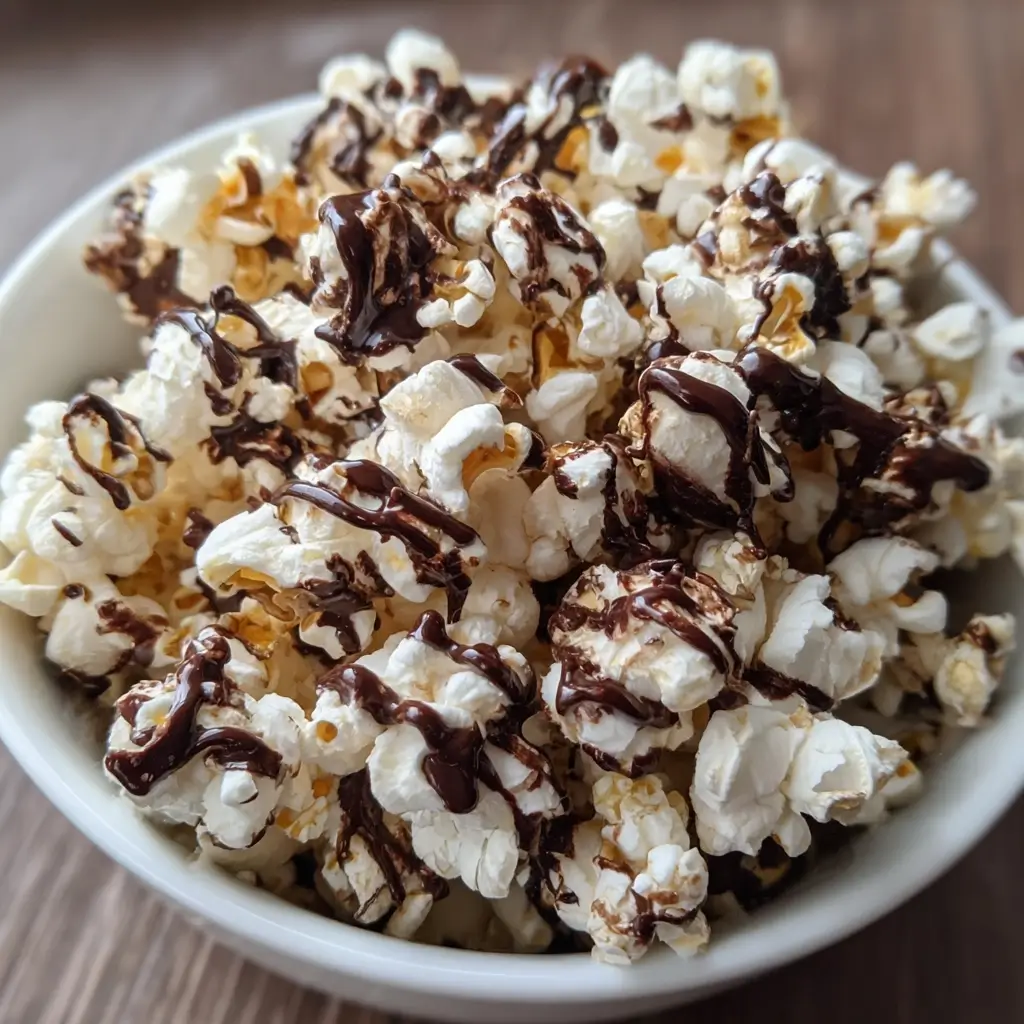

Of all the snacks that have graced our family movie nights, nothing disappears quite as fast as a giant bowl of this Easy Chocolate Drizzle Popcorn. I remember the first time I made it, thinking it might be a bit too simple to be a “special” treat. I was so wrong. The moment the aroma of freshly popped corn mingled with the scent of melting chocolate, my kids descended on the kitchen like a pack of hungry wolves. The result was a symphony of delighted crunches and a chorus of “Mom, can you make this every week?” It’s the perfect blend of salty and sweet, crunchy and smooth. That contrast is what makes it so ridiculously addictive. It transforms a humble bowl of popcorn into a gourmet experience that feels decadent but is, in reality, one of the simplest, quickest, and most rewarding recipes in my arsenal. It’s our go-to for everything from cozy nights in to big-batch party favors, and it never fails to be the star of the show.
Ingredients
- ½ cup Unpopped Popcorn Kernels: The foundation of our recipe. Using kernels and popping them fresh on the stove provides the best texture and flavor, far superior to microwave bags. Yellow or white kernels both work beautifully.
- 3 tablespoons Coconut Oil (or other high-smoke-point oil): This is for popping the kernels. Coconut oil adds a very subtle, complementary sweetness, but canola, vegetable, or sunflower oil are also excellent choices due to their ability to handle high heat without burning.
- 1 cup Semi-Sweet Chocolate Chips: The star of the drizzle! Semi-sweet chocolate provides a perfect balance, offering rich cocoa flavor without being overly sugary. We highly recommend using good quality chocolate chips or a chopped chocolate bar for the best melting consistency and taste.
- 1 teaspoon Flaky Sea Salt: This is the secret weapon. A final sprinkle of flaky sea salt, like Maldon, enhances the sweetness of the chocolate and the savory nature of the popcorn, creating an irresistible sweet-and-salty combination that elevates the entire snack. Fine sea salt will work in a pinch, but the texture of flaky salt is a game-changer.
Instructions
- Prepare Your Workstation: Before you start popping, prepare your cooling station. Take a large baking sheet (or two, if needed) and line it with parchment paper or a silicone baking mat. This is where you will spread the popcorn to cool and set the chocolate, ensuring it doesn’t stick.
- Pop the Popcorn: In a large, heavy-bottomed pot or Dutch oven with a lid, add the 3 tablespoons of coconut oil. Turn the heat to medium-high. To test if the oil is hot enough, drop 2-3 kernels into the pot. Once those kernels pop, the oil is at the perfect temperature. Add the rest of the popcorn kernels in an even layer, cover the pot with the lid, and give it a gentle shake to coat the kernels in oil.
- Listen and Shake: As the kernels begin to pop more frequently, gently shake the pot back and forth over the burner every 15-20 seconds. This prevents the kernels at the bottom from burning and encourages more kernels to pop. Keep the lid slightly ajar to allow steam to escape; this is crucial for achieving crispy, not soggy, popcorn.
- Know When It’s Done: Continue shaking until the popping slows down significantly, to about 2-3 seconds between pops. Immediately remove the pot from the heat. The residual heat will pop the last few kernels. Don’t wait until the popping stops completely, or you risk burning the batch.
- Cool the Popcorn: Carefully pour the hot popcorn onto your prepared baking sheet. Spread it out into a single, even layer. Take a moment to sift through and remove any unpopped kernels (we call them “old maids”). You don’t want anyone biting down on a hard kernel. Let the popcorn cool to room temperature for about 10-15 minutes.
- Melt the Chocolate: While the popcorn is cooling, it’s time to melt the chocolate. You can use a double boiler or the microwave.
- Double Boiler Method: Fill a small saucepan with about an inch of water and bring it to a simmer. Place a heatproof bowl (glass or metal) over the saucepan, ensuring the bottom of the bowl does not touch the water. Add the chocolate chips to the bowl and stir continuously with a rubber spatula until the chocolate is smooth and completely melted. This gentle heating method prevents the chocolate from burning.
- Microwave Method: Place the chocolate chips in a microwave-safe bowl. Microwave on 50% power for 30-second intervals, stirring well with a spatula after each interval. Continue this process until the chocolate is almost completely melted, with just a few small lumps remaining. Remove from the microwave and stir until the residual heat melts the remaining lumps and the chocolate is silky smooth. Be careful not to overheat it, as this can cause the chocolate to “seize” and become grainy.
- Drizzle and Set: Once the popcorn has cooled and the chocolate is melted, it’s time for the magic. Using a fork, a spoon, or a small whisk, dip it into the melted chocolate and wave it back and forth over the popcorn, creating thin, even drizzles. You can also transfer the melted chocolate to a small plastic sandwich bag, snip off a tiny corner, and use it as a makeshift piping bag for more control. Be as generous or as sparse with the chocolate as you like.
- Final Touch and Cooling: Immediately after drizzling the chocolate, while it’s still wet, sprinkle the flaky sea salt evenly over the popcorn. This ensures the salt adheres to the chocolate. Now, let the baking sheet sit at room temperature for at least 1-2 hours, or until the chocolate is completely firm to the touch. To speed up the process, you can place the baking sheet in the refrigerator for 15-20 minutes, but be mindful not to leave it in too long as condensation can form.
- Break and Serve: Once the chocolate is fully set, gently break the popcorn apart into clusters or individual pieces. Transfer it to a large serving bowl and enjoy immediately!
Nutrition Facts
(Disclaimer: The following nutritional information is an estimate based on the ingredients listed and may vary depending on the specific products used. This is calculated per serving, with the recipe yielding approximately 8 servings.)
- Servings: 8
- Calories per serving: Approximately 250 kcal
- Fat: This snack contains healthy fats from the coconut oil and cocoa butter in the chocolate, which provide energy.
- Carbohydrates: The primary source of energy in this recipe, coming mainly from the popcorn, which is a complex carbohydrate.
- Fiber: Popcorn is a whole grain, making it a good source of dietary fiber, which is essential for digestive health and can help you feel full and satisfied.
- Sugar: The sweetness comes from the semi-sweet chocolate. Using dark chocolate can reduce the sugar content, while milk chocolate would increase it.
- Sodium: The flaky sea salt contributes to the sodium content, but it’s crucial for the flavor profile. You can adjust the amount to your personal preference.
Preparation Time
This delicious snack is remarkably quick to whip up, making it perfect for a last-minute craving or impromptu gathering.
- Preparation Time: 5 minutes (measuring ingredients, preparing the baking sheet).
- Cook Time: 10 minutes (popping the corn, melting the chocolate).
- Cooling & Setting Time: 1-2 hours (or 20 minutes in the refrigerator).
- Total Time (until ready to eat): Approximately 1 hour 15 minutes.
How to Serve
This Easy Chocolate Drizzle Popcorn is incredibly versatile. Here are some creative and fun ways to serve it:
- The Classic Movie Night Bowl:
- Serve it in one giant, communal bowl placed in the center of the coffee table.
- It’s the perfect centerpiece for a family movie marathon or a binge-watching session with friends.
- Individual Party Servings:
- Portion the popcorn into individual paper cones, small cellophane bags, or even colorful cupcake liners.
- This is perfect for kids’ birthday parties or gatherings to prevent hands from going into one big bowl and for easy portion control.
- Gourmet Gift Giving:
- Package the finished, cooled popcorn in clear airtight jars or holiday-themed tins.
- Tie a beautiful ribbon around it with a personalized tag for a thoughtful and delicious homemade gift for neighbors, teachers, or coworkers.
- As an Ice Cream or Yogurt Topping:
- Break the popcorn into smaller clusters and sprinkle it over a scoop of vanilla bean ice cream or a bowl of Greek yogurt.
- The crunch and chocolatey-salty flavor provide a fantastic textural contrast.
- On a Dessert Charcuterie Board:
- Create a stunning dessert board featuring a pile of chocolate drizzle popcorn alongside other treats like fresh berries, chocolate-covered pretzels, various cookies, and a bowl of caramel or fudge sauce for dipping.
- In a Sweet & Salty Trail Mix:
- Once cooled and broken apart, mix the chocolate popcorn with other ingredients like roasted almonds, cashews, dried cranberries, and M&M’s for an elevated trail mix perfect for hiking or snacking on the go.
Additional Tips
To ensure your chocolate drizzle popcorn comes out perfectly every single time, here are eight additional tips from our kitchen to yours.
- Achieve the Perfect Pop: The key to crispy popcorn is allowing steam to escape. When popping on the stovetop, don’t seal the lid completely. Leave it slightly ajar or use a lid with a vent hole. This prevents the steam from getting trapped inside the pot, which can lead to chewy, semi-soggy popcorn.
- Chocolate Quality Matters: While any chocolate chip will work, using a higher-quality chocolate (like Ghirardelli, Guittard, or a good-quality baking bar chopped into pieces) will make a noticeable difference. Better chocolate melts more smoothly, has a richer flavor, and provides a more satisfying “snap” when it sets.
- Experiment with Chocolate Varieties: Don’t feel limited to semi-sweet! This recipe is a fantastic canvas for other chocolates. Try a rich, intense dark chocolate for a less sweet version, creamy milk chocolate for a sweeter treat, or even a vibrant white chocolate drizzle. You can even do a double-drizzle with both dark and white chocolate for a beautiful visual effect.
- Get Creative with Toppings: The flaky sea salt is a classic, but the possibilities are endless. Immediately after drizzling the chocolate, try adding:
- Rainbow or chocolate sprinkles for a festive touch.
- Crushed nuts like pecans, almonds, or peanuts.
- Toasted coconut flakes.
- Crushed peppermint candies for a holiday twist.
- Mini M&M’s or crushed Oreo cookies.
- Master the Drizzle Technique: For a professional-looking drizzle, a piping bag or a squeeze bottle offers the most control. If you don’t have one, a simple fork works great for a rustic, zig-zag pattern. For a heavier chocolate coating, you can even dip the popcorn clusters directly into the melted chocolate instead of drizzling.
- Ensure Your Popcorn is Cool: Do not drizzle hot chocolate onto hot popcorn. The residual heat from the popcorn will keep the chocolate from setting properly and can even cause it to melt right off. Allowing the popcorn to cool completely to room temperature is a non-negotiable step for a crisp, firm chocolate shell.
- Proper Storage is Everything: To maintain maximum freshness and crunch, store your finished chocolate popcorn in a completely airtight container at room temperature. Avoid storing it in the refrigerator, as the cool, moist environment can make the popcorn soft and the chocolate may develop condensation (“sweat”). It will last for up to 3-4 days, though it’s at its absolute best within the first 48 hours.
- Scaling for a Crowd: This recipe is easily doubled or tripled for a large party or for making holiday gifts. If you’re making a larger batch, pop the popcorn in two or three separate batches rather than overcrowding the pot, which can lead to uneven popping and burning. Use two or three baking sheets to ensure you can spread the popcorn in a single layer for effective cooling and setting.
Frequently Asked Questions (FAQ)
Q1: My chocolate became thick and grainy when I tried to melt it. What did I do wrong?
This is a common issue called “seizing.” Chocolate seizes for two main reasons: overheating or contact with water. If you’re using a microwave, be sure to heat it in short, 30-second intervals on a lower power setting, stirring in between. In a double boiler, ensure the water is only simmering, not boiling, and that no water or steam gets into the bowl with the chocolate. Even a single drop of water can cause it to seize.
Q2: Can I use a bag of microwave popcorn instead of kernels?
Yes, you can, but for the best results, we highly recommend popping your own. If you do use microwave popcorn, choose a variety that is lightly salted and has minimal butter flavor, as the artificial butter can clash with the chocolate. Pop the corn, spread it on the baking sheet, and proceed with the recipe as written.
Q3: How do I get all the unpopped kernels out easily?
Here’s a great trick: After popping, pour the popcorn into a very large bowl. Give the bowl a few vigorous shakes. The heavy, unpopped kernels will naturally fall to the bottom. You can then scoop the light, fluffy popped corn off the top and transfer it to your baking sheet, leaving the hard kernels behind.
Q4: How far in advance can I make this for a party?
You can comfortably make this chocolate drizzle popcorn up to two days in advance. Make sure it is completely cooled and the chocolate is fully set before transferring it to a large, airtight container. Storing it at room temperature will preserve its crunch and flavor perfectly until party time.
Q5: Is this recipe gluten-free?
Yes, this recipe is naturally gluten-free. Popcorn, oil, salt, and pure chocolate are all gluten-free ingredients. However, if you have a severe allergy or celiac disease, always double-check the packaging of your chocolate chips to ensure they were not processed in a facility with wheat and are certified gluten-free to avoid any cross-contamination.
Q6: Why is my finished popcorn chewy instead of crunchy?
The most likely culprit is trapped steam during the popping process. As mentioned in the tips, keeping the lid slightly ajar lets that moisture escape. If the popcorn sits in a steamy pot, it re-absorbs that moisture and becomes chewy. Another reason could be improper storage in a container that isn’t fully airtight, allowing air and humidity to soften it over time.
Q7: Can I use a different kind of salt?
You can, but the effect will be different. Flaky sea salt is recommended for its delicate, crunchy texture and clean, briny flavor that pops on the tongue. Table salt is much finer and denser, making it easy to oversalt, and it lacks the textural excitement. If you only have fine sea salt or table salt, use a much smaller amount and sprinkle it from high above to get a more even, light distribution.
Q8: I want a thicker chocolate coating, not just a drizzle. How can I do that?
For a much heavier chocolate coating, you’ll want to increase the amount of chocolate to 1.5 or 2 cups. After melting the chocolate, allow it to cool for a few minutes so it’s not piping hot. Add your cooled popcorn directly to the bowl of melted chocolate and use a spatula to gently fold and toss the popcorn until it’s evenly and thickly coated. Then, spread it on your prepared baking sheet to set. This will create thicker, chunkier clusters of chocolate-covered popcorn.
Print
Easy Chocolate Drizzle Popcorn
Ingredients
- ½ cup Unpopped Popcorn Kernels: The foundation of our recipe. Using kernels and popping them fresh on the stove provides the best texture and flavor, far superior to microwave bags. Yellow or white kernels both work beautifully.
- 3 tablespoons Coconut Oil (or other high-smoke-point oil): This is for popping the kernels. Coconut oil adds a very subtle, complementary sweetness, but canola, vegetable, or sunflower oil are also excellent choices due to their ability to handle high heat without burning.
- 1 cup Semi-Sweet Chocolate Chips: The star of the drizzle! Semi-sweet chocolate provides a perfect balance, offering rich cocoa flavor without being overly sugary. We highly recommend using good quality chocolate chips or a chopped chocolate bar for the best melting consistency and taste.
- 1 teaspoon Flaky Sea Salt: This is the secret weapon. A final sprinkle of flaky sea salt, like Maldon, enhances the sweetness of the chocolate and the savory nature of the popcorn, creating an irresistible sweet-and-salty combination that elevates the entire snack. Fine sea salt will work in a pinch, but the texture of flaky salt is a game-changer.
Instructions
- Prepare Your Workstation: Before you start popping, prepare your cooling station. Take a large baking sheet (or two, if needed) and line it with parchment paper or a silicone baking mat. This is where you will spread the popcorn to cool and set the chocolate, ensuring it doesn’t stick.
- Pop the Popcorn: In a large, heavy-bottomed pot or Dutch oven with a lid, add the 3 tablespoons of coconut oil. Turn the heat to medium-high. To test if the oil is hot enough, drop 2-3 kernels into the pot. Once those kernels pop, the oil is at the perfect temperature. Add the rest of the popcorn kernels in an even layer, cover the pot with the lid, and give it a gentle shake to coat the kernels in oil.
- Listen and Shake: As the kernels begin to pop more frequently, gently shake the pot back and forth over the burner every 15-20 seconds. This prevents the kernels at the bottom from burning and encourages more kernels to pop. Keep the lid slightly ajar to allow steam to escape; this is crucial for achieving crispy, not soggy, popcorn.
- Know When It’s Done: Continue shaking until the popping slows down significantly, to about 2-3 seconds between pops. Immediately remove the pot from the heat. The residual heat will pop the last few kernels. Don’t wait until the popping stops completely, or you risk burning the batch.
- Cool the Popcorn: Carefully pour the hot popcorn onto your prepared baking sheet. Spread it out into a single, even layer. Take a moment to sift through and remove any unpopped kernels (we call them “old maids”). You don’t want anyone biting down on a hard kernel. Let the popcorn cool to room temperature for about 10-15 minutes.
- Melt the Chocolate: While the popcorn is cooling, it’s time to melt the chocolate. You can use a double boiler or the microwave.
- Double Boiler Method: Fill a small saucepan with about an inch of water and bring it to a simmer. Place a heatproof bowl (glass or metal) over the saucepan, ensuring the bottom of the bowl does not touch the water. Add the chocolate chips to the bowl and stir continuously with a rubber spatula until the chocolate is smooth and completely melted. This gentle heating method prevents the chocolate from burning.
- Microwave Method: Place the chocolate chips in a microwave-safe bowl. Microwave on 50% power for 30-second intervals, stirring well with a spatula after each interval. Continue this process until the chocolate is almost completely melted, with just a few small lumps remaining. Remove from the microwave and stir until the residual heat melts the remaining lumps and the chocolate is silky smooth. Be careful not to overheat it, as this can cause the chocolate to “seize” and become grainy.
- Drizzle and Set: Once the popcorn has cooled and the chocolate is melted, it’s time for the magic. Using a fork, a spoon, or a small whisk, dip it into the melted chocolate and wave it back and forth over the popcorn, creating thin, even drizzles. You can also transfer the melted chocolate to a small plastic sandwich bag, snip off a tiny corner, and use it as a makeshift piping bag for more control. Be as generous or as sparse with the chocolate as you like.
- Final Touch and Cooling: Immediately after drizzling the chocolate, while it’s still wet, sprinkle the flaky sea salt evenly over the popcorn. This ensures the salt adheres to the chocolate. Now, let the baking sheet sit at room temperature for at least 1-2 hours, or until the chocolate is completely firm to the touch. To speed up the process, you can place the baking sheet in the refrigerator for 15-20 minutes, but be mindful not to leave it in too long as condensation can form.
- Break and Serve: Once the chocolate is fully set, gently break the popcorn apart into clusters or individual pieces. Transfer it to a large serving bowl and enjoy immediately!
Nutrition
- Serving Size: one normal portion
- Calories: 250