")

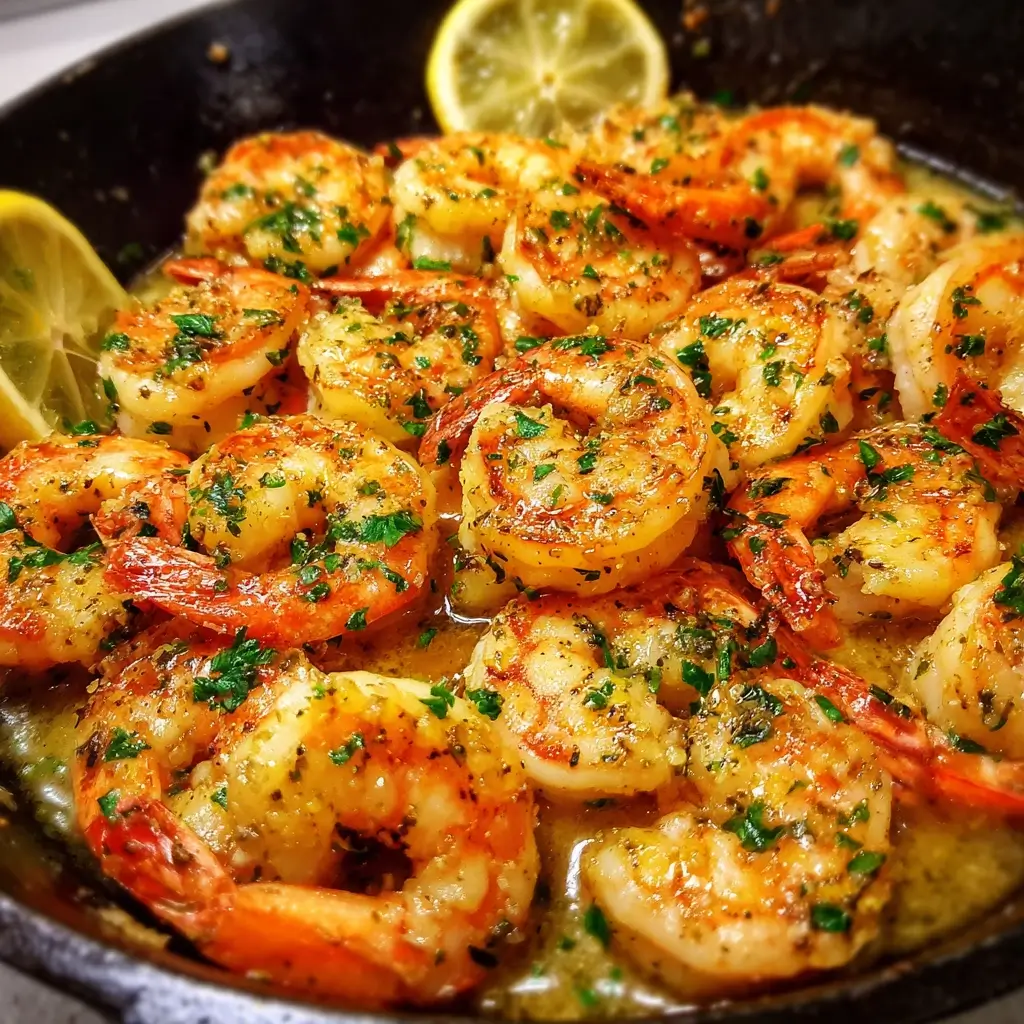

Of all the recipes in my weeknight rotation, this Easy Lemon Butter Shrimp Skillet holds a truly special place. I remember the first time I made it, I was in a classic dinner-time panic. The day had been long, the kids were hungry, and my culinary inspiration was at an all-time low. I needed something fast, but I was craving something more than just another simple meal. I wanted flavor, a bit of elegance, and something that felt like a treat without requiring hours of effort. I found a version of this recipe, grabbed the shrimp from my freezer, and in less than 20 minutes, the most incredible aroma filled my kitchen. It was a symphony of sizzling butter, fragrant garlic, and the bright, zesty promise of fresh lemon. When I brought the skillet to the table, the vibrant pink shrimp glistening in that golden sauce, my family’s eyes lit up. It was an instant hit. The shrimp disappeared in a flurry of forks, with everyone using pieces of crusty bread to soak up every last drop of the luscious sauce. Since that day, it’s become our go-to “fancy but fast” meal. It’s the dish I make when I want to celebrate a small victory, or when I need to turn a mundane Tuesday into something memorable. The beauty of this recipe lies in its simplicity; a handful of quality ingredients transform into a dish that tastes like it came from a seaside bistro. It’s a testament to the fact that you don’t need a complicated recipe or a long list of ingredients to create something truly delicious and satisfying. This dish is pure comfort, elegance, and convenience, all cooked in a single skillet.
Ingredients
- 2 tablespoons Unsalted Butter: This forms the rich, creamy foundation of our sauce, allowing for precise control over the saltiness of the final dish.
- 2 tablespoons Olive Oil: Combined with butter, it helps prevent the butter from browning too quickly and adds a layer of fruity, nuanced flavor.
- 4-5 cloves Garlic, minced: The aromatic heart of the recipe. Use fresh cloves for the most pungent and savory flavor that will infuse the entire sauce.
- 1 ½ pounds Large Shrimp, peeled and deveined: The star of the show. Using large, raw shrimp ensures they remain plump, juicy, and tender after cooking.
- ½ teaspoon Kosher Salt: Enhances all the other flavors in the dish. Adjust to your personal taste.
- ¼ teaspoon Black Pepper, freshly ground: Adds a subtle warmth and a touch of spice that complements the shrimp beautifully.
- ¼ cup Dry White Wine or Chicken Broth: This is for deglazing the pan, lifting all the flavorful browned bits from the bottom of the skillet and adding a crucial layer of depth to the sauce.
- Juice of 1 Large Lemon (about ¼ cup): Provides the signature bright, zesty, and acidic kick that cuts through the richness of the butter and elevates the entire dish.
- 2 tablespoons Fresh Parsley, chopped: Adds a burst of fresh, herbaceous flavor and a beautiful touch of green for color and presentation.
- Pinch of Red Pepper Flakes (optional): For those who enjoy a little bit of heat, this adds a gentle warmth to the background of the sauce.
Instructions
- Prepare the Shrimp: Before you begin, ensure your shrimp are fully thawed, peeled, and deveined. The most crucial step is to pat them completely dry with paper towels. This removes excess moisture, which is essential for getting a beautiful sear on the shrimp rather than just steaming them in the pan. Season the dried shrimp generously with the kosher salt and freshly ground black pepper, tossing them gently to ensure each one is evenly coated.
- Heat the Skillet: Place a large skillet or sauté pan over medium-high heat. A cast-iron or stainless-steel skillet works best for achieving an even, consistent heat. Add the olive oil and one tablespoon of the unsalted butter to the pan. Allow the butter to melt completely and begin to bubble slightly, indicating the pan is hot and ready.
- Sauté the Garlic: Add the minced garlic to the hot skillet. Sauté for about 30-60 seconds, stirring constantly, until it becomes wonderfully fragrant. Be very watchful during this step; you want the garlic to become aromatic and lightly golden, but not browned or burnt. Burnt garlic will impart a bitter, acrid taste to your entire sauce.
- Sear the Shrimp: Add the seasoned shrimp to the skillet in a single layer. It’s important not to overcrowd the pan, as this will lower the temperature and cause the shrimp to steam instead of sear. If necessary, cook the shrimp in two separate batches. Let the shrimp cook for about 1-2 minutes on the first side, undisturbed, until they turn a vibrant pink and opaque on the bottom.
- Flip and Deglaze: Flip the shrimp over to cook the other side. Immediately pour in the dry white wine or chicken broth. Use a wooden spoon or spatula to gently scrape up any flavorful browned bits (the “fond”) that have stuck to the bottom of the pan. This process, known as deglazing, incorporates an immense amount of flavor back into your sauce.
- Create the Sauce: Let the shrimp continue to cook for another 1-2 minutes. Once they are pink, opaque, and curled into a “C” shape, they are perfectly cooked. Reduce the heat to low. Add the remaining tablespoon of butter and the fresh lemon juice to the skillet. Swirl the pan or stir gently until the butter has completely melted and emulsified with the pan liquids, creating a silky, luscious sauce that coats the shrimp.
- Finish and Serve: Remove the skillet from the heat immediately to prevent the shrimp from overcooking. Stir in the freshly chopped parsley and the optional red pepper flakes. Give everything one final toss to combine. Taste the sauce and adjust the seasoning if necessary, adding more salt, pepper, or a squeeze of lemon to your liking. Serve immediately for the best taste and texture.
Nutrition Facts
- Servings: 4
- Calories per Serving: Approximately 350 kcal
- Protein: This dish is an excellent source of high-quality, lean protein, primarily from the shrimp. Protein is vital for building and repairing tissues, making enzymes and hormones, and is an important building block of bones, muscles, cartilage, skin, and blood.
- Healthy Fats: The use of olive oil contributes heart-healthy monounsaturated fats. These fats can help reduce bad cholesterol levels in your blood, which may lower your risk of heart disease and stroke.
- Vitamin C: The generous amount of fresh lemon juice provides a significant boost of Vitamin C, a powerful antioxidant that helps protect cells from damage, supports the immune system, and aids in collagen production for healthy skin.
- Iron: Shrimp is a good source of iron, an essential mineral that is a vital component of hemoglobin, the substance in red blood cells that carries oxygen from your lungs to transport it throughout your body.
- Low in Carbohydrates: With its focus on protein and healthy fats, this recipe is naturally very low in carbohydrates, making it an excellent choice for those following low-carb or keto-friendly diets.
Preparation time
This recipe is the epitome of a quick and easy meal, designed for busy weeknights without sacrificing flavor. The total time from start to finish is under 20 minutes. The preparation time, which includes peeling and deveining the shrimp (if not already done), mincing the garlic, and juicing the lemon, takes approximately 10 minutes. The cooking time is incredibly fast, clocking in at around 7-10 minutes. The key is to have all your ingredients prepped and ready to go before you even turn on the stove, a culinary practice known as “mise en place,” which ensures the cooking process is smooth, efficient, and stress-free.
How to Serve
The versatility of this Lemon Butter Shrimp Skillet is one of its greatest strengths. The rich, bright sauce begs to be soaked up, and the shrimp pairs beautifully with a wide variety of accompaniments. Here are some of our favorite ways to serve this delightful dish:
- Over Pasta
- Linguine or Fettuccine: The long, flat strands are perfect for catching the silky lemon butter sauce. Tossing the hot pasta directly into the skillet with the shrimp and sauce creates a restaurant-quality meal.
- Angel Hair Pasta: For a more delicate pairing, the thin strands of angel hair pasta cook in minutes and allow the shrimp to remain the star of the show.
- With Grains
- Fluffy White Rice: A simple bed of steamed jasmine or basmati rice is a perfect canvas, soaking up the sauce beautifully and providing a neutral base that complements the flavors.
- Quinoa or Brown Rice: For a healthier, whole-grain option, serve the shrimp over a bed of fluffy quinoa or nutty brown rice to add extra fiber and nutrients.
- Low-Carbohydrate Options
- Zucchini Noodles (Zoodles): Keep the meal light and low-carb by serving the shrimp and sauce over a bed of sautéed or raw zucchini noodles.
- Cauliflower Rice: Another fantastic low-carb alternative that mimics the texture of traditional rice and absorbs the sauce wonderfully.
- With a Simple Salad: Serve the shrimp alongside a fresh arugula or mixed greens salad with a light vinaigrette for a simple, elegant, and healthy meal.
- Alongside Vegetables
- Roasted Asparagus or Broccoli: The earthy flavors of roasted vegetables provide a delicious contrast to the bright, zesty shrimp.
- Steamed Green Beans: A side of simple, crisp-tender steamed green beans offers a fresh and healthy component to round out the meal.
- Don’t Forget the Bread!
- Crusty Bread: This is almost non-negotiable! Slices of a rustic baguette, sourdough, or ciabatta are essential for sopping up every last drop of the incredible lemon butter garlic sauce from the bottom of the plate.
Additional tips
- The Secret is Dry Shrimp: Do not skip the step of patting the shrimp completely dry. Excess water on the surface of the shrimp will create steam in the hot pan, preventing the shrimp from developing that beautiful golden-brown crust. A proper sear locks in moisture and adds a deeper layer of flavor.
- Don’t Overcrowd the Pan: This is a golden rule for searing any protein. Adding too many shrimp to the skillet at once will drastically lower the temperature of the pan. Instead of searing, the shrimp will release their liquid and begin to steam, resulting in a paler color and a slightly rubbery texture. Cook in two batches if your skillet isn’t large enough to hold them in a single layer with space between each one.
- Fresh is Best for Flavor: While bottled lemon juice and pre-minced garlic are convenient, using fresh ingredients will elevate this dish from good to absolutely spectacular. The flavor of freshly squeezed lemon juice is brighter and more complex, and freshly minced garlic provides a pungent, aromatic quality that you simply can’t get from a jar.
- Master the Heat: Pay close attention to your stove’s heat levels. Use medium-high heat to get a quick, hard sear on the shrimp, then lower the heat immediately when you add the final butter and lemon juice. This prevents the delicate sauce from breaking or becoming greasy and ensures the shrimp don’t overcook in the residual heat.
- Unlock Flavor by Deglazing: When you add the wine or broth to the hot pan, don’t just pour it in. Use your cooking utensil to actively scrape at the bottom of the skillet. Those little browned bits stuck to the pan are concentrated pockets of flavor from the shrimp and garlic. Releasing them into the liquid is the key to creating a sauce with incredible depth.
- Add a Splash of Cream: For a richer, more decadent sauce, you can add a splash (about 2-3 tablespoons) of heavy cream along with the final tablespoon of butter and lemon juice. This will create a luxuriously creamy sauce that clings beautifully to pasta or rice.
- Incorporate Greens: To add more nutrients and a pop of color, toss in a few large handfuls of fresh spinach at the very end of cooking. Stir for about a minute until the spinach has just wilted into the sauce. Halved cherry tomatoes or sun-dried tomatoes also make a delicious addition.
- Don’t Overcook the Shrimp: Shrimp cook incredibly fast. The difference between perfectly tender shrimp and tough, rubbery shrimp is often less than a minute. The visual cue is key: they are done as soon as they are no longer translucent, have turned a vibrant pink, and have curled into a gentle “C” shape. If they curl into a tight “O” shape, they are overcooked.
FAQ section
1. Can I use frozen shrimp for this recipe?
Absolutely! Frozen shrimp is a fantastic and convenient option. For the best results, it’s crucial to thaw them properly first. You can either place the frozen shrimp in a colander and run cold water over them for 5-10 minutes until thawed, or you can place them in a covered bowl in the refrigerator overnight. Whichever method you choose, make sure to pat them completely dry with paper towels before seasoning and cooking.
2. What is the best kind of shrimp to buy?
For this recipe, large or jumbo raw shrimp (around 16-20 or 21-25 count per pound) work best. Their larger size makes them more forgiving, as they are less likely to overcook quickly, and they result in a plumper, juicier bite. Always opt for raw, uncooked shrimp, as using pre-cooked shrimp will almost certainly lead to a rubbery texture since you’ll essentially be cooking them twice.
3. My lemon butter sauce didn’t come together properly, what did I do wrong?
This can happen if the heat is too high when you add the final ingredients. If the pan is scorching hot, the butter can “break” and separate, creating a greasy texture instead of an emulsified sauce. To fix this, reduce the heat to low before adding the final butter and lemon juice. Swirling the pan or stirring constantly helps the fat (butter) and the acid (lemon juice) come together into a smooth, cohesive sauce.
4. Can I make this dish ahead of time?
While this dish is truly best enjoyed fresh from the skillet, you can make it ahead of time if necessary. Shrimp can become tough when reheated, so it’s important to do it gently. Store the cooked shrimp and sauce in an airtight container in the refrigerator for up to 2 days. To reheat, warm it gently in a skillet over low heat just until warmed through, or microwave in short 30-second intervals. Avoid high heat.
5. I don’t have white wine. What are good substitutes?
Chicken broth is the best and most common substitute for white wine in this recipe, as it still provides a wonderful depth of flavor for deglazing the pan. You could also use vegetable broth. If you have none of those, you could even use a squeeze of extra lemon juice mixed with a little water, though you will miss some of the savory depth.
6. How can I add more vegetables to this meal?
This recipe is very adaptable to vegetables. You can add them directly to the skillet. Quick-cooking vegetables like sliced mushrooms, asparagus tips, or halved cherry tomatoes can be added along with the shrimp. For heartier vegetables like broccoli florets or sliced bell peppers, it’s best to sauté them in the skillet for a few minutes first, remove them, cook the shrimp, and then add the vegetables back in at the end with the sauce.
7. Is this Lemon Butter Shrimp Skillet recipe healthy?
Yes, it can certainly be part of a healthy and balanced diet. Shrimp is a fantastic source of lean protein and essential nutrients. Olive oil provides healthy fats, and garlic and lemon offer numerous health benefits. The main consideration is the butter. While it adds incredible flavor, it is high in saturated fat. You can easily make the dish lighter by reducing the butter to one tablespoon total and increasing the olive oil, or by simply being mindful of your portion size.
8. Why is it important to use a large skillet?
Using a large skillet (at least 12 inches) is crucial for the success of this dish. A larger surface area allows you to spread the shrimp out in a single, even layer without them touching. This direct contact with the hot surface of the pan is what creates the beautiful, flavorful sear. If the shrimp are crowded together in a small pan, they will trap steam, preventing browning and resulting in a less flavorful, less appealing texture.

Easy Lemon Butter Shrimp Skillet
Ingredients
- 2 tablespoons Unsalted Butter: This forms the rich, creamy foundation of our sauce, allowing for precise control over the saltiness of the final dish.
- 2 tablespoons Olive Oil: Combined with butter, it helps prevent the butter from browning too quickly and adds a layer of fruity, nuanced flavor.
- 4–5 cloves Garlic, minced: The aromatic heart of the recipe. Use fresh cloves for the most pungent and savory flavor that will infuse the entire sauce.
- 1 ½ pounds Large Shrimp, peeled and deveined: The star of the show. Using large, raw shrimp ensures they remain plump, juicy, and tender after cooking.
- ½ teaspoon Kosher Salt: Enhances all the other flavors in the dish. Adjust to your personal taste.
- ¼ teaspoon Black Pepper, freshly ground: Adds a subtle warmth and a touch of spice that complements the shrimp beautifully.
- ¼ cup Dry White Wine or Chicken Broth: This is for deglazing the pan, lifting all the flavorful browned bits from the bottom of the skillet and adding a crucial layer of depth to the sauce.
- Juice of 1 Large Lemon (about ¼ cup): Provides the signature bright, zesty, and acidic kick that cuts through the richness of the butter and elevates the entire dish.
- 2 tablespoons Fresh Parsley, chopped: Adds a burst of fresh, herbaceous flavor and a beautiful touch of green for color and presentation.
- Pinch of Red Pepper Flakes (optional): For those who enjoy a little bit of heat, this adds a gentle warmth to the background of the sauce.
Instructions
- Prepare the Shrimp: Before you begin, ensure your shrimp are fully thawed, peeled, and deveined. The most crucial step is to pat them completely dry with paper towels. This removes excess moisture, which is essential for getting a beautiful sear on the shrimp rather than just steaming them in the pan. Season the dried shrimp generously with the kosher salt and freshly ground black pepper, tossing them gently to ensure each one is evenly coated.
- Heat the Skillet: Place a large skillet or sauté pan over medium-high heat. A cast-iron or stainless-steel skillet works best for achieving an even, consistent heat. Add the olive oil and one tablespoon of the unsalted butter to the pan. Allow the butter to melt completely and begin to bubble slightly, indicating the pan is hot and ready.
- Sauté the Garlic: Add the minced garlic to the hot skillet. Sauté for about 30-60 seconds, stirring constantly, until it becomes wonderfully fragrant. Be very watchful during this step; you want the garlic to become aromatic and lightly golden, but not browned or burnt. Burnt garlic will impart a bitter, acrid taste to your entire sauce.
- Sear the Shrimp: Add the seasoned shrimp to the skillet in a single layer. It’s important not to overcrowd the pan, as this will lower the temperature and cause the shrimp to steam instead of sear. If necessary, cook the shrimp in two separate batches. Let the shrimp cook for about 1-2 minutes on the first side, undisturbed, until they turn a vibrant pink and opaque on the bottom.
- Flip and Deglaze: Flip the shrimp over to cook the other side. Immediately pour in the dry white wine or chicken broth. Use a wooden spoon or spatula to gently scrape up any flavorful browned bits (the “fond”) that have stuck to the bottom of the pan. This process, known as deglazing, incorporates an immense amount of flavor back into your sauce.
- Create the Sauce: Let the shrimp continue to cook for another 1-2 minutes. Once they are pink, opaque, and curled into a “C” shape, they are perfectly cooked. Reduce the heat to low. Add the remaining tablespoon of butter and the fresh lemon juice to the skillet. Swirl the pan or stir gently until the butter has completely melted and emulsified with the pan liquids, creating a silky, luscious sauce that coats the shrimp.
- Finish and Serve: Remove the skillet from the heat immediately to prevent the shrimp from overcooking. Stir in the freshly chopped parsley and the optional red pepper flakes. Give everything one final toss to combine. Taste the sauce and adjust the seasoning if necessary, adding more salt, pepper, or a squeeze of lemon to your liking. Serve immediately for the best taste and texture.
Nutrition
- Serving Size: one normal portion
- Calories: 350


