")


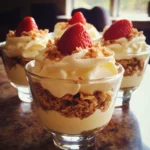
There’s something truly delightful about whipping up a dessert that feels indulgent but requires almost no fuss. When I first tried these No Bake Strawberry Cheesecake Jars, I was blown away by how fresh, creamy, and perfectly sweet they were—all layered beautifully in a little jar that’s as charming as it is convenient. Whether you’re craving a refreshing treat on a warm afternoon or looking to impress guests without heating up your kitchen, this recipe is a total game-changer. The combination of luscious cream cheese, juicy strawberries, and a buttery crust comes together effortlessly, proving that sometimes the best desserts don’t need an oven. Trust me, once you’ve tried these, they’ll become your go-to for when you want something homemade, impressive, and absolutely scrumptious.
Why love No Bake Strawberry Cheesecake Jars?
Effortless indulgence: No oven, no stress—just simple layering magic. Creamy delight: Silky cream cheese meets fresh strawberry sweetness for an irresistible flavor punch. Portable perfection: Individual jars make serving and sharing a breeze. Visual appeal: Gorgeous layers turn every jar into a mini dessert masterpiece. Time-saver: Ready in minutes, ideal for busy days or last-minute guests.
No Bake Strawberry Cheesecake Jars Ingredients
For the Crust
- Graham cracker crumbs – Use finely crushed crumbs for the perfect buttery base.
- Unsalted butter – Melted butter binds the crust beautifully without overpowering flavor.
- Brown sugar – Adds a hint of caramel sweetness to complement the cream cheese layers.
For the Cheesecake Filling
- Cream cheese – Bring to room temperature for a smooth, dreamy texture.
- Powdered sugar – Dissolves easily, keeping the filling silky and sweet without graininess.
- Heavy cream – Whipped to soft peaks to lighten the filling into a fluffy cloud.
- Vanilla extract – Enhances flavor depth with a warm, aromatic touch.
For the Strawberry Layer
- Fresh strawberries – Choose ripe, juicy berries for the brightest, freshest taste.
- Strawberry preserves – Stir in preserves to boost natural sweetness and add lovely shine.
- Lemon juice – A splash brightens the fruit flavor, balancing the cheesecake’s richness.
Capture the magic of these No Bake Strawberry Cheesecake Jars by layering these ingredients—each one playing a starring role towards that luscious, creamy, and utterly irresistible finish.
How to Make No Bake Strawberry Cheesecake Jars
- For the Crust: In a medium bowl, whisk together graham cracker crumbs, melted butter, and brown sugar for 1–2 minutes until the mixture is evenly moistened and holds together when pressed.
- Press Crust: Divide the crumb mixture evenly among four 8-ounce jars, pressing firmly into the bottoms to form a compact, even crust layer about 1/4-inch thick.
- For the Filling: In a large bowl, beat room-temperature cream cheese and powdered sugar with an electric mixer on medium speed until smooth, scraping sides occasionally.
- Whip Cream: Pour cold heavy cream into a chilled bowl and whip on high speed for 1–2 minutes until soft, billowy peaks form.
- Fold Cream: Gently fold the whipped cream into the cream cheese mixture with a spatula, stirring until the filling is smooth, airy, and fully combined without deflating.
- For the Strawberry Layer: In a medium bowl, gently stir chopped fresh strawberries with strawberry preserves and a splash of lemon juice until the fruit is juicy, glossy, and well-coated.
- Assemble Jars: Spoon or pipe half of the cheesecake filling into each jar, then layer with the strawberry mixture; repeat with remaining filling and berries for beautiful, striped layers.
- Chill: Cover the jars securely with lids or plastic wrap, then chill in the refrigerator for at least 2 hours—or overnight—for the cheesecake to set and flavors to meld.
Optional: Garnish with a fresh mint leaf or extra strawberry slice.
Exact quantities are listed in the recipe card below.
Variations & Substitutions for No Bake Strawberry Cheesecake Jars
Feel free to explore these fun twists to make the recipe truly your own!
-
Chocolate Twist: Add cocoa powder to the crust for a chocolatey base that beautifully complements the cream cheese.
-
Berry Medley: Substitute strawberries with your favorite berries like blueberries or raspberries for a vibrant, mixed-berry creation.
-
Nutty Crust: Replace graham crackers with crushed nuts for a gluten-free option that adds a delightful crunch and rich flavor.
-
Creamy Vegan: Use vegan cream cheese and coconut whipped cream to create a delicious plant-based version everyone can enjoy.
-
Citrus Zing: Infuse the cheesecake filling with orange or lime zest to brighten the flavor and create a refreshing citrus note.
-
Mini Size: Layer smaller jars or cups for a dainty dessert option, perfect for parties or portion control.
-
Spicy Heat: A pinch of chili powder in the strawberry layer adds an unexpected warmth that pairs surprisingly well with the sweetness.
-
Caramel Drizzle: Finish with a drizzle of caramel sauce on top for an indulgent touch that elevates your dessert experience.
Make Ahead Options
These No Bake Strawberry Cheesecake Jars are a fantastic option for meal prep! You can prepare the crust and cheesecake filling up to 24 hours in advance, which allows for stress-free assembly later. Simply store the crust mix in an airtight container and refrigerate the filling; it will maintain its silky texture. For the fresh strawberry layer, prepare the strawberries with preserves and lemon juice up to 3 days ahead—just keep them covered in the fridge to prevent browning. When you’re ready to serve, layer the filling and strawberry mixture in jars, refrigerate for at least 2 hours, and enjoy a beautifully fresh dessert with minimal effort!
What to Serve with No Bake Strawberry Cheesecake Jars?
Add a touch of joy to your dessert experience by pairing these delightful jars with complementary flavors and textures.
-
Fresh Mint Tea: The soothing herbal notes of mint tea balance the sweetness of the cheesecake, enhancing its fresh flavor profile.
-
Chocolate Covered Strawberries: A rich, decadent companion that enriches the berry theme while adding an elegant touch to any dessert table.
-
Vanilla Ice Cream: Creamy vanilla ice cream perfectly contrasts the strawberry layers, bringing a refreshing element that melts into blissful harmony.
-
Berry Salad: A light mix of seasonal berries adds a refreshing burst of flavor, enhancing the fruitiness and bringing brightness to your meal.
-
Sparkling Water with Lime: This bubbly drink keeps the palate fresh, and the citrus complements the creamy layers beautifully—a refreshing choice for any occasion.
-
Almond Biscotti: The crunchy texture of these lightly sweet cookies offers a delightful contrast to the soft, creamy jars, perfect for dipping.
Indulge with these pairings to create a memorable dessert experience that captivates both the taste buds and the heart!
Tips for the Best No Bake Strawberry Cheesecake Jars
- Use room-temperature cream cheese: This ensures the filling is ultra-smooth and creamy, avoiding lumps in your no bake strawberry cheesecake jars.
- Don’t overwhip the cream: Whip heavy cream to soft peaks only; overwhipping can cause a grainy texture and deflate your airy filling.
- Press the crust firmly: Compact the graham cracker crust evenly in each jar to prevent it from crumbling when serving.
- Fresh strawberries matter: Choose ripe and juicy berries to keep your strawberry layer vibrant and naturally sweet.
- Chill long enough: Allow at least 2 hours in the fridge for the layers to set beautifully and flavors to meld perfectly.
How to Store and Freeze No Bake Strawberry Cheesecake Jars
Refrigerator: Keep your No Bake Strawberry Cheesecake Jars covered in the fridge for up to 4 days, maintaining that delightful freshness and flavor.
Freezer: If you’re planning to store them longer, freeze the jars (without the strawberry layer) for up to 2 months in airtight containers, allowing you to enjoy them anytime.
Thawing: To enjoy, simply thaw the frozen jars in the fridge overnight before serving, then layer with fresh strawberries before indulging!
Serving Tip: Always serve these jars chilled for the best creamy texture and refreshing taste—perfect for gatherings or a cozy night in!
Easy No Bake Strawberry Cheesecake Jars With Creamy, Dreamy Layers Recipe FAQs
How do I know if my strawberries are ripe enough for the No Bake Strawberry Cheesecake Jars?
Look for strawberries that are bright red all over with no white or green tips. They should feel firm but yield slightly to gentle pressure and smell sweetly fragrant. Avoid berries with dark spots or mushy areas for the freshest, juiciest result.
What’s the best way to store leftover No Bake Strawberry Cheesecake Jars?
Store the jars tightly covered in the refrigerator at or below 40°F (4°C). They will stay fresh and delicious for up to 4 days. I recommend keeping them sealed well to prevent the crust from absorbing fridge odors or getting soggy.
Can I freeze the cheesecake jars, and how do I do it properly?
Absolutely! For the best texture, freeze the jars without the fresh strawberry topping. Place the jars in an airtight container or wrap them tightly with plastic wrap and aluminum foil. Freeze for up to 2 months. When ready to serve, thaw them slowly in the refrigerator overnight, and add freshly prepared strawberry layers just before enjoying.
What if my cheesecake filling turns out grainy or lumpy?
This can happen if the cream cheese isn’t fully softened or if the cream is overwhipped. To fix this, always bring cream cheese to room temperature and beat it thoroughly until smooth. Whip the cream to soft peaks only, then gently fold it in with a spatula to keep the filling light and creamy.
Are these jars safe for pets, or do they contain any common allergens?
While this recipe is delicious for humans, the ingredients like cream cheese, sugar, and strawberries are not suitable for pets, especially dogs or cats, due to lactose and added sugars. Also, this recipe contains dairy and gluten (from graham crackers), so it’s not suitable for those with those allergies or sensitivities unless you substitute accordingly.

Easy No Bake Strawberry Cheesecake Jars With Creamy, Dreamy Layers
Ingredients
Equipment
Method
- In a medium bowl, whisk together graham cracker crumbs, melted butter, and brown sugar for 1–2 minutes until evenly moistened.
- Divide the crumb mixture among four 8-ounce jars, pressing firmly to form a compact crust layer.
- In a large bowl, beat cream cheese and powdered sugar with an electric mixer on medium speed until smooth.
- Pour heavy cream into a chilled bowl and whip on high speed until soft peaks form.
- Gently fold the whipped cream into the cream cheese mixture until smooth and airy.
- Stir chopped strawberries with strawberry preserves and lemon juice until juicy and well-coated.
- Spoon half of the cheesecake filling into each jar, layer with the strawberry mixture, and repeat.
- Cover jars securely and chill in the refrigerator for at least 2 hours.