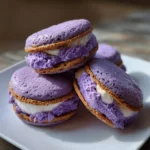
Ingredients
Scale
This recipe is broken down into two main components: the soft and chewy Ube Crinkle Cookies and the rich, no-churn Ube Ice Cream. Using high-quality ube products will yield the most vibrant color and authentic flavor.
For the Ube Crinkle Cookies (Makes approx. 24 cookies):
- 1 ¾ cups All-Purpose Flour: This is the structural backbone of our cookies, providing the perfect chew.
- 1 ½ teaspoons Baking Powder: Our leavening agent, which gives the cookies a slight lift and tender texture.
- ½ teaspoon Salt: Essential for balancing the sweetness and enhancing the overall flavor profile.
- ½ cup Unsalted Butter, softened: Using softened, room temperature butter is key to achieving a light, well-creamed base for the dough.
- 1 cup Granulated Sugar: Provides sweetness and contributes to the cookies’ spread and texture.
- 1 large Egg, room temperature: Acts as a binder, holding the dough together and adding richness.
- 2 teaspoons Ube Extract: This is where the magic happens! It provides the signature vibrant purple color and the distinct, nutty ube flavor.
- ¼ cup Powdered Sugar: Used for coating the dough balls, this is what creates the beautiful “crinkle” effect as the cookies bake and spread.
For the No-Churn Ube Ice Cream:
- 2 cups Heavy Whipping Cream, very cold: The base of our ice cream. It must be very cold to whip up properly and create a light, airy texture.
- 1 (14-ounce) can Sweetened Condensed Milk, cold: This provides sweetness and, more importantly, acts as a stabilizer that prevents large ice crystals from forming, ensuring a creamy, scoopable result without an ice cream maker.
- 1 cup Ube Halaya (Purple Yam Jam), room temperature: This is the primary source of our ube flavor. It’s a thick, sweet jam made from purple yam that adds incredible depth, texture, and taste.
- 1 teaspoon Ube Extract: We add a little extra extract to the ice cream base to boost the color and intensify the flavor.
- 1 teaspoon Vanilla Extract: Vanilla is a natural companion to ube, enhancing its sweet and nutty notes.
- A pinch of Salt: A tiny amount sharpens all the flavors and cuts through the richness.
Instructions
Follow these detailed steps carefully for perfect results. The process involves making the cookies, preparing the ice cream, and then assembling the final sandwiches. Patience during the chilling and freezing stages is crucial!
Part 1: Making the Ube Crinkle Cookies
- Combine Dry Ingredients: In a medium bowl, whisk together the all-purpose flour, baking powder, and salt. Whisking helps to evenly distribute the leavening agent and salt, ensuring a consistent texture in every cookie. Set this bowl aside.
- Cream Butter and Sugar: In a large bowl using a stand mixer with the paddle attachment or a hand mixer, beat the softened unsalted butter and granulated sugar on medium-high speed for about 3-4 minutes. You are looking for a light, pale, and fluffy texture. This process, known as creaming, incorporates air into the base of your dough.
- Add Egg and Ube Extract: Add the room temperature egg and the ube extract to the creamed butter and sugar. Beat on medium speed until everything is well combined and the mixture is a uniform, vibrant purple. Scrape down the sides and bottom of the bowl with a spatula to ensure no bits are left unmixed.
- Incorporate Dry Ingredients: Reduce the mixer speed to low and gradually add the flour mixture you set aside earlier. Mix only until the last streaks of flour have just disappeared. Be careful not to overmix at this stage; overmixing can develop too much gluten, leading to tough, dense cookies instead of soft and chewy ones.
- Chill the Dough: The dough will be quite soft. Cover the bowl with plastic wrap and transfer it to the refrigerator to chill for at least 2 hours, or ideally overnight. Chilling is a critical, non-negotiable step. It solidifies the fat in the dough, which prevents the cookies from spreading too much in the oven, and it also allows the flavors to meld and deepen.
- Preheat and Prepare: When you’re ready to bake, preheat your oven to 350°F (175°C). Line two large baking sheets with parchment paper. Place the powdered sugar in a small, shallow bowl.
- Shape and Coat: Remove the chilled dough from the refrigerator. Using a small cookie scoop or a tablespoon, portion the dough into 1-inch balls. Roll each ball between your palms to smooth it out, then generously roll it in the bowl of powdered sugar until it’s completely coated.
- Bake the Cookies: Place the sugar-coated dough balls onto the prepared baking sheets, leaving about 2 inches of space between each one to allow for spreading. Bake for 10-12 minutes. The edges should be set, but the centers should still look slightly soft and underdone. This is the secret to a chewy cookie.
- Cool Completely: Let the cookies cool on the baking sheet for 5 minutes before transferring them to a wire rack to cool completely. You must let them cool 100% before assembling the ice cream sandwiches, or you’ll have a melted mess.
Part 2: Making the No-Churn Ube Ice Cream
- Whip the Heavy Cream: In a large, chilled bowl (you can pop it in the freezer for 15 minutes beforehand), pour in the very cold heavy whipping cream. Using a stand mixer with the whisk attachment or a hand mixer, whip the cream on medium-high speed until stiff peaks form. Stiff peaks mean that when you lift the beaters out of the cream, the peak that forms holds its shape and doesn’t flop over. This aeration process is what gives the ice cream its volume and light texture.
- Combine Wet Ingredients: In a separate large bowl, whisk together the cold sweetened condensed milk, room temperature ube halaya, ube extract, vanilla extract, and the pinch of salt. Whisk until the mixture is smooth and uniform in color. Using room temperature ube halaya makes it much easier to incorporate smoothly.
- Fold the Mixtures: Gently fold about one-third of the whipped cream into the ube and condensed milk mixture using a spatula. This initial addition lightens the base, making it easier to incorporate the rest of the cream without deflating it. Once combined, gently fold in the remaining whipped cream in two more additions. Use a gentle “down, across, up, and over” folding motion until just combined and no white streaks remain. Be careful not to stir or beat, as this will knock the air out of the whipped cream.
- Freeze the Ice Cream: Pour the ice cream base into a 9×5 inch loaf pan or another freezer-safe container. Smooth the top with your spatula. Cover the surface directly with a piece of plastic wrap or parchment paper (this prevents ice crystals) and then cover the container tightly with a lid or foil. Freeze for at least 6 hours, or until completely firm.
Part 3: Assembling the Ube Ice Cream Sandwiches
- Prepare for Assembly: Once the ice cream is firm and the cookies are completely cool, you’re ready to assemble. Find 12 pairs of similarly sized cookies. Place one cookie from each pair, bottom-side-up, on a baking sheet lined with parchment paper.
- Scoop the Ice Cream: Let the ube ice cream sit on the counter for 5-10 minutes to soften just slightly, making it easier to scoop. Place a generous scoop of ice cream (about ⅓ to ½ cup) onto the center of each of the 12 overturned cookies.
- Form the Sandwich: Place the matching cookie on top of the ice cream, bottom-side-down. Gently press down until the ice cream spreads to the edges of the cookies. If desired, you can use a small offset spatula or a butter knife to smooth the ice cream around the edges for a cleaner look.
- Freeze Until Firm: Immediately wrap each individual ice cream sandwich tightly in plastic wrap or parchment paper, followed by a layer of aluminum foil for extra protection against freezer burn. Place the wrapped sandwiches back on the baking sheet and freeze for at least 2-3 hours, or until they are completely firm and solid. This final freeze is essential for the sandwiches to hold their shape when eaten.
Nutrition
- Serving Size: one normal portion
- Calories: 480