Ingredients
Here is the simple list of ingredients you’ll need to create this cool and creamy masterpiece. The beauty of this recipe lies in its accessibility; these are common pantry and refrigerator staples that come together to create something truly special.
- 2 cups (480 ml) Heavy Whipping Cream, very cold: This is the heart and soul of the cake. Using cold, full-fat heavy cream is non-negotiable for creating a thick, stable, and luxuriously rich whipped cream that holds its shape and provides the dessert’s signature airy texture.
- 1/2 cup (60g) Powdered Sugar (Confectioners’ Sugar): Chosen over granulated sugar because it dissolves instantly into the cream without any grittiness, ensuring a silky-smooth consistency. It also contains a small amount of cornstarch, which helps to stabilize the whipped cream.
- 2 teaspoons Pure Vanilla Extract: A crucial flavor enhancer. A high-quality pure vanilla extract will elevate the cream from simply sweet to aromatic and complex, beautifully complementing the banana and graham cracker flavors.
- 1 box (14.4 oz or 408g) Graham Crackers: The structural foundation of our “cake.” These humble, honey-kissed crackers will absorb moisture from the cream and transform into soft, tender, cake-like layers that are a delight to slice through.
- 4–5 large Ripe Bananas, sliced into 1/4-inch rounds: Choose bananas that are yellow with a few brown spots. This indicates they are at their peak sweetness and flavor, but still firm enough to hold their shape when sliced and layered.
Instructions
Follow these detailed, step-by-step instructions carefully to ensure your icebox cake is a resounding success. The process is all about layering and chilling, allowing time to work its magic.
Step 1: Prepare the Whipping Cream
This is the most critical step for achieving the perfect texture. For best results, place your large mixing bowl and the beaters from your electric mixer (either stand or handheld) in the freezer for 10-15 minutes before you begin. A chilled environment helps the fat in the cream to emulsify and whip up faster and more voluminously. Pour the very cold heavy whipping cream into the chilled bowl. Begin beating on low speed for about 30 seconds, then gradually increase the speed to medium-high. As the cream begins to thicken and form soft peaks (when you lift the beaters, a peak forms but slumps over immediately), slowly add the powdered sugar and vanilla extract. Continue to beat on high speed until stiff peaks form. You’ll know you’ve reached stiff peaks when you can lift the beaters straight out of the cream and the peak that forms holds its shape without collapsing. Be very careful not to over-beat, or your cream will turn grainy and start to become butter.
Step 2: Prepare Your Pan and First Layer
Select an 8×8 inch or 9×9 inch square baking dish. You do not need to grease the dish. Create the foundation of your cake by arranging a single, tight layer of graham crackers on the bottom of the dish. You will likely need to break some crackers into smaller pieces to fill in any gaps and create a solid base. The goal is to cover the entire bottom surface as completely as possible.
Step 3: Begin the Layering Process
Generously spread about one-quarter of your freshly prepared whipped cream mixture evenly over the graham cracker base. Use an offset spatula or the back of a spoon to create a smooth, consistent layer that reaches all the way to the edges of the pan. This ensures that every cracker, even those at the corners, will soften properly.
Step 4: Add the Banana Layer
Arrange a single layer of the sliced bananas over the whipped cream. Place the slices close together to ensure there’s sweet banana flavor in every single bite, but try not to overlap them too much. The moisture from the bananas will also contribute to softening the crackers below.
Step 5: Repeat the Layers
Continue this layering process, building your cake. Add another single layer of graham crackers on top of the bananas. Gently press them down. Follow with another quarter of the whipped cream, spreading it evenly. Then, add another layer of sliced bananas. Repeat this sequence one more time: graham crackers, whipped cream, and bananas.
Step 6: The Final Layer and Finishing Touches
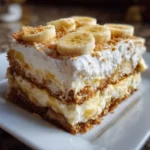
For the top of the cake, place your final layer of graham crackers. Spread the remaining whipped cream mixture over the top, making sure to cover the entire surface beautifully. You can make it smooth and sleek, or you can use the back of your spoon to create lovely swirls and peaks for a more rustic, homemade look. For an extra touch, you can crush one or two extra graham crackers and sprinkle the crumbs over the top, or even add a few strategically placed fresh banana slices just before serving.
Step 7: The Crucial Chilling Period
This is where the transformation happens. Cover the baking dish tightly with plastic wrap or a lid. Place the cake in the refrigerator to chill for a minimum of 6 hours, but for the absolute best results, let it chill overnight (8-12 hours). During this time, the graham crackers will absorb the moisture from the whipped cream and bananas, softening into a wonderfully tender, cake-like consistency. The flavors will meld together into a harmonious and delicious union. Do not skip or shorten this step; it is essential to the texture of the final dessert.
Nutrition
- Serving Size: one normal portion
- Calories: 450