")


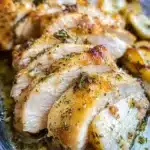
There’s something truly magical about the aroma of roasted chicken wafting through the house. It speaks of comfort, home-cooked goodness, and shared meals around the table. For years, my family dinners have been graced by this Garlic Herb Roasted Chicken, and it’s become a staple request. Even on the busiest weeknights, the simplicity of this recipe means a delicious and healthy meal is never too far away. The crispy skin, the juicy, flavorful meat infused with aromatic herbs and garlic – it’s a dish that’s both impressive enough for guests and comforting enough for a cozy family night in. Honestly, even my pickiest eater devours this chicken, and the leftovers (if there are any!) are just as delightful the next day. If you’re looking for a foolproof, crowd-pleasing chicken recipe that will become a regular in your rotation, look no further. This Garlic Herb Roasted Chicken is it.
Ingredients: Simple, Fresh, and Flavorful
This recipe shines because of its simplicity. You don’t need a long list of exotic ingredients to create a truly memorable meal. Here’s what you’ll need:
- Whole Chicken (3-4 lbs): The star of the show! Opt for a good quality, fresh chicken for the best flavor and texture. A 3-4 pound chicken is ideal for a family of four, with potential leftovers.
- Fresh Garlic (6-8 cloves): Garlic is the backbone of the flavor profile. Fresh garlic is crucial for that pungent, aromatic kick. We’ll be using it both inside and outside the chicken.
- Fresh Rosemary (2-3 sprigs): Rosemary adds a piney, woodsy aroma that complements chicken beautifully. Fresh rosemary is preferred, but dried can be used in a pinch (use about 1 teaspoon dried).
- Fresh Thyme (2-3 sprigs): Thyme provides an earthy, slightly lemony flavor that rounds out the herb blend. Fresh thyme is best, but dried thyme (about 1 teaspoon) works as a substitute.
- Lemon (1): Lemon zest and juice brighten up the dish, adding a touch of acidity that cuts through the richness of the chicken. It also helps tenderize the meat.
- Olive Oil (3 tablespoons): Olive oil helps the herbs and garlic adhere to the chicken, promotes crispy skin, and adds richness. Use extra virgin olive oil for the best flavor.
- Salt and Black Pepper: Essential seasonings to enhance all the flavors. Use kosher salt and freshly ground black pepper for optimal taste.
Instructions: Step-by-Step Guide to Roasting Perfection
Roasting a chicken might seem intimidating, but it’s actually incredibly straightforward. Follow these simple steps for a perfectly roasted Garlic Herb Chicken every time:
Step 1: Prepare the Chicken
Begin by preheating your oven to 400°F (200°C). While the oven is heating, remove the chicken from its packaging. Pat the chicken dry thoroughly with paper towels, both inside and out. This is a crucial step for achieving crispy skin. Moisture is the enemy of crispy skin, so the drier the chicken, the better. Check the cavity of the chicken for any giblets or neck and remove them. You can discard these or save them for making stock later.
Step 2: Garlic Herb Infusion – Inside and Out
Peel and roughly chop the garlic cloves. Take about half of the garlic and stuff it into the cavity of the chicken. Add one sprig of rosemary and one sprig of thyme to the cavity as well. Cut the lemon in half. Squeeze the juice of half a lemon into the cavity and place the squeezed lemon halves inside. This aromatic stuffing will infuse the chicken from the inside out as it roasts.
In a small bowl, combine the remaining chopped garlic, the leaves from the remaining rosemary and thyme sprigs (finely chop them if they are large), the zest of the remaining half lemon, olive oil, salt, and freshly ground black pepper. Mix everything together well to create a fragrant herb rub.
Step 3: Rub and Season the Chicken
Using your hands, generously rub the garlic herb mixture all over the outside of the chicken, ensuring every part is coated, including under the wings and legs. Don’t be shy with the seasoning! Seasoning is key to flavorful roasted chicken. Make sure to get some of the rub under the skin of the breast if you can, to directly flavor the breast meat.
Step 4: Trussing (Optional but Recommended)
Trussing the chicken (tying the legs together) is optional, but it helps the chicken cook more evenly and maintain a nice shape. If you want to truss, use kitchen twine to tie the legs together securely. This will prevent the legs from splaying out during roasting and ensure the breast cooks more evenly.
Step 5: Roasting the Chicken
Place the chicken in a roasting pan. You can use a roasting rack inside the pan to elevate the chicken, which allows for better air circulation and crispier skin all around. If you don’t have a roasting rack, you can use roughly chopped vegetables like carrots, onions, and celery as a makeshift rack – this also adds flavor to the vegetables as they roast with the chicken drippings.
Roast the chicken in the preheated oven for approximately 1 hour and 15 minutes to 1 hour and 30 minutes, or until a meat thermometer inserted into the thickest part of the thigh (without touching the bone) registers 165°F (74°C). The cooking time will vary depending on the size of your chicken and your oven.
Step 6: Basting (Optional for Extra Flavor and Moisture)
For extra flavorful and moist chicken, you can baste it with pan juices during the roasting process. About halfway through the roasting time (around 45 minutes in), carefully remove the roasting pan from the oven and spoon the pan juices over the chicken. Be careful as the pan and juices will be hot. Return the chicken to the oven to continue roasting. Basting is not strictly necessary, but it can enhance the flavor and keep the chicken extra juicy.
Step 7: Resting is Key
Once the chicken is cooked through and reaches 165°F (74°C), remove it from the oven and let it rest for at least 10-15 minutes before carving. Resting is absolutely crucial! During roasting, the juices in the chicken redistribute towards the center. Resting allows these juices to redistribute back throughout the meat, resulting in a more tender and juicy chicken. Tent the chicken loosely with foil while it rests to keep it warm.
Step 8: Carving and Serving
After resting, carve the chicken and serve immediately. To carve, start by removing the legs and thighs. Then, slice the breast meat. Serve with your favorite sides and enjoy the delicious Garlic Herb Roasted Chicken! Don’t forget to drizzle some of the pan juices over the chicken for extra flavor.
Nutrition Facts: A Healthy and Delicious Choice
(Based on approximate values for a 4 oz serving of roasted chicken breast, skin removed, and recipe ingredients – Note: Nutritional values can vary based on specific ingredients and serving size)
- Serving Size: 4 ounces (113g) roasted chicken breast (skin removed)
- Calories: Approximately 250-300 kcal
- Protein: 35-40g
Important Note: These values are estimates. For precise nutritional information, use a nutrition calculator and input the exact ingredients and serving size. Roasted chicken is a good source of lean protein, vitamins, and minerals. Removing the skin significantly reduces the fat content.
Preparation Time: Quick Prep, Effortless Roasting
- Prep Time: 15-20 minutes (This includes chopping garlic, herbs, zesting lemon, and rubbing the chicken).
- Cook Time: 1 hour 15 minutes – 1 hour 30 minutes (depending on chicken size and oven).
- Resting Time: 10-15 minutes.
- Total Time: Approximately 1 hour 40 minutes – 2 hours.
This recipe is fantastic for weeknights because the active prep time is minimal. While the chicken roasts, you can prepare side dishes or relax and enjoy the wonderful aroma filling your kitchen.
How to Serve: Versatile and Crowd-Pleasing
Garlic Herb Roasted Chicken is incredibly versatile and pairs well with a wide variety of side dishes. Here are some serving suggestions:
- Classic Sides:
- Roasted Vegetables: Potatoes, carrots, broccoli, Brussels sprouts, asparagus, and sweet potatoes are all excellent roasted alongside or separately from the chicken. Toss them with olive oil, salt, pepper, and perhaps some of the same herbs used for the chicken for a cohesive flavor profile.
- Mashed Potatoes: Creamy mashed potatoes are a comforting classic that complements roasted chicken perfectly.
- Green Salad: A fresh green salad with a light vinaigrette provides a refreshing contrast to the richness of the chicken.
- Grain-Based Sides:
- Quinoa or Rice Pilaf: A flavorful quinoa or rice pilaf adds substance and complements the herb flavors of the chicken.
- Couscous: Fluffy couscous is a quick and easy side that pairs well with roasted chicken.
- Seasonal Sides:
- Summer: Corn on the cob, grilled zucchini, tomato salad.
- Fall: Roasted butternut squash, creamy polenta, apple slaw.
- Winter: Root vegetable mash, braised greens, winter squash gratin.
- Spring: Asparagus with lemon, spring pea and mint salad, roasted radishes.
- Sauces and Gravies:
- Pan Gravy: Make a simple pan gravy from the chicken drippings for an extra layer of flavor.
- Lemon Herb Sauce: Whisk together pan juices with lemon juice, white wine, and fresh herbs for a bright and flavorful sauce.
- Chimichurri: A vibrant chimichurri sauce (Argentinian herb sauce) can add a zesty kick.
Additional Tips for Roast Chicken Perfection
Elevate your Garlic Herb Roasted Chicken from good to absolutely amazing with these helpful tips:
- Choose the Right Chicken: Opt for a good quality, fresh chicken. Organic or air-chilled chickens often have better flavor and texture. Consider the size based on your needs – a 3-4 lb chicken is ideal for a family of four.
- Dry Brining for Crispy Skin: For extra crispy skin, try dry brining the chicken. The day before you plan to roast, generously salt the chicken all over, inside and out, and leave it uncovered in the refrigerator overnight. This helps draw out moisture from the skin, leading to incredible crispiness when roasted.
- Bring Chicken to Room Temperature: Before roasting, let the chicken sit at room temperature for about 30 minutes to an hour. This helps the chicken cook more evenly, as it won’t be starting from fridge-cold.
- Don’t Overcrowd the Pan: If you are roasting vegetables alongside the chicken, make sure not to overcrowd the roasting pan. Overcrowding steams the vegetables instead of roasting them. Use a large enough pan or roast vegetables separately if needed.
- Use a Meat Thermometer: A meat thermometer is your best friend for ensuring perfectly cooked chicken. Don’t rely on time alone. Insert the thermometer into the thickest part of the thigh, avoiding the bone, and cook until it reaches 165°F (74°C).
- Rest the Chicken Properly: Resist the urge to carve the chicken immediately after it comes out of the oven. Resting for 10-15 minutes is crucial for juicy and tender meat. Tent it loosely with foil to keep it warm.
- Herb Variations: Feel free to experiment with different herbs! Other great options include oregano, marjoram, sage, or a mix of Italian herbs. You can also add a touch of spice with red pepper flakes.
- Make Pan Gravy: Don’t discard those flavorful pan drippings! Use them to make a simple pan gravy. Skim off excess fat, then whisk in a tablespoon of flour (or cornstarch slurry for gluten-free) and cook for a minute. Gradually whisk in chicken broth or water until you reach your desired consistency. Season with salt and pepper to taste.
FAQ: Your Roasted Chicken Questions Answered
Q1: Can I use frozen chicken?
A: While fresh chicken is always recommended for the best flavor and texture, you can use frozen chicken. Make sure to thaw it completely in the refrigerator before roasting. Thawing in the refrigerator is the safest method and ensures even cooking. Do not roast chicken from frozen.
Q2: How do I know when the chicken is done?
A: The most reliable way to know if your chicken is cooked through is to use a meat thermometer. Insert it into the thickest part of the thigh, avoiding the bone. The internal temperature should reach 165°F (74°C). The juices should also run clear when you pierce the thigh with a fork.
Q3: My chicken skin isn’t crispy, what did I do wrong?
A: Several factors contribute to crispy skin:
* Drying the chicken: Make sure you pat the chicken very dry before roasting.
* High oven temperature: Roasting at 400°F (200°C) helps crisp the skin.
* Olive oil: Using olive oil helps promote browning and crispiness.
* Don’t overcrowd the pan: Good air circulation is essential for crispy skin.
* Consider broiling: In the last few minutes of roasting, you can briefly broil the chicken (watch carefully to prevent burning) to further crisp the skin.
Q4: Can I roast vegetables in the same pan as the chicken?
A: Yes, absolutely! Roasting vegetables with the chicken is a great way to make a complete meal. Hearty vegetables like potatoes, carrots, and onions work best. Toss them with olive oil, salt, pepper, and herbs, and place them around the chicken in the roasting pan. Keep in mind that vegetables may take slightly longer to cook than the chicken, so cut them into appropriately sized pieces.
Q5: Can I make this recipe ahead of time?
A: Roasted chicken is best served fresh for optimal crispiness. However, you can roast the chicken a few hours ahead of time and keep it warm. To reheat, you can gently warm it in a low oven (around 300°F/150°C) covered with foil to prevent drying out. Leftover roasted chicken is also delicious cold or used in salads, sandwiches, or chicken pot pie.
Q6: What if I don’t have fresh herbs? Can I use dried?
A: Yes, you can substitute dried herbs if you don’t have fresh. As a general rule, use about 1 teaspoon of dried herbs for every tablespoon of fresh herbs. Dried herbs are more concentrated in flavor, so you need less. Good dried substitutes for rosemary and thyme are readily available.
Q7: How long will leftover roasted chicken last in the refrigerator?
A: Properly stored leftover roasted chicken will last for 3-4 days in the refrigerator. Store it in an airtight container to maintain freshness.
Q8: Can I use different cuts of chicken instead of a whole chicken?
A: While this recipe is designed for a whole chicken, you can adapt it for chicken pieces like thighs or drumsticks. Adjust the roasting time accordingly, as smaller pieces will cook faster. Chicken breasts can also be roasted this way, but be careful not to overcook them, as they can become dry. Use a meat thermometer and aim for 165°F (74°C) internal temperature.
Garlic Herb Roasted Chicken
Ingredients
This recipe shines because of its simplicity. You don’t need a long list of exotic ingredients to create a truly memorable meal. Here’s what you’ll need:
- Whole Chicken (3-4 lbs): The star of the show! Opt for a good quality, fresh chicken for the best flavor and texture. A 3-4 pound chicken is ideal for a family of four, with potential leftovers.
- Fresh Garlic (6-8 cloves): Garlic is the backbone of the flavor profile. Fresh garlic is crucial for that pungent, aromatic kick. We’ll be using it both inside and outside the chicken.
- Fresh Rosemary (2-3 sprigs): Rosemary adds a piney, woodsy aroma that complements chicken beautifully. Fresh rosemary is preferred, but dried can be used in a pinch (use about 1 teaspoon dried).
- Fresh Thyme (2-3 sprigs): Thyme provides an earthy, slightly lemony flavor that rounds out the herb blend. Fresh thyme is best, but dried thyme (about 1 teaspoon) works as a substitute.
- Lemon (1): Lemon zest and juice brighten up the dish, adding a touch of acidity that cuts through the richness of the chicken. It also helps tenderize the meat.
- Olive Oil (3 tablespoons): Olive oil helps the herbs and garlic adhere to the chicken, promotes crispy skin, and adds richness. Use extra virgin olive oil for the best flavor.
- Salt and Black Pepper: Essential seasonings to enhance all the flavors. Use kosher salt and freshly ground black pepper for optimal taste.
Instructions
Roasting a chicken might seem intimidating, but it’s actually incredibly straightforward. Follow these simple steps for a perfectly roasted Garlic Herb Chicken every time:
Step 1: Prepare the Chicken
Begin by preheating your oven to 400°F (200°C). While the oven is heating, remove the chicken from its packaging. Pat the chicken dry thoroughly with paper towels, both inside and out. This is a crucial step for achieving crispy skin. Moisture is the enemy of crispy skin, so the drier the chicken, the better. Check the cavity of the chicken for any giblets or neck and remove them. You can discard these or save them for making stock later.
Step 2: Garlic Herb Infusion – Inside and Out
Peel and roughly chop the garlic cloves. Take about half of the garlic and stuff it into the cavity of the chicken. Add one sprig of rosemary and one sprig of thyme to the cavity as well. Cut the lemon in half. Squeeze the juice of half a lemon into the cavity and place the squeezed lemon halves inside. This aromatic stuffing will infuse the chicken from the inside out as it roasts.
In a small bowl, combine the remaining chopped garlic, the leaves from the remaining rosemary and thyme sprigs (finely chop them if they are large), the zest of the remaining half lemon, olive oil, salt, and freshly ground black pepper. Mix everything together well to create a fragrant herb rub.
Step 3: Rub and Season the Chicken
Using your hands, generously rub the garlic herb mixture all over the outside of the chicken, ensuring every part is coated, including under the wings and legs. Don’t be shy with the seasoning! Seasoning is key to flavorful roasted chicken. Make sure to get some of the rub under the skin of the breast if you can, to directly flavor the breast meat.
Step 4: Trussing (Optional but Recommended)
Trussing the chicken (tying the legs together) is optional, but it helps the chicken cook more evenly and maintain a nice shape. If you want to truss, use kitchen twine to tie the legs together securely. This will prevent the legs from splaying out during roasting and ensure the breast cooks more evenly.
Step 5: Roasting the Chicken
Place the chicken in a roasting pan. You can use a roasting rack inside the pan to elevate the chicken, which allows for better air circulation and crispier skin all around. If you don’t have a roasting rack, you can use roughly chopped vegetables like carrots, onions, and celery as a makeshift rack – this also adds flavor to the vegetables as they roast with the chicken drippings.
Roast the chicken in the preheated oven for approximately 1 hour and 15 minutes to 1 hour and 30 minutes, or until a meat thermometer inserted into the thickest part of the thigh (without touching the bone) registers 165°F (74°C). The cooking time will vary depending on the size of your chicken and your oven.
Step 6: Basting (Optional for Extra Flavor and Moisture)
For extra flavorful and moist chicken, you can baste it with pan juices during the roasting process. About halfway through the roasting time (around 45 minutes in), carefully remove the roasting pan from the oven and spoon the pan juices over the chicken. Be careful as the pan and juices will be hot. Return the chicken to the oven to continue roasting. Basting is not strictly necessary, but it can enhance the flavor and keep the chicken extra juicy.
Step 7: Resting is Key
Once the chicken is cooked through and reaches 165°F (74°C), remove it from the oven and let it rest for at least 10-15 minutes before carving. Resting is absolutely crucial! During roasting, the juices in the chicken redistribute towards the center. Resting allows these juices to redistribute back throughout the meat, resulting in a more tender and juicy chicken. Tent the chicken loosely with foil while it rests to keep it warm.
Step 8: Carving and Serving
After resting, carve the chicken and serve immediately. To carve, start by removing the legs and thighs. Then, slice the breast meat. Serve with your favorite sides and enjoy the delicious Garlic Herb Roasted Chicken! Don’t forget to drizzle some of the pan juices over the chicken for extra flavor.
Nutrition
- Serving Size: one normal portion
- Calories: 300
- Protein: 40g