")


There’s something truly magical about summer evenings, isn’t there? The air gets a little cooler, the fireflies start to dance, and the unmistakable aroma of barbecue fills the neighbourhood. For my family, no summer cookout is truly complete without Grilled Corn on a Stick. I remember the first time I perfected this recipe; the kids, usually picky eaters, couldn’t get enough. Their faces, smeared with butter and beaming with delight as they gnawed on those smoky, sweet kernels, became an instant cherished memory. It wasn’t just corn; it was the taste of sunshine, laughter, and togetherness, all bundled onto a convenient, edible handle. This recipe isn’t complicated – in fact, its beauty lies in its simplicity – but the result is consistently spectacular. It transforms a humble vegetable into the star of the barbecue, a crowd-pleasing side dish that disappears almost as quickly as it comes off the grill. The combination of the natural sweetness of the corn, enhanced by the char and smoke from the grill, and finished with a slick of creamy butter and a sprinkle of salt is pure, unadulterated summer bliss. It’s become such a staple that my neighbours now specifically ask if the “famous grilled corn” will be making an appearance at our potlucks. It’s easy, it’s delicious, and it brings people together – everything a perfect summer recipe should be.
Ingredients
- 8 medium Ears of Fresh Corn: Choose ears that feel plump and have bright green, tightly wrapped husks. The tassels should be slightly sticky and golden, not dry or brown. Freshness is key for sweetness and juiciness.
- ½ cup (1 stick) Unsalted Butter: Softened to room temperature for easy spreading. Using unsalted butter allows you to control the final saltiness of the dish.
- 1 teaspoon Kosher Salt (or to taste): Coarse grain salt adheres well and provides a pleasant flavour contrast. Adjust based on your preference.
- ½ teaspoon Black Pepper (freshly ground, optional): Adds a subtle warmth and spice. Freshly ground pepper offers the most robust flavour.
- Optional: Wooden Skewers or Corn Holders: If your corn stalks aren’t long enough to serve as handles, sturdy wooden skewers inserted into the base provide a clean way to hold the hot corn. Soak wooden skewers in water for 30 minutes before use to prevent burning.
Instructions
- Prepare the Corn: Gently peel back the husks from each ear of corn, leaving them attached at the base if you plan to use them as handles or for presentation. Remove all the silky threads thoroughly; these can burn easily and affect the taste. If you prefer grilling without husks, remove them completely along with the silks. If grilling with husks on (for steaming), carefully pull them back, remove silks, apply butter/seasonings directly to kernels, then pull the husks back up and secure with kitchen twine or a strip of husk if desired. For this primary recipe (direct grilling for char), remove husks and silks entirely. Rinse the shucked corn under cold water and pat dry with paper towels.
- Prepare the Grill: Preheat your outdoor grill (gas or charcoal) to medium-high heat, aiming for a temperature around 400-450°F (200-230°C). Clean the grill grates thoroughly with a grill brush to prevent sticking and ensure even cooking marks. If using a charcoal grill, arrange the coals for direct heat cooking.
- Season the Corn (Optional Pre-Grill): While you can butter and season after grilling, some prefer a light coating beforehand. You can lightly brush the ears with melted butter or olive oil before placing them on the grill. This can help promote browning and prevent sticking, though the main buttering is typically done post-grilling.
- Grill the Corn: Place the shucked corn directly onto the hot grill grates. Grill for approximately 10-15 minutes, turning the corn every 2-3 minutes using tongs. You’re looking for the kernels to become tender, slightly shrunken, and develop some nice char marks on all sides. The exact time will depend on the heat of your grill and the size/freshness of the corn. Avoid walking away for too long, as the sugars in the corn can cause it to burn quickly if left unattended.
- Check for Doneness: The corn is done when the kernels are tender when pierced with a fork or a sharp knife, and they have developed a golden hue with some charred spots. Some kernels might even pop slightly.
- Butter and Season: Once the corn is cooked to your liking, carefully remove it from the grill using tongs and place it on a large platter or baking sheet. Immediately brush each ear generously with the softened unsalted butter. The heat from the corn will melt the butter beautifully, allowing it to seep into every crevice. Sprinkle evenly with kosher salt and freshly ground black pepper (if using).
- Insert Holders (If Needed): If you removed the husks entirely and the stalks aren’t sufficient handles, carefully insert wooden skewers or reusable corn holders into the thicker base of each ear of corn. This makes them much easier and less messy to handle, especially while hot.
- Serve Immediately: Grilled corn on the stick is best enjoyed hot off the grill while the butter is melted and the kernels are juicy and warm.
Nutrition Facts
- Servings: 8 servings (1 ear of corn per serving)
- Calories per Serving: Approximately 150-200 kcal (This is an estimate and can vary significantly based on the size of the corn ear and the amount of butter used).
- Fiber: A good source of dietary fiber, crucial for digestive health and helping you feel full. Corn provides insoluble fiber, which aids regularity.
- Carbohydrates: Primarily provides complex carbohydrates, which are the body’s main source of energy. The natural sugars in corn contribute to its sweet taste.
- Vitamins: Contains essential vitamins like Vitamin C (an antioxidant important for immune function) and some B vitamins (like folate, niacin, and thiamine) involved in energy metabolism.
- Minerals: Offers minerals such as potassium (important for blood pressure regulation and fluid balance) and magnesium (involved in muscle and nerve function).
- Low in Fat (Base Ingredient): Corn itself is naturally low in fat. The primary source of fat in this recipe comes from the added butter.
(Note: Nutrition facts are estimates and do not account for optional toppings beyond butter, salt, and pepper.)
Preparation Time
- Prep Time: Approximately 10-15 minutes. This includes shucking the corn, removing the silks, rinsing, patting dry, and preheating the grill. If soaking husks or skewers, add an extra 30 minutes (passive time).
- Cook Time: Approximately 10-15 minutes on the grill.
- Total Time: Approximately 20-30 minutes from start to finish (excluding optional soaking time). This makes Grilled Corn on a Stick a wonderfully quick and efficient side dish for any barbecue or weeknight meal.
How to Serve
Grilled Corn on a Stick is fantastic on its own, but it also serves as a perfect canvas for a variety of flavours. Here are some serving suggestions:
- Classic:
- Serve immediately after grilling, brushed generously with melted butter, kosher salt, and freshly ground black pepper. Simple, timeless, and always delicious.
- Flavored Butters: Prepare compound butters beforehand and slather them on the hot corn:
- Garlic Herb Butter: Mix softened butter with minced garlic, chopped fresh parsley, chives, and a pinch of salt.
- Chili Lime Butter: Combine softened butter with chili powder, lime zest, a squeeze of lime juice, and a pinch of cayenne for heat.
- Smoked Paprika Butter: Blend softened butter with smoked paprika, a touch of garlic powder, and salt.
- Honey Sriracha Butter: Mix softened butter with honey, Sriracha sauce (to taste), and a little salt for a sweet and spicy kick.
- Cheese Toppings: Sprinkle cheese over the buttered corn:
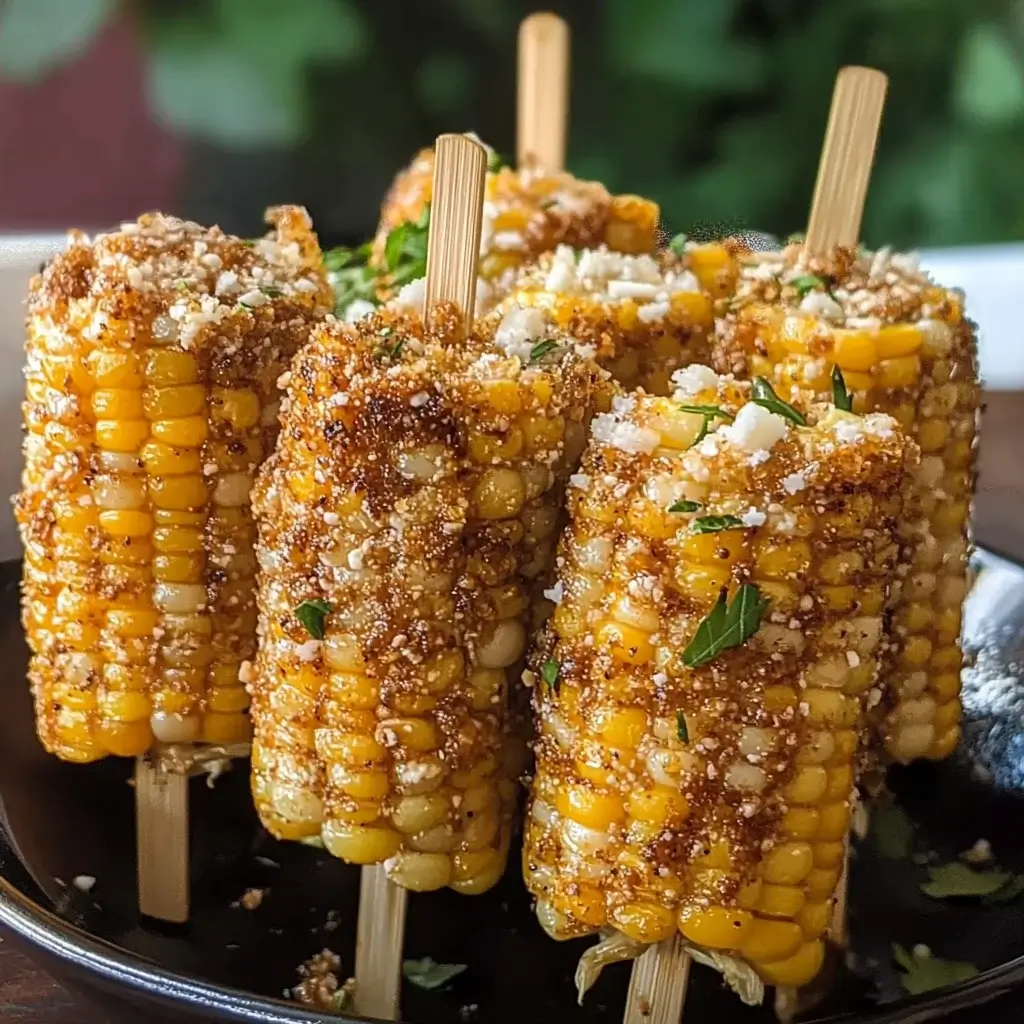
- Mexican Street Corn (Elote) Style: Slather with mayonnaise or Mexican crema, sprinkle generously with crumbled cotija cheese, chili powder, and fresh cilantro. Serve with lime wedges.
- Parmesan Herb: Sprinkle grated Parmesan cheese and finely chopped fresh herbs (like basil or oregano) over the buttered corn.
- Feta Dill: Crumble feta cheese and sprinkle fresh dill over the hot corn.
- Spice Rubs: Apply dry spice rubs immediately after buttering:
- BBQ Rub: Use your favourite store-bought or homemade BBQ rub for a smoky, sweet flavour.
- Cajun Spice: Sprinkle with a zesty Cajun seasoning blend for a taste of Louisiana.
- Everything Bagel Seasoning: Adds a savoury, crunchy texture with sesame seeds, poppy seeds, garlic, and onion.
- Sauces & Drizzles:
- Aioli: Drizzle with a garlic aioli or a chipotle aioli for a creamy, flavourful finish.
- Pesto: Brush with fresh basil pesto for an Italian-inspired twist.
- BBQ Sauce: A light drizzle of your favourite barbecue sauce can complement the smoky flavour.
- Presentation:
- Arrange the grilled corn on a large platter, alternating directions for visual appeal.
- Garnish the platter with fresh herbs like cilantro or parsley.
- Provide small bowls of various toppings (extra butter, salt, cheese, spices) so guests can customize their own ears.
- Ensure plenty of napkins are available – it’s meant to be a fun, hands-on eating experience!
- Pairings:
- Serve alongside classic BBQ fare like grilled chicken, ribs, burgers, hot dogs, or steaks.
- It pairs wonderfully with other summer sides like potato salad, coleslaw, pasta salad, and watermelon slices.
Additional Tips
- Selecting the Best Corn: Look for ears with bright green, moist-looking husks that are wrapped tightly around the corn. The tassels (silks) sticking out the top should be golden or light brown and slightly sticky; avoid corn with dry, dark brown, or black tassels, or husks that feel dry or loose, as this indicates older corn that might be starchy rather than sweet. Feel the ear through the husk for plump, even kernels. If possible, buy corn the day you plan to grill it for maximum freshness and sweetness.
- The Soaking Debate (Husks On): If you choose to grill corn with the husks pulled back on (a method for steaming more than charring), soaking the ears in cold water for 15-30 minutes beforehand helps prevent the husks from burning too quickly and allows the corn inside to steam gently. If you’re grilling directly on the grates without husks for char, soaking the kernels is unnecessary. Soaking wooden skewers for 30 minutes is always recommended if you’re using them as handles.
- Easy Silk Removal: Removing those pesky silks can be tedious. Try this: after pulling back the husks (but leaving them attached), grip the silks firmly at the top and pull downwards in one motion. Many will come off together. For stubborn strands, use a slightly stiff vegetable brush or even a clean, damp cloth or paper towel to rub them off the kernels before rinsing.
- Don’t Overcook: Corn cooks relatively quickly on a hot grill. Overcooking can lead to dry, chewy kernels. Keep a close eye on it, turn frequently, and remove it once tender and lightly charred. The goal is juicy kernels with kissed-by-fire flavour, not dehydrated ones. Remember, it will continue to cook slightly from residual heat after being removed from the grill.
- Grilling Methods – Husk On vs. Husk Off vs. Foil:
- Husk Off (Direct Grill): As per this recipe, provides the best smoky flavour and attractive char marks directly on the kernels. It’s faster but requires more attention to prevent burning.
- Husk On (Steaming): Pull husks back, silk, season/butter, pull husks back up. This method steams the corn inside, resulting in very tender, juicy kernels with less char but infused flavour. Takes slightly longer.
- Foil Packet: Shuck the corn, place it on foil with butter and seasonings, wrap tightly. This steams the corn and is great for infusing flavours, preventing flare-ups, and easy cleanup. You won’t get char marks unless you open the foil for the last few minutes over direct heat.
- Prevent Sticking: Ensure your grill grates are clean and well-oiled before placing the corn down. You can lightly brush the corn itself with oil or melted butter before grilling, or oil the grates by dipping a folded paper towel in high-smoke-point oil (like canola or vegetable) and rubbing it over the hot grates using tongs.
- Keeping Corn Warm for a Crowd: If you’re grilling a large batch, keep the finished corn warm while you cook the rest. Place the buttered and seasoned corn in a large disposable aluminum pan, cover tightly with foil, and place it on the upper rack of the grill (indirect heat) or in a low oven (around 200°F / 95°C). You can also place them in a cooler (without ice!) lined with towels – the insulation works both ways.
- Embrace the Char: Don’t be afraid of getting some dark spots on the corn. Those charred bits are where the intense, smoky flavour comes from. Aim for a mix of golden yellow, bright yellow, and dark brown/black spots for the best taste and visual appeal. Just avoid letting large sections turn completely black and burnt, which will taste bitter.
FAQ Section
- Q: Do I absolutely need to soak the corn before grilling?
- A: It depends on your grilling method. If you are grilling the corn with the husks pulled back over the kernels, then yes, soaking the entire ear (husks and all) in water for about 15-30 minutes is highly recommended. This adds moisture, helps steam the corn inside the husks, and prevents the husks from catching fire immediately. However, for this specific recipe where the corn is shucked and grilled directly on the grates (husk off), soaking the kernels themselves is not necessary. Soaking wooden skewers, if using, is always a good idea to prevent them from burning.
- Q: Is it better to grill corn with the husks on or off?
- A: Neither is definitively “better,” they just yield different results!
- Husks Off (Direct Grilling): This method, used in the main recipe, gives you direct contact between the kernels and the grill heat. This results in more pronounced smoky flavour, attractive char marks, and slightly firmer kernels. It’s generally faster.
- Husks On (Steaming/Grilling): Grilling with the husks on (after silking and seasoning underneath, then re-closing) steams the corn, making it incredibly tender and juicy. It imparts a milder grassy, sweet corn flavour with less char. It takes a bit longer and requires the soaking step mentioned above. Choose based on your preference for flavour and texture!
- A: Neither is definitively “better,” they just yield different results!
- Q: Can I use frozen corn on the cob for this recipe?
- A: Yes, you can use frozen corn on the cob, but the texture might be slightly different (potentially less crisp). It’s best to thaw the corn completely before grilling. Pat it very dry with paper towels after thawing to help it char rather than just steam on the grill. You might need to adjust the grilling time slightly. Fresh corn during its peak season will generally yield the best flavour and texture.
- Q: How long does grilled corn on the stick last, and how should I store leftovers?
- A: Grilled corn is best enjoyed fresh and hot off the grill. However, leftovers can be stored in an airtight container in the refrigerator for 3-4 days. The kernels might dry out slightly upon reheating. To reheat, you can microwave it briefly, warm it in a low oven, or even cut the kernels off the cob and sauté them in a pan with a little butter. You can also cut the kernels off leftover grilled corn and add them to salads, salsas, or pasta dishes.
- Q: Can I prepare grilled corn ahead of time?
- A: You can do some prep work ahead. You can shuck the corn and remove the silks a day in advance; store the shucked ears in an airtight container or zip-top bag in the refrigerator. You can also prepare any flavoured butters or toppings ahead of time. However, the actual grilling should be done just before serving for the best taste, texture, and temperature. Grilling imparts that fresh smoky flavour that diminishes upon cooling and reheating.
- Q: What’s the ideal grill temperature for corn?
- A: Medium-high heat is generally best for grilling shucked corn directly on the grates. Aim for a temperature range of approximately 400°F to 450°F (200°C to 230°C). This temperature is hot enough to create nice char marks and cook the corn relatively quickly without burning it too fast, while ensuring the kernels become tender and juicy inside. If grilling with husks on, a slightly lower medium heat (350-400°F) might be preferable to allow for steaming without incinerating the husks.
- Q: Should I use direct or indirect heat for grilling corn?
- A: For shucked corn aiming for char marks (like this recipe), direct heat is the way to go. Place the corn directly over the flames or hot coals, turning frequently. If you find your corn is charring too quickly before the kernels are tender, you can move it to a cooler part of the grill (indirect heat) to finish cooking through gently. For husk-on grilling or foil packets, starting over direct heat and then moving to indirect heat can also work well to manage the cooking process.
- Q: Can I make this recipe without an outdoor grill?
- A: While an outdoor grill provides the signature smoky flavour, you can achieve similar results using other methods:
- Grill Pan: Use a cast iron grill pan on your stovetop over medium-high heat. Brush the corn with oil or butter and grill, turning occasionally, until charred and tender (about 10-15 minutes). Ensure good ventilation as it can get smoky.
- Broiler: Place shucked corn brushed with butter/oil on a baking sheet under your oven’s broiler (preheated). Watch carefully and turn frequently, as the broiler heat is intense and can burn the corn quickly. It will take about 5-10 minutes. You’ll get char but less smoky flavour.
- Oven Roasting: Roast shucked corn at a high temperature (around 425°F / 220°C) on a baking sheet, turning occasionally, for about 20-25 minutes until tender and slightly caramelized. Again, less smoky flavour than grilling.
- A: While an outdoor grill provides the signature smoky flavour, you can achieve similar results using other methods:

Grilled Corn on a Stick
Ingredients
- 8 medium Ears of Fresh Corn: Choose ears that feel plump and have bright green, tightly wrapped husks. The tassels should be slightly sticky and golden, not dry or brown. Freshness is key for sweetness and juiciness.
- ½ cup (1 stick) Unsalted Butter: Softened to room temperature for easy spreading. Using unsalted butter allows you to control the final saltiness of the dish.
- 1 teaspoon Kosher Salt (or to taste): Coarse grain salt adheres well and provides a pleasant flavour contrast. Adjust based on your preference.
- ½ teaspoon Black Pepper (freshly ground, optional): Adds a subtle warmth and spice. Freshly ground pepper offers the most robust flavour.
- Optional: Wooden Skewers or Corn Holders: If your corn stalks aren’t long enough to serve as handles, sturdy wooden skewers inserted into the base provide a clean way to hold the hot corn. Soak wooden skewers in water for 30 minutes before use to prevent burning.
Instructions
- Prepare the Corn: Gently peel back the husks from each ear of corn, leaving them attached at the base if you plan to use them as handles or for presentation. Remove all the silky threads thoroughly; these can burn easily and affect the taste. If you prefer grilling without husks, remove them completely along with the silks. If grilling with husks on (for steaming), carefully pull them back, remove silks, apply butter/seasonings directly to kernels, then pull the husks back up and secure with kitchen twine or a strip of husk if desired. For this primary recipe (direct grilling for char), remove husks and silks entirely. Rinse the shucked corn under cold water and pat dry with paper towels.
- Prepare the Grill: Preheat your outdoor grill (gas or charcoal) to medium-high heat, aiming for a temperature around 400-450°F (200-230°C). Clean the grill grates thoroughly with a grill brush to prevent sticking and ensure even cooking marks. If using a charcoal grill, arrange the coals for direct heat cooking.
- Season the Corn (Optional Pre-Grill): While you can butter and season after grilling, some prefer a light coating beforehand. You can lightly brush the ears with melted butter or olive oil before placing them on the grill. This can help promote browning and prevent sticking, though the main buttering is typically done post-grilling.
- Grill the Corn: Place the shucked corn directly onto the hot grill grates. Grill for approximately 10-15 minutes, turning the corn every 2-3 minutes using tongs. You’re looking for the kernels to become tender, slightly shrunken, and develop some nice char marks on all sides. The exact time will depend on the heat of your grill and the size/freshness of the corn. Avoid walking away for too long, as the sugars in the corn can cause it to burn quickly if left unattended.
- Check for Doneness: The corn is done when the kernels are tender when pierced with a fork or a sharp knife, and they have developed a golden hue with some charred spots. Some kernels might even pop slightly.
- Butter and Season: Once the corn is cooked to your liking, carefully remove it from the grill using tongs and place it on a large platter or baking sheet. Immediately brush each ear generously with the softened unsalted butter. The heat from the corn will melt the butter beautifully, allowing it to seep into every crevice. Sprinkle evenly with kosher salt and freshly ground black pepper (if using).
- Insert Holders (If Needed): If you removed the husks entirely and the stalks aren’t sufficient handles, carefully insert wooden skewers or reusable corn holders into the thicker base of each ear of corn. This makes them much easier and less messy to handle, especially while hot.
- Serve Immediately: Grilled corn on the stick is best enjoyed hot off the grill while the butter is melted and the kernels are juicy and warm.
Nutrition
- Serving Size: one normal portion
- Calories: 200


