")


I still remember the first time I made this Instant Mango Coconut Cake. It was one of those sweltering summer afternoons when the thought of turning on the oven felt like a cruel joke. The kids were getting restless, and I had promised them a special treat. Scouring the pantry and fridge, I found a can of coconut milk, some ripe mangoes nearing their peak sweetness, and a forgotten sleeve of digestive biscuits. An idea sparked – what if I could create a dessert that captured the essence of a tropical vacation without any of the heat or hassle of baking? Twenty minutes of active work and a few hours of patient waiting later, I pulled this golden-hued masterpiece from the refrigerator. The moment of truth came after dinner. I sliced into the firm, yet creamy cake, the knife gliding through it effortlessly. The first bite was pure bliss. A crunchy, buttery base gave way to a cloud-like filling, bursting with the sweet, floral notes of mango, all rounded out by the rich, exotic creaminess of coconut. My family fell silent, a rare occurrence, their spoons clinking against their plates being the only sound. My youngest looked up at me, a smear of mango on his cheek, and declared it “sunshine cake.” Since that day, this Instant Mango Coconut Cake has become our official family dessert for celebrations, potlucks, and any day that needs a little bit of sunshine. It’s a testament to the fact that the most impressive desserts don’t always require hours of labor or a hot oven, but rather simple, beautiful ingredients allowed to shine.
Ingredients
Here is everything you will need to create this stunning no-bake tropical dessert. Each component plays a vital role in achieving the perfect balance of texture and flavor.
- For the Biscuit Base:
- 200g (7 oz) Digestive Biscuits or Graham Crackers: These form the classic, buttery, and crunchy foundation of our no-bake cake. Graham crackers will lend a hint of honey and cinnamon.
- 100g (1/2 cup) Unsalted Butter, melted: This is the magic ingredient that binds the cookie crumbs together into a firm, sliceable crust.
- For the Mango Coconut Filling:
- 2 cups Ripe Mango Puree (from about 3-4 large mangoes): This is the star of the show. Using sweet, ripe, non-fibrous mangoes like Alphonso, Kent, or Ataulfo will yield the best flavor and smoothest texture.
- 400ml (1 can) Full-Fat Coconut Milk, chilled: Do not use light coconut milk. The high fat content is essential for creating a rich, creamy, and stable filling that tastes luxuriously tropical. Chilling the can helps the cream separate.
- 200ml (scant 1 cup) Heavy Whipping Cream, cold: Whipped to stiff peaks, this ingredient incorporates air and lightness, transforming the filling from a simple pudding into a delicate mousse-like texture.
- 1/2 cup Granulated Sugar (or to taste): This enhances the natural sweetness of the mangoes. You can adjust the amount based on how sweet your fruit is.
- 2 tablespoons (around 15g) Unflavored Gelatin Powder: This is the crucial setting agent that gives our no-bake cake its structure, ensuring clean, beautiful slices.
- 1/4 cup Cold Water: Used to “bloom” the gelatin, which is a necessary step to activate its setting properties and ensure it dissolves smoothly.
- 1 teaspoon Vanilla Extract: A background note that enhances all the other flavors, adding a touch of warmth and complexity.
- Pinch of Salt: Just a tiny amount is needed to balance the sweetness and make the mango and coconut flavors pop.
Instructions
Follow these detailed steps carefully to ensure your cake sets perfectly and tastes divine. The process is simple and broken down into two main parts: creating the base and preparing the luscious filling.
Part 1: Preparing the Buttery Biscuit Base
- Prepare Your Pan: Lightly grease an 8-inch or 9-inch springform pan with butter or a neutral oil. This will make releasing the cake much easier later. You can also line the bottom with a circle of parchment paper for extra insurance.
- Create the Crumbs: Place the digestive biscuits or graham crackers into a food processor. Pulse them until they resemble fine, sandy crumbs. If you don’t have a food processor, you can place the biscuits in a large, sealed zip-top bag and crush them with a rolling pin.
- Combine with Butter: Transfer the biscuit crumbs to a medium bowl. Pour the melted unsalted butter over the crumbs. Using a fork or a spatula, mix thoroughly until all the crumbs are evenly moistened and the mixture looks like wet sand.
- Press into the Pan: Tip the buttery crumb mixture into your prepared springform pan. Use the back of a spoon or the flat bottom of a measuring cup to press the crumbs down firmly and evenly across the bottom of the pan. You can also press them slightly up the sides if you prefer a taller crust.
- Chill the Base: Place the pan in the refrigerator to chill for at least 30 minutes. This step is crucial as it allows the butter to solidify, creating a firm and stable base for your filling.
Part 2: Crafting the Creamy Mango Coconut Filling
- Bloom the Gelatin: In a small bowl, pour the 1/4 cup of cold water. Sprinkle the 2 tablespoons of gelatin powder evenly over the top. Let it sit undisturbed for 5-10 minutes. The gelatin will absorb the water and become thick and jiggly. This process is called “blooming” and is essential for a smooth, lump-free filling.
- Prepare the Mango Puree: While the gelatin is blooming, peel and chop your ripe mangoes, discarding the pit. Place the mango flesh into a blender or food processor and blend until completely smooth. Measure out 2 cups of puree.
- Warm the Coconut Milk Mixture: In a small saucepan, combine the full-fat coconut milk and the granulated sugar. Heat over medium-low heat, stirring constantly, until the sugar is completely dissolved and the mixture is warm to the touch. Do not let it boil.
- Dissolve the Gelatin: Once the coconut milk mixture is warm, remove it from the heat. Add the bloomed gelatin to the saucepan. Whisk continuously until the gelatin has completely dissolved into the warm liquid. There should be no grains or lumps remaining. If you’re unsure, you can strain the mixture through a fine-mesh sieve.
- Combine Mango and Coconut: In a large bowl, pour the warm coconut milk and gelatin mixture over the 2 cups of mango puree. Add the vanilla extract and the pinch of salt. Whisk everything together until it is well combined and uniform in color. Set this mixture aside to cool to room temperature, about 20-30 minutes. It must be cool before you add the whipped cream.
- Whip the Cream: In a separate, clean, and chilled mixing bowl, pour in the cold heavy whipping cream. Using an electric hand mixer or a stand mixer with the whisk attachment, beat the cream on medium-high speed. Continue beating until stiff peaks form. Stiff peaks mean that when you lift the beaters out of the cream, the peak that forms holds its shape and doesn’t flop over.
- Fold Everything Together: Gently add about one-third of the whipped cream into the cooled mango-coconut mixture. Use a spatula to fold it in, lightening the base. Then, add the remaining whipped cream. Fold gently and carefully, scraping from the bottom and bringing it up over the top, until just combined and no white streaks remain. Be careful not to overmix, as this will deflate the whipped cream and make your filling dense.
- Assemble the Cake: Retrieve your chilled biscuit base from the refrigerator. Pour the airy mango coconut filling over the base and spread it out evenly with your spatula.
- Chill to Set: Cover the springform pan with plastic wrap, being careful not to let it touch the surface of the filling. Place the cake in the refrigerator to chill for a minimum of 4 hours, but preferably 6 hours or overnight. The cake needs this time to set completely.
- Release and Serve: Once fully set, run a thin knife around the edge of the cake to loosen it from the sides of the springform pan. Carefully unlatch and remove the ring. Your beautiful Instant Mango Coconut Cake is now ready to be sliced and enjoyed!
Nutrition Facts
Disclaimer: The following nutritional information is an estimate and can vary based on the specific ingredients used.
- Servings: 10-12 slices
- Calories per Serving: Approximately 380-420 kcal
- Vitamin C: Mangoes are an excellent source of this powerful antioxidant, which is essential for immune system function and skin health. A single slice of this cake can provide a significant portion of your daily recommended intake.
- Healthy Fats: The full-fat coconut milk provides medium-chain triglycerides (MCTs), a type of fat that is more easily metabolized by the body for energy compared to other saturated fats.
- Carbohydrates: This dessert provides a quick source of energy, primarily from the natural sugars in the mangoes, the added sugar, and the biscuit base. It’s the perfect pick-me-up treat.
- Dietary Fiber: Both mangoes and digestive biscuits contribute a modest amount of dietary fiber, which is important for digestive health and promoting a feeling of fullness.
- Protein: The gelatin and dairy components contribute a small amount of protein, which is vital for building and repairing tissues in the body.
Preparation Time
This recipe is prized for its minimal active time, making it perfect for busy schedules. The majority of the time is hands-off while the cake works its magic in the refrigerator.
- Active Preparation Time: 20-25 minutes. This includes making the crust, pureeing the mangoes, and mixing the filling.
- Chilling Time: A minimum of 4-6 hours, or ideally overnight. This extended chilling period is non-negotiable as it allows the gelatin to fully set, resulting in a firm cake that holds its shape beautifully when sliced.
How to Serve
Serving this Instant Mango Coconut Cake is almost as enjoyable as making it. Its vibrant color and elegant simplicity make it a showstopper on any table. Here are some ideas to elevate its presentation and create a memorable dessert experience:
Garnishes for a Finishing Touch:
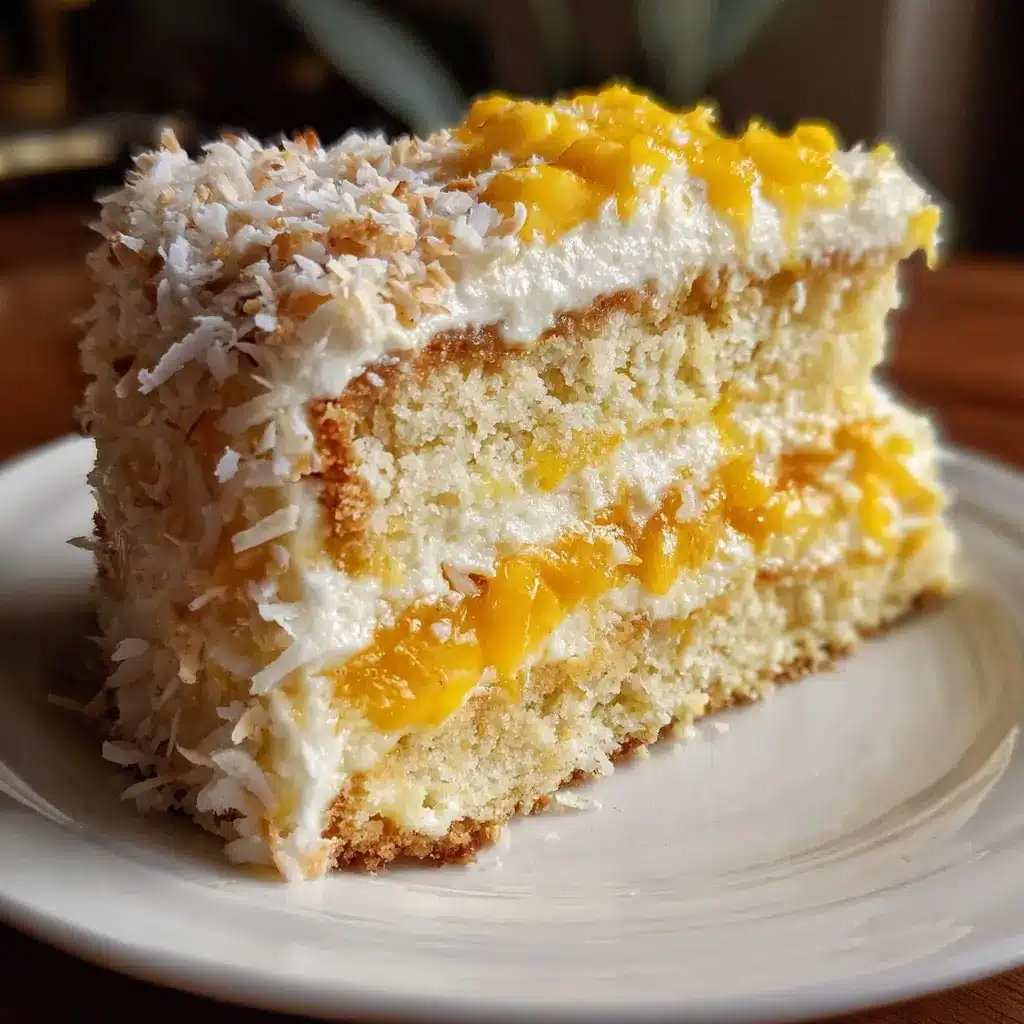
- Toasted Coconut Flakes: Sprinkle generously over the top just before serving. Toasting brings out a nutty, deeper flavor and adds a delightful crunchy texture that contrasts with the creamy filling.
- Fresh Mango Slices or Cubes: Arrange fresh, sweet mango pieces in the center or around the edge of the cake. This not only looks beautiful but also reinforces the star flavor of the dessert.
- A Dusting of Powdered Sugar: For a simple, elegant look, a light dusting of powdered sugar can make the cake look like it came from a professional patisserie.
- Fresh Mint Sprigs: The bright green color of mint provides a stunning visual contrast against the golden-yellow cake, and its fresh aroma complements the tropical flavors wonderfully.
- Passion Fruit Drizzle: For an extra tropical punch, drizzle the pulp and seeds of a fresh passion fruit over each slice. Its tartness cuts through the richness of the cake perfectly.
Perfect Pairings:
- Serve a slice with a dollop of unsweetened whipped cream or a scoop of high-quality vanilla bean ice cream.
- Pair with a refreshing beverage like a tall glass of iced tea, a sparkling lemonade, or a light and crisp white wine like a Sauvignon Blanc.
- For a cozy pairing, a cup of hot green tea or a mild black coffee works beautifully to balance the cake’s sweetness.
Occasions to Shine:
- Summer Barbecues and Picnics: As a no-bake dessert, it’s the ultimate contribution to any outdoor gathering. It’s cool, refreshing, and easy to transport.
- Birthday Celebrations: It’s a wonderful and unique alternative to a traditional baked birthday cake, especially for someone who loves tropical flavors.
- Holiday Dessert Tables: This cake adds a bright, sunny splash of color to an Easter, Mother’s Day, or Christmas dessert spread.
- An Easy Weeknight Treat: Because it’s so simple to whip up, you don’t need a special occasion to enjoy this slice of paradise.
Additional Tips
Master this recipe and make it your own with these eight expert tips, designed to ensure success every single time.
- Choose the Perfect Mangoes: The quality of your cake depends heavily on the quality of your mangoes. Opt for varieties that are known for being sweet, fragrant, and less fibrous, such as Alphonso (the king of mangoes), Kent, Keitt, or Ataulfo (honey mangoes). To check for ripeness, gently squeeze the fruit; it should have a little give but not be mushy. It should also have a strong, sweet aroma near the stem.
- The Secret to a Perfect Crust: For an extra crunchy and flavorful crust, consider adding 1/4 cup of desiccated coconut or finely chopped nuts (like macadamia or almonds) to your biscuit crumb mixture. Also, when pressing the base into the pan, use the flat bottom of a glass to press down firmly and evenly. This compaction is key to preventing a crumbly base.
- Achieve a Silky-Smooth Filling: To guarantee your filling is perfectly smooth, take the extra step of straining your mango puree through a fine-mesh sieve before mixing it with the other ingredients. This will remove any potential fibers that your blender might have missed, resulting in a truly velvety texture.
- Mastering Gelatin: The most common point of failure in no-bake cheesecakes and mousses is the gelatin. Always “bloom” it in cold water first. Never add gelatin powder directly to a hot liquid, as it will clump instantly. When dissolving the bloomed gelatin in the warm coconut milk, whisk until you cannot see or feel any grains. If in doubt, it’s better to whisk for an extra minute.
- Room Temperature is Key: It is critical that your mango-gelatin mixture has cooled to room temperature before you fold in the whipped cream. If the mango mixture is too warm, it will melt the whipped cream, causing the filling to become liquidy and lose all its airy volume, resulting in a dense, rubbery cake.
- The Art of Folding: Do not stir or whisk the whipped cream into the mango base. The technique of “folding” is designed to combine ingredients while retaining as much air as possible. Use a large, flexible spatula to cut down through the middle of the mixture, scrape along the bottom of the bowl, and bring that mixture up and over the top. Rotate the bowl a quarter turn and repeat. Continue gently until no streaks remain.
- For Clean, Professional Slices: The secret to picture-perfect slices is a hot knife. Fill a tall glass with hot water. Dip a long, sharp knife into the hot water, wipe it dry with a paper towel, and then make your first cut. Repeat this process—dip, wipe, cut—for every single slice. The hot blade will melt through the cake cleanly, preventing the filling from sticking and smearing.
- Make-Ahead Magic: This cake is an excellent make-ahead dessert, which is perfect for stress-free entertaining. You can prepare it completely one or even two days in advance. In fact, its flavor and texture often improve after a full 24 hours in the refrigerator, as the flavors have more time to meld and mature. Just keep it covered and garnish right before serving.
FAQ Section
Here are answers to some of the most frequently asked questions about making the Instant Mango Coconut Cake.
1. Can I use frozen mangoes for this recipe?
Yes, absolutely! Frozen mango chunks are a fantastic and convenient alternative, especially when fresh mangoes are not in season. Simply thaw the frozen mangoes completely at room temperature or in the microwave, drain any excess liquid, and then blend them into a puree as instructed. Ensure you still measure out exactly 2 cups of puree.
2. How can I make this recipe vegan?
You can easily adapt this recipe to be fully vegan. For the filling, use a vegan whipping cream or the solid cream skimmed from the top of two cans of chilled full-fat coconut milk instead of dairy whipping cream. To replace the gelatin, use 1.5 to 2 teaspoons of agar-agar powder. Dissolve the agar-agar in the coconut milk and bring it to a gentle simmer for 2-3 minutes to activate it before mixing with the mango puree. For the base, use a vegan butter substitute and ensure your biscuits are dairy-free.
3. My cake didn’t set properly. What went wrong?
This is almost always a gelatin-related issue. There are a few possible culprits: a) The gelatin wasn’t bloomed properly in cold water first. b) The gelatin didn’t fully dissolve in the warm coconut milk. c) You may have accidentally boiled the gelatin mixture, which can weaken its setting power. d) Not enough chilling time was allowed. This cake needs a minimum of 4-6 hours to become firm.
4. How should I store leftover mango coconut cake?
Leftover cake should be stored in an airtight container in the refrigerator. It will keep well for up to 4 days. After this point, the biscuit base may start to become soft. This cake is not suitable for freezing, as the gelatin-based filling can become watery and spongy upon thawing.
5. Can I use a different type of pan if I don’t have a springform pan?
Yes, you can. A 9-inch deep-dish pie plate or a square 8×8 inch baking dish will work. To make removal easier, line the entire dish with parchment paper, leaving some overhang on the sides to act as “handles.” You can then lift the entire cake out of the dish before slicing.
6. Is this Instant Mango Coconut Cake recipe gluten-free?
The filling of the cake is naturally gluten-free. To make the entire recipe gluten-free, you simply need to substitute the digestive biscuits or graham crackers in the base with your favorite gluten-free cookies. Many brands offer excellent gluten-free shortbread or digestive-style biscuits that would work perfectly.
7. Can I use a different fruit instead of mango?
Yes, this recipe is quite versatile. You could substitute the mango puree with an equal amount of puree from other soft, sweet fruits. Strawberry, raspberry, or peach puree would work wonderfully. However, avoid using fresh pineapple, kiwi, or papaya, as these fruits contain an enzyme (bromelain for pineapple, actinidin for kiwi) that breaks down gelatin and will prevent your cake from setting. If you wish to use them, you must cook the fruit puree first to deactivate the enzyme.
8. Can I reduce the amount of sugar?
Certainly. The sweetness of the cake is very adaptable. The amount of sugar needed will depend heavily on the natural sweetness of your mangoes. It’s a good idea to taste your mango puree before adding any sugar. You can start with a smaller amount, like 1/4 cup, mix it into the coconut milk, taste, and add more if you feel it’s necessary. You could also use alternative sweeteners like maple syrup or agave nectar, but be mindful that they may slightly alter the flavor profile.

Instant Mango Coconut Cake
Ingredients
Here is everything you will need to create this stunning no-bake tropical dessert. Each component plays a vital role in achieving the perfect balance of texture and flavor.
- For the Biscuit Base:
- 200g (7 oz) Digestive Biscuits or Graham Crackers: These form the classic, buttery, and crunchy foundation of our no-bake cake. Graham crackers will lend a hint of honey and cinnamon.
- 100g (1/2 cup) Unsalted Butter, melted: This is the magic ingredient that binds the cookie crumbs together into a firm, sliceable crust.
- For the Mango Coconut Filling:
- 2 cups Ripe Mango Puree (from about 3–4 large mangoes): This is the star of the show. Using sweet, ripe, non-fibrous mangoes like Alphonso, Kent, or Ataulfo will yield the best flavor and smoothest texture.
- 400ml (1 can) Full-Fat Coconut Milk, chilled: Do not use light coconut milk. The high fat content is essential for creating a rich, creamy, and stable filling that tastes luxuriously tropical. Chilling the can helps the cream separate.
- 200ml (scant 1 cup) Heavy Whipping Cream, cold: Whipped to stiff peaks, this ingredient incorporates air and lightness, transforming the filling from a simple pudding into a delicate mousse-like texture.
- 1/2 cup Granulated Sugar (or to taste): This enhances the natural sweetness of the mangoes. You can adjust the amount based on how sweet your fruit is.
- 2 tablespoons (around 15g) Unflavored Gelatin Powder: This is the crucial setting agent that gives our no-bake cake its structure, ensuring clean, beautiful slices.
- 1/4 cup Cold Water: Used to “bloom” the gelatin, which is a necessary step to activate its setting properties and ensure it dissolves smoothly.
- 1 teaspoon Vanilla Extract: A background note that enhances all the other flavors, adding a touch of warmth and complexity.
- Pinch of Salt: Just a tiny amount is needed to balance the sweetness and make the mango and coconut flavors pop.
Instructions
Follow these detailed steps carefully to ensure your cake sets perfectly and tastes divine. The process is simple and broken down into two main parts: creating the base and preparing the luscious filling.
Part 1: Preparing the Buttery Biscuit Base
- Prepare Your Pan: Lightly grease an 8-inch or 9-inch springform pan with butter or a neutral oil. This will make releasing the cake much easier later. You can also line the bottom with a circle of parchment paper for extra insurance.
- Create the Crumbs: Place the digestive biscuits or graham crackers into a food processor. Pulse them until they resemble fine, sandy crumbs. If you don’t have a food processor, you can place the biscuits in a large, sealed zip-top bag and crush them with a rolling pin.
- Combine with Butter: Transfer the biscuit crumbs to a medium bowl. Pour the melted unsalted butter over the crumbs. Using a fork or a spatula, mix thoroughly until all the crumbs are evenly moistened and the mixture looks like wet sand.
- Press into the Pan: Tip the buttery crumb mixture into your prepared springform pan. Use the back of a spoon or the flat bottom of a measuring cup to press the crumbs down firmly and evenly across the bottom of the pan. You can also press them slightly up the sides if you prefer a taller crust.
- Chill the Base: Place the pan in the refrigerator to chill for at least 30 minutes. This step is crucial as it allows the butter to solidify, creating a firm and stable base for your filling.
Part 2: Crafting the Creamy Mango Coconut Filling
- Bloom the Gelatin: In a small bowl, pour the 1/4 cup of cold water. Sprinkle the 2 tablespoons of gelatin powder evenly over the top. Let it sit undisturbed for 5-10 minutes. The gelatin will absorb the water and become thick and jiggly. This process is called “blooming” and is essential for a smooth, lump-free filling.
- Prepare the Mango Puree: While the gelatin is blooming, peel and chop your ripe mangoes, discarding the pit. Place the mango flesh into a blender or food processor and blend until completely smooth. Measure out 2 cups of puree.
- Warm the Coconut Milk Mixture: In a small saucepan, combine the full-fat coconut milk and the granulated sugar. Heat over medium-low heat, stirring constantly, until the sugar is completely dissolved and the mixture is warm to the touch. Do not let it boil.
- Dissolve the Gelatin: Once the coconut milk mixture is warm, remove it from the heat. Add the bloomed gelatin to the saucepan. Whisk continuously until the gelatin has completely dissolved into the warm liquid. There should be no grains or lumps remaining. If you’re unsure, you can strain the mixture through a fine-mesh sieve.
- Combine Mango and Coconut: In a large bowl, pour the warm coconut milk and gelatin mixture over the 2 cups of mango puree. Add the vanilla extract and the pinch of salt. Whisk everything together until it is well combined and uniform in color. Set this mixture aside to cool to room temperature, about 20-30 minutes. It must be cool before you add the whipped cream.
- Whip the Cream: In a separate, clean, and chilled mixing bowl, pour in the cold heavy whipping cream. Using an electric hand mixer or a stand mixer with the whisk attachment, beat the cream on medium-high speed. Continue beating until stiff peaks form. Stiff peaks mean that when you lift the beaters out of the cream, the peak that forms holds its shape and doesn’t flop over.
- Fold Everything Together: Gently add about one-third of the whipped cream into the cooled mango-coconut mixture. Use a spatula to fold it in, lightening the base. Then, add the remaining whipped cream. Fold gently and carefully, scraping from the bottom and bringing it up over the top, until just combined and no white streaks remain. Be careful not to overmix, as this will deflate the whipped cream and make your filling dense.
- Assemble the Cake: Retrieve your chilled biscuit base from the refrigerator. Pour the airy mango coconut filling over the base and spread it out evenly with your spatula.
- Chill to Set: Cover the springform pan with plastic wrap, being careful not to let it touch the surface of the filling. Place the cake in the refrigerator to chill for a minimum of 4 hours, but preferably 6 hours or overnight. The cake needs this time to set completely.
- Release and Serve: Once fully set, run a thin knife around the edge of the cake to loosen it from the sides of the springform pan. Carefully unlatch and remove the ring. Your beautiful Instant Mango Coconut Cake is now ready to be sliced and enjoyed!
Nutrition
- Serving Size: one normal portion
- Calories: 420