")

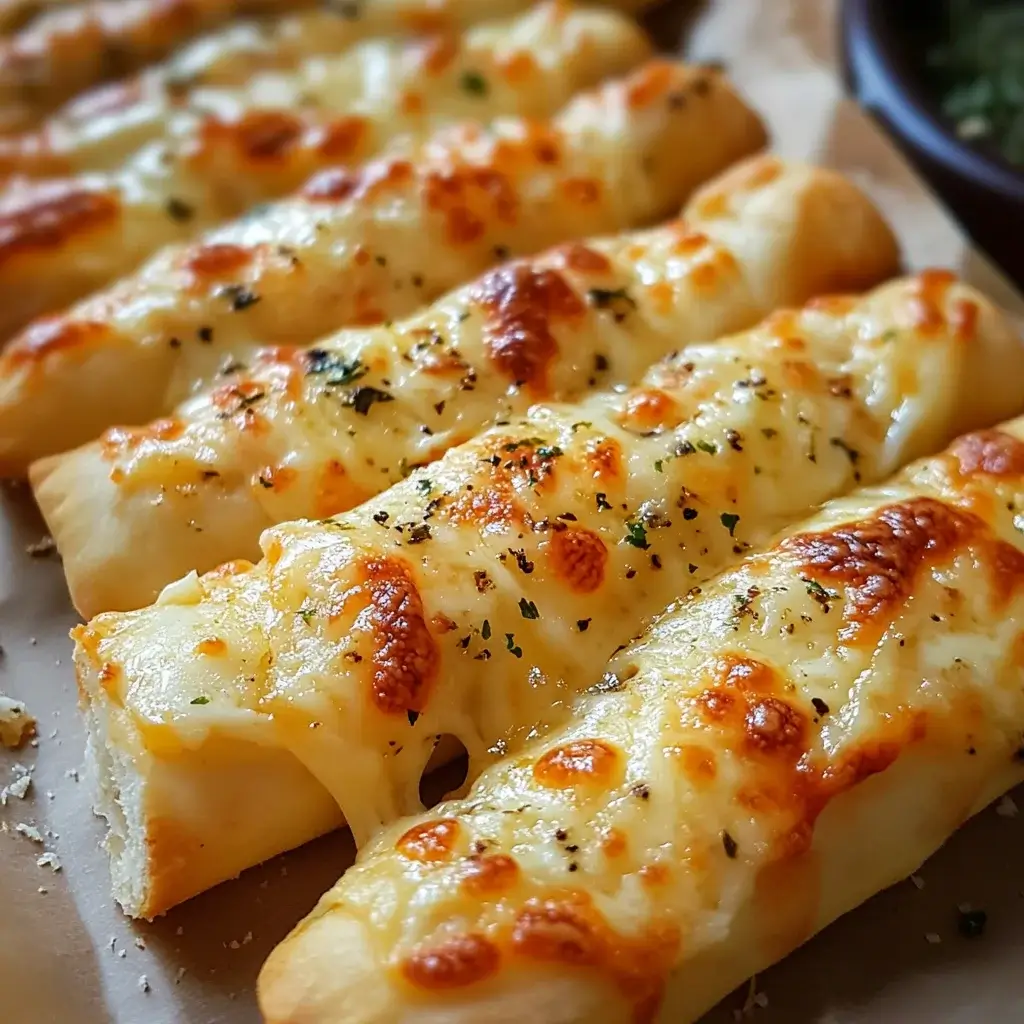

Honestly, who can resist the smell of warm garlic and melting cheese wafting through the kitchen? In my house, the moment I even mention cheesy garlic breadsticks, it’s like a dinner bell has rung. Kids appear from thin air, homework gets mysteriously done, and suddenly everyone is gathered around the counter, practically vibrating with anticipation. This recipe? It’s not just good cheesy garlic breadsticks – it’s irresistible. They’re perfectly soft and fluffy on the inside, crispy and golden brown on the outside, and absolutely loaded with garlicky, cheesy goodness. Forget store-bought; once you try these homemade breadsticks, you’ll understand why they’ve become a staple in our family meals and a guaranteed crowd-pleaser at every gathering. Get ready to experience garlic breadsticks like never before!
Ingredients: The Key to Cheesy Garlic Breadstick Perfection
To create truly irresistible cheesy garlic breadsticks, you need the right ingredients. Each component plays a vital role in achieving that perfect balance of flavor and texture. Let’s break down what you’ll need:
- For the Dough:
- 1 cup (240ml) Warm Water (105-115°F): The water temperature is crucial for activating the yeast. Too cold, and the yeast won’t activate; too hot, and you risk killing it. Lukewarm water is your sweet spot.
- 1 teaspoon Sugar: A little sugar provides food for the yeast, helping it to rise more effectively and adds a subtle sweetness to the dough.
- 2 ¼ teaspoons (1 packet) Active Dry Yeast: This is the magic ingredient that makes our breadsticks light and fluffy. Ensure your yeast is fresh for the best results.
- 2 ½ tablespoons Olive Oil, plus more for brushing: Olive oil adds flavor and richness to the dough, and it’s also essential for brushing the breadsticks before and after baking for that beautiful golden crust. Extra virgin olive oil will provide the most flavor.
- 1 teaspoon Salt: Salt is crucial for flavor development and also controls the yeast activity, preventing the dough from rising too quickly.
- 3 cups (360g) All-Purpose Flour, plus more for dusting: All-purpose flour is the workhorse for these breadsticks, providing the structure and chewiness we desire. You may need a little extra for dusting your work surface. Bread flour can also be used for a slightly chewier texture.
- For the Garlic Butter Topping:
- ½ cup (1 stick) Unsalted Butter, melted: Butter is the foundation of our flavorful topping. Unsalted butter allows you to control the saltiness of the final product.
- 4-6 cloves Garlic, minced: Fresh garlic is non-negotiable for that authentic garlic bread flavor. Adjust the amount to your garlic preference. Roasting the garlic beforehand can mellow the flavor and add a subtle sweetness.
- 1 teaspoon Dried Italian Herbs: A blend of Italian herbs like oregano, basil, and rosemary adds depth and complexity to the garlic butter. You can also use fresh herbs if you have them on hand, finely chopped.
- ½ teaspoon Salt: Enhances the flavors of the garlic butter and seasons the breadsticks perfectly.
- ¼ teaspoon Black Pepper: Adds a touch of spice and complements the garlic and herbs.
- For the Cheesy Goodness:
- 2 cups (about 8 ounces) Shredded Mozzarella Cheese: Mozzarella is the classic choice for cheesy breadsticks due to its excellent melting properties and mild, milky flavor. Part-skim or whole milk mozzarella both work well.
- ½ cup (about 2 ounces) Shredded Parmesan Cheese: Parmesan adds a salty, nutty, and sharp flavor that complements the mozzarella beautifully and adds a wonderful textural element when baked.
- Optional: Fresh Parsley, chopped, for garnish: Fresh parsley adds a pop of color and a touch of freshness to the finished breadsticks.
Ingredient Notes for Success:
- Yeast Freshness: Always check the expiration date of your yeast. If you’re unsure if your yeast is still active, you can test it by mixing a teaspoon of yeast with warm water and a pinch of sugar. If it foams up within 5-10 minutes, it’s good to go.
- Flour Measurement: For accurate measuring, spoon flour into your measuring cup and level it off with a knife. Avoid scooping directly from the bag, as this can pack the flour and lead to drier breadsticks.
- Garlic Quality: Use fresh, plump garlic cloves for the best flavor. Pre-minced garlic from a jar can be used in a pinch, but fresh garlic makes a significant difference.
- Cheese Choices: While mozzarella and parmesan are classic, feel free to experiment with other cheeses like provolone, cheddar, or Monterey Jack for different flavor profiles. A blend of cheeses can create a more complex and interesting flavor.
- Herb Variations: If you don’t have Italian herbs, you can use dried oregano, basil, or rosemary individually. Fresh herbs like chives, thyme, or even rosemary sprigs can also be added to the garlic butter or sprinkled on top before baking for a more gourmet touch.
Step-by-Step Instructions: Crafting Irresistible Cheesy Garlic Breadsticks
Now, let’s get to the fun part – making these delicious breadsticks! Follow these step-by-step instructions for guaranteed cheesy garlic breadstick success:
Step 1: Activate the Yeast
- In a large bowl, combine the warm water and sugar. Stir until the sugar is dissolved.
- Sprinkle the active dry yeast over the warm water mixture. Let it sit for 5-10 minutes, or until the yeast becomes foamy and bubbly. This indicates that the yeast is active and ready to work its magic.
Step 2: Prepare the Dough
- Add the olive oil and salt to the yeast mixture. Stir to combine.
- Gradually add the all-purpose flour, one cup at a time, mixing with a wooden spoon or spatula until a shaggy dough forms.
- Turn the dough out onto a lightly floured surface. Knead for 5-7 minutes, or until the dough is smooth, elastic, and no longer sticky. If the dough is too sticky, add a little more flour, one tablespoon at a time. If it’s too dry, add a teaspoon of water at a time.
- Form the dough into a ball and place it in a lightly oiled bowl. Turn the dough to coat it in oil.
- Cover the bowl with plastic wrap or a clean kitchen towel and let it rise in a warm place for 1-1.5 hours, or until doubled in size. This is crucial for developing the light and airy texture of the breadsticks. A warm place could be a slightly warmed oven (turned off!), a sunny spot, or even just a warm corner of your kitchen.
Step 3: Prepare the Garlic Butter
- While the dough is rising, prepare the garlic butter. In a small saucepan or microwave-safe bowl, melt the butter.
- Add the minced garlic, Italian herbs, salt, and pepper to the melted butter. Stir well to combine.
- Set the garlic butter aside to allow the flavors to meld together. The warmth of the butter will help infuse the garlic and herbs, creating a more flavorful topping.
Step 4: Shape the Breadsticks
- Preheat your oven to 400°F (200°C). Line a large baking sheet with parchment paper or a silicone baking mat. This prevents sticking and makes cleanup easier.
- Once the dough has doubled in size, gently punch it down to release the air.
- Turn the dough out onto a lightly floured surface. Divide the dough in half.
- Roll out each half of the dough into a rectangle, about 12×16 inches and about ¼ inch thick.
- Using a pizza cutter or knife, cut each rectangle into breadsticks, about 1 inch wide and 4-6 inches long. The size is up to you, but this is a good guideline for manageable breadsticks.
Step 5: Assemble and Bake
- Arrange the breadsticks on the prepared baking sheet, leaving some space between them for even baking.
- Brush the breadsticks generously with the garlic butter. Make sure to get into all the crevices.
- Sprinkle the shredded mozzarella and parmesan cheese evenly over the breadsticks. Don’t be shy with the cheese – this is what makes them irresistible!
- Bake for 12-15 minutes, or until the breadsticks are golden brown and the cheese is melted and bubbly. Keep an eye on them towards the end of baking to prevent burning, as oven temperatures can vary.
Step 6: Final Touches and Serving
- Remove the breadsticks from the oven and brush them with any remaining garlic butter (optional, but highly recommended for extra flavor and moisture).
- If desired, garnish with fresh chopped parsley.
- Let the breadsticks cool slightly on the baking sheet before serving. This allows the cheese to set a bit and prevents burning your mouth!
- Serve warm and enjoy the cheesy, garlicky goodness!
Troubleshooting Tips During Baking:
- Breadsticks Browning Too Quickly: If the breadsticks are browning too fast, especially on the edges, reduce the oven temperature by 25°F (15°C) and continue baking. You can also loosely tent the baking sheet with foil to prevent further browning.
- Cheese Not Melting Properly: Ensure the oven is preheated to the correct temperature. If the cheese isn’t melting, you can broil the breadsticks for the last minute or two of baking, watching closely to prevent burning.
- Breadsticks Too Doughy: If the breadsticks are still doughy in the center, even after the recommended baking time, bake them for a few more minutes. This could be due to variations in oven temperature or dough thickness.
Nutrition Facts: Cheesy Garlic Breadsticks (Estimated)
Please note that the following nutrition information is an estimate and can vary based on specific ingredient brands and portion sizes.
- Serving Size: 2 breadsticks (recipe makes approximately 24 breadsticks)
- Calories per Serving: Approximately 250-300 calories
Approximate Nutritional Breakdown per Serving (Estimated):
- Calories: 250-300
- Fat: 12-15g
Important Considerations:
- These breadsticks are moderately high in calories and fat due to the cheese and butter.
- Sodium content can be adjusted by using low-sodium cheese and butter or reducing the amount of salt added.
- This recipe is not gluten-free or suitable for those with dairy allergies unless modified with appropriate substitutions.
- Enjoy in moderation as part of a balanced diet.
Preparation Time: Plan Your Breadstick Baking Schedule
Knowing the preparation time helps you plan your cooking schedule effectively. Here’s a breakdown of the time involved in making these irresistible cheesy garlic breadsticks:
- Prep Time: 30 minutes (includes yeast activation, dough mixing, and garlic butter preparation)
- Rise Time: 1 hour 30 minutes – 2 hours (depending on room temperature)
- Cook Time: 12-15 minutes
- Total Time: Approximately 2 hours 12 minutes – 2 hours 45 minutes
Tips for Time Management:
- Make the dough ahead: You can prepare the dough up to 24 hours in advance. After the first rise, punch it down, wrap it tightly in plastic wrap, and refrigerate it. Let it come to room temperature for about 30-60 minutes before rolling out and baking.
- Prepare the garlic butter in advance: The garlic butter can also be made ahead of time and stored in the refrigerator. Reheat it gently before brushing onto the breadsticks.
- Double the batch: If you’re serving a crowd or want leftovers, consider doubling the recipe. The dough freezes well after the first rise. Thaw overnight in the refrigerator before proceeding with the recipe.
How to Serve: Perfect Pairings for Cheesy Garlic Breadsticks
Cheesy garlic breadsticks are incredibly versatile and can be served in numerous ways. Here are some delicious serving suggestions to elevate your breadstick experience:
- Classic Italian Meals:
- Pasta Dishes: Serve alongside spaghetti and meatballs, lasagna, baked ziti, fettuccine alfredo, or any pasta dish with marinara or creamy sauce. The breadsticks are perfect for soaking up extra sauce!
- Pizza Night: The ultimate pizza companion! Enjoy them as a starter or side dish with homemade or takeout pizza.
- Chicken Parmesan: A match made in heaven! Cheesy garlic breadsticks and chicken parmesan are a comforting and satisfying Italian-American classic.
- Soups and Salads:
- Hearty Soups: Pair with tomato soup, minestrone, French onion soup, or creamy vegetable soups for a complete and warming meal.
- Italian Salads: Serve with a Caprese salad, Caesar salad, or Italian chopped salad for a lighter but equally flavorful meal.
- Appetizers and Snacks:
- Party Appetizer: Cut the breadsticks into smaller bite-sized pieces and serve with marinara sauce, ranch dressing, or pesto for dipping at parties and gatherings.
- Game Day Snack: Perfect for game day! Serve alongside wings, dips, and other snack foods for a crowd-pleasing spread.
- Movie Night Treat: A delicious and satisfying snack for movie night.
- Main Courses:
- Grilled Meats: Serve as a side dish with grilled chicken, steak, or ribs. The garlicky flavor complements grilled meats beautifully.
- Roasted Vegetables: Pair with roasted vegetables like broccoli, asparagus, or Brussels sprouts for a balanced and flavorful meal.
- Dipping Sauces:
- Marinara Sauce: A classic and essential dipping sauce for cheesy garlic breadsticks.
- Ranch Dressing: A creamy and tangy option that complements the garlic and cheese.
- Pesto: Adds a fresh and herbaceous flavor.
- Garlic Aioli: For an extra garlicky kick!
- Spicy Arrabbiata Sauce: For those who like a little heat.
- Cheese Sauce: Double down on the cheese with a warm cheese sauce for dipping.
Additional Tips for Cheesy Garlic Breadstick Success
Want to take your cheesy garlic breadsticks to the next level? Here are five extra tips to ensure breadstick perfection every time:
- Bloom the Garlic for Milder Flavor: If you prefer a less intense garlic flavor, you can “bloom” the minced garlic in the melted butter over low heat for a few minutes before adding the herbs and seasonings. This mellows out the raw garlic bite while still infusing the butter with garlic flavor. Be careful not to burn the garlic.
- Use a Pizza Stone for Extra Crispy Bottoms: For incredibly crispy breadstick bottoms, preheat a pizza stone in your oven while it preheats. Place the baking sheet with the breadsticks directly on the hot pizza stone during baking. The stone will retain heat and create a crispier crust.
- Add a Touch of Heat: For a spicy kick, add a pinch of red pepper flakes to the garlic butter or sprinkle them on top of the breadsticks before baking. You can also use a spicy cheese blend or serve with a spicy dipping sauce.
- Don’t Overbake: Overbaking can result in dry and hard breadsticks. Bake just until golden brown and the cheese is melted and bubbly. The breadsticks will continue to cook slightly as they cool.
- Fresh Herbs Make a Difference: While dried Italian herbs are convenient, using fresh herbs like parsley, basil, oregano, or rosemary in the garlic butter or as a garnish elevates the flavor and aroma of the breadsticks. Finely chop fresh herbs and add them to the garlic butter or sprinkle them on top after baking.
Frequently Asked Questions (FAQ) About Cheesy Garlic Breadsticks
Got questions about making cheesy garlic breadsticks? Here are answers to some common queries:
Q1: Can I use pre-made pizza dough to make these breadsticks?
A: Yes, you absolutely can! Using pre-made pizza dough is a great shortcut when you’re short on time. Simply thaw the dough according to package instructions, then roll it out, cut it into breadsticks, and follow the recipe from step 5 (Assemble and Bake) onwards. Pre-made dough might result in a slightly different texture than homemade dough, but it will still be delicious.
Q2: Can I freeze cheesy garlic breadsticks?
A: Yes, you can freeze baked cheesy garlic breadsticks for later enjoyment. Let them cool completely after baking. Wrap them tightly in plastic wrap and then in aluminum foil, or place them in a freezer-safe bag. To reheat, bake from frozen at 350°F (175°C) for 10-15 minutes, or until heated through and the cheese is melted again. They are best enjoyed within 2-3 months for optimal quality.
Q3: What if I don’t have active dry yeast? Can I use instant yeast?
A: Yes, you can substitute instant yeast (also called rapid-rise yeast) for active dry yeast. You don’t need to activate instant yeast in water first. Simply add it directly to the dry ingredients (flour) along with the sugar and salt. You can still use warm water, but the initial proofing step is not necessary. The rise time might be slightly shorter with instant yeast.
Q4: Can I make these breadsticks ahead of time for a party?
A: Yes, you can prepare the breadsticks ahead of time in a few ways:
- Make the dough ahead: As mentioned earlier, the dough can be made up to 24 hours in advance and refrigerated.
- Assemble ahead, bake later: You can assemble the breadsticks on the baking sheet, brush them with garlic butter, and sprinkle with cheese several hours before baking. Cover and refrigerate. Bake just before serving, adding a few extra minutes to the baking time if they are cold.
- Bake ahead, reheat later: You can bake the breadsticks completely and reheat them as described in the freezing question.
Q5: My breadsticks are not as fluffy as I’d like. What could be the reason?
A: Several factors can affect the fluffiness of your breadsticks:
- Yeast Activity: Ensure your yeast is fresh and properly activated. If the yeast is old or not activated correctly, the dough may not rise adequately.
- Kneading: Proper kneading develops gluten, which gives the breadsticks structure and fluffiness. Knead the dough for the recommended time until it is smooth and elastic.
- Rise Time: Allow the dough to rise for the full recommended time until it has doubled in size. A proper rise is essential for a light and airy texture.
- Flour Measurement: Measuring flour incorrectly (packing it into the cup) can lead to drier dough. Spoon flour into the measuring cup and level it off.

Irresistible Cheesy Garlic Breadsticks
Ingredients
To create truly irresistible cheesy garlic breadsticks, you need the right ingredients. Each component plays a vital role in achieving that perfect balance of flavor and texture. Let’s break down what you’ll need:
- For the Dough:
- 1 cup (240ml) Warm Water (105-115°F): The water temperature is crucial for activating the yeast. Too cold, and the yeast won’t activate; too hot, and you risk killing it. Lukewarm water is your sweet spot.
- 1 teaspoon Sugar: A little sugar provides food for the yeast, helping it to rise more effectively and adds a subtle sweetness to the dough.
- 2 ¼ teaspoons (1 packet) Active Dry Yeast: This is the magic ingredient that makes our breadsticks light and fluffy. Ensure your yeast is fresh for the best results.
- 2 ½ tablespoons Olive Oil, plus more for brushing: Olive oil adds flavor and richness to the dough, and it’s also essential for brushing the breadsticks before and after baking for that beautiful golden crust. Extra virgin olive oil will provide the most flavor.
- 1 teaspoon Salt: Salt is crucial for flavor development and also controls the yeast activity, preventing the dough from rising too quickly.
- 3 cups (360g) All-Purpose Flour, plus more for dusting: All-purpose flour is the workhorse for these breadsticks, providing the structure and chewiness we desire. You may need a little extra for dusting your work surface. Bread flour can also be used for a slightly chewier texture.
- For the Garlic Butter Topping:
- ½ cup (1 stick) Unsalted Butter, melted: Butter is the foundation of our flavorful topping. Unsalted butter allows you to control the saltiness of the final product.
- 4–6 cloves Garlic, minced: Fresh garlic is non-negotiable for that authentic garlic bread flavor. Adjust the amount to your garlic preference. Roasting the garlic beforehand can mellow the flavor and add a subtle sweetness.
- 1 teaspoon Dried Italian Herbs: A blend of Italian herbs like oregano, basil, and rosemary adds depth and complexity to the garlic butter. You can also use fresh herbs if you have them on hand, finely chopped.
- ½ teaspoon Salt: Enhances the flavors of the garlic butter and seasons the breadsticks perfectly.
- ¼ teaspoon Black Pepper: Adds a touch of spice and complements the garlic and herbs.
- For the Cheesy Goodness:
- 2 cups (about 8 ounces) Shredded Mozzarella Cheese: Mozzarella is the classic choice for cheesy breadsticks due to its excellent melting properties and mild, milky flavor. Part-skim or whole milk mozzarella both work well.
- ½ cup (about 2 ounces) Shredded Parmesan Cheese: Parmesan adds a salty, nutty, and sharp flavor that complements the mozzarella beautifully and adds a wonderful textural element when baked.
- Optional: Fresh Parsley, chopped, for garnish: Fresh parsley adds a pop of color and a touch of freshness to the finished breadsticks.
Instructions
Now, let’s get to the fun part – making these delicious breadsticks! Follow these step-by-step instructions for guaranteed cheesy garlic breadstick success:
Step 1: Activate the Yeast
- In a large bowl, combine the warm water and sugar. Stir until the sugar is dissolved.
- Sprinkle the active dry yeast over the warm water mixture. Let it sit for 5-10 minutes, or until the yeast becomes foamy and bubbly. This indicates that the yeast is active and ready to work its magic.
Step 2: Prepare the Dough
- Add the olive oil and salt to the yeast mixture. Stir to combine.
- Gradually add the all-purpose flour, one cup at a time, mixing with a wooden spoon or spatula until a shaggy dough forms.
- Turn the dough out onto a lightly floured surface. Knead for 5-7 minutes, or until the dough is smooth, elastic, and no longer sticky. If the dough is too sticky, add a little more flour, one tablespoon at a time. If it’s too dry, add a teaspoon of water at a time.
- Form the dough into a ball and place it in a lightly oiled bowl. Turn the dough to coat it in oil.
- Cover the bowl with plastic wrap or a clean kitchen towel and let it rise in a warm place for 1-1.5 hours, or until doubled in size. This is crucial for developing the light and airy texture of the breadsticks. A warm place could be a slightly warmed oven (turned off!), a sunny spot, or even just a warm corner of your kitchen.
Step 3: Prepare the Garlic Butter
- While the dough is rising, prepare the garlic butter. In a small saucepan or microwave-safe bowl, melt the butter.
- Add the minced garlic, Italian herbs, salt, and pepper to the melted butter. Stir well to combine.
- Set the garlic butter aside to allow the flavors to meld together. The warmth of the butter will help infuse the garlic and herbs, creating a more flavorful topping.
Step 4: Shape the Breadsticks
- Preheat your oven to 400°F (200°C). Line a large baking sheet with parchment paper or a silicone baking mat. This prevents sticking and makes cleanup easier.
- Once the dough has doubled in size, gently punch it down to release the air.
- Turn the dough out onto a lightly floured surface. Divide the dough in half.
- Roll out each half of the dough into a rectangle, about 12×16 inches and about ¼ inch thick.
- Using a pizza cutter or knife, cut each rectangle into breadsticks, about 1 inch wide and 4-6 inches long. The size is up to you, but this is a good guideline for manageable breadsticks.
Step 5: Assemble and Bake
- Arrange the breadsticks on the prepared baking sheet, leaving some space between them for even baking.
- Brush the breadsticks generously with the garlic butter. Make sure to get into all the crevices.
- Sprinkle the shredded mozzarella and parmesan cheese evenly over the breadsticks. Don’t be shy with the cheese – this is what makes them irresistible!
- Bake for 12-15 minutes, or until the breadsticks are golden brown and the cheese is melted and bubbly. Keep an eye on them towards the end of baking to prevent burning, as oven temperatures can vary.
Step 6: Final Touches and Serving
- Remove the breadsticks from the oven and brush them with any remaining garlic butter (optional, but highly recommended for extra flavor and moisture).
- If desired, garnish with fresh chopped parsley.
- Let the breadsticks cool slightly on the baking sheet before serving. This allows the cheese to set a bit and prevents burning your mouth!
- Serve warm and enjoy the cheesy, garlicky goodness!
Troubleshooting Tips During Baking:
- Breadsticks Browning Too Quickly: If the breadsticks are browning too fast, especially on the edges, reduce the oven temperature by 25°F (15°C) and continue baking. You can also loosely tent the baking sheet with foil to prevent further browning.
- Cheese Not Melting Properly: Ensure the oven is preheated to the correct temperature. If the cheese isn’t melting, you can broil the breadsticks for the last minute or two of baking, watching closely to prevent burning.
- Breadsticks Too Doughy: If the breadsticks are still doughy in the center, even after the recommended baking time, bake them for a few more minutes. This could be due to variations in oven temperature or dough thickness.
Nutrition
- Serving Size: one normal portion
- Calories: 300
- Fat: 15g