")


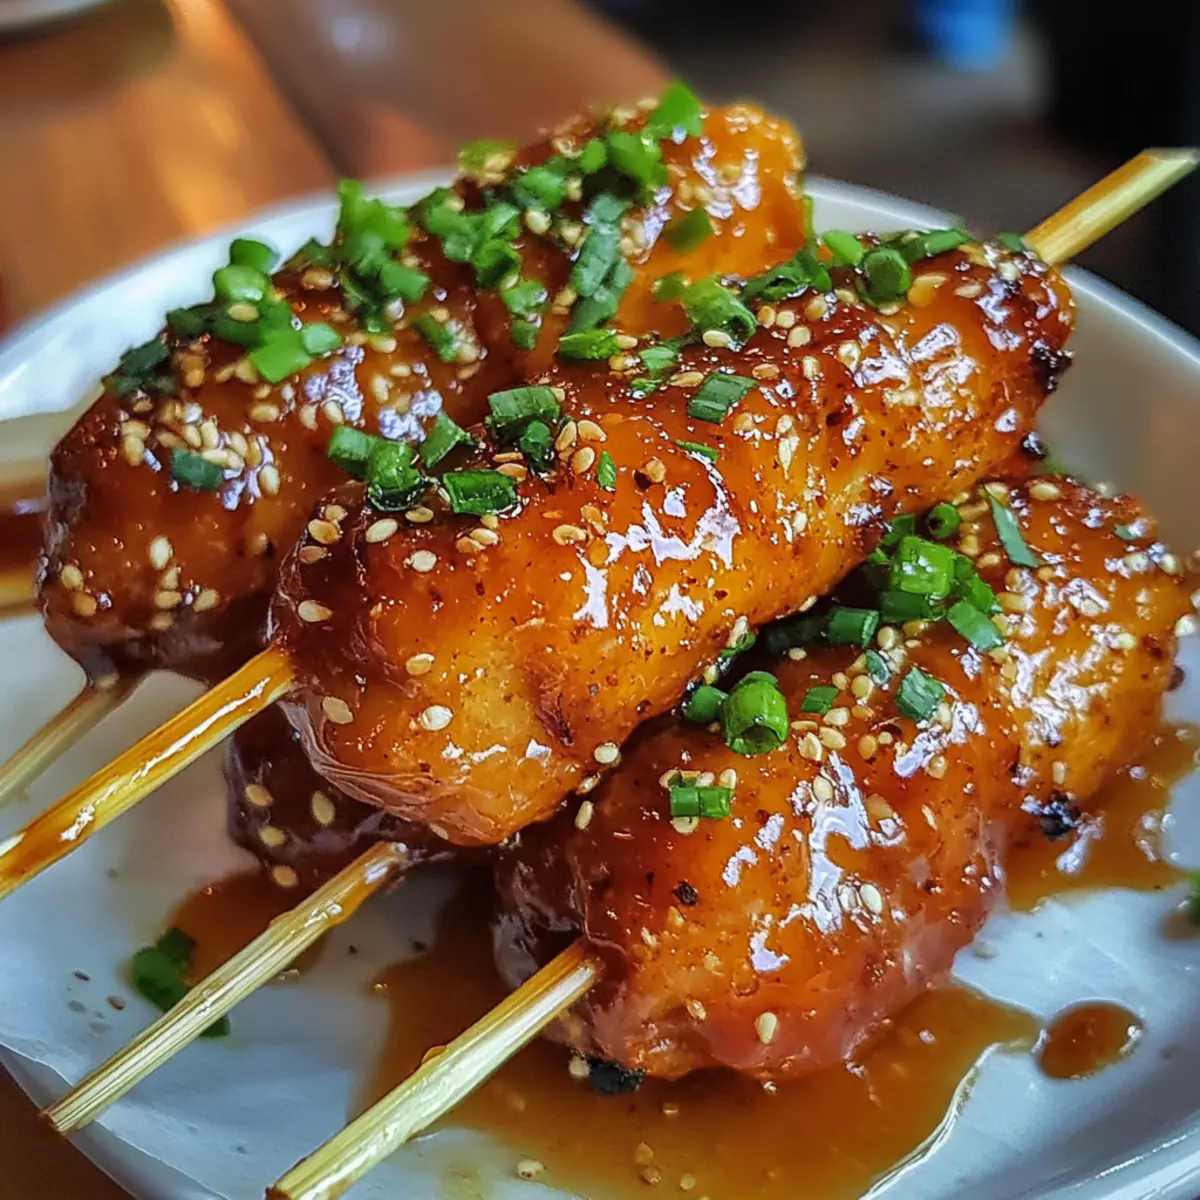
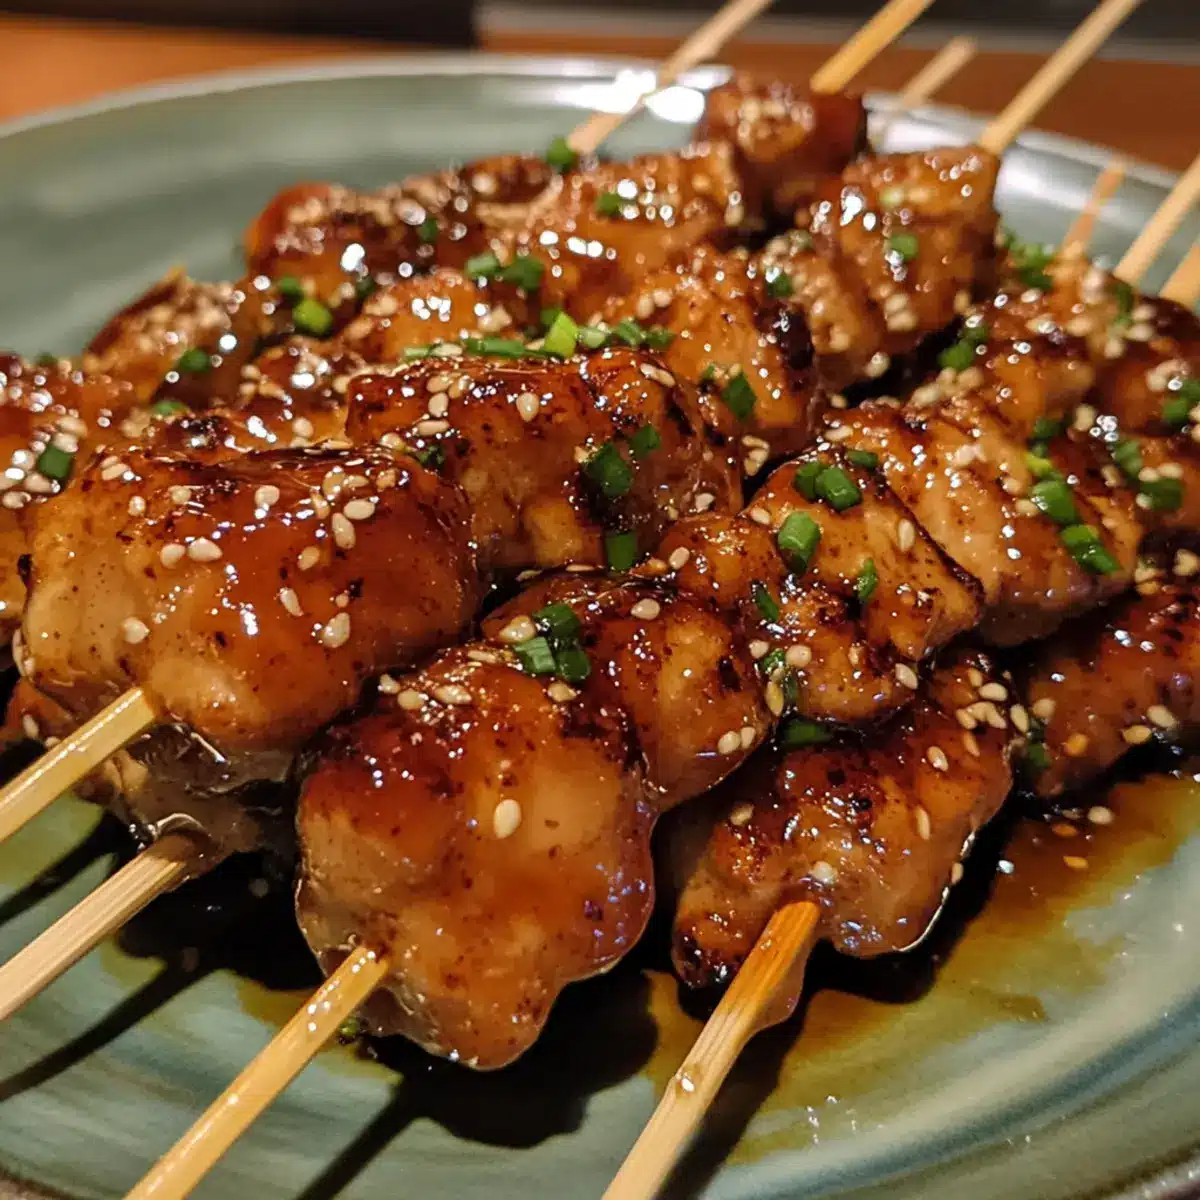
The moment those Honey Glazed Chicken Pops hit the pan, the irresistible aroma of sweet honey mingling with savory spices grabs your attention—and trust me, it only gets better from there. I stumbled upon this recipe when I wanted to jazz up a weeknight dinner without spending hours in the kitchen. The result? Crispy, tender chicken bites coated in a sticky, golden glaze that’s both comforting and exciting. Whether you’re craving a crowd-pleasing appetizer for your next gathering or just want to treat yourself to something homemade and flavorful, these Honey Glazed Chicken Pops strike the perfect balance between sweet and savory with minimal fuss. Once you try them, I guarantee fast food will feel a lot less tempting.
Why choose Honey Glazed Chicken Pops?
Simplicity: This recipe is quick and easy, perfect for busy weeknights or last-minute gatherings. Bold flavor: The sweet and savory honey glaze delivers a mouthwatering punch that satisfies any palate. Crispy texture: Each pop boasts a crunchy exterior with juicy, tender chicken inside. Versatility: Serve as an appetizer, snack, or main dish with your favorite sides. Crowd-pleaser: Everyone loves these addictive bites, making them ideal for parties or family dinners. Homemade goodness: Say goodbye to fast food boredom with a flavorful, comforting alternative you’ll want to make again and again.
Honey Glazed Chicken Pops Ingredients
For the Chicken Pops
- Chicken breast or thighs – Choose boneless, skinless pieces for easy, bite-sized pops.
- Salt and pepper – Basic seasoning to enhance natural chicken flavor.
- Garlic powder – Adds a warm, savory depth that balances the sweetness of the glaze.
- Cornstarch or flour – Helps create that perfect crispy coating when frying or baking.
- Vegetable oil – Use a neutral oil with a high smoke point for frying to get a golden crust.
For the Honey Glaze
- Honey – The star ingredient in our Honey Glazed Chicken Pops, bringing natural sweetness and a beautiful sticky shine.
- Soy sauce – Adds salty umami contrast to balance the honey’s sweetness.
- Apple cider vinegar or lemon juice – Introduces a tangy brightness that lifts the glaze.
- Crushed red pepper flakes or chili powder – Optional, for a subtle kick to excite your taste buds.
- Fresh ginger, grated – Infuses a gentle warmth and complexity into the glaze.
How to Make Honey Glazed Chicken Pops
- Cut Chicken: Slice boneless, skinless chicken into bite-sized pops, then season generously with salt, pepper, and garlic powder for balanced flavor in every tender piece.
- Coat Pops: Dredge each chicken pop in cornstarch or flour, shaking off any excess. This creates that irresistible, crunchy exterior that locks in juicy goodness.
- Heat Oil: Pour vegetable oil into a skillet up to ½-inch depth and heat to 350°F (175°C). Proper temperature ensures golden, evenly cooked pops every time.
- Fry Chicken: Gently add pops in batches, frying 3–4 minutes per side until golden brown and crisp. Avoid crowding the pan to keep oil temperature steady.
- Drain Excess: Transfer fried pops to a paper-towel-lined plate to absorb extra oil. This step keeps them light and perfectly primed to soak up the sticky glaze.
For the Glaze:
- Combine Ingredients: In a small saucepan, whisk honey, soy sauce, apple cider vinegar, grated ginger, and red pepper flakes until the mixture is smooth and well blended.
- Simmer Glaze: Cook over medium heat, stirring constantly for about 2 minutes until it bubbles, thickens slightly, and turns a rich, golden hue.
- Glaze Chicken: Add drained pops to the pan, tossing gently to coat each one in the sticky honey glaze. Heat for 1 more minute to set the shine.
- Serve & Garnish: Transfer glazed pops to a platter and sprinkle with sesame seeds or sliced green onions for color and extra pop of flavor.
Optional: Serve with lime wedges for zesty brightness.
Exact quantities are listed in the recipe card below.
Make Ahead Options
These Honey Glazed Chicken Pops are perfect for meal prep enthusiasts! You can chop and season the chicken (up to 24 hours in advance) and refrigerate it, allowing the flavors to meld beautifully. Additionally, you can prepare the honey glaze (up to 3 days ahead) and store it in an airtight container in the refrigerator. When you’re ready to serve, simply fry the chicken pops until golden and then toss them in the prepared glaze for that delightful shine. This way, you’ll enjoy bold flavor and crispy texture with minimal last-minute effort, ensuring a delicious homemade treat that’s just as irresistible even when prepped ahead!
Expert Tips for Honey Glazed Chicken Pops
- Perfect Cut Size: Slice chicken into uniform, bite-sized pops to ensure even cooking and a consistent crispy texture throughout each piece.
- Don’t Overcrowd Pan: Fry chicken pops in small batches to maintain oil temperature, preventing soggy coating and uneven crispiness.
- Glaze Consistency: Simmer the honey glaze until slightly thickened but not too runny—this helps it cling beautifully to the chicken pops.
- Balance Sweet and Savory: Adjust honey and soy sauce ratios to suit your taste, keeping that signature sweet-savory harmony in every bite.
- Use Fresh Ingredients: Fresh ginger and quality honey elevate the glaze, giving your Honey Glazed Chicken Pops vibrant flavor and an authentic homemade touch.
Variations & Substitutions for Honey Glazed Chicken Pops
Feel free to explore these delicious twists on your Honey Glazed Chicken Pops to make them your own!
-
Gluten-Free: Substitute regular flour with gluten-free flour or cornstarch for a crispy coating that everyone can enjoy. This ensures no one has to miss out on the fun.
-
Spicy Kick: Add more crushed red pepper flakes or a dash of sriracha to the glaze for an exciting heat that elevates each bite. The combination of sweet and spice creates a deliciously bold profile.
-
Herb-Infused: Incorporate fresh herbs like rosemary or thyme into the glaze to add a unique flavor depth and aroma. The freshness of the herbs will balance the sweetness beautifully.
-
Citrus Zing: Swap apple cider vinegar with fresh lime or orange juice for a zesty twist that brightens up the glaze. This adds an invigorating flair that brings a refreshing note to the dish.
-
Coconut Flare: Use coconut aminos instead of soy sauce for a sweeter, more tropical interpretation that’s still packed with umami. The subtle coconut flavor makes these bites even more irresistible!
-
Veggie Alternative: Try this honey glaze on crispy tofu or cauliflower bites for a vegetarian version full of flavor and texture. This twist keeps it satisfying while accommodating plant-based eaters.
-
Baked Option: Skip the frying and bake the chicken pops at 400°F (200°C) for 20-25 minutes, flipping halfway for a healthier alternative that still delivers crispy edges and juicy interiors.
-
Nutty Crunch: Add crushed nuts, like peanuts or almonds, sprinkled on top before serving for added crunch and flavor. The nuts will provide a lovely surprise with each pop!
Storage Tips for Honey Glazed Chicken Pops
Room Temperature: Enjoy your Honey Glazed Chicken Pops fresh for optimal flavor, but if left out, they can sit at room temperature for up to 2 hours.
Fridge: Store any leftovers in an airtight container in the fridge for up to 3 days. Reheat in a skillet to restore crispiness before serving again.
Freezer: Freeze chicken pops in a single layer on a baking sheet, then transfer to a freezer bag for up to 2 months. Reheat directly from frozen using the oven for best texture.
Reheating: For the tastiest results, reheat in the oven at 375°F (190°C) for 10-15 minutes, ensuring they regain their crispy exterior while heating through.
What to Serve with Honey Glazed Chicken Pops?
Build a delightful meal that complements these vibrant bites, adding variety and balance to your table.
-
Crispy Coleslaw: A crunchy side with crisp veggies and a tangy dressing offers a refreshing contrast to the sweet glaze. It’s not just a side; it brings texture and a lovely crunch that enhances the meal.
-
Garlic Rice: Fluffy, aromatic rice infused with garlic provides a savory base, perfect for soaking up every drip of the sticky honey glaze. The mild flavor lets the chicken pops shine without overwhelming your palate.
-
Roasted Vegetables: Seasonal veggies caramelized to perfection provide earthy notes that deepen the flavor profile of your dinner. Try mixing colorful bell peppers, zucchini, and carrots for a vibrant touch.
-
Sweet Potato Fries: Crispy and slightly sweet, these fries echo the honey notes of the chicken pops while adding a satisfying crunch. Their earthy flavor balances the dish beautifully.
-
Creamy Dipping Sauce: A tangy ranch or zesty mustard dip amplifies the savory elements, ensuring each bite is exciting. This not only enhances the pops but also makes your meal feel like a fun treat.
-
Sparkling Lemonade: A fizzy drink with a hint of citrus refreshes the palate while perfectly complementing the sweet and savory flavors of your chicken. It’s light and invigorating, making it the ideal beverage pairing.
-
Fruit Salad: A light, vibrant mix of seasonal fruits adds freshness and balances the dish. The natural sweetness of fruits, like watermelon or berries, contrasts beautifully with the savory chicken.
-
Chocolate Lava Cake: To round out your meal, this luscious dessert provides a rich, indulgent finish. Its warm, gooey center and slightly bitter chocolate make a striking contrast to the honey sweetness!
Honey Glazed Chicken Pops Recipe FAQs
How do I know if my chicken is fresh and suitable for Honey Glazed Chicken Pops?
Choose boneless, skinless chicken breasts or thighs that are pale pink with no dark spots or off odors. Fresh chicken should feel firm and slightly moist but not slimy. If you see any discoloration or smell a sour or ammonia-like scent, it’s best to avoid using it.
What’s the best way to store leftover Honey Glazed Chicken Pops?
Store leftovers in an airtight container in the fridge for up to 3 days. To keep them as crispy as possible, reheat them in a skillet over medium heat or pop them in the oven at 375°F (190°C) for 10-15 minutes. Avoid microwaving if you want to preserve that crunchy texture.
Can I freeze Honey Glazed Chicken Pops and how should I do it?
Absolutely! For best results, freeze the pops in a single layer on a baking sheet first so they don’t stick together. After they’re firm, transfer them to a freezer-safe bag or container. They keep well for up to 2 months. When you’re ready, reheat them directly from frozen in the oven at 375°F for about 15-20 minutes until heated through and crispy.
What if my honey glaze isn’t thickening properly?
No worries! If the glaze is too runny, continue simmering it gently over medium heat while stirring constantly. This will reduce the liquid content and thicken the glaze. Be patient and avoid high heat to prevent burning. A thicker glaze clings better to the chicken, giving that gorgeous sticky finish.
Are Honey Glazed Chicken Pops safe for pets or people with allergies?
I recommend keeping these pops for human enjoyment only, as the glaze contains honey, soy sauce, and spices that may not be suitable for pets. For allergy considerations, if you have soy allergies, substitute soy sauce with coconut aminos or tamari. Always adjust ingredients to fit dietary needs safely.
Irresistible Honey Glazed Chicken Pops Recipe for Bold Flavor Fans
Ingredients
Equipment
Method
- Slice boneless, skinless chicken into bite-sized pops, season with salt, pepper, and garlic powder.
- Dredge each chicken pop in cornstarch or flour and shake off excess.
- Pour vegetable oil into a skillet and heat to 350°F (175°C).
- Fry chicken in batches for 3–4 minutes per side until golden brown.
- Transfer fried pops to a paper-towel-lined plate to absorb extra oil.
- In a small saucepan, whisk honey, soy sauce, apple cider vinegar, grated ginger, and red pepper flakes until smooth.
- Cook the glaze over medium heat, stirring for about 2 minutes until thickened.
- Add drained pops to the pan, tossing to coat in glaze and heat for 1 more minute.
- Transfer glazed pops to a platter and sprinkle with sesame seeds or green onions.