")

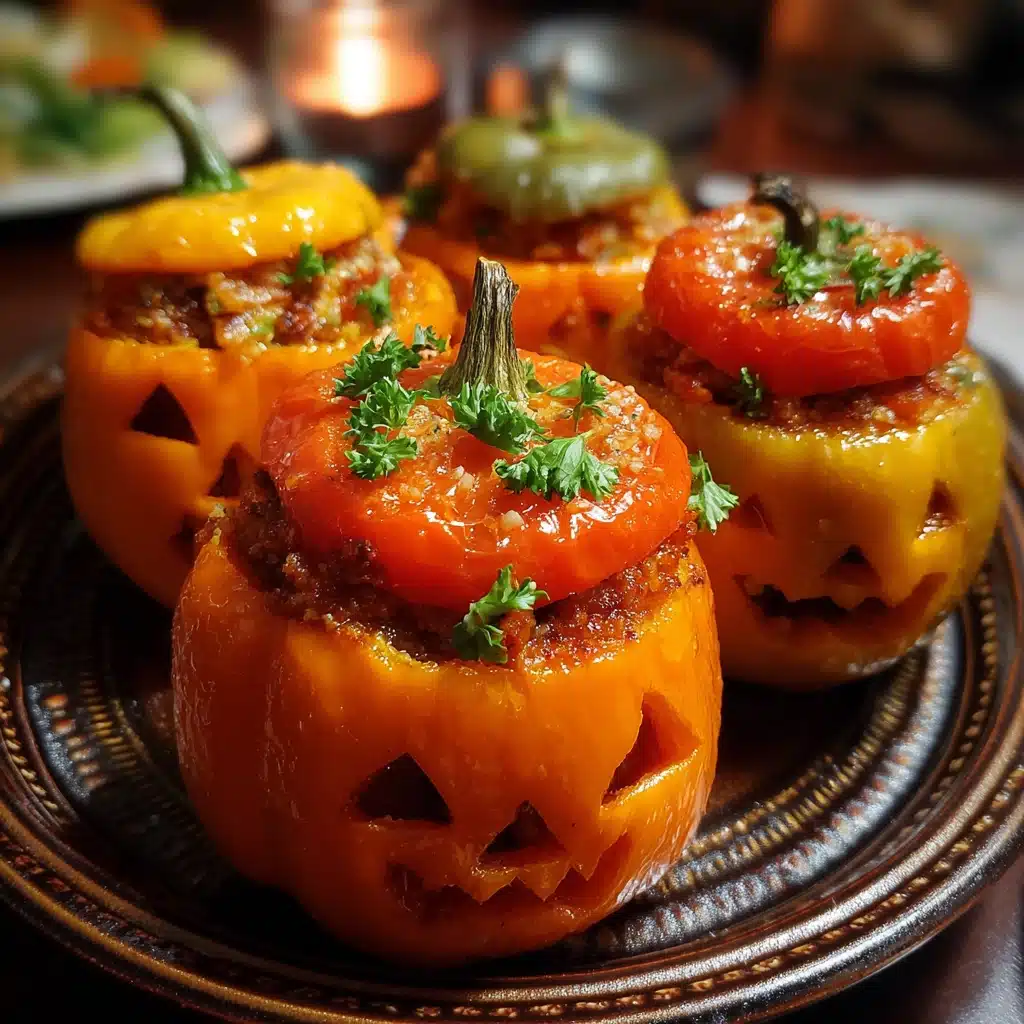

Of all the traditions our family has embraced for Halloween, from spooky movie marathons to competitive pumpkin carving, our annual Jack-O’-Lantern Stuffed Veggies dinner has become the one I look forward to the most. The first time I made these, I was just looking for a way to sneak some actual nutrition into a day otherwise dominated by sugar. I wasn’t expecting the sheer delight on my kids’ faces when I brought a tray of glowing, ghoulishly grinning orange peppers to the table. They were so captivated by their personal, edible Jack-O’-Lanterns that they didn’t even question the healthy filling packed inside. Now, it’s a non-negotiable part of our Halloween night ritual. The savory aroma of the seasoned beef, rice, and melted cheese fills the house, mingling with the sweet scent of candy, creating a perfect balance. It’s the ideal pre-trick-or-treating meal—hearty, warming, and festive enough to feel like a treat in itself. This recipe isn’t just about food; it’s about creating a fun, delicious memory that brings the whole family together in the kitchen before the spooky festivities begin.
Ingredients
- 6 large Orange Bell Peppers: These will be the vessels for our spooky creations. Look for peppers that are firm, brightly colored, and have a relatively flat bottom so they can stand upright.
- 1 ½ lbs Lean Ground Beef: The savory, protein-packed heart of our filling.
- 1 cup Uncooked Long-Grain White Rice: This will cook within the filling, absorbing all the delicious flavors and making the dish substantial.
- 1 large Yellow Onion, finely chopped: Provides a foundational sweet and aromatic flavor base.
- 3 cloves Garlic, minced: Adds a pungent, aromatic kick that complements the beef perfectly.
- 1 (15-ounce) can Diced Tomatoes, undrained: Lends moisture, acidity, and a rich tomato flavor to the filling.
- 1 (8-ounce) can Tomato Sauce: Helps bind the filling together and deepens the savory tomato taste.
- 1 cup Beef Broth: Adds richness and the necessary liquid for the rice to cook to tender perfection inside the peppers.
- 4 oz Cooked Ham, finely diced: Introduces a subtle, smoky saltiness that elevates the entire filling.
- 2 teaspoons Italian Seasoning: A blend of dried herbs like oregano, basil, and thyme that provides a classic, savory flavor profile.
- 1 teaspoon Smoked Paprika: Adds a touch of smoky depth and beautiful color.
- 1 teaspoon Salt (or to taste): Enhances all the other flavors.
- ½ teaspoon Black Pepper (or to taste): Provides a gentle, warming spice.
- 2 cups Shredded Sharp Cheddar or Monterey Jack Cheese, divided: One cup will be mixed into the filling for cheesy goodness in every bite, and one cup will be reserved for a perfectly melted, bubbly topping.
- 2 tablespoons Olive Oil: Used for sautéing the aromatics and browning the beef.
Instructions
Creating these festive Jack-O’-Lantern Stuffed Veggies is a two-part process: preparing the pepper “pumpkins” and cooking the delicious filling. It’s a fun activity that even the kids can help with!
Step 1: Prepare the Jack-O’-Lantern Peppers
First, wash and thoroughly dry your orange bell peppers. Using a sharp paring knife, carefully slice off the top of each pepper, about half an inch down from the stem. Treat these tops like the lid of a pumpkin; you’ll want to keep them. Set the “lids” aside. Next, reach inside each pepper and remove all the seeds and the white pithy membranes. You can use a small spoon to scrape the insides clean.
Step 2: Carve the Spooky Faces
This is the most creative part! Using your small, sharp paring knife, carefully carve Jack-O’-Lantern faces into one side of each hollowed-out pepper. You can make them spooky, happy, or goofy. Triangles work well for eyes and noses, and a simple jagged line makes a great mouth. Be gentle to avoid cracking the pepper walls. This is a fantastic step for older children to help with, or for younger kids to draw a face with a marker for you to carve. Once carved, arrange the peppers standing up in a 9×13-inch baking dish or another dish large enough to hold them snugly.
Step 3: Begin the Filling
In a large skillet or Dutch oven, heat the olive oil over medium-high heat. Add the finely chopped yellow onion and sauté for 4-5 minutes, until it becomes soft and translucent. Add the minced garlic and cook for another minute until fragrant, being careful not to let it burn.
Step 4: Brown the Beef and Ham
Add the lean ground beef and the diced ham to the skillet with the onions and garlic. Break up the beef with a wooden spoon and cook until it is thoroughly browned and no pink remains. This should take about 7-8 minutes. Once cooked, drain off any excess grease from the skillet.
Step 5: Combine the Filling Ingredients
Reduce the heat to medium. To the skillet with the cooked meat, add the uncooked rice, undrained diced tomatoes, tomato sauce, beef broth, Italian seasoning, smoked paprika, salt, and black pepper. Stir everything together until it’s well combined.
Step 6: Simmer the Filling
Bring the mixture to a gentle simmer. Once it’s bubbling, reduce the heat to low, cover the skillet, and let it cook for about 15-20 minutes. You want the rice to be partially cooked and to have absorbed most of the liquid. The filling should be thick, not watery.
Step 7: Add the Cheese
Turn off the heat. Uncover the skillet and stir in 1 cup of the shredded cheddar or Monterey Jack cheese. Continue to stir until the cheese is completely melted and incorporated into the filling, creating a rich, gooey consistency.
Step 8: Stuff the Peppers
Preheat your oven to 375°F (190°C). Carefully spoon the warm beef and rice mixture into each of your carved bell peppers, packing it in firmly until each pepper is filled to the brim.
Step 9: Prepare for Baking
Pour about ½ cup of water or beef broth into the bottom of the baking dish, around the peppers. This will create steam as they bake, helping the peppers become tender without burning on the bottom.
Step 10: Bake the Stuffed Peppers
Place the little pepper “lids” back on top of each stuffed pepper. Cover the entire baking dish tightly with aluminum foil. Place the dish in the preheated oven and bake for 45 minutes. The foil traps the steam, ensuring the peppers cook through and become tender.
Step 11: The Final Melt
After 45 minutes, carefully remove the foil from the baking dish. Also, remove the pepper “lids” and set them aside for a moment. Sprinkle the remaining 1 cup of shredded cheese evenly over the top of the filling in each pepper.
Step 12: Brown and Serve
Return the baking dish to the oven, uncovered, and bake for another 10-15 minutes. You’re looking for the cheese to be completely melted, bubbly, and just beginning to turn golden brown on top. Once done, remove from the oven and let the peppers rest for a few minutes before serving. You can place the pepper “lids” back on top or serve them on the side.
Nutrition Facts
- Servings: 6
- Calories per Serving: Approximately 550 kcal
- High in Protein: Each stuffed pepper provides a significant amount of high-quality protein from the ground beef, essential for muscle repair, growth, and keeping you feeling full and satisfied.
- Excellent Source of Vitamin C: Bell peppers are packed with Vitamin C, a powerful antioxidant that supports immune function and skin health. One serving can provide well over your daily requirement.
- Rich in Fiber: The combination of bell peppers, tomatoes, onions, and rice contributes a good amount of dietary fiber, which is crucial for digestive health and maintaining stable blood sugar levels.
- Provides Essential Iron: The lean ground beef is a fantastic source of heme iron, a type of iron that is easily absorbed by the body and is vital for transporting oxygen in the blood and preventing fatigue.
- A Balanced Meal: This recipe conveniently combines protein, carbohydrates, and vegetables all in one delicious package, making it a well-rounded and complete meal.
Preparation Time
- Prep Time: 25 minutes (This includes chopping vegetables and carving the pepper faces).
- Cook Time: 1 hour 15 minutes (This includes cooking the filling and baking the peppers).
- Total Time: 1 hour 40 minutes
The most hands-on part of this recipe is the preparation. The carving can take a little time, but it’s a joyful process that truly makes the dish special. The baking time is mostly hands-off, allowing you to prepare side dishes or simply enjoy the festive aromas wafting from your kitchen.
How to Serve
These Jack-O’-Lantern Stuffed Veggies are a showstopper on their own, but pairing them with the right accompaniments can turn them into an unforgettable Halloween feast. Here are some creative and delicious ways to serve them:
- As the Star of the Show:
- Place each stuffed pepper on an individual plate to showcase its spooky, carved face.
- For a dramatic effect, serve them on a large platter lined with dark “graveyard” greens like kale or radicchio, making the orange peppers pop.
- With Spooky Side Dishes:
- Ghostly Mashed Potatoes: Serve a scoop of creamy mashed potatoes next to the pepper. You can even pipe the potatoes into a ghost shape using a piping bag (or a ziplock bag with the corner snipped off) and use black sesame seeds or capers for eyes.
- Witch’s Brew Soup: A small cup of vibrant green (like a creamy broccoli or zucchini) or blood-red (classic tomato) soup makes for a fantastic starter or side.
- Graveyard Salad: Create a simple garden salad with mixed greens, and use a cookie cutter to cut “tombstones” out of slices of bread or cheese. Crumble dark pumpernickel bread over the top to look like dirt.
- Wormy Pasta: Cook some spaghetti or linguine and toss it in a light pesto or marinara sauce to serve as a “bed of worms” for your pepper to sit on.
- Garnish for Extra Flair:
- A Dollop of “Ghostly” Topping: Add a small spoonful of sour cream or plain Greek yogurt on top of the melted cheese just before serving.
- Pretzel Stem: Break a pretzel stick in half and insert it into the pepper “lid” to create a realistic-looking pumpkin stem.
- Fresh Herb “Vines”: Garnish the plate with a few fresh parsley or cilantro sprigs to look like pumpkin vines curling away from the pepper.
Additional Tips
- Choose Your Peppers Wisely: The key to peppers that stand up straight is selecting the right ones at the store. Look for large, blocky peppers with four distinct lobes on the bottom. This gives them a stable, flat base. If you get one that’s a bit wobbly, you can carefully slice a very thin layer off the bottom to create a flat surface.
- Paring Knife is Your Best Friend: For carving the faces, a small, sharp paring knife offers the most control. Don’t try to use a large chef’s knife. For perfectly clean cuts, score the design first and then carefully cut through the pepper wall.
- Pre-Cook for Softer Peppers: If you prefer your bell peppers to be extra tender, you can pre-cook them before stuffing. Simply place the hollowed-out peppers in a pot of boiling water for 3-4 minutes, then immediately transfer them to an ice bath to stop the cooking process. Dry them thoroughly before carving and stuffing.
- Make-Ahead for an Easy Halloween: The entire filling can be made up to two days in advance and stored in an airtight container in the refrigerator. On Halloween, all you need to do is carve your peppers, stuff them, and bake. This is a huge time-saver on a busy evening.
- Experiment with Fillings: This recipe is incredibly versatile. Feel free to swap the ground beef for ground turkey, chicken, or a plant-based crumble. You can also change the grain; quinoa, farro, or couscous are all fantastic substitutes for white rice. Add other finely diced veggies like zucchini, mushrooms, or corn to the filling for extra nutrients and flavor.
- Cheese Variations: While cheddar and Monterey Jack are classic choices, don’t be afraid to experiment. A spicy Pepper Jack would add a nice kick, while a mix of mozzarella and parmesan would give you a classic Italian flavor and a beautiful “cheese pull.”
- Get the Kids Involved: This is the perfect recipe for little helpers. Let them wash the peppers, stir the (cooled) filling, and help spoon it into the peppers. Their favorite part will undoubtedly be drawing the faces on the peppers with a food-safe marker, which you can then use as a guide for carving.
- Proper Storage and Reheating: Leftover stuffed peppers are delicious! Store them in an airtight container in the refrigerator for up to 3 days. To reheat, place them in an oven-safe dish, add a splash of water to the bottom, cover with foil, and bake at 350°F (175°C) for 15-20 minutes, or until heated through. You can also reheat them in the microwave.
FAQ Section
1. Can I make these Jack-O’-Lantern Stuffed Veggies vegetarian or vegan?
Absolutely! To make them vegetarian, simply substitute the ground beef with a plant-based ground crumble, cooked lentils, or a mixture of finely chopped mushrooms and black beans. Use vegetable broth instead of beef broth. To make them vegan, follow the vegetarian modifications and use your favorite brand of dairy-free shredded cheese.
2. My carved peppers keep falling over in the baking dish. How can I fix this?
The best way to prevent this is to choose peppers with a flat, stable bottom. If they are still wobbly, you can either slice a very thin piece off the bottom to create a level surface or you can prop them up against each other in a slightly smaller baking dish so they are snug and supported.
3. Can I use different colored bell peppers for this recipe?
Of course! While orange peppers are the most traditional for a “Jack-O’-Lantern” look, you can create a whole spooky patch of peppers. Red and yellow peppers are sweet like orange ones. Green peppers have a more earthy, slightly bitter flavor that many people enjoy. A mix of colors on a platter looks incredibly festive.
4. Is this stuffed pepper recipe gluten-free?
Yes, this recipe is naturally gluten-free as written. Rice, meat, vegetables, and cheese do not contain gluten. Just be sure to double-check the labels on your beef broth and any pre-packaged seasonings to ensure they are certified gluten-free and have no hidden wheat additives.
5. How do I know when the filling is cooked and ready to be stuffed?
The filling is cooked in two stages. In the skillet, the beef should be browned with no pink remaining, and the rice should have absorbed most of the liquid and become partially tender after simmering. The rest of the cooking happens in the oven. The final dish is ready when the peppers are tender (easily pierced with a fork) and the cheese on top is bubbly and golden.
6. Can I freeze these stuffed peppers for later?
Yes, this recipe freezes very well. You can freeze them either before or after baking.
- To freeze before baking: Stuff the raw peppers, but don’t bake them. Place them on a baking sheet and freeze until solid, then transfer to a freezer-safe bag or container. They can be stored for up to 3 months. Bake from frozen, adding about 20-30 minutes to the initial covered baking time.
- To freeze after baking: Let the cooked peppers cool completely. Wrap them individually in plastic wrap and then place them in a freezer-safe container. To reheat, thaw in the refrigerator overnight and bake at 350°F until heated through.
7. What is the best kind of rice to use for stuffed peppers?
Long-grain white rice is a great choice because it cooks relatively quickly and absorbs flavors well. However, you can also use brown rice for more fiber and a nuttier taste, but you may need to add a bit more liquid (broth) and increase the simmering time on the stovetop and the baking time in the oven. Instant rice can also be used, but you would add it at the end of the filling-making process with less liquid, as it requires minimal cooking time.
8. My filling seems too watery before stuffing the peppers. What did I do wrong?
If your filling seems too wet after simmering, it likely just needs a little more time. Remove the lid from the skillet and let it simmer for an additional 5-7 minutes, stirring occasionally, to allow the excess liquid to evaporate. The filling should be thick and moist, not soupy. If you’re in a hurry, you can also stir in a tablespoon or two of breadcrumbs or quick-cooking oats to help absorb the extra moisture.

Jack-O’-Lantern Stuffed Veggies
Ingredients
- 6 large Orange Bell Peppers: These will be the vessels for our spooky creations. Look for peppers that are firm, brightly colored, and have a relatively flat bottom so they can stand upright.
- 1 ½ lbs Lean Ground Beef: The savory, protein-packed heart of our filling.
- 1 cup Uncooked Long-Grain White Rice: This will cook within the filling, absorbing all the delicious flavors and making the dish substantial.
- 1 large Yellow Onion, finely chopped: Provides a foundational sweet and aromatic flavor base.
- 3 cloves Garlic, minced: Adds a pungent, aromatic kick that complements the beef perfectly.
- 1 (15-ounce) can Diced Tomatoes, undrained: Lends moisture, acidity, and a rich tomato flavor to the filling.
- 1 (8-ounce) can Tomato Sauce: Helps bind the filling together and deepens the savory tomato taste.
- 1 cup Beef Broth: Adds richness and the necessary liquid for the rice to cook to tender perfection inside the peppers.
- 4 oz Cooked Ham, finely diced: Introduces a subtle, smoky saltiness that elevates the entire filling.
- 2 teaspoons Italian Seasoning: A blend of dried herbs like oregano, basil, and thyme that provides a classic, savory flavor profile.
- 1 teaspoon Smoked Paprika: Adds a touch of smoky depth and beautiful color.
- 1 teaspoon Salt (or to taste): Enhances all the other flavors.
- ½ teaspoon Black Pepper (or to taste): Provides a gentle, warming spice.
- 2 cups Shredded Sharp Cheddar or Monterey Jack Cheese, divided: One cup will be mixed into the filling for cheesy goodness in every bite, and one cup will be reserved for a perfectly melted, bubbly topping.
- 2 tablespoons Olive Oil: Used for sautéing the aromatics and browning the beef.
Instructions
Creating these festive Jack-O’-Lantern Stuffed Veggies is a two-part process: preparing the pepper “pumpkins” and cooking the delicious filling. It’s a fun activity that even the kids can help with!
Step 1: Prepare the Jack-O’-Lantern Peppers
First, wash and thoroughly dry your orange bell peppers. Using a sharp paring knife, carefully slice off the top of each pepper, about half an inch down from the stem. Treat these tops like the lid of a pumpkin; you’ll want to keep them. Set the “lids” aside. Next, reach inside each pepper and remove all the seeds and the white pithy membranes. You can use a small spoon to scrape the insides clean.
Step 2: Carve the Spooky Faces
This is the most creative part! Using your small, sharp paring knife, carefully carve Jack-O’-Lantern faces into one side of each hollowed-out pepper. You can make them spooky, happy, or goofy. Triangles work well for eyes and noses, and a simple jagged line makes a great mouth. Be gentle to avoid cracking the pepper walls. This is a fantastic step for older children to help with, or for younger kids to draw a face with a marker for you to carve. Once carved, arrange the peppers standing up in a 9×13-inch baking dish or another dish large enough to hold them snugly.
Step 3: Begin the Filling
In a large skillet or Dutch oven, heat the olive oil over medium-high heat. Add the finely chopped yellow onion and sauté for 4-5 minutes, until it becomes soft and translucent. Add the minced garlic and cook for another minute until fragrant, being careful not to let it burn.
Step 4: Brown the Beef and Ham
Add the lean ground beef and the diced ham to the skillet with the onions and garlic. Break up the beef with a wooden spoon and cook until it is thoroughly browned and no pink remains. This should take about 7-8 minutes. Once cooked, drain off any excess grease from the skillet.
Step 5: Combine the Filling Ingredients
Reduce the heat to medium. To the skillet with the cooked meat, add the uncooked rice, undrained diced tomatoes, tomato sauce, beef broth, Italian seasoning, smoked paprika, salt, and black pepper. Stir everything together until it’s well combined.
Step 6: Simmer the Filling
Bring the mixture to a gentle simmer. Once it’s bubbling, reduce the heat to low, cover the skillet, and let it cook for about 15-20 minutes. You want the rice to be partially cooked and to have absorbed most of the liquid. The filling should be thick, not watery.
Step 7: Add the Cheese
Turn off the heat. Uncover the skillet and stir in 1 cup of the shredded cheddar or Monterey Jack cheese. Continue to stir until the cheese is completely melted and incorporated into the filling, creating a rich, gooey consistency.
Step 8: Stuff the Peppers
Preheat your oven to 375°F (190°C). Carefully spoon the warm beef and rice mixture into each of your carved bell peppers, packing it in firmly until each pepper is filled to the brim.
Step 9: Prepare for Baking
Pour about ½ cup of water or beef broth into the bottom of the baking dish, around the peppers. This will create steam as they bake, helping the peppers become tender without burning on the bottom.
Step 10: Bake the Stuffed Peppers
Place the little pepper “lids” back on top of each stuffed pepper. Cover the entire baking dish tightly with aluminum foil. Place the dish in the preheated oven and bake for 45 minutes. The foil traps the steam, ensuring the peppers cook through and become tender.
Step 11: The Final Melt
After 45 minutes, carefully remove the foil from the baking dish. Also, remove the pepper “lids” and set them aside for a moment. Sprinkle the remaining 1 cup of shredded cheese evenly over the top of the filling in each pepper.
Step 12: Brown and Serve
Return the baking dish to the oven, uncovered, and bake for another 10-15 minutes. You’re looking for the cheese to be completely melted, bubbly, and just beginning to turn golden brown on top. Once done, remove from the oven and let the peppers rest for a few minutes before serving. You can place the pepper “lids” back on top or serve them on the side.
Nutrition
- Serving Size: one normal portion
- Calories: 550