")


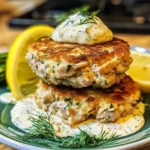
Our household has a few weeknight dinner heroes, those recipes that are quick, relatively healthy, and universally loved, and these Lemon Dill Tuna Cakes have firmly cemented their place in that hallowed rotation. The first time I made them, I was looking for a way to jazz up the humble can of tuna, and the bright combination of zesty lemon and fresh dill immediately caught my eye. The aroma alone, as they sizzled in the pan, was enough to bring my kids wandering into the kitchen, curious and hungry. The verdict? An overwhelming success! The cakes were beautifully golden and crispy on the outside, yet wonderfully moist and flaky on the inside. The lemon provided a vibrant tang that cut through the richness of the tuna, while the dill added an herbaceous freshness that elevated the whole dish. Even my notoriously picky eater asked for seconds, which is the highest praise a recipe can receive in our home. Since then, they’ve become a go-to for busy evenings, light lunches, and even as impressive-looking appetizers when guests come over. They are incredibly versatile and forgiving, which makes them a joy to prepare.
Ingredients
- Canned Tuna: 2 (5-ounce) cans of tuna, packed in water or oil, drained very well and flaked. (Using good quality tuna makes a noticeable difference in flavor and texture.)
- Panko Breadcrumbs: 1/2 cup, plus an additional 1/4 cup for coating. (Panko provides a lighter, crispier crust than regular breadcrumbs.)
- Mayonnaise: 1/4 cup. (Acts as a binder and adds moisture and richness.)
- Large Egg: 1, lightly beaten. (Helps bind the cakes together.)
- Fresh Dill: 2 tablespoons, finely chopped. (The star herb, providing a fresh, slightly anise-like flavor.)
- Lemon Zest: 1 tablespoon, from about 1 large lemon. (Adds a bright, aromatic citrusy punch without too much acidity.)
- Lemon Juice: 1 tablespoon, freshly squeezed. (Enhances the lemon flavor and adds a touch of tartness.)
- Dijon Mustard: 1 teaspoon. (Adds a subtle tangy depth and helps emulsify the mixture.)
- Green Onions (Scallions): 2, finely chopped (both white and green parts). (Provide a mild, fresh onion flavor.)
- Salt: 1/2 teaspoon, or to taste. (Enhances all the other flavors.)
- Black Pepper: 1/4 teaspoon, freshly ground, or to taste. (Adds a gentle warmth.)
- Olive Oil or Vegetable Oil: 2-3 tablespoons, for frying. (For achieving that golden-brown, crispy exterior.)
Instructions
- Prepare the Tuna: Ensure the canned tuna is thoroughly drained. Excess moisture can make the cakes soggy and difficult to form. Flake the tuna into a medium-sized mixing bowl using a fork.
- Combine Wet Ingredients and Seasonings: In a separate small bowl, whisk together the mayonnaise, beaten egg, fresh dill, lemon zest, lemon juice, Dijon mustard, chopped green onions, salt, and black pepper until well combined.
- Mix with Tuna: Pour the wet ingredient mixture over the flaked tuna in the larger bowl. Add the 1/2 cup of panko breadcrumbs to the bowl. Gently fold all the ingredients together until just combined. Be careful not to overmix, as this can make the tuna cakes tough.
- Chill (Optional but Recommended): Cover the bowl with plastic wrap and refrigerate the tuna mixture for at least 15-30 minutes. Chilling helps the flavors meld and makes the cakes easier to shape and less likely to fall apart during cooking.
- Shape the Cakes: Place the additional 1/4 cup of panko breadcrumbs on a shallow plate or pie dish. Remove the tuna mixture from the refrigerator. Scoop out about 1/4 cup of the mixture per cake (or your desired size) and form it into a patty, about 1/2 to 3/4 inch thick. You should get about 6-8 patties depending on their size.
- Coat the Cakes: Gently press each patty into the panko breadcrumbs on the plate, ensuring both sides are lightly coated. This will help create a crispy exterior.
- Cook the Tuna Cakes:
- Heat the olive oil or vegetable oil in a large non-stick skillet over medium heat. The oil should be hot enough that a breadcrumb sizzles when dropped in, but not smoking.
- Carefully place the tuna cakes in the hot skillet, ensuring not to overcrowd the pan (cook in batches if necessary).
- Cook for 3-5 minutes per side, or until golden brown and crispy, and heated through. Adjust the heat as necessary to prevent burning.
- Drain and Serve: Once cooked, transfer the tuna cakes to a plate lined with paper towels to absorb any excess oil. Serve warm with your favorite accompaniments.
Nutrition Facts
- Servings: Makes approximately 6-8 cakes; Serving size: 2 cakes.
- Calories per serving (approx. 2 cakes): 280-350 kcal (This can vary based on tuna type, oil used for frying, and exact patty size.)
- Protein: High in protein, essential for muscle repair and growth, primarily from the tuna and egg.
- Omega-3 Fatty Acids: Tuna is a good source of these heart-healthy fats, particularly if using tuna packed in oil (though water-packed is often used for lower fat).
- Vitamin D: Tuna provides some Vitamin D, important for bone health and immune function.
- Sodium: Moderate sodium content, largely dependent on the canned tuna and added salt. Choose low-sodium tuna if this is a concern.
Preparation Time
- Prep Time: Approximately 20 minutes (includes draining tuna, chopping ingredients, and mixing).
- Chill Time (Optional): 15-30 minutes.
- Cook Time: Approximately 8-10 minutes per batch.
- Total Time (excluding optional chill time): Around 30 minutes.
This recipe is wonderfully efficient, making it perfect for a quick weeknight dinner or a speedy lunch. The active preparation is minimal, and the cooking process is straightforward and fast.
How to Serve
These Lemon Dill Tuna Cakes are incredibly versatile. Here are some delicious ways to serve them:
- As a Main Course:
- Serve 2-3 cakes per person alongside a fresh green salad with a light vinaigrette.
- Pair with roasted vegetables like asparagus, broccoli, or zucchini.
- Accompany with a side of quinoa, couscous, or wild rice for a more substantial meal.
- Offer with a dollop of tartar sauce, a lemon-dill yogurt dip (Greek yogurt, lemon juice, dill, garlic powder), or a spicy aioli.
- In Sandwiches or Wraps:
- Place a warm tuna cake in a toasted bun (like a burger) with lettuce, tomato, and your favorite sauce.
- Use them as a filling for pita bread or a tortilla wrap with shredded carrots, cucumber, and a creamy dressing.
- Make mini tuna sliders on small dinner rolls for a fun appetizer or light meal.
- As Appetizers:
- Form smaller, bite-sized patties and serve them on a platter with various dipping sauces.
- Top each mini cake with a small dollop of crème fraîche and a tiny sprig of dill for an elegant presentation.
- For a Light Lunch:
- Serve one or two tuna cakes over a bed of mixed greens or arugula.
- Enjoy with a side of cottage cheese or fresh fruit.
- Garnishes:
- Always serve with extra lemon wedges for squeezing over the cakes just before eating.
- A sprinkle of fresh dill or chopped parsley adds a final touch of freshness and color.
Additional Tips
- Quality Tuna Matters: Opt for good quality canned tuna. Solid white albacore tuna tends to have a firmer texture and milder flavor, while chunk light tuna can be softer. Whichever you choose, ensure it’s packed in water or oil you trust, and drain it very well.
- Don’t Overmix: When combining the ingredients, mix until they are just incorporated. Overmixing can develop the gluten in any breadcrumbs (if not panko) and can make the tuna cakes dense and tough rather than light and flaky.
- Chilling is Key: While optional, chilling the mixture for at least 15-30 minutes before forming patties helps the flavors meld and firms up the mixture, making the cakes easier to handle and less likely to fall apart during cooking.
- Panko for Crispiness: Panko breadcrumbs are Japanese-style breadcrumbs that are flakier and absorb less oil than regular breadcrumbs, resulting in a lighter, crispier crust. If you don’t have panko, regular fine, dry breadcrumbs will work, but the texture will be different.
- Oil Temperature: Ensure your oil is properly heated before adding the tuna cakes. If the oil isn’t hot enough, the cakes will absorb too much oil and become greasy. If it’s too hot, the outside will burn before the inside is heated through. Medium heat is usually perfect.
- Gentle Handling: Be gentle when flipping the tuna cakes in the skillet to prevent them from breaking apart, especially if you skipped the chilling step. A thin, flexible spatula works best.
- Make-Ahead Potential: You can prepare the tuna mixture a day in advance, cover, and refrigerate. Form and cook the patties just before serving. Cooked tuna cakes can also be refrigerated for up to 2-3 days and reheated.
- Flavor Variations: Feel free to experiment! Add a pinch of red pepper flakes for some heat, capers for a briny kick, or swap dill for fresh parsley or chives if preferred. A little finely chopped celery or bell pepper can also add a nice crunch.
FAQ Section
Q1: Can I bake these Lemon Dill Tuna Cakes instead of frying them?
A1: Yes, absolutely! To bake, preheat your oven to 400°F (200°C). Place the coated tuna cakes on a baking sheet lined with parchment paper or lightly greased. You might want to lightly spray the tops of the cakes with cooking spray for extra crispiness. Bake for 15-20 minutes, flipping halfway through, until golden brown and heated through. They won’t be quite as crispy as pan-fried, but they’ll still be delicious and lower in fat.
Q2: My tuna cakes are falling apart. What did I do wrong?
A2: This can happen for a few reasons:
* Too much moisture: Ensure your tuna is very well drained.
* Not enough binder: The egg and mayonnaise help bind. Make sure you’ve used the right amounts. If the mixture still seems too loose, you can add an extra tablespoon or two of panko breadcrumbs to the mixture itself.
* Overmixing: While it sounds counterintuitive, overmixing can sometimes break down the structure.
* Skipping chilling: Chilling helps firm up the mixture.
* Rough handling: Be gentle when forming and flipping.
Q3: Can I make these tuna cakes gluten-free?
A3: Yes, easily! Substitute the panko breadcrumbs with gluten-free panko breadcrumbs or crushed gluten-free crackers. Ensure your mayonnaise and Dijon mustard are also certified gluten-free. The core ingredients (tuna, egg, lemon, dill) are naturally gluten-free.
Q4: How do I store leftover tuna cakes?
A4: Allow the tuna cakes to cool completely, then store them in an airtight container in the refrigerator for up to 3 days. To reheat, you can pan-fry them lightly, bake them in a 350°F (175°C) oven until warmed through, or even use an air fryer. Microwaving can make them a bit soggy.
Q5: Can I freeze Lemon Dill Tuna Cakes?
A5: Yes. You can freeze them either cooked or uncooked.
* Uncooked: Form the patties, place them on a baking sheet lined with parchment paper, and freeze until solid. Then transfer to a freezer-safe bag or container. Thaw in the refrigerator before coating with panko (if not already coated) and cooking as directed.
* Cooked: Cool completely, then freeze in a single layer on a baking sheet before transferring to a freezer bag. Reheat from frozen in a 350°F (175°C) oven for about 20-25 minutes, or until heated through.
Q6: What’s the best type of tuna to use for these cakes?
A6: This is largely personal preference. Solid white albacore tuna offers a firmer, meatier texture and milder flavor. Chunk light tuna (often skipjack or yellowfin) is softer, more flaky, and can have a stronger tuna flavor. Both work well. Tuna packed in water is generally preferred for a “cleaner” tuna flavor and lower fat, but tuna packed in olive oil can add richness (just be sure to drain it very well).
Q7: I don’t have fresh dill. Can I use dried dill?
A7: Yes, you can substitute dried dill, but the flavor will be more concentrated and slightly different. The general rule is to use about one-third the amount of dried herb as fresh. So, for 2 tablespoons of fresh dill, you’d use about 2 teaspoons of dried dill. Fresh dill is highly recommended for its bright, vibrant flavor in this recipe.
Q8: Can I add other vegetables to the tuna cakes?
A8: Certainly! Finely chopped celery, red bell pepper, or even corn kernels can be added for extra texture and flavor. Just be sure to chop them very finely so the cakes still hold together well, and don’t add too much bulk, or you might need an extra bit of binder (like a little more mayonnaise or panko). About 1/4 cup of finely diced vegetables would be a good starting point.
Lemon Dill Tuna Cakes
Ingredients
- Canned Tuna: 2 (5-ounce) cans of tuna, packed in water or oil, drained very well and flaked. (Using good quality tuna makes a noticeable difference in flavor and texture.)
- Panko Breadcrumbs: 1/2 cup, plus an additional 1/4 cup for coating. (Panko provides a lighter, crispier crust than regular breadcrumbs.)
- Mayonnaise: 1/4 cup. (Acts as a binder and adds moisture and richness.)
- Large Egg: 1, lightly beaten. (Helps bind the cakes together.)
- Fresh Dill: 2 tablespoons, finely chopped. (The star herb, providing a fresh, slightly anise-like flavor.)
- Lemon Zest: 1 tablespoon, from about 1 large lemon. (Adds a bright, aromatic citrusy punch without too much acidity.)
- Lemon Juice: 1 tablespoon, freshly squeezed. (Enhances the lemon flavor and adds a touch of tartness.)
- Dijon Mustard: 1 teaspoon. (Adds a subtle tangy depth and helps emulsify the mixture.)
- Green Onions (Scallions): 2, finely chopped (both white and green parts). (Provide a mild, fresh onion flavor.)
- Salt: 1/2 teaspoon, or to taste. (Enhances all the other flavors.)
- Black Pepper: 1/4 teaspoon, freshly ground, or to taste. (Adds a gentle warmth.)
- Olive Oil or Vegetable Oil: 2-3 tablespoons, for frying. (For achieving that golden-brown, crispy exterior.)
Instructions
- Prepare the Tuna: Ensure the canned tuna is thoroughly drained. Excess moisture can make the cakes soggy and difficult to form. Flake the tuna into a medium-sized mixing bowl using a fork.
- Combine Wet Ingredients and Seasonings: In a separate small bowl, whisk together the mayonnaise, beaten egg, fresh dill, lemon zest, lemon juice, Dijon mustard, chopped green onions, salt, and black pepper until well combined.
- Mix with Tuna: Pour the wet ingredient mixture over the flaked tuna in the larger bowl. Add the 1/2 cup of panko breadcrumbs to the bowl. Gently fold all the ingredients together until just combined. Be careful not to overmix, as this can make the tuna cakes tough.
- Chill (Optional but Recommended): Cover the bowl with plastic wrap and refrigerate the tuna mixture for at least 15-30 minutes. Chilling helps the flavors meld and makes the cakes easier to shape and less likely to fall apart during cooking.
- Shape the Cakes: Place the additional 1/4 cup of panko breadcrumbs on a shallow plate or pie dish. Remove the tuna mixture from the refrigerator. Scoop out about 1/4 cup of the mixture per cake (or your desired size) and form it into a patty, about 1/2 to 3/4 inch thick. You should get about 6-8 patties depending on their size.
- Coat the Cakes: Gently press each patty into the panko breadcrumbs on the plate, ensuring both sides are lightly coated. This will help create a crispy exterior.
- Cook the Tuna Cakes:
- Heat the olive oil or vegetable oil in a large non-stick skillet over medium heat. The oil should be hot enough that a breadcrumb sizzles when dropped in, but not smoking.
- Carefully place the tuna cakes in the hot skillet, ensuring not to overcrowd the pan (cook in batches if necessary).
- Cook for 3-5 minutes per side, or until golden brown and crispy, and heated through. Adjust the heat as necessary to prevent burning.
- Drain and Serve: Once cooked, transfer the tuna cakes to a plate lined with paper towels to absorb any excess oil. Serve warm with your favorite accompaniments.
Nutrition
- Serving Size: one normal portion
- Calories: 350