")

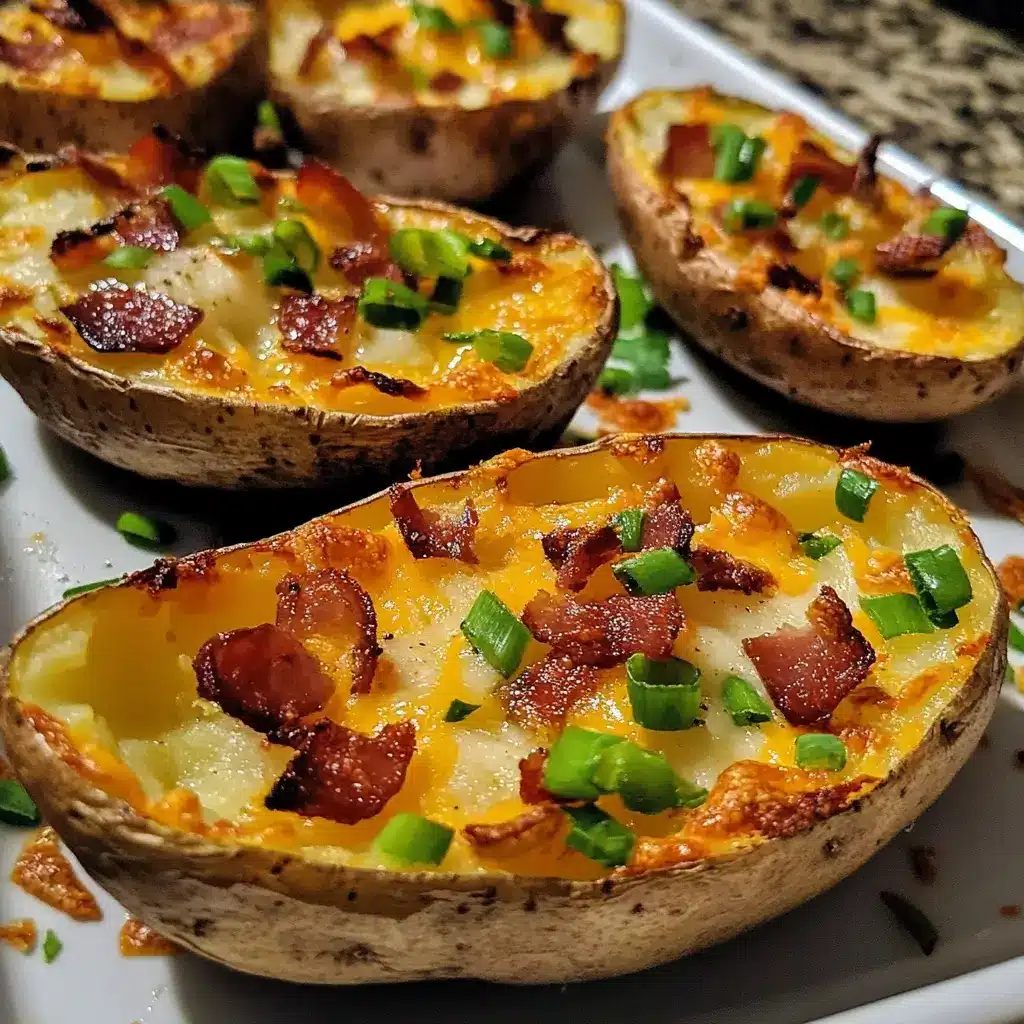

Of all the appetizers in the pantheon of great party food, nothing quite captures the essence of pure, unadulterated comfort like Loaded Baked Potato Skins. I’ll never forget the first time I made them for a big family game day. The house was buzzing with excitement, the game was on the big screen, but the real MVP of the day wasn’t on the field—it was in the oven. The aroma of baking potatoes, sizzling bacon, and sharp, melting cheddar cheese filled every room, drawing people to the kitchen like a magnet. When I finally pulled that sheet pan out, a hush fell over the crowd. Each potato skin was a perfect, golden-brown boat, its shell impossibly crispy and its cargo of cheesy, bacony goodness bubbling under the heat. I watched as my family, from the kids to the grandparents, each grabbed a skin, added a dollop of cool sour cream, and took that first, glorious bite. The collective chorus of “Mmmm” and “Oh, these are incredible!” was my trophy. They weren’t just eating an appetizer; they were experiencing a moment of pure culinary joy. These aren’t just potato skins; they are edible vehicles for happiness, the undisputed champion of appetizers, and a recipe that will make you a legend at any gathering.
Ingredients
This recipe relies on simple, high-quality ingredients to create a truly spectacular result. Each component plays a crucial role, from the starchy potato to the savory toppings.
- Potatoes: 4 large Russet potatoes. Russets are essential for this recipe due to their high starch content and thick, sturdy skin, which becomes perfectly crisp and holds up to all the delicious fillings.
- Oil: 2 tablespoons of olive oil or melted unsalted butter. This is for brushing the skins, a critical step that ensures they become golden brown and incredibly crispy during the second bake.
- Seasoning: 1 teaspoon kosher salt and 1/2 teaspoon black pepper. A simple but vital combination to season the potato shells themselves, ensuring every single bite is flavorful.
- Bacon: 8 slices of thick-cut bacon, cooked until crispy and then crumbled or chopped. The smoky, salty flavor of crispy bacon is the heart and soul of a classic loaded potato skin.
- Cheese: 1 ½ cups of shredded sharp cheddar cheese. Sharp cheddar provides a tangy, robust flavor that cuts through the richness of the bacon and potato. You can also use a mix of cheddar and Monterey Jack.
- Toppings: ½ cup sour cream and ¼ cup chopped fresh chives or green onions. The cool, tangy sour cream and fresh, mild oniony bite of the chives provide the perfect finishing touch and a necessary contrast to the warm, savory skins.
Instructions
Follow these detailed steps carefully to achieve potato skin perfection. The key is a two-part baking process that creates a sturdy, crispy shell before it’s loaded with toppings.
Step 1: The Initial Bake
First, preheat your oven to 400°F (200°C). While the oven is heating, scrub your Russet potatoes thoroughly under cold running water to remove any dirt. Pat them completely dry with a paper towel; a dry exterior is the first step towards a crispy skin. Using a fork, pierce each potato 5-6 times all over. This allows steam to escape during baking, preventing the potatoes from bursting and helping the interior cook evenly. Place the pierced potatoes directly on the middle oven rack and bake for 60 minutes, or until the skin is dry and the inside is completely tender when pierced with a knife.
Step 2: Cooling and Scooping
Once baked, carefully remove the hot potatoes from the oven and set them on a wire rack to cool. Let them cool for at least 15-20 minutes, or until they are comfortable enough to handle. Waiting for them to cool is important; if they are too hot, the skins will be delicate and may tear when you scoop them. Once cooled, slice each potato in half lengthwise. Using a spoon, gently scoop out the cooked potato flesh from the center of each half, leaving about a ¼-inch thick border of potato attached to the skin. This border provides structure and ensures the skins aren’t just empty shells. Be gentle to avoid tearing the skin. Reserve the scooped-out potato flesh for another use, like making mashed potatoes or potato cakes.
Step 3: The Second Bake for Crispy Shells
Increase your oven temperature to 425°F (220°C). Place the hollowed-out potato shells skin-side up on a large baking sheet. Brush the entire surface of each potato shell (both the skin side and the inside) generously with the melted butter or olive oil. This step is non-negotiable for achieving that signature crispy texture. Sprinkle the insides of the shells with the kosher salt and black pepper. Flip the skins over so they are cut-side up. Bake for 10 minutes. Then, flip them again so they are skin-side up and bake for another 5-7 minutes, or until the skins are golden brown and wonderfully crisp.
Step 4: Loading and Final Bake
Remove the crispy potato shells from the oven. Carefully flip them one last time so they are cut-side up. Now for the fun part! Divide the shredded cheddar cheese and the crumbled bacon evenly among the 8 potato shells, filling them generously. Place the loaded skins back into the 425°F (220°C) oven and bake for an additional 5-8 minutes. You’re looking for the cheese to be completely melted, bubbly, and just beginning to turn a light golden brown around the edges.
Step 5: Garnish and Serve Immediately
As soon as you pull the loaded potato skins from the oven, they are ready for their grand finale. Transfer them to a serving platter. Top each skin with a generous dollop of sour cream and a sprinkle of fresh, chopped chives or green onions. Serve them immediately while they are hot and the cheese is still gooey for the ultimate experience.
Nutrition Facts
Please note that these values are an estimate and can vary based on the specific ingredients and portion sizes used.
- Servings: 8 potato skins
- Calories Per Serving: Approximately 350-400 kcal per skin. This is an indulgent appetizer, rich in flavor and satisfaction.
- Fat: High in fat, primarily from the cheese, bacon, and oil, which contributes to the rich taste and crispy texture.
- Protein: A good source of protein, mainly provided by the generous amounts of bacon and cheddar cheese.
- Carbohydrates: The primary source of carbohydrates comes from the potato shell itself, providing energy and that classic potato flavor.
- Sodium: This dish can be high in sodium due to the salt, bacon, and cheese. You can adjust by using low-sodium bacon or reducing the added salt.
Preparation Time
The process involves multiple stages, but much of the time is hands-off while the potatoes bake.
- Preparation: 20 minutes (washing, piercing, scooping, and loading)
- Cook Time: Approximately 1 hour 25 minutes (initial 60-minute bake + 15-minute crisping bake + 10-minute final melt)
- Total Time: Approximately 1 hour 45 minutes
How to Serve
Presentation and pairings can elevate your loaded potato skins from a simple snack to a show-stopping appetizer. Here are some creative ways to serve them.
- The Classic Game Day Platter:
- Arrange the hot potato skins on a large wooden board or rustic platter.
- Place a large bowl of sour cream in the center for communal dipping.
- Have small bowls of extra chives, bacon bits, and shredded cheese on the side so guests can customize their skins even further.
- Serve alongside other classic appetizers like chicken wings, nachos, and celery sticks with blue cheese dip.
- Create a “Potato Skin Bar”:
- This is a fantastic, interactive idea for parties and larger gatherings.
- Prepare the potato skins up to the point of the final melt (Step 4).
- Set up a “bar” with the crispy shells and various bowls of toppings.
- Classic Toppings: Sour cream, bacon, cheddar, chives.
- Gourmet Toppings: Pulled pork or chicken, beef chili, guacamole, salsa, pico de gallo, jalapeños, different cheeses (pepper jack, gouda), caramelized onions, sautéed mushrooms.
- Let guests build their own creations, then pop them in the oven for a few minutes to melt the cheese before serving.
- Perfect Dips and Sauces:
- While sour cream is traditional, don’t be afraid to branch out.
- Classic Ranch Dressing: A cool and herby complement.
- Blue Cheese Dressing: The sharp, funky flavor is a perfect match for the bacon.
- Spicy BBQ Sauce: Adds a smoky, sweet, and tangy kick.
- Queso Dip: For an ultra-cheesy, decadent experience.
Additional Tips
Master the art of the perfect potato skin with these eight expert tips.
- Don’t Wrap in Foil: Never wrap your potatoes in aluminum foil for the initial bake. This traps steam and makes the skins soft and soggy. Baking them directly on the oven rack allows air to circulate, which is the secret to a dry, sturdy skin.
- Save the Scooped Potato: The scooped-out potato flesh is a delicious bonus ingredient. Don’t throw it away! You can mash it with butter, milk, and salt for a quick side of mashed potatoes, or mix it with cheese and chives and form it into patties to pan-fry as potato cakes.
- Make-Ahead for Easy Entertaining: You can prepare the skins ahead of time to make party day less stressful. Complete the recipe through Step 3 (the second bake for crispy shells). Let the empty, crispy shells cool completely, then store them in an airtight container in the refrigerator for up to 2 days. When ready to serve, simply fill them and proceed with the final bake.
- Air Fryer for Extra Crispiness: For an even crispier result, you can use your air fryer. After scooping the potatoes, brush the shells with oil and air fry at 400°F (200°C) for 8-10 minutes, flipping halfway, until golden and crisp. Then, fill them and air fry for another 3-4 minutes to melt the cheese.
- Don’t Over-Scoop: Be careful to leave a ¼-inch border of potato flesh on the skin. If you scoop out too much, the skins will be too flimsy and may collapse or tear when you fill them or pick them up. That little bit of potato adds structure and flavor.
- Achieve Perfect Bacon: For the best texture, cook your bacon until it’s truly crispy. Soggy or chewy bacon will make the filling greasy. You can cook it in a skillet, in the oven on a wire rack, or in the microwave between paper towels. Ensure you drain it well and crumble it while it’s still warm.
- Vary Your Cheeses: While sharp cheddar is a classic, feel free to experiment. A mix of sharp cheddar and Monterey Jack gives you great flavor and a superior “cheese pull.” Smoked gouda adds a wonderful smoky depth, while pepper jack brings a welcome spicy kick.
- Double Brush for a Flakier Shell: For the ultimate crispy, flaky shell, try a double-brushing technique. After the first bake and scooping, brush the skins with oil and bake for 10 minutes. Then, remove them, brush them again with a little more oil, and bake for the final 5-7 minutes. This extra layer of fat helps to “fry” the skin in the oven’s heat.
FAQ Section
Here are answers to some of the most common questions about making loaded baked potato skins.
1. Why did my potato skins come out soggy instead of crispy?
Sogginess is the number one enemy of good potato skins, and it’s usually caused by excess moisture. The most common culprits are: wrapping the potatoes in foil during the initial bake (which steams them), not drying the potatoes thoroughly before baking, or skipping the crucial second bake where the hollowed-out shells are crisped up with oil. Following the instructions to bake directly on the rack and giving the shells their own dedicated baking time with oil is the key to a crispy finish.
2. Can I freeze loaded potato skins?
Yes, they freeze surprisingly well! For best results, freeze them after they are fully assembled but before adding the final sour cream and chive toppings. Let the baked and loaded skins cool completely. Place them on a baking sheet in a single layer and “flash freeze” for about an hour until solid. Then, transfer them to a freezer-safe zip-top bag or airtight container. They can be stored for up to 3 months. To reheat, bake them from frozen on a baking sheet at 375°F (190°C) for 20-25 minutes, or until heated through and crispy.
3. What is the absolute best type of potato to use for potato skins?
Russet potatoes are, without a doubt, the superior choice. Their skins are thick and tough, which allows them to hold their shape and become incredibly crispy. Their interior flesh is high in starch and low in moisture, making it fluffy and easy to scoop out. Using waxy potatoes like red or Yukon Gold will result in softer, less sturdy skins that are more likely to fall apart.
4. How can I make a vegetarian version of this recipe?
Creating a delicious vegetarian version is very easy! Simply omit the bacon and replace it with a savory plant-based alternative. Some great options include:
- Store-bought vegetarian bacon crumbles.
- Sautéed mushrooms and onions.
- Black beans and corn mixed with a little chili powder.
- Caramelized onions and smoked cheese for a deep, rich flavor.
5. What should I do with all the leftover scooped-out potato?
Don’t let that fluffy potato interior go to waste! It’s a versatile ingredient. You can instantly make a small batch of creamy mashed potatoes by adding butter, milk or cream, salt, and pepper. You can also mix it with an egg, some of the leftover shredded cheese, and chives, form it into small patties, and pan-fry them until golden to make delicious potato pancakes. It’s also a great thickener for soups and stews.
6. Can I use leftover baked potatoes from a previous meal?
Absolutely! This recipe is a fantastic way to use up leftover baked potatoes. It’s a great shortcut. Simply slice your cold, leftover baked potatoes in half, scoop out the flesh, and proceed with Step 3 of the recipe (brushing with oil and crisping them up in the oven). This saves you a full hour of baking time.
7. What’s the best way to reheat leftover potato skins?
To bring leftover potato skins back to their crispy glory, the oven or an air fryer is your best bet. Avoid the microwave at all costs, as it will make the skins steamy and soggy. To reheat in the oven, place the skins on a baking sheet and bake at 375°F (190°C) for 10-15 minutes, or until hot and re-crisped. In an air fryer, a few minutes at 375°F (190°C) will work perfectly.
8. Are potato skins considered healthy?
In their classic “loaded” form with bacon, cheese, and sour cream, potato skins are an indulgent treat rather than a health food. They are high in calories, sodium, and saturated fat. However, the potato skin itself is actually nutritious, containing fiber, iron, and B vitamins. You can create a “healthier” version by using turkey bacon, reduced-fat cheese, and swapping the sour cream for plain Greek yogurt. You could also load them with healthier toppings like black beans, salsa, and avocado.

Loaded Baked Potato Skins
Ingredients
This recipe relies on simple, high-quality ingredients to create a truly spectacular result. Each component plays a crucial role, from the starchy potato to the savory toppings.
- Potatoes: 4 large Russet potatoes. Russets are essential for this recipe due to their high starch content and thick, sturdy skin, which becomes perfectly crisp and holds up to all the delicious fillings.
- Oil: 2 tablespoons of olive oil or melted unsalted butter. This is for brushing the skins, a critical step that ensures they become golden brown and incredibly crispy during the second bake.
- Seasoning: 1 teaspoon kosher salt and 1/2 teaspoon black pepper. A simple but vital combination to season the potato shells themselves, ensuring every single bite is flavorful.
- Bacon: 8 slices of thick-cut bacon, cooked until crispy and then crumbled or chopped. The smoky, salty flavor of crispy bacon is the heart and soul of a classic loaded potato skin.
- Cheese: 1 ½ cups of shredded sharp cheddar cheese. Sharp cheddar provides a tangy, robust flavor that cuts through the richness of the bacon and potato. You can also use a mix of cheddar and Monterey Jack.
- Toppings: ½ cup sour cream and ¼ cup chopped fresh chives or green onions. The cool, tangy sour cream and fresh, mild oniony bite of the chives provide the perfect finishing touch and a necessary contrast to the warm, savory skins.
Instructions
Follow these detailed steps carefully to achieve potato skin perfection. The key is a two-part baking process that creates a sturdy, crispy shell before it’s loaded with toppings.
Step 1: The Initial Bake
First, preheat your oven to 400°F (200°C). While the oven is heating, scrub your Russet potatoes thoroughly under cold running water to remove any dirt. Pat them completely dry with a paper towel; a dry exterior is the first step towards a crispy skin. Using a fork, pierce each potato 5-6 times all over. This allows steam to escape during baking, preventing the potatoes from bursting and helping the interior cook evenly. Place the pierced potatoes directly on the middle oven rack and bake for 60 minutes, or until the skin is dry and the inside is completely tender when pierced with a knife.
Step 2: Cooling and Scooping
Once baked, carefully remove the hot potatoes from the oven and set them on a wire rack to cool. Let them cool for at least 15-20 minutes, or until they are comfortable enough to handle. Waiting for them to cool is important; if they are too hot, the skins will be delicate and may tear when you scoop them. Once cooled, slice each potato in half lengthwise. Using a spoon, gently scoop out the cooked potato flesh from the center of each half, leaving about a ¼-inch thick border of potato attached to the skin. This border provides structure and ensures the skins aren’t just empty shells. Be gentle to avoid tearing the skin. Reserve the scooped-out potato flesh for another use, like making mashed potatoes or potato cakes.
Step 3: The Second Bake for Crispy Shells
Increase your oven temperature to 425°F (220°C). Place the hollowed-out potato shells skin-side up on a large baking sheet. Brush the entire surface of each potato shell (both the skin side and the inside) generously with the melted butter or olive oil. This step is non-negotiable for achieving that signature crispy texture. Sprinkle the insides of the shells with the kosher salt and black pepper. Flip the skins over so they are cut-side up. Bake for 10 minutes. Then, flip them again so they are skin-side up and bake for another 5-7 minutes, or until the skins are golden brown and wonderfully crisp.
Step 4: Loading and Final Bake
Remove the crispy potato shells from the oven. Carefully flip them one last time so they are cut-side up. Now for the fun part! Divide the shredded cheddar cheese and the crumbled bacon evenly among the 8 potato shells, filling them generously. Place the loaded skins back into the 425°F (220°C) oven and bake for an additional 5-8 minutes. You’re looking for the cheese to be completely melted, bubbly, and just beginning to turn a light golden brown around the edges.
Step 5: Garnish and Serve Immediately
As soon as you pull the loaded potato skins from the oven, they are ready for their grand finale. Transfer them to a serving platter. Top each skin with a generous dollop of sour cream and a sprinkle of fresh, chopped chives or green onions. Serve them immediately while they are hot and the cheese is still gooey for the ultimate experience.
Nutrition
- Serving Size: one normal portion
- Calories: 400