")


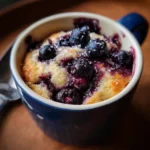
Of all the culinary discoveries I’ve made in my kitchen, few have brought as much consistent, instantaneous joy as this microwave blueberry muffin mug recipe. It was born from a classic morning dilemma: the kids were clamoring for a warm, bakery-style breakfast, but the clock was ticking mercilessly towards the school run. The thought of preheating the oven, mixing a full batch of batter, and the subsequent cleanup felt like an insurmountable task. On a whim, I decided to scale down our favorite blueberry muffin recipe to a single serving and see what the microwave could do. The result was nothing short of miraculous. In less than five minutes, we had a steaming, fragrant muffin in a mug, with a tender, fluffy crumb and jewel-like blueberries bursting with every spoonful. It was an instant hit. Now, it’s our go-to for rushed mornings, a quick after-school snack, or even a simple, comforting dessert. It’s the small, achievable luxury that can turn a hectic day into a delicious one, proving that you don’t need a lot of time to create something truly special.
Ingredients
Here are the simple, pantry-friendly components you’ll need to create your single-serving masterpiece. Each ingredient plays a crucial role in achieving that perfect muffin texture and flavor, even in the microwave.
- All-Purpose Flour (¼ cup): This is the structural backbone of your muffin, creating a soft and tender crumb. Ensure you spoon it into your measuring cup and level it off rather than scooping directly from the bag to avoid a dense, dry muffin.
- White Granulated Sugar (2 tablespoons): This provides the classic sweetness that complements the tartness of the blueberries. You can adjust this slightly to your personal preference.
- Baking Powder (¼ teaspoon): This is the essential leavening agent. It reacts with the liquid ingredients to create tiny air bubbles, giving your muffin its signature lift and fluffy texture, preventing it from becoming a dense puck.
- Pinch of Salt (⅛ teaspoon): A tiny amount of salt doesn’t make the muffin salty; instead, it enhances all the other flavors, making the sweet notes sweeter and the blueberry flavor more vibrant.
- Milk (3 tablespoons): This adds moisture and richness, binding the ingredients together. Whole milk will yield a richer result, but 2%, skim, or even plant-based alternatives like almond or oat milk work beautifully.
- Melted Butter or Vegetable Oil (1 tablespoon): This is the key to a moist, tender muffin. Melted butter adds a rich, classic flavor, while a neutral oil like vegetable or canola oil ensures incredible moistness.
- Vanilla Extract (¼ teaspoon): A dash of vanilla provides a warm, aromatic background note that elevates the overall flavor profile from simple to sophisticated.
- Fresh or Frozen Blueberries (2-3 tablespoons): The star of the show! These gems provide bursts of sweet, tart flavor and beautiful color throughout the muffin. If using frozen, there’s no need to thaw them first.
Instructions
Follow these step-by-step instructions for a flawless microwave muffin every time. The key is to work quickly and avoid overmixing the batter.
- Choose Your Mug: Select a standard-sized, microwave-safe ceramic mug (approximately 12-14 ounces is ideal). A mug with straight sides helps the muffin cook more evenly. Avoid mugs with metallic paint or rims.
- Combine the Dry Ingredients: In your chosen mug, add the all-purpose flour, granulated sugar, baking powder, and salt. Use a fork to whisk these ingredients together thoroughly. This step is crucial for ensuring the baking powder is evenly distributed, which guarantees a uniform rise.
- Incorporate the Wet Ingredients: Pour the milk, melted butter (or oil), and vanilla extract directly into the mug on top of the dry ingredients.
- Mix Until Just Combined: Using the same fork, gently mix the wet and dry ingredients together. Stir only until you no longer see streaks of dry flour. It’s perfectly fine if the batter is a little lumpy! Overmixing develops gluten, which is the number one cause of a tough, rubbery microwave muffin.
- Fold in the Blueberries: Gently fold in your fresh or frozen blueberries. If you are concerned about them sinking, you can toss them in a tiny bit of extra flour before adding them to the batter. This helps them stay suspended.
- Clean the Rim: For a clean presentation and to prevent batter from burning on the sides, wipe any drips or splatters from the inside rim of the mug with a paper towel.
- Microwave to Perfection: Place the mug in the center of your microwave. Cook on high power for approximately 70 to 90 seconds. Microwave times can vary significantly based on your machine’s wattage. Start with 70 seconds and check for doneness.
- Check for Doneness: The muffin is cooked when the top looks set and springs back lightly when touched. You can also insert a toothpick into the center; it should come out clean or with a few moist crumbs attached, but not wet batter. If it’s still doughy, microwave in 10-second increments until it’s fully cooked.
- Let It Rest: This is a vital step! Carefully remove the hot mug from the microwave. Let the muffin rest for 1-2 minutes before eating. This allows the internal steam to finish cooking the center and lets the flavors meld together. It will be extremely hot right out of the microwave.
Nutrition Facts
This nutritional information is an estimate for one blueberry muffin mug cake.
- Servings: 1
- Calories per serving: Approximately 350-400 kcal
- Carbohydrates (approx. 55g): The primary source of energy, coming from the flour, sugar, and natural sugars in the blueberries. This gives you that quick boost to start your day or overcome a mid-afternoon slump.
- Fat (approx. 14g): Primarily from the butter or oil, fat contributes to the muffin’s moist texture and rich flavor, and helps you feel fuller for longer.
- Protein (approx. 6g): Sourced from the flour and milk, protein is essential for building and repairing tissues and adds to the satisfying nature of this quick treat.
Preparation Time
This recipe is the epitome of speed and convenience, designed for when you need a delicious, warm treat in a hurry.
- Total Time: Under 5 minutes.
- Preparation: 2-3 minutes. This involves gathering your handful of pantry staples and mixing them directly in the mug. There’s no need for separate mixing bowls, which dramatically cuts down on both prep and cleanup time.
- Cooking: 70-90 seconds. The magic happens in the microwave, transforming the simple batter into a fully-risen, steaming muffin in less time than it takes to toast a slice of bread.
How to Serve
While this muffin is delightful on its own, a few simple additions can elevate it from a quick snack to a truly indulgent dessert or a more balanced breakfast.
- For a Classic Breakfast Feel:
- Serve warm with a small pat of butter melting on top.
- Add a dollop of Greek yogurt or sour cream for a tangy contrast that complements the sweet blueberries.
- Drizzle with a touch of pure maple syrup or honey for extra sweetness and a classic pancake-house flavor.
- For an Indulgent Dessert:
- Top with a generous scoop of vanilla bean ice cream; the contrast between the warm muffin and the cold, creamy ice cream is heavenly.
- Drizzle with a simple lemon glaze (made from powdered sugar and a few drops of lemon juice) to brighten the flavors.
- Finish with a spoonful of whipped cream and a sprinkle of cinnamon or a few extra fresh blueberries.
- For a Wholesome Twist:
- Sprinkle with a handful of crunchy granola or toasted nuts (like sliced almonds or pecans) for added texture and fiber.
- Top with a spoonful of chia seed jam instead of plain blueberries for an extra boost of omega-3s.
- Serve alongside a small bowl of mixed fresh fruit to create a more rounded and nutritious meal.
Additional Tips
Unlock the full potential of your microwave muffin with these eight expert tips for consistent, delicious results.
- Mug Selection is Key: The size and shape of your mug directly impact cooking. A wider, shorter mug will cook faster than a tall, narrow one. For the most even cooking, choose a standard 12-14 ounce ceramic mug with straight sides. This prevents the edges from overcooking before the center is done.
- Do Not Overmix the Batter: This is the most important rule of microwave baking. Mix only until the flour is just incorporated. A few lumps are a good thing! Overmixing develops gluten, which creates a dense, chewy, and rubbery texture instead of a light and fluffy one. A fork is the best tool for this, as it prevents over-aeration.
- Know Your Microwave’s Wattage: Not all microwaves are created equal. A 1200-watt microwave will cook the muffin much faster than a 700-watt one. The first time you make this recipe, err on the side of caution. Start with the lower end of the recommended cooking time (70 seconds) and add 10-second intervals as needed. Make a note of the perfect time for your specific machine.
- Embrace Frozen Blueberries: Frozen blueberries work wonderfully in this recipe and can even yield a better result. Because they are frozen, they are less likely to burst and bleed their color throughout the batter during mixing. Do not thaw them first; simply toss them in a teaspoon of flour to prevent sinking and add them directly to the batter.
- The Crucial Resting Period: Don’t skip the 1-2 minute rest time after cooking. The muffin continues to cook with residual heat as it sits. This process, known as carryover cooking, is essential for setting the center of the muffin perfectly. It also allows the super-heated sugars and steam to cool down, preventing a nasty burn.
- Customize with Spices and Zest: Elevate the flavor profile with simple additions. A quarter teaspoon of cinnamon or a pinch of nutmeg can add warmth and complexity. For a brighter, fresher taste, add a half teaspoon of finely grated lemon zest to the batter—lemon and blueberry are a classic and delicious pairing.
- Master Your Sweeteners: While white sugar provides a classic taste, you can easily substitute it. Try using brown sugar for a deeper, more caramel-like flavor. You can also experiment with liquid sweeteners like maple syrup or honey, but you may need to reduce the milk by about a teaspoon to compensate for the added liquid.
- Avoid the Overflow: Be mindful not to overfill your mug. The batter should fill the mug no more than halfway to two-thirds full. This gives the muffin ample room to rise as it cooks. If you fill it too high, the batter will likely overflow, creating a sticky mess in your microwave. If you only have smaller mugs, simply divide the batter between two mugs and adjust the cooking time accordingly.
FAQ Section
Here are answers to some of the most common questions about making this microwave blueberry muffin recipe.
1. Why did my microwave muffin turn out rubbery and tough?
This is the most common issue and is almost always caused by one of two things: overmixing the batter or overcooking the muffin. When you overmix, you develop too much gluten, which results in a chewy, tough texture. Mix only until the ingredients are just combined. Overcooking dries out the muffin and makes it hard. Always start with less cooking time and add more in 10-second bursts until it’s done.
2. Can I make this microwave muffin recipe gluten-free?
Yes, you can! Substitute the all-purpose flour with a good quality 1-to-1 gluten-free baking flour blend (one that contains xanthan gum). The texture might be slightly different—sometimes a bit denser or crumblier—but it will still be delicious. Keep all other ingredient measurements the same and follow the instructions as written.
3. How do I stop my blueberries from sinking to the bottom of the mug?
This is a classic baking dilemma that has a simple fix. Before you fold the blueberries into the wet batter, toss them in a small bowl with about a teaspoon of the dry flour mixture you set aside. This light coating of flour creates a bit of friction and helps suspend the berries within the batter as it rises and cooks, ensuring they are evenly distributed.
4. Can I make this recipe vegan?
Absolutely. This recipe is very easy to adapt for a vegan diet. Use a plant-based milk like almond, soy, or oat milk instead of dairy milk. For the fat, simply use vegetable oil or a melted vegan butter substitute. Since this recipe doesn’t contain eggs, those are the only two substitutions you need to make for a fully vegan version.
5. How do I know for sure when the muffin is cooked through?
The best way to check for doneness is the toothpick test. Insert a wooden toothpick or a thin skewer into the center of the muffin. If it comes out clean or with a few moist crumbs attached, it’s ready. If it comes out with wet, gooey batter, it needs more time. Additionally, the top surface of the muffin should look dry (not shiny or wet) and feel springy to a light touch.
6. Can I use a different kind of fruit?
Yes, this recipe is incredibly versatile! You can easily swap the blueberries for other fruits. Try using chopped raspberries, blackberries, or even finely diced strawberries or peaches. You can also use chocolate chips, chopped nuts, or a swirl of cinnamon sugar in the middle for a different flavor profile. Just be sure to keep the total volume of add-ins to about 2-3 tablespoons.
7. Why did my mug muffin explode or overflow in the microwave?
An overflowing muffin is usually caused by using a mug that is too small for the amount of batter. The batter needs space to expand and rise; ensure it doesn’t fill your mug more than two-thirds of the way. In rare cases, an “explosion” can happen if there’s an air pocket at the bottom of the mug or if your microwave has hot spots that cook one part of the batter too quickly, causing a rapid steam buildup. Ensure your batter is evenly settled in the mug before cooking.
8. Can I prepare the batter ahead of time?
It is not recommended to prepare the batter in advance. The magic of the muffin’s rise comes from the baking powder, which is a chemical leavener that activates as soon as it comes into contact with the liquid ingredients. If you let the batter sit for too long before cooking, the chemical reaction will fizzle out, and you’ll be left with a flat, dense muffin. This recipe is designed to be mixed and cooked immediately for the best results.
Microwave Blueberry Muffin Mug Recipe
Ingredients
Here are the simple, pantry-friendly components you’ll need to create your single-serving masterpiece. Each ingredient plays a crucial role in achieving that perfect muffin texture and flavor, even in the microwave.
- All-Purpose Flour (¼ cup): This is the structural backbone of your muffin, creating a soft and tender crumb. Ensure you spoon it into your measuring cup and level it off rather than scooping directly from the bag to avoid a dense, dry muffin.
- White Granulated Sugar (2 tablespoons): This provides the classic sweetness that complements the tartness of the blueberries. You can adjust this slightly to your personal preference.
- Baking Powder (¼ teaspoon): This is the essential leavening agent. It reacts with the liquid ingredients to create tiny air bubbles, giving your muffin its signature lift and fluffy texture, preventing it from becoming a dense puck.
- Pinch of Salt (⅛ teaspoon): A tiny amount of salt doesn’t make the muffin salty; instead, it enhances all the other flavors, making the sweet notes sweeter and the blueberry flavor more vibrant.
- Milk (3 tablespoons): This adds moisture and richness, binding the ingredients together. Whole milk will yield a richer result, but 2%, skim, or even plant-based alternatives like almond or oat milk work beautifully.
- Melted Butter or Vegetable Oil (1 tablespoon): This is the key to a moist, tender muffin. Melted butter adds a rich, classic flavor, while a neutral oil like vegetable or canola oil ensures incredible moistness.
- Vanilla Extract (¼ teaspoon): A dash of vanilla provides a warm, aromatic background note that elevates the overall flavor profile from simple to sophisticated.
- Fresh or Frozen Blueberries (2-3 tablespoons): The star of the show! These gems provide bursts of sweet, tart flavor and beautiful color throughout the muffin. If using frozen, there’s no need to thaw them first.
Instructions
Follow these step-by-step instructions for a flawless microwave muffin every time. The key is to work quickly and avoid overmixing the batter.
- Choose Your Mug: Select a standard-sized, microwave-safe ceramic mug (approximately 12-14 ounces is ideal). A mug with straight sides helps the muffin cook more evenly. Avoid mugs with metallic paint or rims.
- Combine the Dry Ingredients: In your chosen mug, add the all-purpose flour, granulated sugar, baking powder, and salt. Use a fork to whisk these ingredients together thoroughly. This step is crucial for ensuring the baking powder is evenly distributed, which guarantees a uniform rise.
- Incorporate the Wet Ingredients: Pour the milk, melted butter (or oil), and vanilla extract directly into the mug on top of the dry ingredients.
- Mix Until Just Combined: Using the same fork, gently mix the wet and dry ingredients together. Stir only until you no longer see streaks of dry flour. It’s perfectly fine if the batter is a little lumpy! Overmixing develops gluten, which is the number one cause of a tough, rubbery microwave muffin.
- Fold in the Blueberries: Gently fold in your fresh or frozen blueberries. If you are concerned about them sinking, you can toss them in a tiny bit of extra flour before adding them to the batter. This helps them stay suspended.
- Clean the Rim: For a clean presentation and to prevent batter from burning on the sides, wipe any drips or splatters from the inside rim of the mug with a paper towel.
- Microwave to Perfection: Place the mug in the center of your microwave. Cook on high power for approximately 70 to 90 seconds. Microwave times can vary significantly based on your machine’s wattage. Start with 70 seconds and check for doneness.
- Check for Doneness: The muffin is cooked when the top looks set and springs back lightly when touched. You can also insert a toothpick into the center; it should come out clean or with a few moist crumbs attached, but not wet batter. If it’s still doughy, microwave in 10-second increments until it’s fully cooked.
- Let It Rest: This is a vital step! Carefully remove the hot mug from the microwave. Let the muffin rest for 1-2 minutes before eating. This allows the internal steam to finish cooking the center and lets the flavors meld together. It will be extremely hot right out of the microwave.
Nutrition
- Serving Size: one normal portion
- Calories: 400
- Fat: 14g
- Carbohydrates: 55g
- Protein: 6g