")


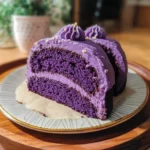
I still remember the first time I stumbled upon the idea of a microwave ube cake. My family, a lively bunch with an insatiable sweet tooth, is always up for trying new desserts, especially if they involve ube, that gloriously purple yam we all adore. However, our busy schedules often mean that elaborate baking projects are relegated to rare, special occasions. So, when I promised them a homemade ube cake on a regular weekday evening, I was met with a healthy dose of skepticism. “A whole cake? Tonight?” my eldest asked, eyes wide. The magic word, I soon revealed, was “microwave.” The skepticism quickly turned into intrigued anticipation. Within minutes, the kitchen was filled with the uniquely sweet, earthy aroma of ube. The process was astonishingly simple, and the result? A vibrant, moist, and utterly delicious ube cake that vanished from the plate almost as quickly as it was made. My youngest, usually a picky eater, declared it “the best purple cake ever!” and even my husband, a traditionalist when it comes to baking, was impressed by its tender crumb and authentic ube flavor. This Microwave Ube Cake recipe has since become a treasured secret weapon in my culinary arsenal – perfect for satisfying sudden cravings, impressing unexpected guests, or simply bringing a little bit of purple joy to an ordinary day. It’s proof that you don’t always need hours and an oven to create something truly special and heartwarming.
Ingredients
- 1 cup All-Purpose Flour: This is the structural backbone of our cake, providing the framework and texture. Ensure it’s sifted for a lighter crumb.
- ¾ cup Granulated Sugar: Provides sweetness to balance the earthy ube flavor. You can adjust slightly based on the sweetness of your ube halaya.
- 2 teaspoons Baking Powder: The leavening agent that will help our microwave cake rise and become fluffy, even without the conventional oven heat.
- ¼ teaspoon Salt: Enhances all the other flavors in the cake, particularly the sweetness of the sugar and the unique notes of ube.
- 1 Large Egg: Acts as a binder, holding the ingredients together, and adds richness and moisture to the cake.
- ½ cup Milk (whole milk or evaporated milk recommended): Adds essential moisture for a tender cake. Evaporated milk can lend a slightly richer taste. Coconut milk can also be used for a more tropical flavor profile.
- ¼ cup Vegetable Oil (or other neutral-flavored oil): Contributes to the cake’s moistness and tenderness, ensuring it doesn’t dry out in the microwave. Melted butter can be substituted for a richer, buttery flavor.
- ½ cup Ube Halaya (Purple Yam Jam): This is the star ingredient, providing the distinct ube flavor, vibrant purple color, and additional moisture. Use a good quality, store-bought version or homemade if you have it.
- 1 teaspoon Ube Extract: Intensifies the ube flavor and color, making the cake even more visually appealing and delicious. A little goes a long way.
- ½ teaspoon Vanilla Extract: Complements the ube flavor beautifully, adding a subtle warmth and depth to the overall taste profile.
Instructions
- Prepare the Microwave-Safe Dish: Generously grease and flour a 7 or 8-inch round microwave-safe glass or ceramic baking dish. Alternatively, you can line the bottom with parchment paper cut to size, then grease and flour the sides. This step is crucial to prevent the cake from sticking and ensures easy removal. Avoid using metal dishes in the microwave.
- Combine Dry Ingredients: In a medium-sized mixing bowl, whisk together the all-purpose flour, granulated sugar, baking powder, and salt. Whisking thoroughly helps to evenly distribute the baking powder and salt, which is essential for a uniform rise and flavor. This also aerates the flour slightly, contributing to a lighter cake.
- Combine Wet Ingredients: In a separate, larger mixing bowl, crack in the egg and whisk it lightly until the yolk and white are just combined. Add the milk, vegetable oil, ube halaya, ube extract, and vanilla extract to the whisked egg. Stir everything together with a spatula or whisk until the ube halaya is well incorporated and the mixture is smooth and homogenous. Break up any large clumps of ube halaya for an even distribution of flavor and color.
- Combine Wet and Dry Mixtures: Gradually pour the dry ingredient mixture into the wet ingredient mixture. Using a spatula, gently fold the ingredients together until just combined. Be careful not to overmix; a few small lumps are perfectly fine. Overmixing can develop the gluten in the flour too much, resulting in a tough cake. Mix only until you no longer see streaks of dry flour.
- Transfer Batter to Dish: Pour the prepared ube cake batter into your greased and floured microwave-safe baking dish. Use the spatula to spread the batter evenly, ensuring it reaches all corners and has a relatively level surface. This will help the cake cook more evenly in the microwave.
- Microwave the Cake: Place the dish in the center of your microwave. Microwave on HIGH power (100%) for 6 to 8 minutes. Microwave cooking times can vary significantly based on the wattage of your microwave. It’s best to start checking for doneness around the 5-6 minute mark.
- Check for Doneness: To check if the cake is cooked through, insert a toothpick or a thin skewer into the center of the cake. If it comes out clean or with a few moist crumbs attached, the cake is done. If there’s wet batter on the toothpick, continue microwaving in 30-second to 1-minute intervals, checking after each, until cooked. The surface of the cake should also spring back when lightly touched. Be cautious not to overcook, as this can lead to a dry and rubbery cake.
- Cool the Cake: Once cooked, carefully remove the dish from the microwave (it will be hot, so use oven mitts). Let the cake cool in the dish on a wire rack for at least 10-15 minutes. This allows the cake to set further and makes it easier to handle. After this initial cooling period, you can carefully invert the cake onto the wire rack to cool completely before frosting or serving. If you lined the bottom with parchment, peel it off at this stage.
Nutrition Facts
- Servings: This recipe typically yields 8 servings.
- Calories per serving (approximate): Around 280-320 kcal. (This is an estimate and can vary based on specific ingredients used, especially the ube halaya and type of milk/oil.)
- Carbohydrates: Approximately 40-45g per serving. This is the primary source of energy in the cake, coming mainly from the flour and sugar.
- Fat: Approximately 10-14g per serving. Primarily from the oil and egg yolk, contributing to the cake’s moistness and richness.
- Protein: Approximately 4-5g per serving. Mainly from the egg and flour, contributing to the structure of the cake.
- Sugar: Approximately 20-25g per serving. This includes the granulated sugar and sugars present in the ube halaya.
- Sodium: Approximately 150-200mg per serving. Derived mainly from the salt and baking powder.
(Note: These nutritional values are estimates. For precise figures, it’s best to calculate based on the exact brands and quantities of ingredients used.)
Preparation Time
- Prep Time: Approximately 10-15 minutes. This includes gathering and measuring your ingredients, greasing the baking dish, and mixing the batter. It’s a swift process, making it ideal for quick dessert needs.
- Cook Time: Approximately 6-8 minutes in the microwave. The exact time can vary depending on your microwave’s wattage and the specific dish used.
- Total Time: Roughly 20-25 minutes from start to when it comes out of the microwave, plus cooling time. This makes it significantly faster than conventional oven-baked cakes.
How to Serve
This Microwave Ube Cake is wonderfully versatile and can be enjoyed in numerous ways. Here are some delightful serving suggestions:
- Simply Plain:
- Enjoy a warm slice as is, allowing the pure ube flavor to shine. Its natural moistness makes it delicious on its own.
- With a Dusting of Powdered Sugar:
- A light dusting of confectioners’ sugar adds a touch of elegance and subtle sweetness.
- Classic Filipino Pairings:
- Cheese: Serve with a slice of cheddar cheese or a sprinkle of grated cheese on top. The salty-sweet combination is a beloved Filipino classic.
- Macapuno Strings: Top with sweet macapuno (young coconut sport) strings for added texture and a complementary tropical flavor.
- Creamy Accompaniments:
- Whipped Cream: A dollop of freshly whipped cream (sweetened or unsweetened) provides a light and airy contrast.
- Cream Cheese Frosting: A tangy cream cheese frosting pairs exceptionally well with the sweetness of ube. You can make a simple ube-flavored cream cheese frosting by adding a little ube extract or halaya to it.
- Condensed Milk Drizzle: For an extra touch of sweetness and moisture, a light drizzle of condensed milk is a popular choice.
- With Ice Cream:
- Serve a warm slice of ube cake with a scoop of your favorite ice cream.
- Vanilla ice cream offers a classic contrast.
- Ube ice cream doubles down on the ube goodness.
- Coconut ice cream enhances the tropical notes.
- Serve a warm slice of ube cake with a scoop of your favorite ice cream.
- As a Base for Trifle:
- Cut the cake into cubes and layer it with whipped cream, ube halaya, and perhaps some toasted coconut flakes or macapuno for a quick ube trifle.
- Alongside Coffee or Tea:
- Perfect as an afternoon treat with a hot cup of coffee, tea, or even a traditional Filipino salabat (ginger tea).
- Garnishes for Visual Appeal:
- A sprinkle of toasted desiccated coconut.
- A few edible flowers for a special occasion.
- A drizzle of melted white chocolate.
No matter how you choose to serve it, this quick ube cake is sure to be a hit!
Additional Tips
- Know Your Microwave: Microwave wattages vary greatly, which directly impacts cooking time. Higher wattage microwaves cook faster. If you’re unsure about your microwave’s power, start checking for doneness at the lower end of the suggested cooking time (e.g., 5-6 minutes) and add more time in 30-second increments as needed.
- Don’t Overmix the Batter: Once you combine the wet and dry ingredients, mix only until they are just incorporated. A few lumps are okay. Overmixing develops gluten, which can result in a tougher, chewier cake rather than a tender one.
- Quality of Ube Halaya Matters: The flavor and color of your cake will heavily depend on the ube halaya (purple yam jam) you use. Opt for a good quality brand that has a rich ube flavor and vibrant color, or use homemade if you have a trusted recipe. Some halaya varieties are sweeter than others, so you might want to slightly adjust the sugar in the recipe accordingly.
- Grease and Flour Thoroughly: Microwaved cakes can sometimes stick more stubbornly than oven-baked ones. Ensure your microwave-safe dish is very well greased (with butter, oil, or cooking spray) and then lightly floured. Tapping out excess flour is key. Using parchment paper on the bottom is also a great way to ensure easy release.
- Allow for Standing Time: After the microwave beeps, let the cake stand in the microwave for a couple of minutes, and then on a wire rack for at least 10-15 minutes before attempting to invert it. This “carryover cooking” allows the cake to finish setting up and cool slightly, making it less likely to break.
- Adjust Sweetness to Taste: If your ube halaya is particularly sweet, or if you prefer a less sweet cake, you can slightly reduce the amount of granulated sugar. Taste your ube halaya first to gauge its sweetness level.
- Storage Instructions: Store any leftover cake in an airtight container at room temperature for up to 2 days, or in the refrigerator for up to 4-5 days. Microwaved cakes can sometimes dry out faster, so proper storage is key. You can briefly microwave a slice for 10-15 seconds to refresh it before serving.
- Consider Add-Ins (Optional): For extra texture or flavor, consider gently folding in about ¼ to ½ cup of add-ins like white chocolate chips (which complement ube beautifully), macapuno strings, or finely chopped nuts (like cashews or pili nuts) into the batter before microwaving.
FAQ Section
Q1: Can I use fresh ube instead of ube halaya?
A1: No, you cannot directly substitute fresh, raw ube for ube halaya in this recipe. Ube halaya is cooked, mashed purple yam that has been sweetened and often enriched with butter and milk. It provides essential moisture, sweetness, and concentrated flavor. If you have fresh ube, you would first need to steam or boil it, mash it, and then prepare it into ube halaya before using it in this cake.
Q2: Why did my microwave ube cake turn out dry or rubbery?
A2: This is usually due to overcooking. Microwave cooking is rapid, and even an extra 30 seconds can make a difference. Always start checking for doneness at the lower end of the recommended time. Another reason could be overmixing the batter, which develops too much gluten. Lastly, ensure your ingredient measurements, especially flour and liquids, are accurate.
Q3: Can I make this recipe in a microwave-safe mug for a single serving?
A3: Yes, you can adapt this for a mug cake! You’ll need to scale down the ingredients significantly (e.g., divide by 4 or 6 depending on your mug size). A typical mug cake might use about ¼ cup flour. Cooking time will also be much shorter, likely 1.5 to 3 minutes, depending on your microwave and mug size. Experiment with a small batch.
Q4: What if I don’t have ube extract? Can I still make the cake?
A4: Yes, you can still make the cake without ube extract. The ube halaya will provide the primary ube flavor and some color. However, the ube extract significantly boosts both the intensity of the purple hue and the distinct ube aroma and taste. Your cake might be lighter in color and have a milder ube flavor without it, but it will still be delicious.
Q5: Can I use a different type of milk, like almond milk or coconut milk?
A5: Absolutely! You can substitute the dairy milk with non-dairy alternatives like almond milk, soy milk, or oat milk on a 1:1 basis. Coconut milk (the beverage type, or even canned light coconut milk) works exceptionally well, as its flavor beautifully complements ube, adding a richer, more tropical note.
Q6: How do I know for sure when the microwave ube cake is perfectly cooked?
A6: The most reliable method is the toothpick test. Insert a toothpick or thin skewer into the center of the cake. If it comes out clean, or with just a few dry, tender crumbs clinging to it, the cake is done. If there’s wet batter, it needs more time. The surface of the cake should also appear set and spring back gently when lightly pressed.
Q7: Can I double this recipe and cook it in a larger dish?
A7: While technically possible, microwaving larger volumes of batter evenly can be tricky. Microwaves cook from the outside in, and a much larger cake might result in overcooked edges and an undercooked center. If you need more cake, it’s generally better to make two separate batches of this recipe for more consistent results. If you do try a larger batch, use a wider, shallower dish rather than a deeper one, and expect a longer, more variable cooking time.
Q8: Is this Microwave Ube Cake recipe gluten-free?
A8: As written, this recipe is not gluten-free because it uses all-purpose wheat flour. To make it gluten-free, you would need to substitute the all-purpose flour with a good quality gluten-free all-purpose baking blend that contains xanthan gum (or add xanthan gum if it doesn’t). The texture might be slightly different, as gluten-free flours behave differently, but it’s certainly achievable. Ensure all other ingredients, like baking powder and extracts, are also certified gluten-free.
Microwave Ube Cake Recipe
Ingredients
- 1 cup All-Purpose Flour: This is the structural backbone of our cake, providing the framework and texture. Ensure it’s sifted for a lighter crumb.
- ¾ cup Granulated Sugar: Provides sweetness to balance the earthy ube flavor. You can adjust slightly based on the sweetness of your ube halaya.
- 2 teaspoons Baking Powder: The leavening agent that will help our microwave cake rise and become fluffy, even without the conventional oven heat.
- ¼ teaspoon Salt: Enhances all the other flavors in the cake, particularly the sweetness of the sugar and the unique notes of ube.
- 1 Large Egg: Acts as a binder, holding the ingredients together, and adds richness and moisture to the cake.
- ½ cup Milk (whole milk or evaporated milk recommended): Adds essential moisture for a tender cake. Evaporated milk can lend a slightly richer taste. Coconut milk can also be used for a more tropical flavor profile.
- ¼ cup Vegetable Oil (or other neutral-flavored oil): Contributes to the cake’s moistness and tenderness, ensuring it doesn’t dry out in the microwave. Melted butter can be substituted for a richer, buttery flavor.
- ½ cup Ube Halaya (Purple Yam Jam): This is the star ingredient, providing the distinct ube flavor, vibrant purple color, and additional moisture. Use a good quality, store-bought version or homemade if you have it.
- 1 teaspoon Ube Extract: Intensifies the ube flavor and color, making the cake even more visually appealing and delicious. A little goes a long way.
- ½ teaspoon Vanilla Extract: Complements the ube flavor beautifully, adding a subtle warmth and depth to the overall taste profile.
Instructions
- Prepare the Microwave-Safe Dish: Generously grease and flour a 7 or 8-inch round microwave-safe glass or ceramic baking dish. Alternatively, you can line the bottom with parchment paper cut to size, then grease and flour the sides. This step is crucial to prevent the cake from sticking and ensures easy removal. Avoid using metal dishes in the microwave.
- Combine Dry Ingredients: In a medium-sized mixing bowl, whisk together the all-purpose flour, granulated sugar, baking powder, and salt. Whisking thoroughly helps to evenly distribute the baking powder and salt, which is essential for a uniform rise and flavor. This also aerates the flour slightly, contributing to a lighter cake.
- Combine Wet Ingredients: In a separate, larger mixing bowl, crack in the egg and whisk it lightly until the yolk and white are just combined. Add the milk, vegetable oil, ube halaya, ube extract, and vanilla extract to the whisked egg. Stir everything together with a spatula or whisk until the ube halaya is well incorporated and the mixture is smooth and homogenous. Break up any large clumps of ube halaya for an even distribution of flavor and color.
- Combine Wet and Dry Mixtures: Gradually pour the dry ingredient mixture into the wet ingredient mixture. Using a spatula, gently fold the ingredients together until just combined. Be careful not to overmix; a few small lumps are perfectly fine. Overmixing can develop the gluten in the flour too much, resulting in a tough cake. Mix only until you no longer see streaks of dry flour.
- Transfer Batter to Dish: Pour the prepared ube cake batter into your greased and floured microwave-safe baking dish. Use the spatula to spread the batter evenly, ensuring it reaches all corners and has a relatively level surface. This will help the cake cook more evenly in the microwave.
- Microwave the Cake: Place the dish in the center of your microwave. Microwave on HIGH power (100%) for 6 to 8 minutes. Microwave cooking times can vary significantly based on the wattage of your microwave. It’s best to start checking for doneness around the 5-6 minute mark.
- Check for Doneness: To check if the cake is cooked through, insert a toothpick or a thin skewer into the center of the cake. If it comes out clean or with a few moist crumbs attached, the cake is done. If there’s wet batter on the toothpick, continue microwaving in 30-second to 1-minute intervals, checking after each, until cooked. The surface of the cake should also spring back when lightly touched. Be cautious not to overcook, as this can lead to a dry and rubbery cake.
- Cool the Cake: Once cooked, carefully remove the dish from the microwave (it will be hot, so use oven mitts). Let the cake cool in the dish on a wire rack for at least 10-15 minutes. This allows the cake to set further and makes it easier to handle. After this initial cooling period, you can carefully invert the cake onto the wire rack to cool completely before frosting or serving. If you lined the bottom with parchment, peel it off at this stage.
Nutrition
- Serving Size: one normal portion
- Calories: 320
- Sugar: 25g
- Sodium: 200mg
- Fat: 14g
- Carbohydrates: 45g
- Protein: 5g