")


Of all the culinary experiments I’ve embarked on in my kitchen, few have been met with as much initial skepticism and ultimate adoration as these Mini Cauliflower Crust Pizzas. I’ll be honest, the first time I told my family we were having “cauliflower pizza” for dinner, I was met with a symphony of groans and dubious looks. The kids pictured a plate of steamed vegetables masquerading as their favorite food, and my partner, a pizza purist, seemed genuinely concerned for my well-being. I, too, had my doubts. I’d heard the horror stories of soggy, crumbly crusts that tasted more like a sad vegetable casserole than a satisfying pizza. But I was determined to find a healthier, low-carb alternative for our weekly pizza night that didn’t sacrifice flavor or that quintessential pizza experience. This recipe is the triumphant result of that quest. The moment of truth came when I pulled these golden, bubbly mini pizzas from the oven. The aroma was undeniably that of a pizzeria—rich tomato, savory herbs, and toasted cheese. The kids, drawn in by the smell, cautiously took their first bites. The groans were replaced by sounds of pure delight. They were shocked. The crust was firm enough to be picked up, with crispy, cheesy edges and a tender, flavorful center that didn’t taste overwhelmingly of cauliflower. It was a revelation! They devoured their mini pizzas and even asked for seconds. My partner, the purist, conceded that it was “shockingly delicious” and a brilliant way to sneak more veggies into our diet. Now, these mini cauliflower crust pizzas are a beloved staple in our home, a testament to the fact that healthy eating can be incredibly fun, satisfying, and delicious for everyone.
Ingredients
Here are the simple, wholesome ingredients you’ll need to create these fantastic mini pizzas. Each component plays a crucial role in achieving the perfect texture and flavor for a crust that’s both sturdy and delicious.
For the Cauliflower Crusts (Makes about 8-10 mini crusts):
- 1 large head of cauliflower (about 2-2.5 pounds): This is the star of the show, providing the low-carb and gluten-free base for our pizzas. You will rice it to mimic the texture of flour.
- 1 large egg, lightly beaten: This is the primary binder that holds the crust together, ensuring it doesn’t crumble when you pick it up.
- 1/2 cup finely grated Parmesan cheese: Parmesan adds a wonderful, nutty, salty flavor and helps the crust to brown and crisp up beautifully in the oven.
- 1/2 cup shredded mozzarella cheese: Mixed into the crust, mozzarella provides extra binding power and a subtle, classic pizza cheese flavor.
- 1 teaspoon dried oregano: This essential herb infuses the crust with that classic Italian pizzeria aroma and taste.
- 1/2 teaspoon garlic powder: Adds a savory depth of flavor to the crust, complementing the cauliflower perfectly.
- 1/2 teaspoon salt: Enhances all the other flavors in the crust.
- 1/4 teaspoon black pepper: Provides a touch of gentle spice.
For the Toppings (Per Mini Pizza):
- 1-2 tablespoons marinara or pizza sauce: Use a quality sauce with minimal added sugar to keep it healthy and low-carb.
- 1/4 cup shredded mozzarella cheese: The classic, melty topping that no pizza should be without.
- Your choice of toppings: This is where you can get creative! Sliced mushrooms, bell peppers, onions, olives, sliced ham, or cooked ground beef are all fantastic options.
Instructions
Follow these detailed steps carefully, especially the part about removing moisture, to guarantee a perfectly crisp and delicious cauliflower pizza crust every single time. Patience here is the key to success!
Step 1: Prepare the Cauliflower
Preheat your oven to 425°F (220°C). Line two large baking sheets with parchment paper. Do not use wax paper, and avoid simply greasing the pan, as the parchment paper is essential for preventing the crusts from sticking.
Wash and thoroughly dry the head of cauliflower. Remove the leaves and the tough core, then chop the cauliflower into large florets. Working in batches, place the florets into a food processor and pulse until the cauliflower breaks down into a fine, rice-like consistency. Be careful not to over-process, or you’ll end up with a paste. If you don’t have a food processor, you can use the coarse side of a box grater to grate the florets. You should have about 3-4 cups of riced cauliflower.
Step 2: Cook the Riced Cauliflower
Transfer the riced cauliflower to a large, microwave-safe bowl. Cover the bowl and microwave on high for 4-5 minutes, or until the cauliflower is soft and steam-cooked. Alternatively, you can steam it on the stovetop for 5-7 minutes. The goal is simply to cook it through to make it tender.
Step 3: The Most Critical Step – Squeeze Out the Water
Allow the cooked cauliflower to cool for at least 10-15 minutes, or until it’s cool enough to handle safely. This step is non-negotiable and is the secret to a firm, non-soggy crust. Transfer the cooled cauliflower rice onto the center of a clean, thin kitchen towel, a few layers of heavy-duty cheesecloth, or a nut milk bag. Gather the corners of the towel or cloth and twist it tightly, squeezing out as much liquid as you possibly can. You will be amazed at how much water comes out. Continue wringing and squeezing until it is very, very dry and almost no more liquid can be extracted. The drier your cauliflower, the crispier your crust will be.
Step 4: Mix the Crust Ingredients
Place the very dry, squeezed cauliflower into a large mixing bowl. Add the beaten egg, Parmesan cheese, 1/2 cup of shredded mozzarella, dried oregano, garlic powder, salt, and black pepper. Use your hands or a spatula to mix everything together thoroughly until it forms a uniform, dough-like ball.
Step 5: Form the Mini Pizza Crusts
Divide the cauliflower “dough” into 8 to 10 equal portions. Place each portion onto the parchment-lined baking sheets, leaving a few inches of space between them. Using your hands, flatten and shape each portion into a small, round pizza crust, about 4-5 inches in diameter and about 1/8 to 1/4 inch thick. Try to make them as uniform in thickness as possible to ensure even baking.
Step 6: The First Bake (Par-baking)
Place the baking sheets in the preheated oven and bake for 15-20 minutes. The crusts are ready when they are firm to the touch, dry, and the edges are beautifully golden brown. This initial bake is essential for creating a sturdy base that can hold up to your toppings.
Step 7: Top Your Pizzas
Remove the par-baked crusts from the oven. Now for the fun part! Spread a thin layer of marinara sauce over each mini crust, leaving a small border around the edge. Sprinkle with the 1/4 cup of mozzarella cheese and add your favorite toppings. Be mindful not to overload the crusts, as this can make them soggy.
Step 8: The Final Bake
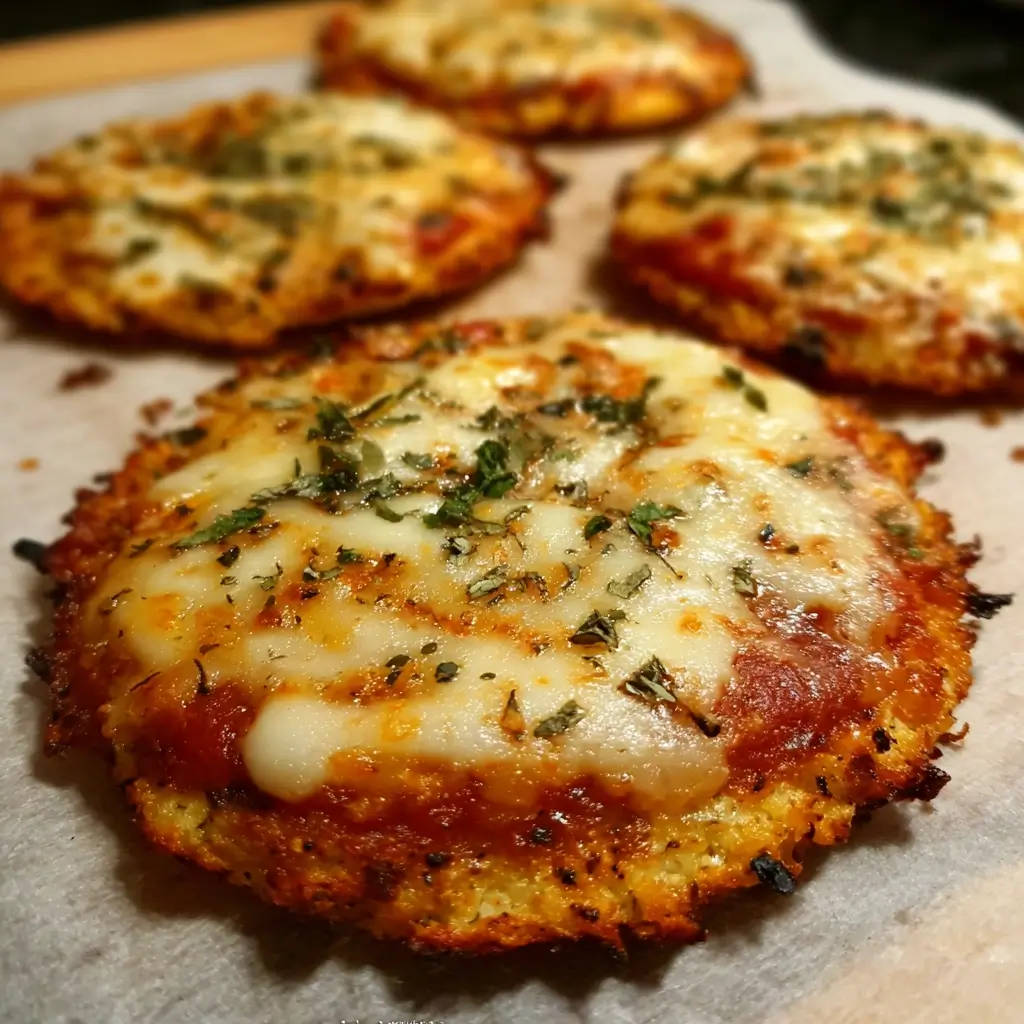
Return the topped mini pizzas to the oven and bake for another 7-10 minutes, or until the cheese is melted, bubbly, and slightly browned.
Step 9: Cool and Serve
Remove the pizzas from the oven and let them cool on the baking sheet for a couple of minutes. This allows the crust to set up a bit more, making it easier to handle. Use a spatula to carefully transfer them to a cutting board or serving platter. Enjoy your delicious and healthy creation immediately!
Nutrition Facts
This recipe offers a fantastic nutritional profile, making it a guilt-free indulgence. Please note that these values are an approximation and can vary based on the exact ingredients and toppings used.
- Servings: This recipe makes approximately 4 servings (2-3 mini pizzas per serving).
- Calories Per Serving: Approximately 280-350 calories (crust and basic cheese/sauce topping only).
- Low in Carbohydrates: Each serving contains a fraction of the carbs found in traditional flour-based pizza, making it an excellent choice for those following a low-carb, keto, or diabetic-friendly diet.
- High in Fiber: Cauliflower is a great source of dietary fiber, which is essential for digestive health, promoting feelings of fullness, and helping to regulate blood sugar levels.
- Gluten-Free: This recipe is naturally gluten-free, providing a safe and delicious pizza option for individuals with celiac disease or gluten sensitivity.
- Rich in Vitamins: Cauliflower is packed with essential nutrients, including Vitamin C, an important antioxidant for immune function, and Vitamin K, which plays a role in bone health.
- Good Source of Protein: With egg and cheese in both the crust and the topping, each serving provides a satisfying amount of protein, which helps in muscle repair and keeps you feeling full longer.
Preparation Time
While this recipe requires a few extra steps compared to ordering takeout, the delicious and healthy results are well worth the effort.
- Active Preparation Time: Approximately 25-30 minutes. This includes ricing the cauliflower, squeezing out the moisture, mixing the crust, and shaping the mini pizzas.
- Total Cooking Time: Approximately 25-30 minutes. This is divided between the initial par-baking of the crusts and the final bake with the toppings.
- Total Time from Start to Finish: Approximately 50-60 minutes. This makes it a perfectly manageable weeknight dinner.
How to Serve
These versatile mini pizzas can be served in a variety of fun and delicious ways. Here are some ideas to make your healthy pizza night a memorable one:
- As a Main Course:
- Classic Pizza Night: Serve 2-3 mini pizzas per person alongside a large, fresh green salad with a simple vinaigrette dressing. This creates a balanced, satisfying meal.
- With a Healthy Side: Pair them with a side of roasted vegetables like broccoli, zucchini, or bell peppers for an extra dose of nutrients.
- Soup and Pizza Combo: For a cozy meal, serve a mini pizza alongside a bowl of creamy tomato basil soup or a hearty minestrone.
- As an Appetizer or Party Food:
- Pizza Bar: Set up a “build-your-own” mini pizza station for guests. Provide the par-baked crusts and a variety of bowls filled with different sauces, cheeses, and toppings. It’s an interactive and fun way to entertain.
- Finger Food Platter: Arrange the finished mini pizzas on a large platter with other appetizers. Because of their small size, they are perfect for mingling and parties.
- Paired with Dips: Serve the mini pizzas with a selection of dipping sauces on the side.
- Extra Marinara Sauce
- Garlic Butter
- Basil Pesto
- Healthy Ranch Dip (made with Greek yogurt)
- For Kids’ Lunches:
- Healthy Lunchbox Treat: These pizzas are fantastic cold or at room temperature. Pack one or two in your child’s lunchbox for a fun, nutritious meal that’s much healthier than school cafeteria options.
Additional Tips
To elevate your mini cauliflower crust pizza game from great to absolutely perfect, keep these eight expert tips in mind.
- Don’t Skip the Squeeze (A Second Reminder!): It bears repeating because it’s the single most important step. If you think you’ve squeezed enough, squeeze again. The goal is to remove every last possible drop of water to prevent a soggy, fall-apart crust. Your arm might get a little tired, but the crispy result is your reward.
- Parchment Paper is Non-Negotiable: Do not try to bake these crusts directly on a metal sheet or on aluminum foil, even if it’s greased. The cauliflower mixture is prone to sticking, and parchment paper creates a perfect non-stick barrier, ensuring your crusts lift off easily without breaking.
- Size and Thickness Matter: For the crispiest results, press your crusts thin—about 1/8 of an inch is ideal. Thicker crusts will work, but they will have a softer, more bread-like texture in the center. Keep them a uniform thickness so they cook evenly.
- Let The Crust Cool Before Topping: After the first bake, let the crusts cool on the pan for 5-10 minutes. This helps them to firm up even more. Applying cold sauce to a piping hot crust can introduce steam and moisture, which is the enemy of crispiness.
- Go Easy on the Sauce and Toppings: It can be tempting to load up your pizza, but a cauliflower crust is more delicate than a flour one. A thin layer of sauce is all you need. Also, be mindful of watery vegetables like fresh tomatoes or mushrooms; it’s a good idea to lightly sauté them first to cook off some of their moisture before adding them as a topping.
- Use a Pizza Stone for Extra Crispiness: If you have a pizza stone or steel, preheat it in the oven and bake the pizzas (on their parchment paper) directly on the hot surface. This intense, direct heat will help to cook the bottom of the crust, making it exceptionally crisp.
- Batch and Freeze for Later: This recipe is perfect for meal prep. Make a double batch of the crusts and complete the par-baking step. Let them cool completely, then stack them with a small piece of parchment paper between each crust. Place the stack in a freezer-safe bag or container and freeze for up to 3 months. When you’re ready for a quick meal, just pull them out, top them while frozen, and bake for 10-15 minutes.
- Don’t Be Afraid to Get Your Hands Dirty: When mixing the crust ingredients and shaping the pizzas, your hands are your best tools. They allow you to feel the consistency of the “dough” and to press the crusts into an even, compact shape much more effectively than a spatula can.
FAQ Section
Here are answers to some of the most frequently asked questions about making mini cauliflower crust pizzas.
1. Why is my cauliflower crust soggy and falling apart?
This is the most common issue, and 99% of the time, the cause is excess moisture. You must wring every possible drop of water out of the cooked cauliflower rice using a cheesecloth or a thin kitchen towel. If the cauliflower mix is too wet, it will steam in the oven instead of baking, resulting in a soft, crumbly crust that can’t be picked up. Squeeze, squeeze, and squeeze some more!
2. Can I use frozen riced cauliflower to save time?
Yes, you absolutely can! It’s a great time-saver. You will need to cook it according to the package directions (usually in the microwave). Once cooked, let it cool, then proceed with the all-important squeezing step. Frozen cauliflower tends to hold even more water than fresh, so be extra diligent about wringing it out until it’s very dry.
3. Is this recipe truly keto-friendly?
Yes, the crust itself is very low in carbohydrates and high in fiber, making it perfectly suitable for a ketogenic diet. To ensure the entire pizza is keto-friendly, you must be mindful of your toppings. Use a pizza sauce with no added sugar, be generous with cheese and low-carb meats (like ham or ground beef), and stick to non-starchy vegetable toppings like mushrooms, olives, and bell peppers.
4. How do I store and reheat leftovers?
Store any leftover mini pizzas in an airtight container in the refrigerator for up to 3-4 days. The crust will soften upon refrigeration. To bring back the crispiness, the best way to reheat them is in an air fryer at 375°F (190°C) for 3-4 minutes or in a toaster oven. You can also reheat them on a baking sheet in a conventional oven at 400°F (200°C) for 5-7 minutes. Microwaving is not recommended as it will make the crust very soft.
5. Can I make one large pizza instead of several mini ones?
Certainly. You can press the entire cauliflower mixture into one large 10-12 inch round on a single parchment-lined baking sheet. You will need to increase the par-baking time to 25-30 minutes, or until the center is firm and the edges are golden. A larger crust is slightly more delicate, so be gentle when topping it and slicing it after the final bake.
6. Can I make the crusts ahead of time?
Yes, this is a fantastic meal prep strategy. Prepare and par-bake the crusts as directed in the recipe. Let them cool completely, then stack them with parchment paper in between each one and store them in an airtight container or zip-top bag in the refrigerator for up to 2 days, or in the freezer for up to 3 months. This makes pizza night incredibly fast—just pull them out, top, and bake.
7. Can I make this recipe dairy-free?
You can adapt it to be dairy-free. For the crust, you can substitute the Parmesan and mozzarella with a high-quality, firm dairy-free cheese alternative. Look for one that grates well and is designed for melting. You will also need to use a dairy-free cheese for the topping. The texture may be slightly different, but you can still achieve a delicious result.
8. What other seasonings can I add to the crust for more flavor?
Feel free to customize the crust to your liking! For a spicier kick, add 1/4 teaspoon of red pepper flakes. For a more herbaceous flavor, add 1/2 teaspoon of an Italian seasoning blend. A pinch of onion powder can also complement the garlic powder nicely. Experimenting with seasonings is a great way to make the recipe your own.

Mini Cauliflower Crust Pizzas
Ingredients
Here are the simple, wholesome ingredients you’ll need to create these fantastic mini pizzas. Each component plays a crucial role in achieving the perfect texture and flavor for a crust that’s both sturdy and delicious.
For the Cauliflower Crusts (Makes about 8-10 mini crusts):
- 1 large head of cauliflower (about 2–2.5 pounds): This is the star of the show, providing the low-carb and gluten-free base for our pizzas. You will rice it to mimic the texture of flour.
- 1 large egg, lightly beaten: This is the primary binder that holds the crust together, ensuring it doesn’t crumble when you pick it up.
- 1/2 cup finely grated Parmesan cheese: Parmesan adds a wonderful, nutty, salty flavor and helps the crust to brown and crisp up beautifully in the oven.
- 1/2 cup shredded mozzarella cheese: Mixed into the crust, mozzarella provides extra binding power and a subtle, classic pizza cheese flavor.
- 1 teaspoon dried oregano: This essential herb infuses the crust with that classic Italian pizzeria aroma and taste.
- 1/2 teaspoon garlic powder: Adds a savory depth of flavor to the crust, complementing the cauliflower perfectly.
- 1/2 teaspoon salt: Enhances all the other flavors in the crust.
- 1/4 teaspoon black pepper: Provides a touch of gentle spice.
For the Toppings (Per Mini Pizza):
- 1–2 tablespoons marinara or pizza sauce: Use a quality sauce with minimal added sugar to keep it healthy and low-carb.
- 1/4 cup shredded mozzarella cheese: The classic, melty topping that no pizza should be without.
- Your choice of toppings: This is where you can get creative! Sliced mushrooms, bell peppers, onions, olives, sliced ham, or cooked ground beef are all fantastic options.
Instructions
Follow these detailed steps carefully, especially the part about removing moisture, to guarantee a perfectly crisp and delicious cauliflower pizza crust every single time. Patience here is the key to success!
Step 1: Prepare the Cauliflower
Preheat your oven to 425°F (220°C). Line two large baking sheets with parchment paper. Do not use wax paper, and avoid simply greasing the pan, as the parchment paper is essential for preventing the crusts from sticking.
Wash and thoroughly dry the head of cauliflower. Remove the leaves and the tough core, then chop the cauliflower into large florets. Working in batches, place the florets into a food processor and pulse until the cauliflower breaks down into a fine, rice-like consistency. Be careful not to over-process, or you’ll end up with a paste. If you don’t have a food processor, you can use the coarse side of a box grater to grate the florets. You should have about 3-4 cups of riced cauliflower.
Step 2: Cook the Riced Cauliflower
Transfer the riced cauliflower to a large, microwave-safe bowl. Cover the bowl and microwave on high for 4-5 minutes, or until the cauliflower is soft and steam-cooked. Alternatively, you can steam it on the stovetop for 5-7 minutes. The goal is simply to cook it through to make it tender.
Step 3: The Most Critical Step – Squeeze Out the Water
Allow the cooked cauliflower to cool for at least 10-15 minutes, or until it’s cool enough to handle safely. This step is non-negotiable and is the secret to a firm, non-soggy crust. Transfer the cooled cauliflower rice onto the center of a clean, thin kitchen towel, a few layers of heavy-duty cheesecloth, or a nut milk bag. Gather the corners of the towel or cloth and twist it tightly, squeezing out as much liquid as you possibly can. You will be amazed at how much water comes out. Continue wringing and squeezing until it is very, very dry and almost no more liquid can be extracted. The drier your cauliflower, the crispier your crust will be.
Step 4: Mix the Crust Ingredients
Place the very dry, squeezed cauliflower into a large mixing bowl. Add the beaten egg, Parmesan cheese, 1/2 cup of shredded mozzarella, dried oregano, garlic powder, salt, and black pepper. Use your hands or a spatula to mix everything together thoroughly until it forms a uniform, dough-like ball.
Step 5: Form the Mini Pizza Crusts
Divide the cauliflower “dough” into 8 to 10 equal portions. Place each portion onto the parchment-lined baking sheets, leaving a few inches of space between them. Using your hands, flatten and shape each portion into a small, round pizza crust, about 4-5 inches in diameter and about 1/8 to 1/4 inch thick. Try to make them as uniform in thickness as possible to ensure even baking.
Step 6: The First Bake (Par-baking)
Place the baking sheets in the preheated oven and bake for 15-20 minutes. The crusts are ready when they are firm to the touch, dry, and the edges are beautifully golden brown. This initial bake is essential for creating a sturdy base that can hold up to your toppings.
Step 7: Top Your Pizzas
Remove the par-baked crusts from the oven. Now for the fun part! Spread a thin layer of marinara sauce over each mini crust, leaving a small border around the edge. Sprinkle with the 1/4 cup of mozzarella cheese and add your favorite toppings. Be mindful not to overload the crusts, as this can make them soggy.
Step 8: The Final Bake
Return the topped mini pizzas to the oven and bake for another 7-10 minutes, or until the cheese is melted, bubbly, and slightly browned.
Step 9: Cool and Serve
Remove the pizzas from the oven and let them cool on the baking sheet for a couple of minutes. This allows the crust to set up a bit more, making it easier to handle. Use a spatula to carefully transfer them to a cutting board or serving platter. Enjoy your delicious and healthy creation immediately!
Nutrition
- Serving Size: one normal portion
- Calories: 350