")

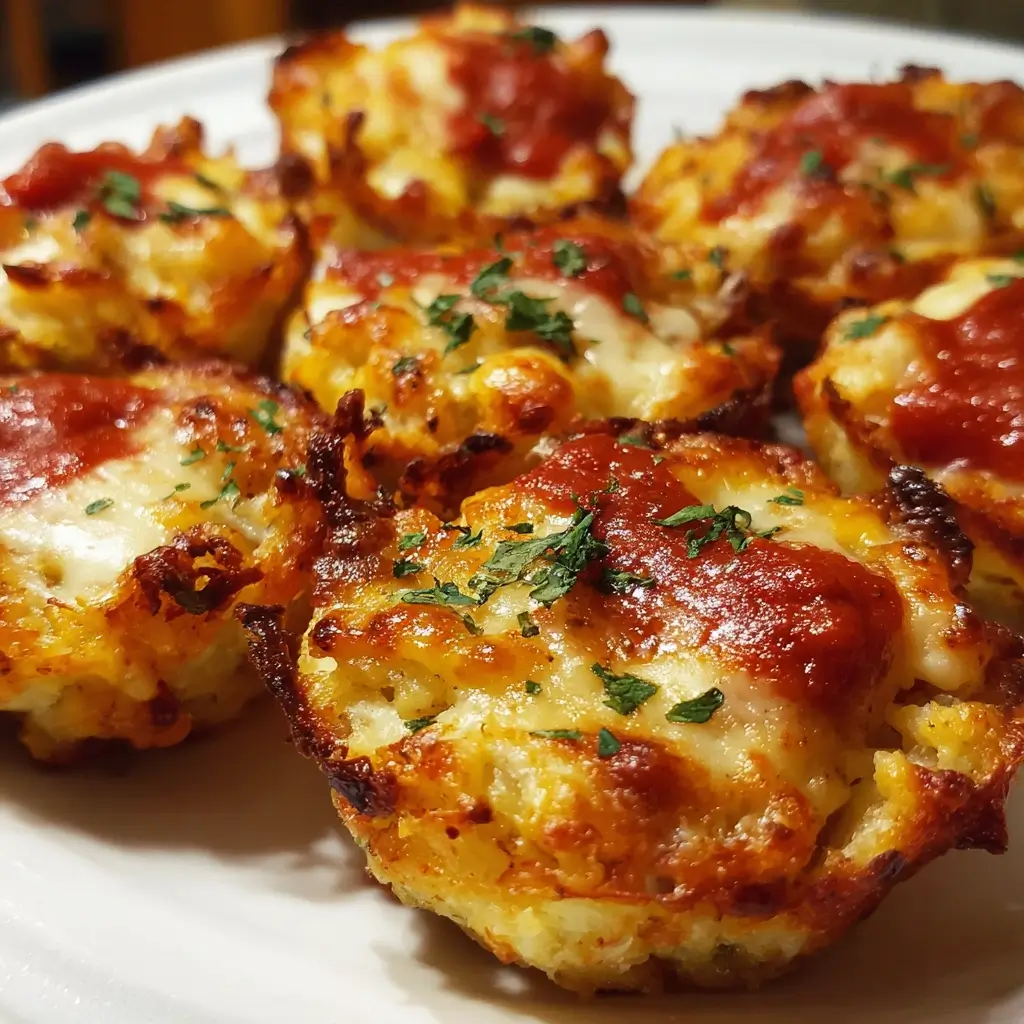

Of all the culinary challenges a home cook faces, finding a snack that is both genuinely healthy and universally loved by the entire family ranks near the top. For weeks, I was on a quest for the perfect game-day appetizer. My family loves pizza, but I wanted something lighter, a guilt-free option that wouldn’t leave us feeling sluggish. I’d heard whispers of the magic of cauliflower crusts, but my past attempts had resulted in something… well, less than crispy. I was skeptical, to say the least. Then, I stumbled upon the concept of turning the crust into mini, bite-sized rounds. It was a revelation! The smaller size, I reasoned, might be the key to achieving that elusive crispiness. I spent a weekend perfecting the technique, learning the crucial secret (it’s all in the squeeze!), and finally emerged from the kitchen with a platter of golden-brown Mini Cauliflower Pizza Bites. The reaction was instantaneous. My kids, who normally turn their noses up at the mere mention of cauliflower, devoured them. My husband, a pizza purist, went back for seconds, then thirds, declaring them “unbelievably good.” They were a certified hit—crispy on the edges, tender in the middle, and loaded with that savory, cheesy pizza flavor we all crave. These little bites have become our go-to for movie nights, parties, and anytime we need a delicious, low-carb snack that feels like a true indulgence.
Why You Will Absolutely Love This Recipe
Before we dive into the nuts and bolts of creating these delicious morsels, let’s talk about why this Mini Cauliflower Pizza Bites recipe is destined to become a staple in your kitchen. This isn’t just another healthy alternative; it’s a game-changer for snack time, appetizers, and even light meals.
- Incredibly Delicious: Let’s get the most important point out of the way first: these taste amazing. They capture the savory, cheesy, and satisfying essence of a classic pizza in a perfect, poppable format. The cauliflower base has a mild, slightly nutty flavor that pairs beautifully with marinara, cheese, and your favorite toppings.
- Low-Carb and Keto-Friendly: This is the ultimate low-carb comfort food. By swapping out a traditional flour-based dough for a cauliflower crust, you dramatically slash the carbohydrate count, making these bites perfect for anyone following a ketogenic, low-carb, or Atkins lifestyle. You can finally satisfy that pizza craving without derailing your diet.
- Gluten-Free by Nature: For those with celiac disease, gluten sensitivity, or who simply choose to avoid gluten, this recipe is a dream come true. Cauliflower, cheese, and egg are all naturally gluten-free, providing a safe and delicious option that doesn’t rely on expensive or hard-to-find gluten-free flour blends.
- Packed with Veggies: It’s a wonderfully sneaky way to get more vegetables into your family’s diet. Kids and picky adults who might normally resist a side of cauliflower will happily gobble up these pizza bites, none the wiser about their healthy foundation. Each bite is packed with the nutritional benefits of cauliflower, including Vitamin C, Vitamin K, and fiber.
- Perfectly Portioned for Snacking and Parties: Their mini size makes them the ideal finger food. They are easy to handle, require no cutlery, and look fantastic arranged on a platter. This makes them a show-stopping appetizer for parties, a fun after-school snack for kids, or the star of your game-day spread.
- Completely Customizable: Think of these little crusts as blank canvases for your culinary creativity. While the classic marinara and mozzarella combination is a guaranteed winner, the topping possibilities are endless. You can cater to vegetarians, meat-lovers, and everyone in between. We’ll explore some exciting variations later in the article.
- Great for Meal Prep: You can prepare the cauliflower crusts in advance, making assembly quick and easy when you’re ready to serve. They also store and reheat beautifully, so you can make a large batch and enjoy them for days.
These Mini Cauliflower Pizza Bites are more than just a recipe; they’re a solution. They solve the problem of healthy snacking, party planning, and satisfying cravings all in one go. They prove that you don’t have to sacrifice flavor for nutrition.
Ingredients
The beauty of this recipe lies in its simplicity. You only need a handful of wholesome, easy-to-find ingredients to create these irresistible bites.
- 1 large head of Cauliflower (about 2-2.5 pounds): This is the star of the show. One large head will yield approximately 4 cups of riced cauliflower, which is what you need for the crust.
- 1 large Egg, lightly beaten: This acts as the primary binder, holding the riced cauliflower and cheese together to form a sturdy, yet tender, crust.
- 1 cup shredded Mozzarella Cheese, divided: You’ll use half a cup in the crust mixture for flavor and binding, and the other half for that classic, gooey pizza topping. For the best melt, shred your own from a block.
- ½ cup grated Parmesan Cheese: This adds a sharp, salty, and nutty flavor to the crust, elevating it from a simple vegetable base to something truly savory and delicious.
- 1 teaspoon Italian Seasoning (or a mix of dried oregano and basil): This blend of herbs infuses the crust with that quintessential pizza aroma and taste.
- ½ teaspoon Garlic Powder: A hint of garlic powder enhances the savory notes of the crust and complements the other Italian flavors.
- Salt and freshly ground Black Pepper, to taste: Essential for seasoning the crust properly and bringing all the flavors together.
- ½ cup Marinara or Pizza Sauce: Use your favorite store-bought or homemade sauce. Look for one with no added sugar to keep the recipe low-carb.
- Optional Mini Toppings: Miniature pepperoni, finely diced bell peppers, sliced black olives, finely chopped cooked mushrooms, or a sprinkle of red pepper flakes for heat.
Instructions
Follow these steps carefully, especially the part about removing moisture, to guarantee perfectly crispy and delicious pizza bites every time.
Step 1: Prepare the Cauliflower
First, preheat your oven to 425°F (220°C). Line a large baking sheet with parchment paper to prevent sticking and ensure even browning. Wash and thoroughly dry the head of cauliflower, then remove the leaves and tough core. Cut the cauliflower into large florets.
Step 2: Rice the Cauliflower
Working in batches, place the cauliflower florets into a food processor. Pulse in 1-second intervals until the cauliflower is broken down into small, rice-sized pieces. Be careful not to over-process, or you’ll end up with a watery puree. If you don’t have a food processor, you can use the large holes of a box grater to grate the florets. You should have about 4 cups of riced cauliflower.
Step 3: Cook the Riced Cauliflower
Transfer the riced cauliflower to a large, microwave-safe bowl. Microwave on high, uncovered, for 5-6 minutes, or until it’s tender and steam-cooked. Alternatively, you can steam it on the stovetop for about 5 minutes. The goal is to cook it just enough to make it soft.
Step 4: The Most Crucial Step – Squeeze Out the Moisture!
Allow the cooked cauliflower to cool for at least 10-15 minutes, until it’s safe to handle. This step is absolutely non-negotiable for a crispy crust. A soggy crust is almost always the result of skipping or rushing this part. Place the cooled cauliflower rice in the center of a clean kitchen towel, a few layers of heavy-duty paper towels, or a nut milk bag. Gather the edges and twist, squeezing as hard as you can to wring out every last drop of excess water. You will be amazed at how much liquid comes out. The resulting cauliflower should be very dry and significantly reduced in volume.
Step 5: Mix the “Dough”
In a large mixing bowl, combine the thoroughly squeezed cauliflower, the beaten egg, ½ cup of the shredded mozzarella cheese, the grated Parmesan cheese, Italian seasoning, garlic powder, salt, and pepper. Use your hands or a spatula to mix everything together until it’s well combined and forms a sticky “dough.”
Step 6: Form and Bake the Crusts
Take heaping tablespoons of the cauliflower mixture and form them into small, flattened discs on the prepared baking sheet. Aim for a diameter of about 2 inches and a thickness of about ¼ inch. Don’t make them too thick, as they won’t crisp up as well. Use your fingers to press them down firmly and shape the edges. This recipe should yield between 20-24 mini crusts.
Step 7: The First Bake (Pre-Baking)
Place the baking sheet in the preheated oven and bake for 15-20 minutes, or until the crusts are firm, dry to the touch, and beautifully golden brown around the edges. This pre-baking step is essential for creating a sturdy base that can hold up to the toppings.
Step 8: Top and Final Bake
Remove the baking sheet from the oven. Carefully top each mini crust with about ½ teaspoon of marinara sauce, spreading it evenly but leaving a small border. Sprinkle the remaining ½ cup of mozzarella cheese over the sauce. Add any other mini toppings you desire at this stage.
Step 9: The Final Melt
Return the baking sheet to the oven. You can either bake for another 5-7 minutes at 425°F (220°C) or, for a faster and more authentic “pizza oven” result, switch the oven to the broil setting. Broil for 2-3 minutes, watching them very closely, until the cheese is bubbly, melted, and slightly browned in spots. Be extremely vigilant when broiling as they can go from perfect to burnt in seconds.
Step 10: Cool and Serve
Let the mini cauliflower pizza bites cool on the baking sheet for a few minutes. This allows them to set up completely, making them easier to handle. Serve warm with your favorite dipping sauces.
Nutrition Facts
This nutritional information is an estimate and can vary based on the specific ingredients used.
- Servings: This recipe yields approximately 6 servings (4 bites per serving).
- Calories per Serving: Approximately 165 kcal.
- Low in Carbohydrates (7g per serving): By using cauliflower as the base, these bites are significantly lower in carbs than their traditional flour-based counterparts, making them an excellent choice for a keto or low-carb diet.
- High in Protein (11g per serving): The combination of cheese and egg provides a solid amount of protein, which helps with satiety and keeps you feeling full and satisfied.
- Good Source of Vitamin C (45% of DV): Cauliflower is a powerhouse of nutrients, and just one serving of these bites provides a substantial boost of Vitamin C, an essential antioxidant for immune function.
- Rich in Calcium (25% of DV): Thanks to the generous amount of mozzarella and Parmesan cheese, these bites are a great source of calcium, which is crucial for strong bones and teeth.
- Dietary Fiber (3g per serving): The cauliflower base also provides dietary fiber, which is important for digestive health and maintaining stable blood sugar levels.
Preparation Time
This recipe involves a few steps, but the delicious result is well worth the effort.
- Prep Time: 25 minutes (This includes ricing the cauliflower and squeezing out the moisture).
- Cook Time: 25-30 minutes (This includes the pre-baking of the crusts and the final melt).
- Total Time: Approximately 50-55 minutes from start to finish.
How to Serve
These versatile bites can be served in a variety of fun and delicious ways. Here are some ideas to get you started:
- The Classic Appetizer Platter:
- Arrange the warm pizza bites on a large platter or wooden board.
- Garnish with fresh basil or parsley for a pop of color and freshness.
- Serve alongside a trio of dipping sauces in small bowls. Great options include:
- Extra marinara sauce
- Ranch dressing (a classic pizza pairing)
- Garlic aioli or garlic butter sauce
- Pesto sauce
- A Light and Healthy Lunch:
- Serve a portion of 4-5 pizza bites as a main course.
- Pair them with a simple side salad with a light vinaigrette dressing. An arugula salad with lemon and olive oil is a perfect, peppery complement.
- Fun Kid-Friendly Meal:
- Let your kids have fun by setting up a “topping bar” with their favorite pre-cooked and finely diced toppings.
- Serve with a side of fruit or raw veggie sticks like carrots and cucumbers for a balanced and exciting meal.
- Game Day or Party Finger Food:
- Make a double or triple batch to feed a crowd.
- Use toothpicks to make them even easier for guests to grab and enjoy while mingling.
- Keep them warm in a low-temperature oven (around 200°F or 95°C) until ready to serve.
Additional Tips
Master this recipe and make it your own with these eight expert tips.
- The Squeeze is Truly Everything: I cannot overstate this. The difference between a crispy bite and a soggy mess is the amount of water you squeeze from the cooked cauliflower. Use a cheesecloth or a thin, clean kitchen towel for the best leverage. Your goal is a dry, crumbly ball of cauliflower.
- Choose Your Cheese Wisely: For the best melt and flavor, buy blocks of mozzarella and Parmesan and grate them yourself. Pre-shredded cheeses are often coated in starches like potato starch or cellulose to prevent clumping, which can hinder melting and add unnecessary carbs.
- Don’t Be Afraid to Season: The cauliflower base is a blank slate. Feel free to amp up the flavor. Add a pinch of red pepper flakes for heat, a dash of onion powder for more savory depth, or even some smoked paprika for a smoky twist in the crust mixture.
- Give Them Space on the Pan: Do not overcrowd the baking sheet when forming the crusts. Leaving enough space between each bite allows hot air to circulate freely around them, which is essential for achieving those delicious, crispy golden-brown edges. Use two baking sheets if necessary.
- The Pre-Bake is Non-Negotiable: Do not be tempted to skip the initial 15-20 minute bake of the plain crusts. This step is what dries out the surface and creates a firm base that won’t turn to mush when you add the moist sauce and toppings.
- Make-Ahead Magic for Easy Entertaining: You can fully prepare and pre-bake the cauliflower crusts a day or two in advance. Let them cool completely, then store them in an airtight container in the refrigerator. When you’re ready to serve, simply top them and bake/broil until the cheese is melted. This is a lifesaver for party prep!
- Get Creative with Toppings: While classic toppings are great, think outside the box! Try a “white pizza” version with a garlic-infused olive oil base instead of marinara, topped with mozzarella and ricotta. Or, create a “BBQ Beef” version with a sugar-free BBQ sauce, shredded cooked beef, and red onion. Just ensure all toppings are finely chopped to fit the mini size.
- Master the Reheat: To restore their crispiness, avoid the microwave when reheating leftovers. The best way is to place them on a baking sheet in a 375°F (190°C) oven or a toaster oven for 5-7 minutes, or until warmed through and crispy again. An air fryer also works wonderfully for reheating.
Frequently Asked Questions (FAQ)
Here are answers to some of the most common questions about making Mini Cauliflower Pizza Bites.
1. Why were my cauliflower pizza bites soggy?
Sogginess is the number one issue and it’s almost always caused by one thing: excess moisture. You either did not squeeze enough water out of the cooked cauliflower, or you used too much sauce. To fix this, be relentless when wringing out the cauliflower rice, and use only a thin layer of sauce on each bite.
2. Can I use frozen riced cauliflower for this recipe?
Yes, you can absolutely use frozen riced cauliflower to save time. You will need to cook it according to the package directions first. The most important thing is that you must still let it cool and then squeeze out all the excess moisture, just as you would with fresh. Frozen cauliflower can sometimes hold even more water, so be extra thorough with the squeezing step.
3. How can I make these pizza bites dairy-free or vegan?
For a dairy-free version, you can substitute the mozzarella and Parmesan with your favorite dairy-free cheese shreds and grated Parmesan alternatives. For a vegan version, you’ll need to do that and replace the egg. A “flax egg” (1 tablespoon ground flaxseed mixed with 3 tablespoons water, left to sit for 5 minutes) works well as a binder in this recipe.
4. How do I properly store and reheat leftovers?
Store any leftover pizza bites in an airtight container in the refrigerator for up to 3-4 days. The best way to reheat them is in an oven, toaster oven, or air fryer at 375°F (190°C) for 5-7 minutes until they are hot and have regained their crispy texture. Microwaving will make them soft.
5. Can I freeze these Mini Cauliflower Pizza Bites?
Yes, they freeze beautifully! There are two ways to do it. You can freeze the pre-baked, untopped crusts by laying them flat on a baking sheet until solid, then transferring to a freezer bag. Or, you can freeze the fully assembled and baked pizza bites. Reheat them directly from frozen in a 400°F (200°C) oven for 10-15 minutes.
6. What are some other creative topping combinations?
The possibilities are endless! Try a Greek-inspired bite with pesto, feta cheese, and chopped kalamata olives. Or a “Hawaiian” version with a tiny piece of ham and a tidbit of pineapple. For a vegetarian delight, use finely diced mushrooms, onions, and bell peppers (be sure to pre-cook the veggies to remove moisture).
7. Is a food processor absolutely necessary to make the cauliflower rice?
No, a food processor is not essential, though it is the fastest method. If you don’t have one, you can use the coarse side (the large holes) of a standard box grater to grate the raw cauliflower florets into rice-like pieces. It takes a bit more elbow grease but works perfectly.
8. Are these Mini Cauliflower Pizza Bites actually keto-friendly?
Yes, they are exceptionally keto-friendly. With a base made from cauliflower, egg, and cheese, the carbohydrate count is very low. To ensure they remain strictly keto, use a marinara or pizza sauce that has no added sugar and be mindful of the carb counts in any additional toppings you choose. They are a fantastic way to enjoy pizza flavor while adhering to a ketogenic diet.

Mini Cauliflower Pizza Bites
Ingredients
The beauty of this recipe lies in its simplicity. You only need a handful of wholesome, easy-to-find ingredients to create these irresistible bites.
- 1 large head of Cauliflower (about 2–2.5 pounds): This is the star of the show. One large head will yield approximately 4 cups of riced cauliflower, which is what you need for the crust.
- 1 large Egg, lightly beaten: This acts as the primary binder, holding the riced cauliflower and cheese together to form a sturdy, yet tender, crust.
- 1 cup shredded Mozzarella Cheese, divided: You’ll use half a cup in the crust mixture for flavor and binding, and the other half for that classic, gooey pizza topping. For the best melt, shred your own from a block.
- ½ cup grated Parmesan Cheese: This adds a sharp, salty, and nutty flavor to the crust, elevating it from a simple vegetable base to something truly savory and delicious.
- 1 teaspoon Italian Seasoning (or a mix of dried oregano and basil): This blend of herbs infuses the crust with that quintessential pizza aroma and taste.
- ½ teaspoon Garlic Powder: A hint of garlic powder enhances the savory notes of the crust and complements the other Italian flavors.
- Salt and freshly ground Black Pepper, to taste: Essential for seasoning the crust properly and bringing all the flavors together.
- ½ cup Marinara or Pizza Sauce: Use your favorite store-bought or homemade sauce. Look for one with no added sugar to keep the recipe low-carb.
- Optional Mini Toppings: Miniature pepperoni, finely diced bell peppers, sliced black olives, finely chopped cooked mushrooms, or a sprinkle of red pepper flakes for heat.
Instructions
Follow these steps carefully, especially the part about removing moisture, to guarantee perfectly crispy and delicious pizza bites every time.
Step 1: Prepare the Cauliflower
First, preheat your oven to 425°F (220°C). Line a large baking sheet with parchment paper to prevent sticking and ensure even browning. Wash and thoroughly dry the head of cauliflower, then remove the leaves and tough core. Cut the cauliflower into large florets.
Step 2: Rice the Cauliflower
Working in batches, place the cauliflower florets into a food processor. Pulse in 1-second intervals until the cauliflower is broken down into small, rice-sized pieces. Be careful not to over-process, or you’ll end up with a watery puree. If you don’t have a food processor, you can use the large holes of a box grater to grate the florets. You should have about 4 cups of riced cauliflower.
Step 3: Cook the Riced Cauliflower
Transfer the riced cauliflower to a large, microwave-safe bowl. Microwave on high, uncovered, for 5-6 minutes, or until it’s tender and steam-cooked. Alternatively, you can steam it on the stovetop for about 5 minutes. The goal is to cook it just enough to make it soft.
Step 4: The Most Crucial Step – Squeeze Out the Moisture!
Allow the cooked cauliflower to cool for at least 10-15 minutes, until it’s safe to handle. This step is absolutely non-negotiable for a crispy crust. A soggy crust is almost always the result of skipping or rushing this part. Place the cooled cauliflower rice in the center of a clean kitchen towel, a few layers of heavy-duty paper towels, or a nut milk bag. Gather the edges and twist, squeezing as hard as you can to wring out every last drop of excess water. You will be amazed at how much liquid comes out. The resulting cauliflower should be very dry and significantly reduced in volume.
Step 5: Mix the “Dough”
In a large mixing bowl, combine the thoroughly squeezed cauliflower, the beaten egg, ½ cup of the shredded mozzarella cheese, the grated Parmesan cheese, Italian seasoning, garlic powder, salt, and pepper. Use your hands or a spatula to mix everything together until it’s well combined and forms a sticky “dough.”
Step 6: Form and Bake the Crusts
Take heaping tablespoons of the cauliflower mixture and form them into small, flattened discs on the prepared baking sheet. Aim for a diameter of about 2 inches and a thickness of about ¼ inch. Don’t make them too thick, as they won’t crisp up as well. Use your fingers to press them down firmly and shape the edges. This recipe should yield between 20-24 mini crusts.
Step 7: The First Bake (Pre-Baking)
Place the baking sheet in the preheated oven and bake for 15-20 minutes, or until the crusts are firm, dry to the touch, and beautifully golden brown around the edges. This pre-baking step is essential for creating a sturdy base that can hold up to the toppings.
Step 8: Top and Final Bake
Remove the baking sheet from the oven. Carefully top each mini crust with about ½ teaspoon of marinara sauce, spreading it evenly but leaving a small border. Sprinkle the remaining ½ cup of mozzarella cheese over the sauce. Add any other mini toppings you desire at this stage.
Step 9: The Final Melt
Return the baking sheet to the oven. You can either bake for another 5-7 minutes at 425°F (220°C) or, for a faster and more authentic “pizza oven” result, switch the oven to the broil setting. Broil for 2-3 minutes, watching them very closely, until the cheese is bubbly, melted, and slightly browned in spots. Be extremely vigilant when broiling as they can go from perfect to burnt in seconds.
Step 10: Cool and Serve
Let the mini cauliflower pizza bites cool on the baking sheet for a few minutes. This allows them to set up completely, making them easier to handle. Serve warm with your favorite dipping sauces.
Nutrition
- Serving Size: one normal portion
- Calories: 165
- Carbohydrates: 7g
- Fiber: 3g
- Protein: 11g