")


There are some recipes that just feel like a warm hug, and these Mini Cheese and Herb Biscuits are precisely that. I still remember the first time I made them. It was a dreary Sunday afternoon, and the family was in a bit of a slump. I wanted to bake something savory and comforting, something that would fill the house with an irresistible aroma. I stumbled upon the idea of a simple biscuit but decided to elevate it with a generous amount of sharp cheddar and a medley of fresh herbs from our little window garden. As they baked, the scent of melting cheese, fragrant parsley, and warm chives wafted through every room, and slowly, everyone emerged from their corners, drawn to the kitchen. When I pulled the tray of golden, puffy little orbs from the oven, they were gone in minutes. My kids, usually picky eaters, couldn’t get enough of their cheesy, fluffy goodness. My husband declared them the “perfect sidekick” for literally any meal. Since that day, these mini biscuits have become our go-to for everything from a quick after-school snack to a sophisticated appetizer for guests, and they are the perfect accompaniment to a hearty beef stew on a cold winter’s night. They are deceptively easy to make, yet they taste like something from a gourmet bakery. This recipe isn’t just about food; it’s about creating small, delicious moments of joy that bring everyone together.
Ingredients for the Perfect Mini Cheese and Herb Biscuits
Each ingredient in this recipe plays a crucial role in creating the final, perfect biscuit. Using high-quality, fresh ingredients will significantly elevate the flavor and texture.
- 2 ½ cups (300g) All-Purpose Flour: This is the structural foundation of our biscuits. All-purpose flour provides the ideal balance of protein to create a biscuit that is tender and fluffy but still holds its shape beautifully. Be sure to measure it correctly by spooning it into your measuring cup and leveling it off, rather than scooping directly from the bag, which can compact the flour and lead to dry biscuits.
- 1 tablespoon Granulated Sugar: A small amount of sugar might seem odd in a savory biscuit, but it is essential for balancing the flavors. It enhances the savoriness of the cheese and herbs and helps the biscuits achieve a beautiful golden-brown color during baking.
- 1 tablespoon Baking Powder: This is the primary leavening agent. Baking powder is what gives these mini biscuits their impressive height and light, airy texture. Make sure your baking powder is fresh (less than six months old) for the best possible rise.
- 1 teaspoon Salt: Salt is a non-negotiable flavor enhancer. It sharpens the taste of the cheese, brightens the herbs, and brings all the different components of the biscuit into delicious harmony.
- ½ teaspoon Black Pepper: A hint of freshly ground black pepper adds a subtle, warming spice that complements the sharp cheddar cheese wonderfully.
- ½ cup (113g) Cold, Unsalted Butter, cut into small cubes: The temperature and state of the butter are paramount. Using very cold, cubed butter is the secret to flaky layers. As the cold butter melts in the hot oven, it releases steam, creating tiny pockets of air that result in a tender, layered crumb.
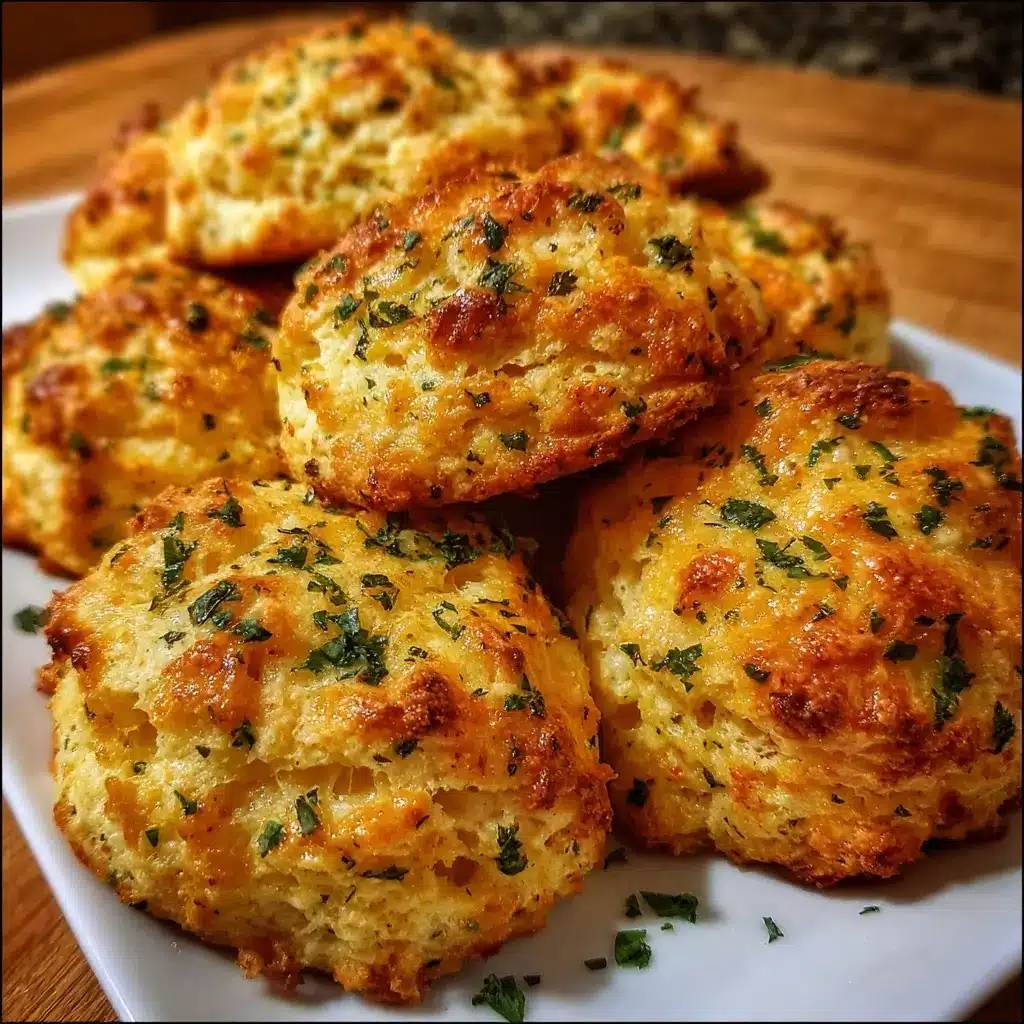
- 1 ½ cups (150g) Sharp Cheddar Cheese, shredded: For the best flavor and melt, use a block of sharp or extra-sharp cheddar and shred it yourself. Pre-shredded cheeses are often coated in anti-caking agents that can inhibit a smooth melt and add a slightly powdery texture. The sharpness of the cheddar ensures the cheese flavor shines through.
- ¼ cup Freshly Chopped Herbs (e.g., chives, parsley, rosemary): Fresh herbs infuse the biscuits with vibrant, aromatic flavor. A combination of chives for a delicate oniony note, parsley for fresh brightness, and a tiny bit of rosemary for a woody, fragrant depth is a fantastic blend. You can customize this based on your preference.
- 1 cup (240ml) Cold Buttermilk: Buttermilk is the magic ingredient for tenderness. Its acidity reacts with the baking powder for an extra lift and also works to break down the gluten in the flour, resulting in a melt-in-your-mouth, soft texture that is never tough or chewy.
Step-by-Step Instructions for Flawless Biscuits
Follow these detailed steps carefully to ensure your mini biscuits turn out perfectly fluffy, cheesy, and delicious every single time. The key is to work quickly and keep your ingredients cold.
- Prepare Your Oven and Baking Sheet: First things first, preheat your oven to 400°F (200°C). This ensures the oven is sufficiently hot when the biscuits go in, which is crucial for getting a good initial rise. Line a large baking sheet with parchment paper to prevent the biscuits from sticking and to make cleanup a breeze.
- Combine the Dry Ingredients: In a large mixing bowl, add the all-purpose flour, granulated sugar, baking powder, salt, and black pepper. Use a whisk to stir these ingredients together for about 30 seconds. This step is more effective than using a spoon because whisking not only combines everything evenly but also aerates the flour, contributing to a lighter final product.
- Cut in the Cold Butter: Scatter the small cubes of very cold butter over the top of the flour mixture. Using a pastry blender or two knives, “cut” the butter into the flour. The goal is to break the butter down and coat it in flour until the mixture resembles coarse crumbs with some pea-sized pieces of butter still visible. It’s vital not to overmix or let the butter melt. These visible butter pieces are what will create the flaky layers. You can also use your fingertips, but work quickly to avoid warming the butter with your hands.
- Incorporate the Flavorful Add-ins: Gently stir in the shredded sharp cheddar cheese and the freshly chopped herbs. Toss them with the flour and butter mixture until they are evenly distributed. This ensures that every single bite of your biscuits is packed with cheesy, herby goodness.
- Add the Buttermilk and Form the Dough: Create a well in the center of your dry ingredients. Pour the cold buttermilk into the well. Using a fork or a rubber spatula, gently stir the wet and dry ingredients together until just combined. The dough will be shaggy and slightly sticky. The most important rule of biscuit making is to not overmix. Overworking the dough will develop the gluten in the flour, resulting in tough, dense biscuits instead of light and fluffy ones. Stop mixing as soon as the flour is moistened.
- Scoop the Biscuits: Using a small cookie scoop or two spoons, drop rounded tablespoons of the dough onto the prepared baking sheet. Space them about 2 inches apart to allow for spreading and to ensure hot air can circulate around each biscuit for even baking. This drop-biscuit method is much faster and easier than rolling and cutting, and it results in a charmingly rustic appearance.
- Bake to Golden Perfection: Place the baking sheet on the middle rack of your preheated oven. Bake for 12-15 minutes, or until the tops are a beautiful golden brown and the biscuits are cooked through. The exact time will depend on your oven, so keep an eye on them during the last few minutes. You’ll know they are ready when they have puffed up nicely and a toothpick inserted into the center of one comes out clean.
- Optional Finishing Touch: For an extra rich finish and a beautiful sheen, you can brush the tops of the hot biscuits with a little melted butter as soon as they come out of the oven. This step is optional but highly recommended for that professional bakery look and taste.
- Cool and Serve: Let the biscuits cool on the baking sheet for a few minutes before transferring them to a wire rack to cool slightly more. They are best served warm.
Nutrition Facts
Please note that these nutritional values are an estimate and can vary based on the specific ingredients used.
- Servings: This recipe yields approximately 24 mini biscuits.
- Calories per serving: Approximately 110 calories per mini biscuit.
- Carbohydrates: As the primary source of energy in the biscuits, the flour contributes most of the carbohydrates, which fuel your body and brain.
- Protein: The cheese and buttermilk provide a good source of protein, which is essential for building and repairing tissues in the body.
- Fat: A significant portion of the flavor and the tender, flaky texture comes from the fat in the butter and cheese.
- Calcium: Thanks to the generous amount of cheddar cheese and buttermilk, these biscuits are a source of calcium, which is vital for strong bones and teeth.
- Sodium: The salt and cheese contribute to the sodium content, which is an important electrolyte for nerve and muscle function, but should be consumed in moderation.
Preparation Time
This recipe is designed to be quick and straightforward, making it perfect for a last-minute addition to any meal or a speedy snack.
- Active Preparation Time: Approximately 15 minutes. This includes gathering and measuring ingredients, mixing the dough, and scooping it onto the baking sheet.
- Baking Time: Approximately 12-15 minutes.
- Total Time: Under 30 minutes from start to finish, you can have a batch of warm, fresh, homemade biscuits ready to enjoy.
How to Serve Your Mini Cheese and Herb Biscuits
These versatile little bites can be served in a multitude of ways, fitting in anywhere from a casual brunch to an elegant dinner party. Here are some of our favorite ways to enjoy them:
- As a Breakfast or Brunch Star:
- Serve alongside scrambled eggs and a side of fresh fruit for a complete and satisfying breakfast.
- Use them as the base for mini breakfast sandwiches. Simply slice one in half and fill it with a small folded omelet and a slice of savory ham.
- Smother them in a classic sausage or beef gravy for a decadent and hearty biscuits and gravy experience.
- The Perfect Side Dish:
- Pair them with a bowl of creamy tomato soup or a hearty potato leek soup for dipping. Their savory flavor is the perfect complement.
- Serve them next to a robust beef stew or a spicy chili. They are perfect for sopping up every last delicious drop from the bowl.
- Offer them in a bread basket as an alternative to dinner rolls for any main course, from roasted chicken to grilled steak.
- An Elegant Appetizer or Party Snack:
- Arrange them on a platter with a side of softened, high-quality butter or a homemade herb-infused butter.
- Feature them on a charcuterie or cheese board. Their cheesy flavor pairs wonderfully with cured meats, olives, and various cheeses.
- Slice them in half and top with a dollop of pimento cheese, smoked salmon with dill cream cheese, or a simple slice of prosciutto.
- A Simple and Comforting Snack:
- Enjoy them plain, served warm straight from the oven. Their flavor is so rich and complex they need no accompaniment.
- Split one open and spread a thin layer of butter while it’s still warm for a simple, melt-in-your-mouth treat.
Additional Tips for Biscuit Perfection
Achieve biscuit-making mastery with these eight expert tips that address the most common challenges and questions.
- The Colder, The Better: This cannot be overstated. Your butter and buttermilk must be as cold as possible. Some bakers even cube their butter and then stick it in the freezer for 10-15 minutes before using it. Cold ingredients prevent the butter from melting prematurely, which is the key to creating those coveted flaky layers.
- Don’t Overwork the Dough: Mix the dough until it just comes together. A few dry streaks of flour are perfectly fine. The moment you start overmixing or kneading the dough, you are developing gluten, which is the enemy of a tender biscuit. A gentle hand is the secret to a soft crumb.
- Shred Your Own Cheese: Resist the temptation of pre-shredded cheese. It contains additives like potato starch or cellulose to prevent clumping, which can give your biscuits a slightly gritty texture and prevent the cheese from melting as creamily. Taking two extra minutes to shred a block of cheese makes a world of difference in flavor and texture.
- Master the Herb Blend: Don’t be afraid to experiment with the herbs. Thyme, dill, or even a little bit of sage can be wonderful additions. If using a potent herb like rosemary, use it sparingly as it can easily overpower the other flavors. The key is to find a balance that you love.
- Don’t Compress the Dough: When scooping the dough, try to handle it as little as possible. The drop-biscuit method is great for this. If you were to roll and cut the dough, it would be crucial not to twist the cutter, as this seals the edges and prevents the biscuit from rising to its full potential. The same principle applies here: a light touch ensures a high rise.
- The Buttermilk Substitute in a Pinch: If you don’t have buttermilk on hand, you can easily make a substitute. For every 1 cup of milk (whole milk works best), stir in 1 tablespoon of lemon juice or white vinegar. Let it sit for 5-10 minutes. It will curdle slightly and be ready to use. This acidic substitute will still provide the necessary tenderness and lift.
- Achieving the Perfect Golden Top: For an even deeper golden-brown color and a slight sheen on top of your biscuits, you can brush them with a simple egg wash (one egg beaten with a tablespoon of water) or some melted butter just before they go into the oven.
- Batching and Freezing for Later: These biscuits freeze exceptionally well. You can freeze them either unbaked or baked. To freeze unbaked, scoop the dough onto a parchment-lined baking sheet and freeze until solid. Then, transfer the frozen dough balls to a freezer-safe bag. You can bake them directly from frozen, adding a few extra minutes to the baking time. To freeze baked biscuits, let them cool completely, then store them in a freezer bag. Reheat in a 350°F oven for a few minutes until warm.
Frequently Asked Questions (FAQ)
Here are answers to some of the most common questions about making these mini cheese and herb biscuits.
1. Can I make these biscuits ahead of time?
Yes, you have a few options. You can prepare the dough, scoop it onto a baking sheet, cover it with plastic wrap, and refrigerate it for up to 24 hours before baking. Alternatively, you can fully bake the biscuits, let them cool, and store them in an airtight container at room temperature for up to 2 days. Reheat them in a warm oven for a few minutes to refresh them before serving.
2. Can I use different types of cheese?
Absolutely! While sharp cheddar provides a classic, bold flavor, this recipe is very forgiving. Try using Gruyère for a nutty flavor, Monterey Jack or Colby for a milder taste and excellent melt, or even a spicy pepper jack to add a bit of a kick. A combination of cheeses also works wonderfully.
3. My biscuits didn’t rise and were dense. What did I do wrong?
This is a common issue with a few likely culprits. The most common reason is that your baking powder was old or expired. Always check the date! The second most likely reason is overworking the dough, which develops gluten and makes the biscuits tough. Lastly, your butter may not have been cold enough, which means it melted into the dough instead of creating steam pockets for lift.
4. Can I use dried herbs instead of fresh?
Yes, you can. The general rule of thumb is to use one-third the amount of dried herbs as you would fresh herbs, as the flavor of dried herbs is more concentrated. So, for this recipe, you would use about 1 to 1 ½ tablespoons of a dried herb blend instead of the ¼ cup of fresh herbs.
5. How do I properly store leftover biscuits?
Leftover baked biscuits should be cooled completely and then stored in an airtight container or a resealable plastic bag at room temperature. They will stay fresh for about 2-3 days. Storing them in the refrigerator can actually make them go stale faster.
6. Can I freeze the baked biscuits?
Yes, baked biscuits freeze beautifully. Once they have cooled completely, place them in a single layer in a freezer-safe bag or container. They can be frozen for up to 3 months. To reheat, you can let them thaw at room temperature or warm them directly from frozen in a 350°F (175°C) oven for about 10-12 minutes, until heated through.
7. I don’t have buttermilk. What is the best substitute?
The best and easiest substitute is soured milk. For every 1 cup of regular milk, add 1 tablespoon of an acid like white vinegar or lemon juice. Let it stand for 5-10 minutes until it thickens and curdles slightly. This DIY version mimics the acidity of buttermilk and will work perfectly in this recipe to ensure tender biscuits.
8. Is it possible to make these biscuits gluten-free?
Yes, you can make a gluten-free version of these biscuits. You will need to use a high-quality, all-purpose gluten-free flour blend that contains xanthan gum. Follow the recipe as written, but be aware that gluten-free dough can sometimes be a bit stickier or have a slightly different texture. The final result will still be a delicious, cheesy biscuit.

Mini Cheese and Herb Biscuits
Ingredients
Each ingredient in this recipe plays a crucial role in creating the final, perfect biscuit. Using high-quality, fresh ingredients will significantly elevate the flavor and texture.
- 2 ½ cups (300g) All-Purpose Flour: This is the structural foundation of our biscuits. All-purpose flour provides the ideal balance of protein to create a biscuit that is tender and fluffy but still holds its shape beautifully. Be sure to measure it correctly by spooning it into your measuring cup and leveling it off, rather than scooping directly from the bag, which can compact the flour and lead to dry biscuits.
- 1 tablespoon Granulated Sugar: A small amount of sugar might seem odd in a savory biscuit, but it is essential for balancing the flavors. It enhances the savoriness of the cheese and herbs and helps the biscuits achieve a beautiful golden-brown color during baking.
- 1 tablespoon Baking Powder: This is the primary leavening agent. Baking powder is what gives these mini biscuits their impressive height and light, airy texture. Make sure your baking powder is fresh (less than six months old) for the best possible rise.
- 1 teaspoon Salt: Salt is a non-negotiable flavor enhancer. It sharpens the taste of the cheese, brightens the herbs, and brings all the different components of the biscuit into delicious harmony.
- ½ teaspoon Black Pepper: A hint of freshly ground black pepper adds a subtle, warming spice that complements the sharp cheddar cheese wonderfully.
- ½ cup (113g) Cold, Unsalted Butter, cut into small cubes: The temperature and state of the butter are paramount. Using very cold, cubed butter is the secret to flaky layers. As the cold butter melts in the hot oven, it releases steam, creating tiny pockets of air that result in a tender, layered crumb.
- 1 ½ cups (150g) Sharp Cheddar Cheese, shredded: For the best flavor and melt, use a block of sharp or extra-sharp cheddar and shred it yourself. Pre-shredded cheeses are often coated in anti-caking agents that can inhibit a smooth melt and add a slightly powdery texture. The sharpness of the cheddar ensures the cheese flavor shines through.
- ¼ cup Freshly Chopped Herbs (e.g., chives, parsley, rosemary): Fresh herbs infuse the biscuits with vibrant, aromatic flavor. A combination of chives for a delicate oniony note, parsley for fresh brightness, and a tiny bit of rosemary for a woody, fragrant depth is a fantastic blend. You can customize this based on your preference.
- 1 cup (240ml) Cold Buttermilk: Buttermilk is the magic ingredient for tenderness. Its acidity reacts with the baking powder for an extra lift and also works to break down the gluten in the flour, resulting in a melt-in-your-mouth, soft texture that is never tough or chewy.
Instructions
Follow these detailed steps carefully to ensure your mini biscuits turn out perfectly fluffy, cheesy, and delicious every single time. The key is to work quickly and keep your ingredients cold.
- Prepare Your Oven and Baking Sheet: First things first, preheat your oven to 400°F (200°C). This ensures the oven is sufficiently hot when the biscuits go in, which is crucial for getting a good initial rise. Line a large baking sheet with parchment paper to prevent the biscuits from sticking and to make cleanup a breeze.
- Combine the Dry Ingredients: In a large mixing bowl, add the all-purpose flour, granulated sugar, baking powder, salt, and black pepper. Use a whisk to stir these ingredients together for about 30 seconds. This step is more effective than using a spoon because whisking not only combines everything evenly but also aerates the flour, contributing to a lighter final product.
- Cut in the Cold Butter: Scatter the small cubes of very cold butter over the top of the flour mixture. Using a pastry blender or two knives, “cut” the butter into the flour. The goal is to break the butter down and coat it in flour until the mixture resembles coarse crumbs with some pea-sized pieces of butter still visible. It’s vital not to overmix or let the butter melt. These visible butter pieces are what will create the flaky layers. You can also use your fingertips, but work quickly to avoid warming the butter with your hands.
- Incorporate the Flavorful Add-ins: Gently stir in the shredded sharp cheddar cheese and the freshly chopped herbs. Toss them with the flour and butter mixture until they are evenly distributed. This ensures that every single bite of your biscuits is packed with cheesy, herby goodness.
- Add the Buttermilk and Form the Dough: Create a well in the center of your dry ingredients. Pour the cold buttermilk into the well. Using a fork or a rubber spatula, gently stir the wet and dry ingredients together until just combined. The dough will be shaggy and slightly sticky. The most important rule of biscuit making is to not overmix. Overworking the dough will develop the gluten in the flour, resulting in tough, dense biscuits instead of light and fluffy ones. Stop mixing as soon as the flour is moistened.
- Scoop the Biscuits: Using a small cookie scoop or two spoons, drop rounded tablespoons of the dough onto the prepared baking sheet. Space them about 2 inches apart to allow for spreading and to ensure hot air can circulate around each biscuit for even baking. This drop-biscuit method is much faster and easier than rolling and cutting, and it results in a charmingly rustic appearance.
- Bake to Golden Perfection: Place the baking sheet on the middle rack of your preheated oven. Bake for 12-15 minutes, or until the tops are a beautiful golden brown and the biscuits are cooked through. The exact time will depend on your oven, so keep an eye on them during the last few minutes. You’ll know they are ready when they have puffed up nicely and a toothpick inserted into the center of one comes out clean.
- Optional Finishing Touch: For an extra rich finish and a beautiful sheen, you can brush the tops of the hot biscuits with a little melted butter as soon as they come out of the oven. This step is optional but highly recommended for that professional bakery look and taste.
- Cool and Serve: Let the biscuits cool on the baking sheet for a few minutes before transferring them to a wire rack to cool slightly more. They are best served warm.
Nutrition
- Serving Size: one normal portion
- Calories: 110