")

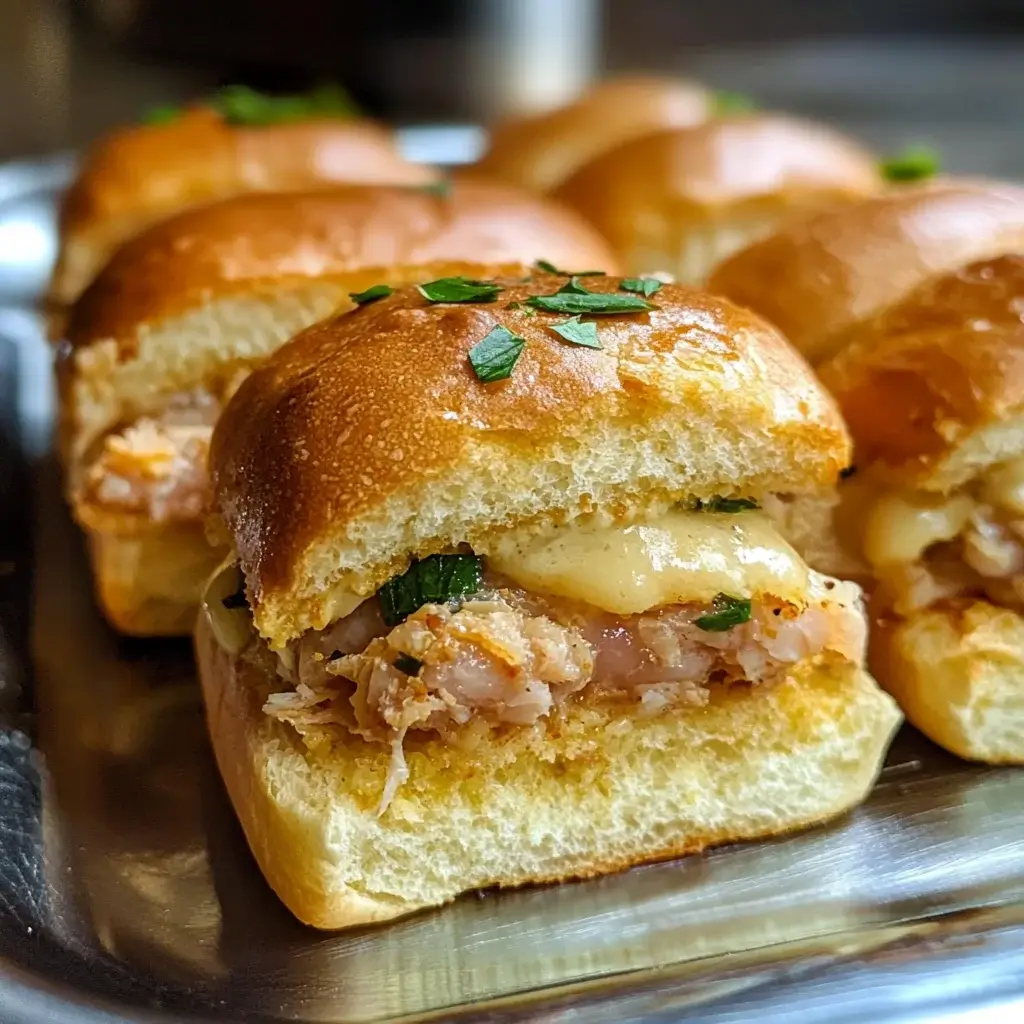

I still remember the first time I made these Mini Tuna Melt Sliders. It was for a casual Sunday get-together with family, and I wanted something warm, comforting, and easy to share. Honestly, I wasn’t sure if simple tuna melts, even in mini form, would be exciting enough. Boy, was I wrong! From the moment the aroma of baking bread, melting cheese, and savory tuna started wafting from the kitchen, people started migrating towards the oven. When I finally pulled out that golden, bubbly tray of sliders, they disappeared in record time. My notoriously picky nephew, who usually turns his nose up at anything involving fish, devoured three before I could even blink! My husband declared them “the ultimate comfort food snack,” and my sister immediately asked for the recipe. Since then, these little bites of cheesy, savory goodness have become a staple for everything from game day feasts and potlucks to quick weeknight dinners when I need something satisfying without a lot of fuss. They are incredibly simple to assemble, yet they deliver a huge punch of flavor and that nostalgic warmth everyone loves about a classic tuna melt, perfectly packaged in a grab-and-go slider format. The combination of the soft, slightly sweet buns, the creamy and flavorful tuna salad, the gooey melted cheese, and the buttery, crisp tops is just pure magic. They truly are a crowd-pleaser, guaranteed to bring smiles and satisfy cravings.
Ingredients
Here’s what you’ll need to create these irresistible Mini Tuna Melt Sliders:
- Slider Buns: 1 package (12 count) Hawaiian sweet rolls or other soft slider buns. (These provide a slightly sweet, soft base that complements the savory filling beautifully. King’s Hawaiian is a popular choice, but any soft dinner roll or small brioche bun works well.)
- Canned Tuna: 2 cans (5 ounces each) solid white albacore or light tuna, packed in water or oil, drained very well. (Ensure the tuna is thoroughly drained to prevent soggy sliders. Flaking it gently helps maintain some texture.)
- Mayonnaise: ½ cup good quality mayonnaise. (This is the binder for the tuna salad, providing creaminess and richness. Use your favorite brand; full-fat typically yields the best flavor and texture.)
- Celery: ¼ cup finely chopped celery. (Adds essential crunch, freshness, and a subtle vegetal note that cuts through the richness.)
- Red Onion: ¼ cup finely chopped red onion (or yellow onion/shallots). (Provides a mild, pungent bite that balances the creaminess. Red onion also adds a nice touch of color.)
- Sharp Cheddar Cheese: 6 slices sharp cheddar cheese (or about 1.5 cups shredded). (Sharp cheddar offers a tangy, robust flavor that stands up well to the tuna. Other melting cheeses like Provolone, Swiss, Monterey Jack, or Colby Jack can also be used or combined.)
- Unsalted Butter: ¼ cup (½ stick) unsalted butter, melted. (Used for brushing the tops of the sliders, adding richness, flavor, and helping them achieve a beautiful golden-brown crust.)
- Worcestershire Sauce: 1 teaspoon Worcestershire sauce. (Adds a complex umami depth and savory kick to the butter topping.)
- Dijon Mustard (Optional but Recommended): 1 teaspoon Dijon mustard added to the butter topping OR 1-2 tablespoons mixed into the tuna salad. (Adds a subtle tang and complexity that elevates the overall flavor profile.)
- Garlic Powder: ½ teaspoon garlic powder (for the butter topping). (Infuses the buttery tops with a gentle, savory garlic aroma and flavor.)
- Salt: ¼ teaspoon kosher salt, or to taste (for the tuna salad). (Enhances all the flavors in the tuna mixture.)
- Black Pepper: ¼ teaspoon freshly ground black pepper, or to taste (for the tuna salad). (Adds a touch of warmth and spice.)
- Optional additions to Tuna Salad: 1 tablespoon sweet pickle relish, 1 tablespoon chopped fresh dill or parsley, a squeeze of lemon juice, a pinch of paprika or cayenne pepper for heat.
Instructions
Follow these simple steps to assemble and bake your delicious Mini Tuna Melt Sliders:
- Preheat Oven & Prepare Baking Dish: Preheat your oven to 375°F (190°C). Lightly grease a 9×13 inch baking dish or line it with parchment paper for easier cleanup. This ensures the sliders don’t stick and cook evenly.
- Prepare the Slider Buns: Carefully slice the entire slab of slider buns horizontally in half using a long serrated bread knife, keeping the individual rolls connected. Place the bottom half of the buns into the prepared baking dish, cut-side up. Set the top half aside for later. Getting a clean, even cut is key here, so take your time.
- Make the Tuna Salad Filling: In a medium bowl, combine the thoroughly drained and flaked tuna, mayonnaise, finely chopped celery, and finely chopped red onion. Add the salt and freshly ground black pepper. If you’re adding optional ingredients like relish, dill, parsley, lemon juice, or Dijon mustard directly to the tuna salad, mix them in now. Stir gently until everything is just combined. Avoid overmixing, which can make the tuna mushy. Taste and adjust seasoning if necessary.
- Assemble the Sliders (Layer 1 – Cheese): Arrange half of the cheese slices (3 slices) evenly over the bottom buns in the baking dish, or sprinkle half of the shredded cheese (about ¾ cup). This bottom layer of cheese melts upwards, creating a barrier that helps prevent the buns from getting soggy from the tuna salad.
- Add the Tuna Salad: Spoon the prepared tuna salad mixture evenly over the cheese layer on the bottom buns. Spread it gently out to the edges, ensuring a consistent layer of filling across all the sliders.
- Assemble the Sliders (Layer 2 – Cheese): Place the remaining cheese slices (3 slices) over the tuna salad layer, or sprinkle the remaining shredded cheese (about ¾ cup) evenly on top. This top layer of cheese ensures that classic, gooey, melted cheese goodness in every bite.
- Place the Top Buns: Carefully place the top half of the slider buns over the cheese layer, aligning them with the bottom buns.
- Prepare the Butter Topping: In a small microwave-safe bowl or saucepan, melt the unsalted butter. Whisk in the Worcestershire sauce, garlic powder, and optional Dijon mustard (if using it in the topping). Stir until well combined. This savory butter mixture is crucial for flavor and achieving those perfectly golden, slightly crisp tops.
- Brush the Sliders: Generously brush the prepared butter mixture evenly over the tops of the slider buns. Make sure to cover the entire surface, including the edges and creases between the rolls. You can use a pastry brush for this. If desired, you can sprinkle a little extra garlic powder, some poppy seeds, or sesame seeds on top at this stage for extra flair.
- Bake the Sliders: Cover the baking dish loosely with aluminum foil. This helps the sliders heat through and the cheese melt completely without the tops burning too quickly. Bake in the preheated oven for 15 minutes.
- Brown the Tops: Remove the aluminum foil from the baking dish. Continue baking for another 5-10 minutes, or until the tops are golden brown and slightly crispy, and the cheese is completely melted and bubbly around the edges. Keep a close eye on them during this stage to prevent burning.
- Rest and Serve: Once baked, carefully remove the baking dish from the oven. Let the sliders rest for 5 minutes before serving. This allows the cheese to set slightly, making them easier to handle and cut. Use a knife or spatula to cut along the lines of the individual rolls to separate the sliders. Serve immediately while warm and gooey.
Nutrition Facts
(Approximate values per slider, assuming 12 sliders per batch. Actual values may vary based on specific ingredients used.)
- Servings: 12 Sliders
- Calories: Approximately 280-350 kcal per slider. (This provides a general idea of the energy content, making it a satisfying snack or part of a larger meal.)
- Protein: Approximately 12-15g per slider. (Primarily from the tuna and cheese, protein contributes to satiety and muscle maintenance.)
- Fat: Approximately 15-20g per slider (Saturated Fat: 6-8g). (Comes from the mayonnaise, cheese, and butter. Includes some healthy fats from tuna, especially if using oil-packed.)
Disclaimer: These nutritional facts are estimates only. For precise information, calculate based on the specific brands and quantities of ingredients used.
Preparation Time
- Total Time: Approximately 30-35 minutes
- Prep Time: 15 minutes (This includes chopping vegetables, draining tuna, mixing the salad, assembling the sliders, and preparing the butter topping.)
- Cook Time: 20-25 minutes (15 minutes covered, 5-10 minutes uncovered for browning.)
This recipe is relatively quick to put together, making it ideal for busy weeknights, last-minute appetizers, or when you need a comforting meal without spending hours in the kitchen. The majority of the time is hands-off while the sliders bake to golden, cheesy perfection in the oven.
How to Serve
These Mini Tuna Melt Sliders are versatile and can be served in various ways and for numerous occasions. Here are some ideas:
- As an Appetizer:
- Arrange them on a platter for parties, potlucks, or game day gatherings. Their small size makes them perfect finger food.
- Serve alongside other popular appetizers like chicken wings, veggie platters with dip, or chips and salsa.
- As a Main Course (Lunch or Light Dinner):
- Serve 2-3 sliders per person.
- Pair them with a classic soup, such as creamy tomato soup or a hearty vegetable soup, for a comforting diner-style meal.
- Accompany with a fresh side salad (like a simple green salad with vinaigrette, coleslaw, or a pasta salad) to add some freshness and crunch.
- Serve with a side of potato chips, sweet potato fries, or regular French fries for a more indulgent meal.
- Accompaniments & Garnishes:
- Pickles: Dill pickle spears or chips on the side are a classic pairing, offering a tangy crunch that cuts through the richness.
- Sauces: Offer small bowls of ketchup, extra mayonnaise, spicy mayo (mayo mixed with sriracha or hot sauce), or even ranch dressing for dipping.
- Garnish: Sprinkle freshly chopped parsley or chives over the top just before serving for a pop of color and freshness.
- Occasions:
- Game Day: The ultimate handheld snack for watching sports.
- Potlucks & Parties: Easy to transport (bake at home and reheat briefly, or assemble and bake on site) and always a crowd-pleaser.
- Casual Family Dinners: A fun twist on a classic sandwich that kids and adults love.
- Lunch Boxes: While best warm, cooled sliders can still be enjoyed (though they won’t be crispy). Pack them separately if possible.
- After-School Snack: A hearty and satisfying option for hungry kids.
Additional Tips
Enhance your Mini Tuna Melt Slider experience with these helpful tips:
- Drain Tuna Thoroughly: This is crucial! Excess moisture from the tuna will make your sliders soggy. Press the tuna firmly in a colander or use the can lid to squeeze out as much liquid as possible. Patting it dry with paper towels is also a good extra step.
- Cheese Choices: Don’t be afraid to experiment with cheese! While sharp cheddar is classic, try Swiss for a nutty flavor, Provolone for mild creaminess, Monterey Jack or Colby for excellent melting, or even Pepper Jack for a spicy kick. A combination of cheeses often yields fantastic results.
- Bun Variations: While Hawaiian rolls are popular for their sweetness, feel free to use other types of slider buns like plain white dinner rolls, potato rolls, pretzel buns, or small brioche buns. Toasting the inside of the buns lightly before assembling can add another layer of texture and sogginess prevention.
- Amp Up the Tuna Salad: Customize your tuna salad! Add chopped pickles or sweet relish for tang, capers for a briny bite, a squeeze of fresh lemon juice for brightness, chopped hard-boiled eggs for extra substance, or different herbs like dill, parsley, or chives. A dash of hot sauce or cayenne pepper can add welcome heat.
- Make-Ahead Instructions: You can assemble the sliders completely (up to step 9, before brushing with butter) a few hours ahead of time. Cover tightly with plastic wrap and refrigerate. When ready to bake, let them sit at room temperature for about 15-20 minutes, then brush with the melted butter topping and bake as directed, possibly adding a few extra minutes to the covered baking time. The tuna salad itself can be made a day in advance and stored in an airtight container in the refrigerator.
- Preventing Soggy Bottoms: Besides draining the tuna well, placing the first layer of cheese directly on the bottom buns helps create a barrier. Avoid letting the assembled sliders sit for too long at room temperature before baking, as the moisture from the filling can start to seep into the bread.
- Reheating Leftovers: While best fresh, leftovers can be reheated. The microwave will make them soft, but still tasty. For best results (to regain some crispness), reheat them in an oven or toaster oven at 350°F (175°C) for 5-10 minutes, or until warmed through. An air fryer also works well for reheating individual sliders.
- Golden Top Secret: Ensure the butter topping covers the buns completely for even browning. If you like extra crispiness, you can briefly broil the sliders for the last 1-2 minutes of cooking, but watch them very carefully as they can burn extremely quickly under the broiler.
FAQ Section
Here are answers to some frequently asked questions about making Mini Tuna Melt Sliders:
- Q: Can I use different types of tuna?
- A: Yes, absolutely! While solid white albacore tuna offers a firmer texture and milder flavor, light tuna (skipjack or yellowfin) works perfectly well and is often more budget-friendly. Tuna packed in oil can add a bit more richness, but be sure to drain it extremely well. You could even experiment with canned salmon for a different flavor profile.
- Q: How can I make these sliders spicy?
- A: There are several ways! Add finely chopped jalapeños (fresh or pickled) or a pinch of red pepper flakes or cayenne pepper to the tuna salad mixture. You can also use Pepper Jack cheese instead of or in addition to the cheddar. Mixing sriracha or your favorite hot sauce into the mayonnaise or the butter topping is another great option.
- Q: Can I make these gluten-free?
- A: Yes, you can adapt this recipe to be gluten-free. Simply substitute your favorite gluten-free slider buns or small rolls. Ensure your Worcestershire sauce is certified gluten-free, as some brands contain malt vinegar derived from barley. All other core ingredients (tuna, mayo, cheese, veggies, butter) are typically naturally gluten-free, but always double-check labels if Celiac disease or severe sensitivity is a concern.
- Q: My sliders came out soggy. What did I do wrong?
- A: Soggy sliders are usually caused by excess moisture. The most common culprits are: not draining the tuna thoroughly enough, using too much mayonnaise or watery additions (like pickle juice instead of chopped pickles), or letting the assembled sliders sit too long before baking. Ensure tuna is pressed dry, use the recommended mayo amount, and consider the cheese barrier tip mentioned earlier. Baking them immediately after assembly also helps.
- Q: Can I prepare the tuna salad ahead of time?
- A: Yes, the tuna salad mixture can be prepared up to 24 hours in advance. Store it in an airtight container in the refrigerator. This can be a great time-saver, especially when preparing for a party. Just give it a quick stir before assembling the sliders.
- Q: What if I don’t have slider buns?
- A: No problem! You can make larger tuna melts on regular hamburger buns, English muffins, or slices of sturdy bread (like sourdough or rye). The baking time might need slight adjustment depending on the size and thickness of the bread. Alternatively, you could even serve the warm tuna melt mixture in small bowls with crackers or toasted baguette slices for dipping.
- Q: How long do leftover Mini Tuna Melt Sliders last?
- A: Store any leftovers in an airtight container in the refrigerator. They are best consumed within 2-3 days. Reheat them using the oven, toaster oven, or air fryer for the best texture (see reheating tip above).
- Q: Can I freeze these sliders?
- A: Freezing is generally not recommended for assembled and baked tuna melt sliders. The bread texture can become quite soggy upon thawing and reheating, and mayonnaise doesn’t always freeze well. It’s best to make and enjoy them fresh or within a few days from the refrigerator. You could potentially freeze the unbaked, assembled sliders (without the butter topping), thaw them in the fridge overnight, then brush with butter and bake, but the texture might still be compromised compared to fresh.