")

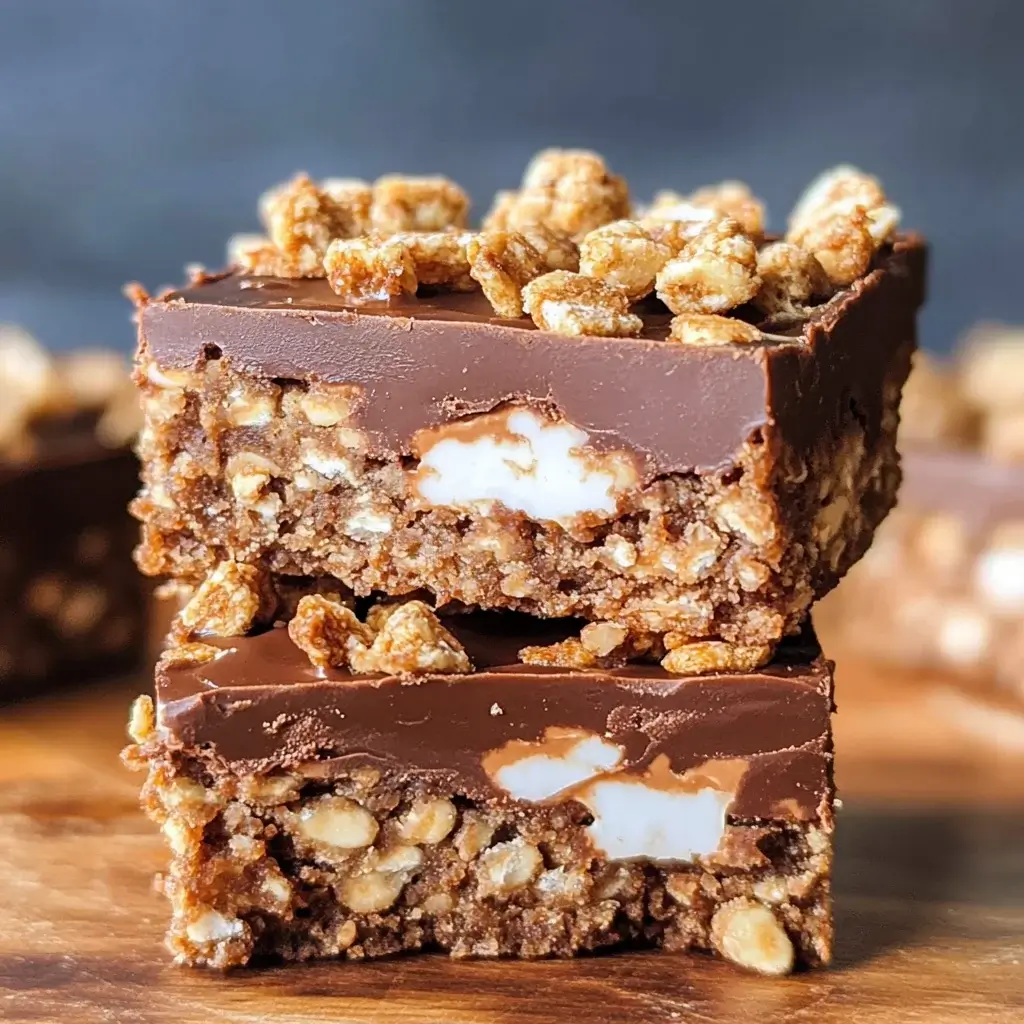

After a long week filled with work deadlines and school runs, there’s nothing my family and I crave more than a simple, satisfying dessert. Baking from scratch sometimes feels like another chore, which is why these No-Bake Choco Graham Bars have become our absolute go-to treat. From the first bite, the rich chocolate fudge layer combined with the satisfying crunch of graham crackers is pure bliss. My kids adore helping me assemble them (it’s truly foolproof!), and honestly, I love them just as much. They are the perfect balance of sweet and comforting, and disappear in minutes at any gathering. If you’re looking for a dessert that’s quick, easy, and guaranteed to be a crowd-pleaser, look no further – these bars are a winner!
Ingredients
- Graham Crackers: (About 1 ½ boxes, 9-10 full sheets) The base of our bars, providing a wonderful, slightly sweet and crumbly texture. You’ll need them broken into squares, ready to create layers of deliciousness.
- Semi-Sweet Chocolate Chips: (2 cups) The star of the show! These melt into a rich, decadent fudge layer. You can also use dark chocolate or milk chocolate depending on your preference.
- Sweetened Condensed Milk: (1 (14 ounce) can) This is the magic ingredient that binds everything together and creates that fudgy, chewy texture we all love. It adds sweetness and richness.
- Butter: (½ cup, 1 stick, unsalted) Adds richness, flavor, and helps create a smooth and glossy fudge. Unsalted butter allows you to control the saltiness of the recipe.
- Vanilla Extract: (1 teaspoon) Enhances the chocolate flavor and adds a touch of warmth. Pure vanilla extract is recommended for the best flavor.
- Optional: Nuts (Walnuts, Pecans, or Almonds): (½ cup, chopped) For added crunch and flavor. Toasted nuts bring out even more flavor.
- Optional: Sprinkles or Sea Salt: For decoration and an extra touch of flavor and visual appeal.
Instructions
- Prepare the Pan: Lightly grease a 9×13 inch baking pan. You can also line it with parchment paper, leaving an overhang on the sides, for easy removal of the bars later. This step is crucial for preventing sticking and making serving a breeze.
- Melt the Chocolate Mixture: In a medium-sized, heavy-bottomed saucepan, combine the semi-sweet chocolate chips, sweetened condensed milk, and butter. Place the saucepan over low heat. Stir constantly with a spatula or wooden spoon until everything is melted and smooth. Be patient and stir continuously to prevent the chocolate from scorching. Low heat is key here.
- Stir in Vanilla and Optional Nuts: Once the chocolate mixture is completely melted and smooth, remove the saucepan from the heat. Stir in the vanilla extract and the chopped nuts (if using). Mix well to ensure everything is evenly distributed throughout the chocolate fudge. The vanilla enhances the chocolate flavor, and nuts add a delightful crunch.
- Layer Graham Crackers and Chocolate: Arrange a layer of graham cracker squares in the prepared baking pan, covering the bottom completely. You may need to break some crackers to fit snugly. Pour about half of the melted chocolate mixture evenly over the graham cracker layer, spreading it with a spatula to ensure it reaches all corners. Create a smooth and even chocolate layer.
- Repeat Layers: Place another layer of graham cracker squares over the chocolate layer. Again, ensure they cover the chocolate as much as possible. Pour the remaining chocolate mixture over the second graham cracker layer, spreading it evenly. This layering creates the classic graham cracker bar texture.
- Chill to Set: Cover the pan with plastic wrap or aluminum foil and refrigerate for at least 2-3 hours, or preferably overnight, to allow the bars to fully set and firm up. Chilling is essential for the bars to become firm and easily sliceable. Patience is rewarded here!
- Cut and Serve: Once the bars are fully chilled and firm, remove them from the refrigerator. If you used parchment paper, lift the bars out of the pan using the overhang. Cut them into squares or bars of your desired size using a sharp knife. For clean cuts, you can run the knife under hot water and wipe it dry between cuts.
- Optional Decoration: Before the chocolate sets completely (if you’re quick after spreading the top layer), you can sprinkle the top with sprinkles, sea salt flakes, or even drizzle with melted white chocolate for a decorative touch. This adds visual appeal and an extra layer of flavor.
Nutrition Facts
(Per serving, approximately 1 bar, recipe yields about 24 bars – Note: Nutritional values are estimates and can vary based on specific ingredients and serving sizes.)
- Servings: 24
- Calories: 200-250 kcal
- Fat: 12-15g
- Saturated Fat: 8-10g
Preparation Time
Quick Assembly, Patient Chilling: The active preparation time for these No-Bake Choco Graham Bars is incredibly minimal, typically around 15-20 minutes. This includes melting the chocolate mixture and layering the ingredients. The beauty of this recipe lies in its simplicity – no oven required! However, the crucial step is the chilling time. Allowing at least 2-3 hours, or ideally overnight, in the refrigerator is essential for the bars to properly set and achieve that perfect fudgy texture and easy-to-cut consistency. So, while you can whip these up in minutes, plan ahead to allow for sufficient chilling time to enjoy them at their best.
How to Serve
These versatile No-Bake Choco Graham Bars are perfect for a variety of occasions and can be served in numerous delightful ways:
- Classic Dessert Squares: Simply cut them into neat squares and serve as a standalone dessert. Their rich chocolate flavor and satisfying crunch make them perfect on their own.
- With a Glass of Milk: Pair them with a cold glass of milk (dairy or non-dairy) for a comforting and classic combination. The milk complements the sweetness of the bars perfectly.
- Alongside Coffee or Tea: Serve them as a sweet treat with a hot cup of coffee or tea. The bitterness of coffee or tea balances the sweetness of the bars beautifully.
- Topped with Ice Cream: Elevate them into a decadent dessert by serving them warm (slightly warmed in the microwave for a few seconds, if desired) with a scoop of vanilla ice cream or your favorite ice cream flavor. The contrast of warm bars and cold ice cream is divine.
- As a Party Platter Addition: Include them on a dessert platter for parties or gatherings. Their no-fuss nature and crowd-pleasing flavor make them a fantastic addition to any dessert spread.
- Lunchbox Treat: Cut into smaller bars or squares, they make a delightful treat to pack in lunchboxes (for both kids and adults!). Ensure they are kept cool to prevent melting.
- With Fresh Fruit: Balance the richness of the bars by serving them with a side of fresh berries like strawberries, raspberries, or blueberries. The fruit adds a refreshing contrast.
- Drizzled with Caramel or Chocolate Sauce: For an extra touch of indulgence, drizzle them with caramel sauce, melted chocolate, or even a combination of both. This adds another layer of flavor and sweetness.
Additional Tips for Perfect No-Bake Choco Graham Bars
- Use Quality Chocolate: The flavor of these bars heavily relies on the chocolate. Opt for good quality semi-sweet chocolate chips or even chop up a semi-sweet chocolate bar for a richer chocolate taste. Better chocolate = better bars!
- Don’t Overheat the Chocolate Mixture: Melt the chocolate mixture over low heat and stir constantly. Overheating can cause the chocolate to seize or become grainy. Patience is key to a smooth and glossy fudge layer.
- Adjust Sweetness to Your Preference: If you prefer a less sweet dessert, you can use dark chocolate chips instead of semi-sweet. You can also reduce the amount of sweetened condensed milk slightly, but this may affect the texture.
- Get Creative with Extracts: While vanilla extract is classic, feel free to experiment with other extracts like almond extract, peppermint extract (especially during the holidays), or even a hint of coffee extract to add a unique flavor profile to your bars.
- Add a Layer of Peanut Butter: For peanut butter lovers, spread a thin layer of peanut butter over the first layer of graham crackers before adding the chocolate mixture. This creates a delicious peanut butter and chocolate combination.
- Toast the Nuts for Enhanced Flavor: If you’re using nuts, toasting them beforehand will significantly enhance their flavor and crunch. Simply spread them on a baking sheet and toast in a 350°F (175°C) oven for 5-7 minutes, or until fragrant. Let them cool before chopping and adding to the recipe.
- Ensure Graham Crackers are Fresh: Use fresh graham crackers for the best texture. Stale graham crackers can be dry and crumbly, affecting the overall texture of the bars. Store graham crackers in an airtight container to maintain freshness.
- For Cleaner Cuts, Use a Warm Knife: To achieve clean, professional-looking cuts, run your knife under hot water and wipe it dry before each cut. This will help the knife glide through the chilled bars smoothly without dragging or crumbling.
Frequently Asked Questions (FAQ)
Q1: Can I use a different type of cracker instead of graham crackers?
A: While graham crackers are traditional and provide a unique flavor and texture, you can experiment with other sturdy crackers like digestive biscuits or even vanilla wafers for a different twist. However, graham crackers are highly recommended for the classic taste and texture of these bars.
Q2: Can I make these bars ahead of time?
A: Absolutely! In fact, these No-Bake Choco Graham Bars are perfect for making ahead of time. They need to chill in the refrigerator for at least 2-3 hours to set, and they can be stored in the refrigerator for up to 5-7 days. This makes them ideal for party prep or making dessert in advance.
Q3: Can I freeze these bars?
A: Yes, you can freeze these bars. Once they are fully set and cut, wrap them individually in plastic wrap or place them in an airtight container with parchment paper between layers to prevent sticking. They can be frozen for up to 2-3 months. Thaw them in the refrigerator before serving.
Q4: My chocolate mixture is too thick. What should I do?
A: If your chocolate mixture becomes too thick, it’s likely been overheated or cooked for too long. Try adding a tablespoon of milk or cream to the mixture and stirring it in over low heat until it thins out slightly. Be careful not to add too much liquid, as this can make the fudge too soft.
Q5: My bars are too soft and not setting up properly. What went wrong?
A: The most common reason for bars not setting up properly is insufficient chilling time. Make sure you chill them for at least 2-3 hours, or preferably overnight. Also, ensure you used sweetened condensed milk and not evaporated milk, as they are different and sweetened condensed milk is essential for the fudge texture. Using too much butter or not enough chocolate can also contribute to softer bars.
Q6: Can I double or halve this recipe?
A: Yes, this recipe is easily scalable. You can double the ingredients to make a larger batch in a larger pan (like a 13×18 inch pan) or halve the ingredients for a smaller batch in an 8×8 inch pan. Adjust the pan size accordingly to ensure the layers have the right thickness.
Q7: Can I use milk chocolate or dark chocolate instead of semi-sweet chocolate?
A: Yes, you can definitely use milk chocolate for a sweeter and milder flavor, or dark chocolate for a richer and less sweet option. The type of chocolate you choose will significantly impact the final flavor profile of the bars, so choose your favorite or what suits your preference.
Q8: How do I prevent the graham cracker layer from getting soggy?
A: Graham crackers are relatively sturdy and shouldn’t get soggy in this recipe due to the fat content in the chocolate mixture acting as a barrier. However, to ensure they remain crisp, assemble the bars promptly after making the chocolate mixture and chill them as soon as possible. Avoid letting the assembled bars sit at room temperature for extended periods before chilling.
Print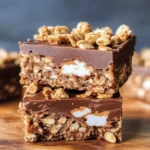
No-Bake Choco Graham Bars
Ingredients
- Graham Crackers: (About 1 ½ boxes, 9-10 full sheets) The base of our bars, providing a wonderful, slightly sweet and crumbly texture. You’ll need them broken into squares, ready to create layers of deliciousness.
- Semi-Sweet Chocolate Chips: (2 cups) The star of the show! These melt into a rich, decadent fudge layer. You can also use dark chocolate or milk chocolate depending on your preference.
- Sweetened Condensed Milk: (1 (14 ounce) can) This is the magic ingredient that binds everything together and creates that fudgy, chewy texture we all love. It adds sweetness and richness.
- Butter: (½ cup, 1 stick, unsalted) Adds richness, flavor, and helps create a smooth and glossy fudge. Unsalted butter allows you to control the saltiness of the recipe.
- Vanilla Extract: (1 teaspoon) Enhances the chocolate flavor and adds a touch of warmth. Pure vanilla extract is recommended for the best flavor.
- Optional: Nuts (Walnuts, Pecans, or Almonds): (½ cup, chopped) For added crunch and flavor. Toasted nuts bring out even more flavor.
- Optional: Sprinkles or Sea Salt: For decoration and an extra touch of flavor and visual appeal.
Instructions
- Prepare the Pan: Lightly grease a 9×13 inch baking pan. You can also line it with parchment paper, leaving an overhang on the sides, for easy removal of the bars later. This step is crucial for preventing sticking and making serving a breeze.
- Melt the Chocolate Mixture: In a medium-sized, heavy-bottomed saucepan, combine the semi-sweet chocolate chips, sweetened condensed milk, and butter. Place the saucepan over low heat. Stir constantly with a spatula or wooden spoon until everything is melted and smooth. Be patient and stir continuously to prevent the chocolate from scorching. Low heat is key here.
- Stir in Vanilla and Optional Nuts: Once the chocolate mixture is completely melted and smooth, remove the saucepan from the heat. Stir in the vanilla extract and the chopped nuts (if using). Mix well to ensure everything is evenly distributed throughout the chocolate fudge. The vanilla enhances the chocolate flavor, and nuts add a delightful crunch.
- Layer Graham Crackers and Chocolate: Arrange a layer of graham cracker squares in the prepared baking pan, covering the bottom completely. You may need to break some crackers to fit snugly. Pour about half of the melted chocolate mixture evenly over the graham cracker layer, spreading it with a spatula to ensure it reaches all corners. Create a smooth and even chocolate layer.
- Repeat Layers: Place another layer of graham cracker squares over the chocolate layer. Again, ensure they cover the chocolate as much as possible. Pour the remaining chocolate mixture over the second graham cracker layer, spreading it evenly. This layering creates the classic graham cracker bar texture.
- Chill to Set: Cover the pan with plastic wrap or aluminum foil and refrigerate for at least 2-3 hours, or preferably overnight, to allow the bars to fully set and firm up. Chilling is essential for the bars to become firm and easily sliceable. Patience is rewarded here!
- Cut and Serve: Once the bars are fully chilled and firm, remove them from the refrigerator. If you used parchment paper, lift the bars out of the pan using the overhang. Cut them into squares or bars of your desired size using a sharp knife. For clean cuts, you can run the knife under hot water and wipe it dry between cuts.
- Optional Decoration: Before the chocolate sets completely (if you’re quick after spreading the top layer), you can sprinkle the top with sprinkles, sea salt flakes, or even drizzle with melted white chocolate for a decorative touch. This adds visual appeal and an extra layer of flavor.
Nutrition
- Serving Size: one normal portion
- Calories: 250
- Fat: 15g
- Saturated Fat: 10g